Search results for

"multipurpose"

Come Creare un Blog nel 2025: Diventa Blogger in Meno di 30 Minuti (e magari guadagna anche qualcosa)

Quindi, hai qualcosa da dire. O forse ce l’ha il tuo capo 🤷

In ogni caso, sei stanco dei capricci degli algoritmi e dei limiti artificiali dei social. Quello che ti serve è uno spazio serio tutto tuo online

🎛️ un posto dove hai il pieno controllo su contenuti e design
📍 un indirizzo condivisibile che sia solo tuo
😎 uno che dica: “Ok, questa persona sa il fatto suo”

…Bene, puoi tranquillamente chiudere la ricerca su Google –
sei nel posto giusto.

Sì, vai pure, chiudila. Ottimo.

Crea il tuo blog ed evita la dipendenza dalle piattaforme

Scherzi a parte: questa guida semplice ti accompagna attraverso tutto quello che ti serve per iniziare a bloggare, passo dopo passo – dalla scelta del nome al momento in cui clicchi “Pubblica” sul tuo primo articolo.

E la parte migliore? Puoi mettere online un blog del genere in meno di mezz’ora – anche se non hai mai toccato una riga di codice in vita tua.

Pronto a lanciare il tuo blog adesso, e magari a farlo pagare il prossimo giro di caffè? 🤑

Andiamo:

Da Qui Si Parte: Cosa Ottieni da Questa Guida

Diciamolo chiaro: questa non è una di quelle storielle vaghe del tipo “apri un blog in 3 clic” – e nemmeno un corso in 97 puntate che ti porta via sei settimane.

Questa è la corsia veloce. Useremo strumenti semplici ma potenti, eviteremo i dettagli inutili e ci concentreremo solo su ciò che conta:

  • Scegliere un nome di dominio efficace che non sembri spam o un refuso
  • Impostare un hosting che funzioni bene e non ti svuoti il portafoglio
  • Installare WordPress nel modo facile – zero drammi con l’FTP
  • Personalizzare il blog con temi e plugin che non facciano schifo
  • Mettere in sicurezza e fare backup senza spendere un centesimo
  • Iniziare a pubblicare articoli piacevoli da leggere e belli da vedere
  • Se vuoi: trasformare il blog in una macchina da entrate extra 💸

Non devi essere uno sviluppatore;
non devi spendere 399,99 $ in un corso sul blogging;
ti bastano un browser, un budget minimo – e 30 minuti di concentrazione.

Suona bene? Allora rispondiamo prima a una domanda che scotta:

Gratis vs a Pagamento: Qual è la Trappola?

Certo, puoi aprire un blog gratis. E se vuoi solo un diario digitale per foto di gatti o vacanze, fallo pure.

Ma se sei anche solo un po’ serio nel scrivere per un pubblico vero, far crescere il sito o (un domani) guadagnarci, ecco la realtà:

  • I blog gratis hanno vincoli. Per lo più sotto forma di indirizzi brutti (tipo tuonome15.piattaforma.com) e pubblicità forzata da cui tu non guadagni.
  • Personalizzazione limitata. Le piattaforme gratuite ti bloccano su layout e scelte di design. Vuoi installare un plugin, cambiare colori o aggiungere una mailing list? Nada.
  • Il controllo non è tuo. Le piattaforme possono cambiare regole, togliere funzioni o spegnersi del tutto – e il pubblico conquistato con fatica sparisce in un attimo.

È un po’ come costruire casa su un terreno di altri. All’inizio comodo – ma se decidono di farci un parcheggio, vieni sfrattato.

Apri un blog e liberati dalle piattaforme

Se vuoi che il blog cresca, sia preso sul serio e resti tuo – spendere qualcosina all’inizio vale assolutamente la pena.

La buona notizia? Terremo i costi iniziali molto bassi:

…con un vero nome a dominio, un vero hosting e una vera proprietà – al prezzo di una pizza al mese 🍕 (ok, magari quella gourmet).

Per cominciare, al tuo blog servono una casa e un indirizzo. Sistemiamo questi due:

Passo 1: Dominio e Hosting (con una piccola sorpresa)

Un nome di dominio 🌐 è l’indirizzo unico del tuo blog sul web (tipo blog.com), mentre l’hosting 🖥️ è il servizio che ospita il sito e lo rende visibile 24/7 al tuo dominio.

La buona notizia? Non devi comprarli separatamente – la maggior parte degli host moderni li offre in bundle. È quello che faremo qui.

Cerchiamo qualcosa che sia:

  • Semplice da usare, anche per chi parte da zero
  • Veloce e affidabile
  • Conveniente senza essere sospetto

Niente ruote reinventate – restiamo su WordPress, la piattaforma gratuita per blog più popolare al mondo – e uno dei tre host ufficialmente consigliati da WordPress.org:

👌 Il piano più economico di Hostinger va benissimo.

Se preferisci, scegli pure un altro host affidabile come Kinsta o SiteGround – o anche un website builder visuale (qui il nostro confronto).

* * *

Useremo un trucchetto psicologico per evitare di bloccarti subito:

…invece di iniziare dal dominio (e perdere ore a trovare il nome perfetto!) andremo avanti creando prima una versione di sviluppo del blog WordPress!

Puoi già pensare al dominio in sottofondo, ma non lasciare che ti blocchi 🚧 nell’impostare il blog – fidati, ne abbiamo visti a centinaia arenarsi lì ;)

Adesso ci serve un posto dove lavorare sul blog. Useremo un coupon per ottenere il prezzo migliore su Hostinger.

Ecco i passaggi:

  1. Vai alla pagina dell’offerta di hosting di Hostinger e clicca su “Claim deal” (oppure scorri per vedere i piani):

    Ottieni la miglior offerta su Hostinger ›

    Sceglieremo l’opzione più base, perché ha tutto ciò che ci serve (si chiama Premium, sì :)

  2. Nella schermata successiva, consigliamo 12 mesi come miglior equilibrio tra prezzo e impegno – ma sei libero di scegliere il ciclo di fatturazione che preferisci:

    Crea un blog passo 1: hosting

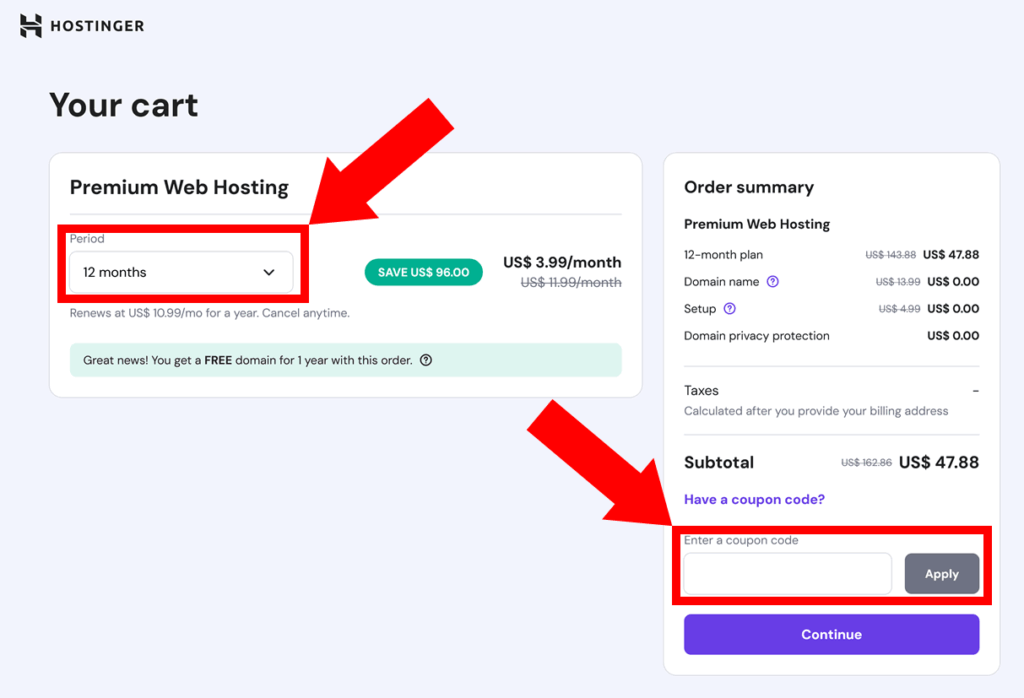
    C’è un’ultima cosa da fare in quella pagina – ottenere un ulteriore 10% di sconto! Copia e incolla questo coupon nel campo sotto il riepilogo prezzi:

    TRUS10CODE
  3. Clicca “Apply” e dovresti vedere il prezzo finale ridursi del 10%. Se il coupon non funziona, prova SPECIAL15 per il 7% – e faccelo sapere nei commenti!

    Crea un blog passo 1: coupon Hostinger applicato

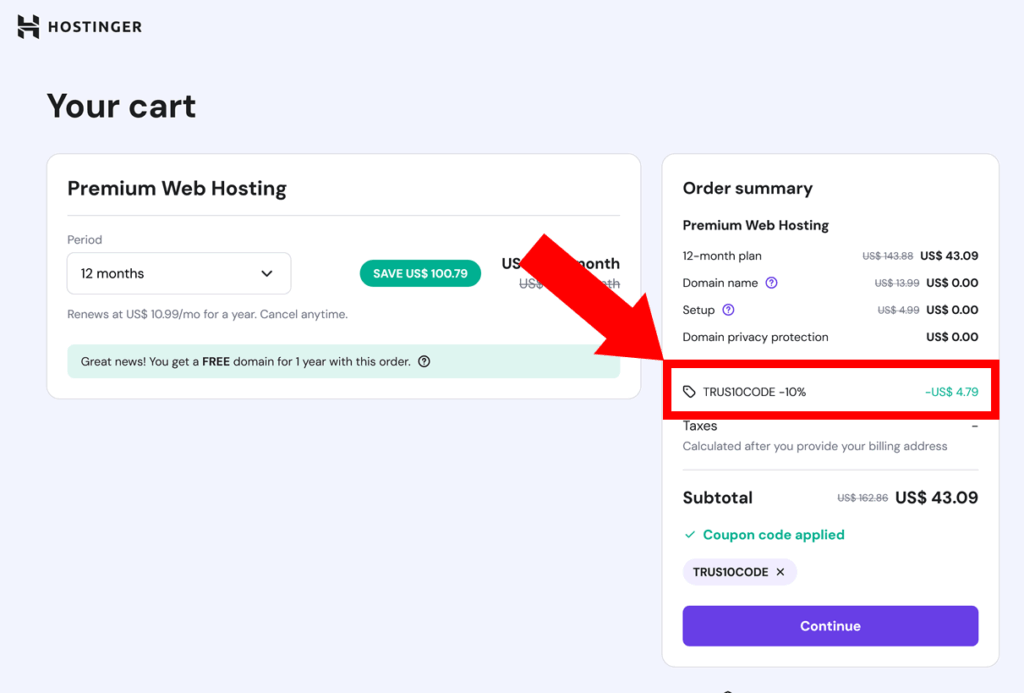
  4. Ti verrà chiesto di creare un account e completare l’ordine. Congratulazioni! Ora hai una casa per il tuo nuovo blog 🏠

Una volta effettuato il pagamento, verrai portato subito alla procedura guidata di Hostinger per impostare il blog e installare WordPress (ti accompagniamo tra un attimo)

* * *

IMPORTANTE: Intanto inizia a pensare ai domini:

Puoi usare il nostro Generatore di Nomi per Blog per fare brainstorming su un .com efficace –

– oppure, se vuoi un’estensione locale come .ca o qualcosa di più di nicchia come .org, usa semplicemente la ricerca domini di Hostinger per verificarne la disponibilità.

Punta a qualcosa di corto, chiaro e facile da ricordare – guarda la nostra guida ai domini per altri consigli.

Prenditi il tempo necessario per un nome che ti suoni giusto – lo registreremo e lo collegheremo alla fine, quando sei pronto per andare online.

Per ora, continuiamo a lavorare sul blog:

Passo 2: Installa WordPress o un Altro Motore

Seguiamo l’onboarding di Hostinger per impostare il tuo WordPress in meno di 5 minuti:

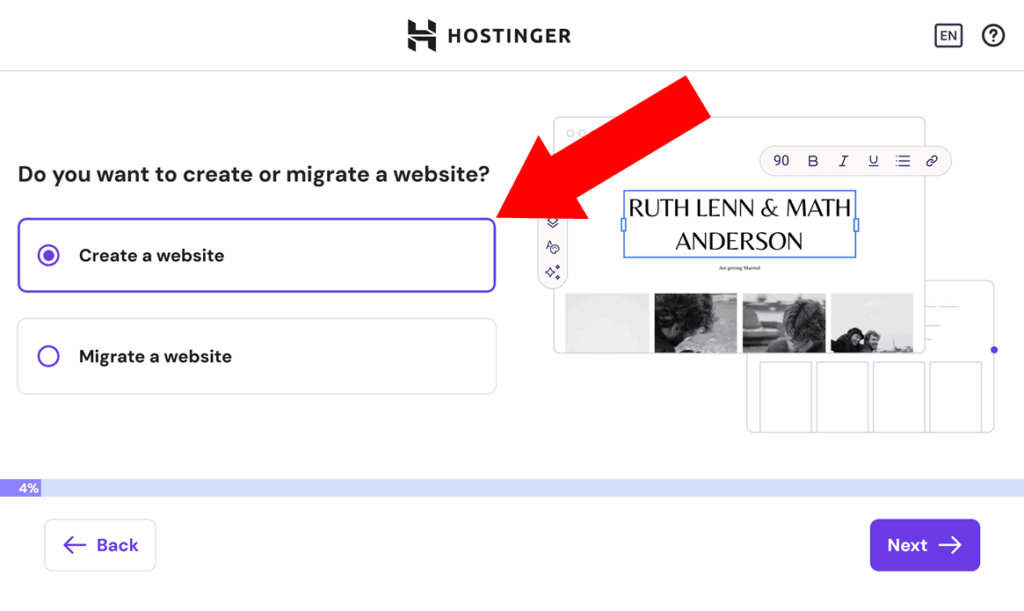
  1. Ignora pure la prima domanda (non cambia nulla) e rispondi “Create a website” alla seconda:

    Crea un blog 2025: procedura Hostinger 1

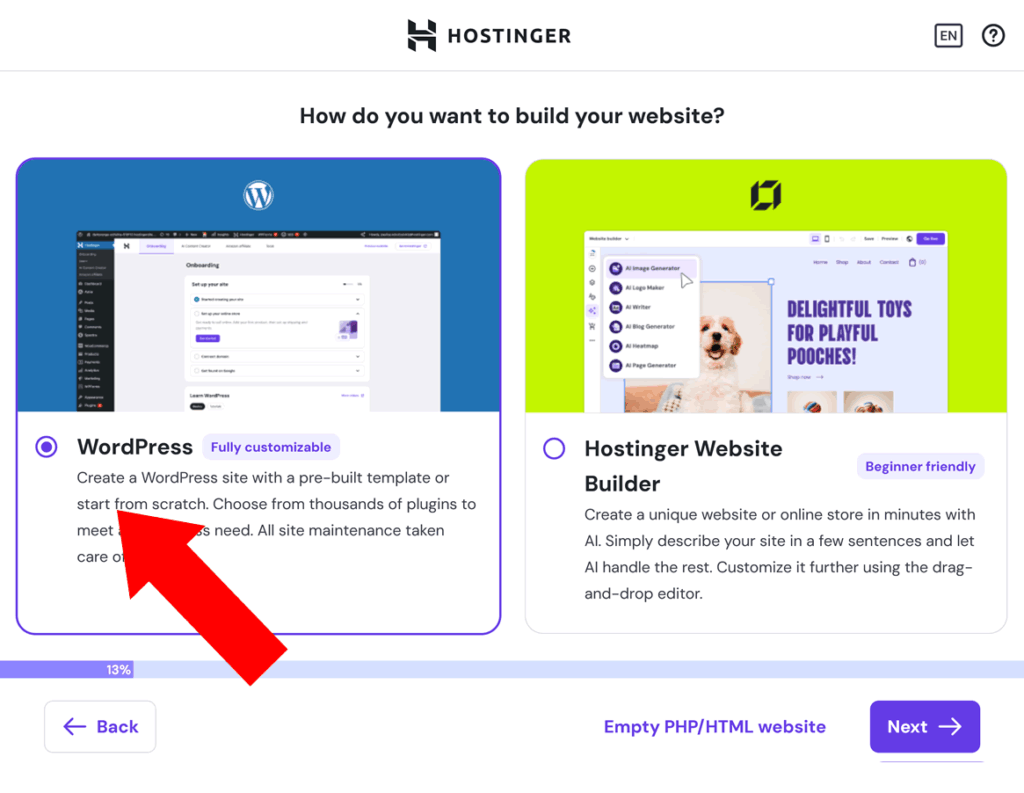
  2. Poi avrai tre opzioni: installare WordPress, usare il website builder di Hostinger o partire da un sito vuoto in PHP/HTML. Anche se il builder è diventato piuttosto valido in 2025, useremo WordPress per la massima semplicità:

    Crea un blog 2025: installazione WordPress

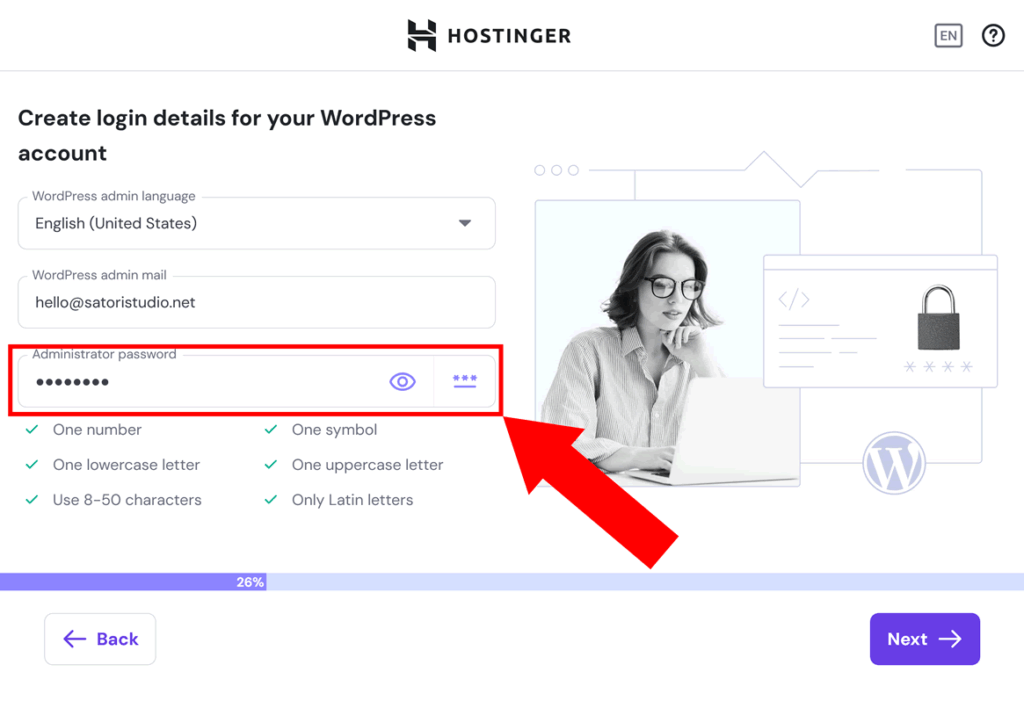
  3. Ora ti verrà chiesto di creare una password per l’area admin di WordPress (potrebbe essere pre-generata – assicurati di metterne una tua!). Puoi anche regolare email e lingua se vuoi:

    Crea un blog 2025: imposta password admin WordPress

  4. Poi potrai scegliere tra un sito preimpostato (con design e contenuti finti), uno dei temi partner di Hostinger (tutti freemium) o un sito vuoto.

    Consigliamo il sito vuoto, perché esistono migliaia di ottimi temi gratuiti che renderanno il tuo blog più unico rispetto alle 10 opzioni prefabbricate viste da milioni di persone:

    Crea un blog 2025: installa WordPress pulito

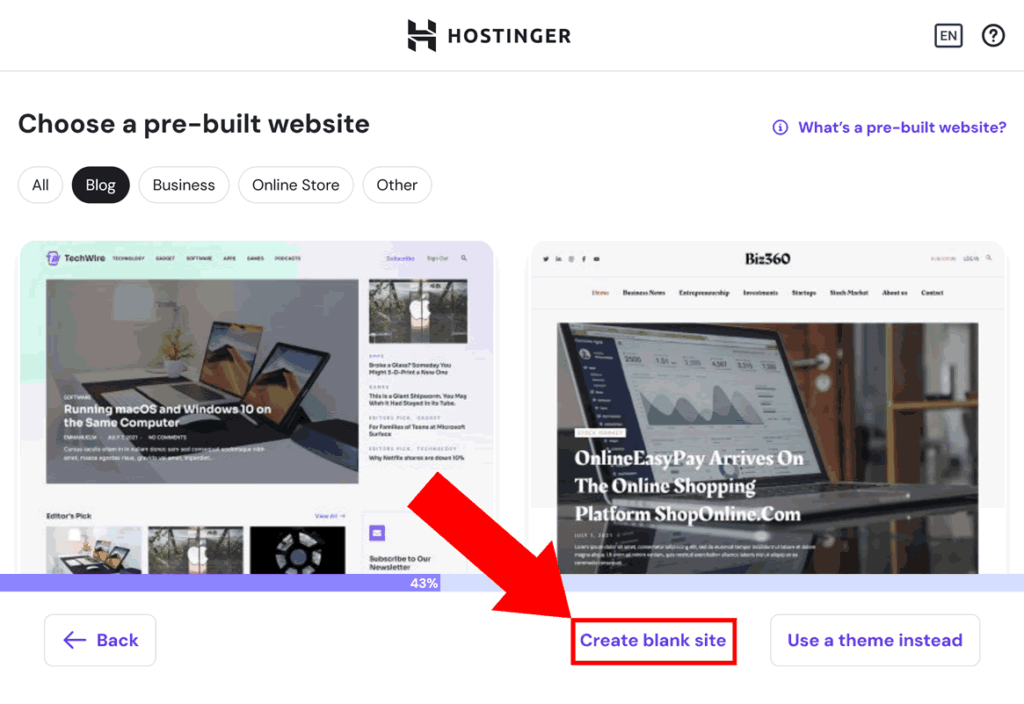
  5. Al passaggio successivo ti chiederà il nome di dominio – scegli “Use temporary domain” se ci stai ancora pensando; collegheremo il dominio definitivo al passo 4.
  6. Poi potrai impostare in quale dei 12 datacenter globali di Hostinger ospitare il tuo blog.

    Più il server è vicino al tuo pubblico, più veloce sarà il sito (quindi non scegliere Singapore se scrivi principalmente per lettori italiani o USA!).

    Infine clicca “Install WordPress“.

  7. Dopo pochi secondi, l’installazione è completa 🪄 il che significa che il tuo nuovo blog è a metà!

Passiamo alle impostazioni essenziali:

Passo 3: Configura il Blog, Metodo Furbo

Prima di pensare a design o contenuti, prendiamo qualche minuto per ritoccare le impostazioni base. Fidati, pochi aggiustamenti ora ti risparmieranno ore di confusione dopo.

Per accedere al pannello admin di WordPress puoi cliccare “Edit Website” dalla dashboard di Hostinger, oppure visitare tuoblog.com/wp-admin ed entrare con email e password impostate prima.

Ecco cosa fare subito:

  • Vai su Impostazioni → Generali
    Aggiorna Titolo del sito e Motto. Compaiono nella scheda del browser e a volte nei risultati di ricerca – quindi falli brevi e descrittivi. Già che ci sei, verifica fuso orario e formato data.
  • Poi vai su Impostazioni → Permalink
    Seleziona Nome articolo – ti dà URL puliti come tuoblog.com/il-mio-primo-post invece di tuoblog.com?p=123. Meglio per utenti e per Google.
  • Ancora con me? Ottimo – ora Impostazioni → Discussione
    Scorri fino a Prima che appaia un commento e spunta “Il commento deve essere approvato manualmente”. Così tieni lontani bot e troll.
  • Passo bonus: Utenti → Profilo
    Cambia il nome pubblico da visualizzare, altrimenti i post risulteranno firmati “admin” – meglio qualcosa che sembri una persona reale.

Troverai senz’altro altre impostazioni utili man mano – questo è il minimo indispensabile per partire senza perderci una giornata.

Ora rendiamo questo blog veramente tuo – con un tema adatto e qualche plugin essenziale:

Passo 4: Scegli il Design e Aggiungi i Plugin Essenziali

Il blog è online. Funziona. Ma diciamolo – adesso sembra ancora un segnaposto generico del 2008 🔲

È l’ora del restyling.

In questo passo 🎨 scegliamo un tema (decide l’aspetto del blog) e installiamo alcuni 🧩 plugin chiave (aggiungono funzioni extra).

Niente panico – puoi cambiare tema in seguito senza rovinare i contenuti, e la maggior parte dei plugin si installa/disinstalla in meno di 10 secondi.

Passo 4.1: Scelta del Tema

Vai su Aspetto → Temi nella bacheca di WordPress e clicca “Aggiungi nuovo

Crea un blog: scegli tra migliaia di temi gratuiti per WordPress

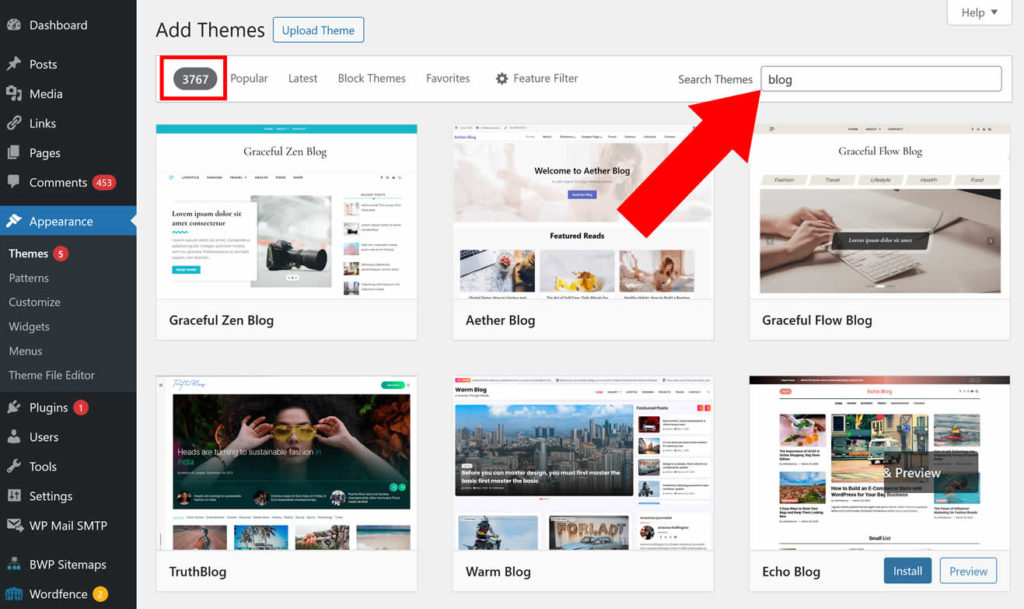
Troverai migliaia di temi gratuiti – filtra per popolarità o usa la ricerca per restringere.

  • Se vuoi un tuttofare solido per partire, consigliamo spudoratamente il nostro template gratuito: Bento ;)
  • Puoi esplorare temi multipurpose popolari come Astra o GeneratePress se vuoi più opzioni.
  • Per i power user, un tema premium come Divi può essere adatto – ricco di funzionalità e design professionali, con extra come form, email marketing, ecc.

Ricorda solo:

Scegli qualcosa di pulito e leggero – il tocco di stile lo aggiungerai dopo.

Passo 4.2: Installazione dei Plugin

I plugin estendono le funzioni del blog: SEO, analytics, form di contatto, backup… tutto modulare e opzionale.

(il che significa che installarli/disinstallarli non intacca contenuti o design).

Ecco i primi che consigliamo subito:

  • All in One SEO – controlla come i tuoi post appaiono nei risultati di ricerca (title, meta description, ecc).
  • UpdraftPlus – backup automatici facili che ti salvano il blog (e la sanità mentale) se qualcosa si rompe.
  • Site Kit by Google – integra in pochi clic Analytics e Search Console.
  • Akismet Anti-Spam – tiene pulita la sezione commenti dai bot.
  • WPForms – builder di moduli drag-and-drop super semplice (es. per la pagina Contatti).

Per installare un plugin: Plugin → Aggiungi nuovo, cerca il nome, poi “Installa” e “Attiva”.

Fine!

Di solito vedrai una nuova voce nel menu a sinistra – se non appare, guarda in “Impostazioni”, potrebbe essere un sottomenu.

Ora il tuo blog ha un design decente, funzioni chiave e spazio 🌱 per crescere

Torniamo al nome di dominio prima del lancio:

Mettere il Blog sul tuo Dominio

Se non hai scelto il dominio al passo 1, ora siamo pronti per il lancio, quindi è il momento di chiudere il cerchio:

  1. Vai alla tua dashboard Hostinger e scegli “Websites” nel menu a sinistra. Sotto il nuovo blog, clicca su “Change domain”:

    Crea un blog 2025: aggiungere dominio su Hostinger

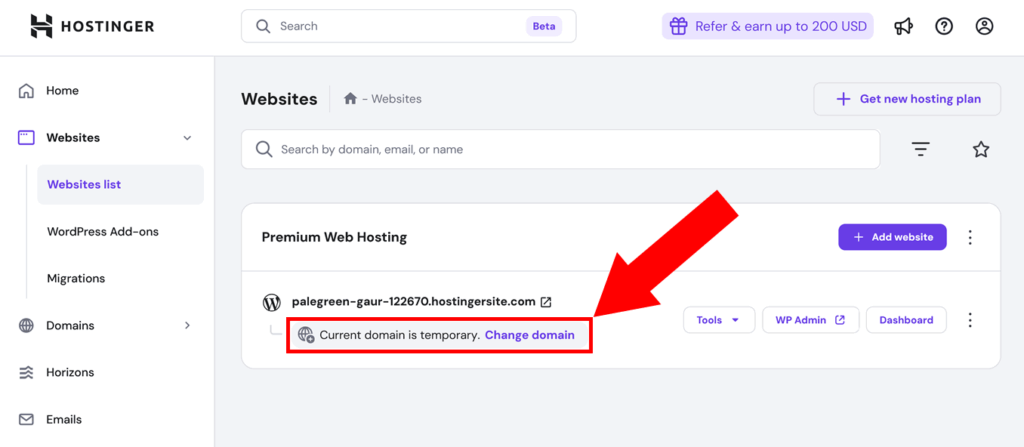
  2. Nella nuova vista, digita il dominio desiderato e apparirà un pop-up: scegli il periodo di registrazione iniziale (si rinnoverà automaticamente); consigliamo 1 anno per testare il blog.

    Crea un blog 2025: dettagli dominio su Hostinger

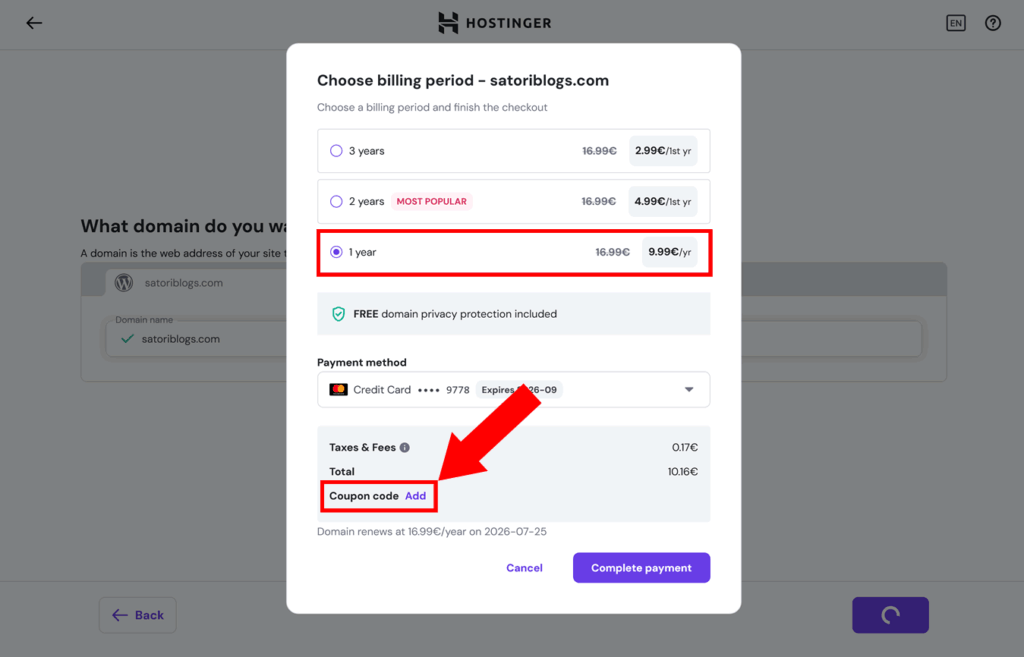
  3. Nella stessa finestra, clicca “Add” accanto al coupon e incolla quanto segue per uno sconto extra:

    TRUS10DOMAIN
  4. Ora puoi completare l’ordine e registrare il dominio. Il tuo WordPress verrà migrato su quel dominio in automatico!

Prima di chiudere, qualche consiglio per proteggerlo, ottimizzarlo – e magari farlo ripagare da solo:

Bonus: Proteggi il Blog e Rendi il Sito Veloce

Hai costruito il blog, lo hai sistemato, aggiunto funzioni – ora assicuriamoci che sia sicuro, stabile – e rapido da caricare.

Ecco qualche dritta per riuscirci senza spendere di più o perdersi nei tecnicismi:

Consiglio #1: Backup Automatici

🔐 Lo sai come si dice – ci sono due tipi di blogger: chi fa i backup, e chi prima o poi piange sul cuscino alle 2 di notte.

Evitiamo la seconda categoria.

Hostinger (e gli altri grandi host) offre backup settimanali su tutti i piani, ma se vuoi più controllo, consigliamo il plugin gratuito UpdraftPlus

Crea backup automatici giornalieri e li salva fuori dal server (es. Google Drive o Dropbox) – così, anche se il server crolla o WordPress si incasina, i tuoi contenuti sono al sicuro.

Consiglio #2: Sicurezza Base

🛡️ Non serve la crittografia da esercito – bastano poche regole:

  • Password forti: niente admin123, per favore. Usa un gestore come NordPass o 1Password.
  • Aggiorna tutto: core di WordPress, temi e plugin. Gli aggiornamenti chiudono falle di sicurezza.
  • Aggiungi l’autenticazione a 2 fattori con ad es. questo plugin – richiede un codice una tantum dal telefono e rende molto più difficile l’accesso ai malintenzionati.

Consiglio #3: Sprint di Velocità

🚀 Anche il blog più bello e utile non serve a nulla se impiega mezzo minuto a caricarsi. Molti utenti abbandonano dopo ~3 secondi!

Cosa fare:

  • Abilita la cache: installa un plugin gratuito come LiteSpeed Cache (il migliore su Hostinger) o WP Super Cache.
  • Usa immagini compresse: carica immagini in .webp o usa un plugin come ShortPixel per comprimerle automaticamente.
  • Pochi plugin ma buoni: evita di installarne 20+ “per provare”. Tieni solo ciò che usi e rimuovi il resto.

Bonus: Hostinger (e altri host moderni) usa già CDN veloci, storage SSD e PHP 8+, quindi parti avvantaggiato.

Voilà – ora hai un blog veloce, sicuro e pronto a scalare. Ovviamente c’è molto altro da esplorare in ognuna di queste direzioni – ma oggi ci fermiamo qui.

Pronto per l’ultimo passo?

Parliamo di come trasformare il blog in una piccola macchina da soldi 💸

Come Monetizzare il Blog

Ok, la maggior parte non apre un blog con l’obiettivo esplicito di arricchirsi.

Ma quando inizi a pubblicare contenuti validi e costruire un pubblico reale… perché non lasciare che il blog paghi le spese?

Crea un blog 2025: monetizzazione

Ecco tre metodi tra i più popolari e collaudati per monetizzare un blog – iniziando in piccolo e scalando nel tempo:

Opzione 1: Affiliate Marketing (la migliore per iniziare)

💰 Inserisci link a prodotti o servizi che consigli davvero – e se qualcuno acquista tramite il tuo link tracciato, guadagni una commissione.

Due esempi:

  • Recensioni: scrivi un articolo sugli strumenti digitali che ami e linka i siti con i tuoi link affiliati
  • Guide: crea un confronto (come il nostro roundup dei site builder) e inserisci i link affiliati per ciascun prodotto

Non ti serve un pubblico enorme – servono fiducia, pertinenza e costanza.

Inizia con programmi come Amazon Associates, Impact, PartnerStack, ShareASale – e i programmi specifici del tuo hosting, VPN o SaaS

Pro tip: consiglia solo cose in cui credi davvero. Altrimenti è solo pubblicità – e i lettori lo capiscono lontano un miglio.

Opzione 2: Pubblicità (meglio con tanto traffico)

📢 Quando il blog inizia a macinare visite costanti, puoi ottenere reddito passivo mostrando annunci.

La via più semplice è Google AdSense – posiziona automaticamente annunci pertinenti e ti paga per visualizzazioni o clic.

Altre reti: Mediavine, Ezoic, BuySellAds.

Considera che gli introiti sono minuscoli finché non raggiungi centinaia di visite al giorno.

Ma se la tua nicchia ha CPM alti (es. finanza, software, B2B) o hai volumi seri, questa strada può rendere bene (soprattutto insieme all’affiliazione!)

Opzione 3: Vendi Prodotti o Servizi

🛍️ Quando hai un pubblico, il blog diventa anche un negozio:

  • Prodotti digitali: ebook di nicchia, corsi online, checklist, template
  • Prodotti fisici tuoi o con dropshipping/print-on-demand
  • Servizi: consulenza, coaching, scrittura o design freelance

Puoi aggiungere l’e-commerce con un plugin gratuito come WooCommerce – o linkare a piattaforme esterne come Gumroad e Etsy.

Ricorda: la monetizzazione richiede tempo. Prima crea contenuti che la gente voglia davvero leggere – i soldi arrivano con la fiducia.

FAQ sul Blogging

🧠 Hai ancora domande? Ecco quelle che riceviamo più spesso dai nuovi blogger:

Devo saper programmare per aprire un blog?

No. WordPress e gli host moderni ti permettono di creare tutto con editor visuali e menu semplici – zero codice richiesto.

Quanto ci vuole per lanciare un blog?

Con questa guida, circa 30 minuti – inclusi setup, design e i primi ritocchi. Puoi anche fermarti a contemplare la tua opera, ogni tanto.

Quanto costa iniziare?

Circa 2–3 $/mese per hosting e dominio (con fatturazione annuale). La maggior parte dei temi e plugin che ti servono è gratuita.

Qualcuno troverà davvero il mio blog?

– se crei contenuti utili e ben scritti e segui le basi della SEO. Plugin come All in One SEO e Site Kit aiutano parecchio.

Posso spostare il blog su un altro host in futuro?

Certo. Con WordPress migrare verso un altro hosting o cambiare dominio è piuttosto semplice. I tuoi contenuti restano portabili.

Quanto ci vuole per guadagnare con il blog?

Dipende – ma la maggior parte dei blog non genera entrate significative nei primi mesi. Punta prima su contenuti e fiducia; i soldi vengono dopo.

Hai ancora dubbi? Lascia la tua domanda nella sezione commenti – saremo felici di aiutarti 🧵

Considerazioni Finali + Un Segreto Onesto

Sei arrivato fino in fondo, ottimo lavoro!

Ora hai tutto il necessario per costruire un blog che è bello da vedere, veloce da usare e con reali possibilità di attirare lettori veri (non solo bot e la mamma).

E adesso la verità – quella che avrei voluto sentire prima:

La differenza più grande tra un blog di successo e uno morto? Non è la tecnologia. Non è la scrittura. Non è nemmeno la fortuna. È questa: continua a presentarti.

La maggior parte dei blog fallisce perché gli autori semplicemente smollano – spesso proprio prima che le cose inizino a funzionare!

Crea un blog 2025: perseveranza

Quindi pubblica il tuo primo articolo.
Poi un altro.
E un altro ancora.

Diventerai più bravo, più veloce, più preciso.

E un giorno, qualcuno che non conosci lascerà un commento sincero tipo: Mi ha aiutato tantissimo, grazie! È lì che scatta qualcosa.

Fino ad allora, vai avanti: ce la puoi fare.

E se ti blocchi o hai domande – scorri fino ai commenti e unisciti alla discussione.

Grazie per la lettura – e benvenuto nel lato blogging di Internet 🖖

Jak si založit blog 2025: Staň se blogerem za 30 minut (a třeba si i něco vydělej)

Takže máš co říct. Nebo to má co říct tvůj šéf 🤷

Každopádně už tě nebaví náladové algoritmy a umělá omezení sociálních sítí. Potřebuješ opravdový prostor na webu

🎛️ místo, kde máš plnou kontrolu nad obsahem i vzhledem
📍 sdílitelnou adresu, která je jen tvoje
😎 a hlavně takové, které říká: „Jo, tenhle člověk ví, co dělá.”

…Tak můžeš v klidu zavřít výsledky Googlu – jsi na správném místě.

No tak, klidně je zavři. Dobrý.

Založ si blog a zbav se závislosti na platformách

Teď vážně: tenhle jednoduchý návod tě provede vším, co potřebuješ ke startu blogu, krok za krokem – od výběru jména až po kliknutí na „Publikovat” u prvního článku.

A nejlepší na tom? Takový blog zvládneš postavit za méně než půl hodiny – i když jsi v životě neviděl(a) řádek kódu.

Připraven(a) spustit blog hned teď – a možná si z něj časem platit i kafe? 🤑

Jdeme na to:

Začni tady: Co přesně z tohohle návodu získáš

Upřímně: tohle není žádná mlhavá „blog založíš na 3 kliky” pohádka – ani 97dílný kurz na šest týdnů.

Tohle je rychlý pruh. Použijeme jednoduché, ale silné nástroje, vynecháme zbytečnosti a zaměříme se jen na to, co fakt pomáhá:

  • Vybereš skvělou doménu, která nezní jako překlep ani scam
  • Nastavíš hosting, který běží plynule a nezruinuje rozpočet
  • Nainstaluješ WordPress snadno – žádná FTP dramata
  • Upravíš blog pomocí témat a pluginů, co dávají smysl
  • Zabezpečíš a budeš zálohovat – a to bez placení
  • Začneš publikovat texty, které se dobře čtou i vypadají
  • A pokud chceš: uděláš z blogu vedlejší příjem 💸

Nepotřebuješ být vývojář;
nemusíš utratit 399,99 $ za kurz o blogování;
stačí prohlížeč, malý rozpočet – a 30 minut soustředění.

Zní to dobře? Tak nejdřív si zodpovíme jednu pálivou otázku:

Zdarma vs placeně: Kde je háček?

Jasně, blog můžeš založit i zadarmo. A pokud chceš jen online deníček s fotkami kočky nebo zápisky z dovolených – směle do toho.

Ale pokud to myslíš aspoň trochu vážně s psaním pro skutečné publikum, růstem webu nebo (časem) vyděláváním, tady je realita:

  • Free blogy mají háčky. Typicky ošklivé adresy (třeba tvojejmeno15.platforma.com) a vynucené reklamy, ze kterých nic nemáš.
  • Omezené možnosti úprav. Většina free platforem tě zamkne do jejich vzhledu a rozložení. Chceš plugin, jiné barvy nebo mailing list? Kdepak.
  • Nemáš plnou kontrolu. Platforma změní pravidla, vezme funkce nebo úplně skončí – a tvoje těžce vydřené publikum je pryč.

Je to jako stavět dům na cizím pozemku. Zpočátku pohodlné – ale když se majitel rozhodne pro parkoviště, vystěhuje tě raz dva.

Založ blog a získej nezávislost na platformách

Chceš-li, aby blog rostl, působil důvěryhodně a zůstal tvůj – pár korun na start se vyplatí.

Dobrá zpráva? Náklady udržíme co nejníž:

…dostaneš skutečnou doménu, skutečný hosting a skutečné vlastnictví – za cenu jedné měsíční pizzy 🍕 (no dobře, té lepší).

Začneme tím, že blogu dáme domov a adresu:

Krok 1: Doména a hosting (s malým trikem)

Doména 🌐 je unikátní adresa tvého blogu na webu (např. blog.cz), zatímco webhosting 🖥️ je služba, která web ukládá a zpřístupňuje 24/7 na té doméně.

Dobrá zpráva? Dnes nemusíš řešit zvlášť – většina moderních hosterů to nabízí v balíčku. A tak to uděláme.

Hledáme něco, co je:

  • snadné i pro úplné začátečníky
  • rychlé a spolehlivé
  • cenově rozumné, ale ne podezřelé

Nebudeme vymýšlet kolo – sáhneme po WordPressu, nejpopulárnějším bezplatném blogovacím systému na světě – a jednom ze tří hosterů oficiálně doporučovaných WordPress.org:

👌 Nejlevnější tarif u Hostingeru nám úplně stačí.

Klidně si vyber i jinou kvalitní volbu jako Kinsta nebo SiteGround – případně drag-and-drop builder (tady je naše srovnání).

* * *

A teď malý psychologický trik, aby ses hned na začátku nezasekl(a):

…místo hledání dokonalé domény (u kterého spousta lidí ztratí hodiny) rovnou vytvoříme vývojovou verzi WordPress blogu!

Doménu můžeš promýšlet na pozadí, ale nenech ji brzdit 🚧 skutečné spuštění blogu – věř, viděli jsme to pokaždé ;)

Teď potřebujeme místo, kde na blogu pracovat. Využijeme kupon a získáme co nejlepší cenu u Hostingeru.

Postup krok za krokem:

  1. Přejdi na stránku nabídky webhostingu Hostingeru a klikni na „Claim deal” (nebo prostě sjeď dolů k ceníku):

    Získat nejlepší cenu u Hostingeru ›

    Vezmeme základní variantu – má vše, co pro blog potřebujeme (jmenuje se sice Premium, ano :)

  2. Na další obrazovce doporučujeme 12 měsíců jako ideální kompromis mezi cenou a závazkem – ale zvol si klidně jiný cyklus:

    Krok 1: hosting pro blog

    Ještě jedna věc – získej navíc 10% slevu! Zkopíruj a vlož následující kupon do pole pod souhrnem ceny:

    TRUS10CODE
  3. Klikni na „Apply” a měla by se odečíst 10% sleva. Kdyby kupon nefungoval, zkus SPECIAL15 pro 7% – a dej nám vědět v komentářích!

    Krok 1: Hostinger kupon úspěšně uplatněn

  4. Budeš vyzván(a) k vytvoření účtu a dokončení objednávky. Gratuluju! Tvůj nový blog má domov 🏠

Po zaplacení tě Hostinger hned přesměruje do průvodce, kde blog nastavíš a nainstaluješ WordPress (za chvíli si to projdeme).

* * *

DŮLEŽITÉ: Zároveň začni přemýšlet o doméně:

Na brainstorming chytlavého .com jména můžeš použít náš generátor názvů blogu

– anebo pokud chceš regionální doménu jako .cz či tematickou jako .org, rovnou použij vyhledávání u Hostingeru a zkontroluj dostupnost.

Míři na něco krátkého, jasného a zapamatovatelného – další tipy najdeš v našem průvodci doménami.

Dej si čas na jméno, které ti sedne – doménu zaregistrujeme a nastavíme úplně na konci, až budeš připraven(á) jít live.

Teď pokračuj v práci na blogu:

Krok 2: Instalace WordPressu nebo jiného enginu

Projdi si průvodce u Hostingeru a nastav WordPress blog za méně než 5 minut:

  1. První otázku klidně přeskoč (na nic nemá vliv) a na druhou odpověz „Create a website”:

    Vytvoření webu: krok 1 průvodce Hostinger

  2. Potom si vybereš ze tří možností: instalovat WordPress, použít vlastní builder Hostingeru nebo začít prázdným PHP/HTML webem. Jejich builder je v 2025 docela v pohodě, ale my zvolíme WordPress pro maximální jednoduchost:

    Instalace WordPressu u Hostingeru

  3. V dalším kroku vytvoříš heslo do administrace WordPressu (může být předvyplněné – určitě si dej vlastní!). Můžeš upravit i e-mail a jazyk:

    Nastavení hesla do administrace WordPressu

  4. Pak bude na výběr předpřipravený web (včetně designu a demo obsahu), partnerská WordPress témata Hostingeru (většinou freemium) nebo čistý web.

    Doporučujeme čistou instalaci, protože existují doslova tisíce skvělých free témat a blog tak bude unikátnější než u pár šablon, které Hostinger nabízí milionům lidí:

    Instalace čistého WordPressu

  5. Dále se tě to zeptá na doménu – pokud ještě vybíráš, klikni na „Use temporary domain”. Finální doménu připojíme těsně před spuštěním ve 4. kroku.
  6. V dalším kroku můžeš zvolit, v kterém z 12 globálních datacenter Hostingeru bude blog uložený.

    Čím blíž publiku, tím rychlejší načítání (takže pokud cílíš na ČR/EU, nevol Singapur).

    Nakonec klikni na „Install WordPress”.

  7. Za pár vteřin je WordPress nainstalovaný 🪄 a tvůj nový blog je v půlce cesty!

Teď doladíme základy:

Krok 3: Chytré základní nastavení

Než se vrhneme na vzhled a obsah, věnuj pár minut základním nastavením. Ušetří ti to hodiny zmatků později.

Do administrace WordPressu se přihlásíš přes „Edit Website” v dashboardu Hostingeru, nebo rovnou na tvujblog.cz/wp-admin pomocí e-mailu a hesla z předchozího kroku.

Začni tímhle:

  • Otevři Settings → General
    Uprav Site Title a Tagline. Zobrazují se v záložce prohlížeče a někdy i ve výsledcích vyhledávání – drž je krátké a výstižné. Zkontroluj také časové pásmo a formát data.
  • Pak jdi do Settings → Permalinks
    Vyber Post name – získáš čisté URL jako tvujblog.cz/muj-prvni-clanek místo tvujblog.cz?p=123. Lepší pro lidi i pro Google.
  • Ještě chvilku vydrž: Settings → Discussion
    Sjeď k Before a comment appears a zaškrtni „Comment must be manually approved”. Odfiltruješ tím spam-boty i trollíky.
  • Bonus: Users → Profile
    Změň si display name, jinak budou příspěvky podepsané „admin”. Vyber něco, co zní jako reálné jméno.

Cestou určitě objevíš další nastavení – tohle je minimum, abys mohl(a) pohodlně začít bez celodenního šťourání.

Teď uděláme blog opravdu tvůj – pěkným tématem a pár důležitými pluginy:

Krok 4: Vyber vzhled a přidej základní pluginy

Blog běží. Funguje. Ale upřímně – teď asi vypadá jako generická šablona z roku 2008 🔲

Jdeme to změnit.

V tomhle kroku 🎨 vybereš téma (definuje vzhled) a nainstaluješ pár 🧩 klíčových pluginů (přidávají funkce).

Neboj – téma můžeš kdykoliv změnit bez ztráty obsahu a většina pluginů se instaluje/odinstaluje do 10 vteřin.

Krok 4.1: Výběr tématu

Běž do Appearance → Themes v administraci a klikni na „Add New

Vyber si z tisíců bezplatných WordPress témat

Najdeš tam tisíce free témat – filtruj podle popularity nebo použij vyhledávání.

  • Jestli chceš solidní univerzál na start, bezostyšně doporučíme náš vlastní free motiv: Bento ;)
  • Mrkni i na populární multipurpose témata jako Astra nebo GeneratePress.
  • Pro náročné se hodí prémiové téma jako Divi – spousta hotových layoutů, formuláře, e-mail nástroje atd.

Jen pamatuj:

Vezmi něco čistého a lehkého – parádičky můžeš doladit později.

Krok 4.2: Instalace pluginů

Pluginy rozšiřují funkce blogu; SEO nástroje, analytika, formuláře, zálohy… všechno modulární a volitelné.

(tzn. instalace/odinstalace neovlivní obsah ani vzhled)

Začni těmito:

  • All in One SEO – nastavíš, jak se články zobrazí ve výsledcích (meta titulky, popisy atd.).
  • UpdraftPlus – jednoduché automatické zálohy, které ti zachrání nervy, když se něco pokazí.
  • Site Kit by Google – propojí blog s Google Analytics a Search Console na pár kliků.
  • Akismet Anti-Spam – drží komentáře čisté a bez botů.
  • WPForms – jednoduchý drag-and-drop builder formulářů (např. kontaktní stránka).

Instalace: Plugins → Add New, vyhledej název, „Install” a pak „Activate”.

Hotovo!

Obvykle se vlevo v menu objeví nová sekce – když ne, mrkni do „Settings”, může být jako podmenu.

Tvůj blog má teď solidní vzhled, klíčové funkce a prostor růst 🌱

* * *

Než to odpálíme, vraťme se k doméně:

Přepnutí blogu na vlastní doménu

Jestli jsi v 1. kroku doménu ještě nevybral(a), teď je čas to dokončit:

  1. Běž do dashboardu Hostinger a klikni vlevo na „Websites”. U svého blogu zvol „Change domain”:

    Přidání domény u Hostingeru

  2. Do nového okna napiš vybranou doménu a vyskočí dialog: zvol počet let registrace (po vypršení se automaticky obnoví). Na testování blogu klidně 1 rok.

    Detaily nové domény u Hostingeru

  3. Ve stejném okně klikni na „Add” u kuponu a vlož následující kód pro dodatečnou slevu:

    TRUS10DOMAIN
  4. Dokonči objednávku a registraci. WordPress se na novou doménu přesune automaticky!

Než to uzavřeme, pár tipů, jak blog chránit, zrychlit – a třeba i nechat vydělávat:

Bonus: Chraň svůj blog a udělej ho rychlý

Blog máš, vzhled i funkce taky – teď ať je bezpečný, stabilní a rychle se načítá.

Tady pár rychlých tipů bez placení a bez technického peklíčka:

Tip #1: Automatické zálohy

🔐 Říká se, že jsou dva typy bloggerů: ti, co zálohují, a ti, co jednou ve 2 ráno brečí do polštáře.

My nechceme být ti druzí.

Hostinger (a další velcí hosteři) nabízí týdenní zálohy u všech tarifů, ale chceš-li větší kontrolu, doporučujeme free UpdraftPlus

Dělá denní automatické zálohy a umí je ukládat mimo server (Google Drive, Dropbox). Když server spadne nebo se WP pokazí, obsah je v bezpečí.

Tip #2: Základní bezpečnost

🛡️ Není potřeba vojenské šifrování – stačí pár pravidel:

  • Silná hesla: žádné admin123, prosím. Bezpečně je uloží třeba NordPass nebo 1Password.
  • Aktualizuj vše: WordPress jádro, témata i pluginy. Aktualizace často řeší bezpečnostní díry.
  • Dvoufázové přihlášení přes např. tento plugin – při loginu vyžádá kód z telefonu a výrazně ztíží průnik.

Tip #3: Zrychlení

🚀 I ten nejhezčí a nejchytřejší blog je k ničemu, pokud se načítá půl minuty. Většina lidí odchází po ~3 sekundách.

Co udělat:

  • Zapni cache: free plugin LiteSpeed Cache (ideální pro Hostinger) nebo WP Super Cache.
  • Komprimuj obrázky: nahrávej ve formátu .webp nebo použij ShortPixel pro automatickou optimalizaci.
  • Pluginy drž při zemi: neinstaluj desítky „jen na zkoušku”. Nech jen to, co opravdu používáš.

Bonus: Hostinger (a další moderní hosteři) už používají rychlé globální CDN, SSD a PHP 8+, takže máš slušný náskok.

Voilá – teď máš blog, který je rychlý, bezpečný a připravený na budoucnost. Samozřejmě se dá jít mnohem víc do hloubky – ale to už je mimo náš dnešní rozsah.

Připraven(a) na finále?
Pojďme z blogu udělat i stroj na peníze 💸

Jak blogem vydělávat

Většina lidí si blog nezakládá s explicitním cílem zbohatnout.

Ale když začneš publikovat dobrý obsah a budovat publikum… proč by blog nemohl platit účty?

Monetizace blogu v roce 2025

Tady máš tři nejčastější a osvědčené způsoby monetizace – začni v malém a škáluj:

Varianta 1: Affiliate marketing (nejlepší pro začátečníky)

💰 Odkazuješ na produkty nebo služby, které máš rád(a) – a když někdo nakoupí přes tvůj speciální odkaz, získáš provizi.

Pár příkladů:

  • Recenze: napiš článek o svých oblíbených digitálních nástrojích a použij partnerské odkazy
  • Průvodci: udělej srovnání (jako náš výběr web builderů) a přidej affiliate odkazy ke každému

K tomu nepotřebuješ obří návštěvnost – stačí důvěra, relevance a konzistence.

Začni třeba programy Amazon Associates, Impact, PartnerStack, ShareASale – a také konkrétními programy hostingu, VPN nebo SaaS nástrojů

Tip: Doporučuj jen to, čemu opravdu věříš. Jinak je to jen reklama – a tu čtenáři poznají na kilometr.

Varianta 2: Reklamy (pro blogy s návštěvností)

📢 Jakmile blog přitáhne stabilní traffic, můžeš pasivní příjmy posílit reklamou.

Nejjednodušší start je Google AdSense – na web sám rozmístí relevantní reklamy a platí za zobrazení nebo kliknutí.

Další sítě: Mediavine, Ezoic, BuySellAds.

Počítej s tím, že příjem z reklam bývá malý, dokud nedosahuješ stovek návštěvníků denně.

V oborech s vysokou hodnotou pro inzerenty (finance, software, B2B) nebo s opravdu velkým trafficem umí reklamy fungovat skvěle – obzvlášť v kombinaci s affiliate marketingem.

Varianta 3: Vlastní produkty a služby

🛍️ Jakmile má blog publikum, může sloužit i jako obchod:

  • Digitální produkty: e-booky, online kurzy, checklisty, šablony
  • Fyzické produkty – vlastní tvorba, dropshipping nebo print-on-demand
  • Služby: konzultace, koučink, copywriting, design

E-shop přidáš přes free plugin WooCommerce – nebo odkážeš na externí platformy jako Gumroad a Etsy.

Pamatuj: monetizace chce čas. Nejdřív obsah, který lidé chtějí číst – peníze přijdou s důvěrou.

Blogovací FAQ

🧠 Pořád máš otázky? Tady jsou ty nejčastější, které dostáváme od začátečníků:

Musím umět programovat, abych založil(a) blog?

Ne. WordPress a moderní hostingy umožňují vše přes vizuální rozhraní a jednoduchá menu – žádný kód netřeba.

Jak dlouho trvá blog spustit?

S tímto návodem zhruba 30 minut – včetně základního nastavení, vzhledu a prvních úprav. Klidně si mezitím dej pauzu na obdivování výsledku.

Kolik stojí rozjet blog?

Počítej kolem 2–3 $/měsíc za hosting a doménu (při roční platbě). Většina potřebných témat a pluginů je zdarma.

Najde vůbec někdo můj blog?

Ano – pokud tvoříš užitečný, čitelný obsah a držíš se základů SEO. Pluginy jako All in One SEO a Site Kit hodně pomůžou.

Můžu blog později přesunout k jinému hostingu?

Jasně. WordPress usnadňuje migraci k jinému poskytovateli i změnu domény. Tvůj obsah je přenositelný.

Za jak dlouho začne blog vydělávat?

Různé – ale většina blogů prvních pár měsíců nevydělává významně. Nejdřív obsah a důvěra; peníze přijdou potom.

Pořád nad něčím váháš? Napiš do komentářů – rádi poradíme 🧵

Závěr + jedno upřímné tajemství

Dočetl(a) jsi až sem, dobrá práce!

Teď máš vše potřebné k blogu, který vypadá dobře, běží rychle a má šanci oslovit reálné čtenáře (ne jen boty a mámu).

A tady je pravda – kterou bych býval rád slyšel dřív:

Největší rozdíl mezi úspěšným blogem a chcíplým? Není to technika. Není to ani spisovatelské umění. Dokonce ani štěstí. Je to tohle: nepřestávej.

Většina blogů skončí, protože jejich autoři prostě přestanou – často těsně předtím, než se to začne lámat!

Trpělivost a vytrvalost při blogování

Publikuj první článek.
Pak další.
A další.

Budeš lepší, rychlejší, přesnější.

A jednoho dne ti cizí člověk napíše upřímný komentář ve stylu: Hrozně mi to pomohlo, díky! V tu chvíli to docvakne.

Do té doby vytrvej: máš na to.

A kdykoliv se zasekneš nebo budeš mít dotaz – skoč dolů do komentářů a přidej se do debaty.

Díky za přečtení – a vítej na blogovací straně internetu 🖖

Wie du 2025 einen Blog erstellst: In unter 30 Minuten zum Blogger (und vielleicht sogar etwas Geld verdienen)

Also, du hast etwas zu sagen. Oder vielleicht dein Chef 🤷

So oder so: Die Launen der Algorithmen und die künstlichen Beschränkungen sozialer Netzwerke nerven dich. Was du brauchst, ist ein richtiger eigener Platz im Netz

🎛️ ein Ort, an dem du volle Kontrolle über Inhalte und Design hast
📍 eine teilbare Adresse, die einzigartig dir gehört
😎 eine, die signalisiert: „Yep, diese Person weiß, was sie tut“

…Du kannst deine Google-Suchergebnisse jetzt getrost schließen – du bist am richtigen Ort gelandet.

Ja, mach ruhig zu. Gut.

Erstelle deinen Blog und werde plattformunabhängig

Scherz beiseite: Diese einfache Anleitung führt dich Schritt für Schritt durch alles, was du fürs Bloggen brauchst – vom Namensfinden bis zum ersten Klick auf „Veröffentlichen“.

Und das Beste? So einen Blog kannst du in weniger als einer halben Stunde bauen – selbst wenn du noch nie in deinem Leben Code angefasst hast.

Bereit, deinen Blog genau jetzt zu starten – und damit vielleicht sogar deine Kaffeeroutine zu finanzieren? 🤑

Los geht’s:

Hier starten: Was du aus diesem Guide mitnimmst

Ganz klar vorweg: Das hier ist nicht eine dieser vagen „Blog in 3 Klicks“-Geschichten – und auch kein 97-teiliger Kurs, für den du sechs Wochen brauchst.

Das ist deine Überholspur. Wir nutzen einfache, aber starke Tools, umgehen unnötige Details und konzentrieren uns nur auf das, was zählt:

  • Wähle einen großartigen Domainnamen, der nicht nach Scam oder Tippfehler klingt
  • Richte Hosting ein, das zuverlässig läuft und nicht dein Budget sprengt
  • Installiere WordPress auf die einfache Art – ganz ohne FTP-Drama
  • Passe deinen Blog an mit Themes und Plugins, die nicht nerven
  • Sichere ihn ab und erstelle Backups ohne einen Cent auszugeben
  • Starte mit dem Publizieren von Beiträgen, die gut klingen und gut aussehen
  • Und wenn du willst: verwandle deinen Blog in eine (Neben-)Einnahmequelle 💸

Du musst kein Developer sein;
du musst keine 399,99 € für einen Blogging-Kurs ausgeben;
du brauchst nur einen Browser, ein kleines Budget – und 30 Minuten Fokus.

Klingt gut? Dann klären wir zuerst eine brennende Frage:

Gratis vs. bezahlt: Wo ist der Haken?

Ja, du kannst einen Blog kostenlos starten. Und wenn du nur ein digitales Tagebuch willst, um Katzenfotos zu teilen oder Urlaube zu dokumentieren – go for it.

Aber wenn du auch nur ansatzweise ernsthaft für ein richtiges Publikum schreiben, deine Seite ausbauen oder (irgendwann) damit Geld verdienen möchtest, gilt Folgendes:

  • Kostenlose Blogs haben Haken. Vor allem in Form hässlicher Adressen (denk an deinname15.plattform.com) und erzwungener Anzeigen, an denen du nichts verdienst.
  • Anpassung ist begrenzt. Die meisten Gratis-Plattformen sperren dich in ihre Layout- und Designvorgaben ein. Plugin installieren, Farben ändern, Mailingliste hinzufügen? Nope.
  • Du hast nicht wirklich die Kontrolle. Plattformen können Regeln ändern, Features entfernen oder ganz dichtmachen – und dein hart erarbeitetes Publikum ist von einem Moment auf den anderen weg.

Es ist ein bisschen so, als würdest du ein Haus auf fremdem Grund bauen. Am Anfang bequem – aber wenn dort ein Parkplatz entstehen soll, wirst du eben rausgeworfen.

Blog erstellen und sich von Plattformen befreien

Wenn dein Blog wachsen, ernst genommen werden und deiner bleiben soll – lohnt sich ein kleiner Betrag am Anfang absolut.

Die gute Nachricht? Wir halten deine Einstiegskosten ultra-niedrig:

…mit echter Domain, echtem Hosting und echtem Besitz – alles zum Preis einer monatlichen Pizza 🍕 (na gut, einer fancy).

Als Nächstes braucht dein Blog ein Zuhause und eine Adresse. Kümmern wir uns darum:

Schritt 1: Hosting und Domain sichern (mit einem kleinen Twist)

Ein Domainname 🌐 ist die eindeutige Adresse deines Blogs im Netz (wie blog.com), während Webhosting 🖥️ der Service ist, der deine Seite speichert und sie 24/7 unter deiner Domain erreichbar macht.

Die gute Nachricht? Du musst beides nicht getrennt besorgen – die meisten modernen Anbieter bündeln Hosting und Domain. Genau das machen wir hier.

Wir suchen etwas, das:

  • Einfach zu bedienen ist – auch für absolute Anfänger
  • Schnell und zuverlässig läuft
  • Erschwinglich ist, ohne dubios zu wirken

Wir müssen das Rad nicht neu erfinden – wir bleiben bei WordPress, der weltweit beliebtesten kostenlosen Blog-Plattform – und bei einem von drei Hosts, die offiziell von WordPress.org empfohlen werden:

👌 Der günstigste Hosting-Plan bei Hostinger reicht völlig aus.

Natürlich kannst du auch einen anderen hochwertigen Hoster wie Kinsta oder SiteGround wählen – oder sogar einen Baukasten (hier ist unser Vergleich).

* * *

Wir nutzen einen kleinen Psychotrick, um nicht gleich am Anfang hängen zu bleiben:

…anstatt mit dem Domainnamen zu starten (und Stunden damit zu verbringen, den perfekten zu suchen!), legen wir direkt eine Entwicklungs-Version deines WordPress-Blogs an!

Du kannst im Hinterkopf schon über Domains nachdenken, aber lass dich nicht blockieren 🚧 – glaub uns, wir haben schon unzählige Fälle gesehen ;)

Jetzt brauchen wir erstmal einen Platz, an dem wir am Blog arbeiten können. Wir nutzen dazu einen Coupon, um den besten Preis bei Hostinger zu bekommen.

Hier die Schritt-für-Schritt-Anleitung:

  1. Geh zur Hosting-Angebotsseite von Hostinger und klicke auf „Deal sichern“ (oder scrolle einfach runter, um die Tarife zu sehen):

    Bestes Angebot bei Hostinger holen ›

    Wir nehmen die günstigste Option, die alles bietet, was wir brauchen (sie heißt Premium, ja :)

  2. Auf der nächsten Seite empfehlen wir 12 Monate als optimales Mittelmaß zwischen Preis und Bindung – aber du kannst natürlich jeden Abrechnungszeitraum wählen:

    Blog erstellen Schritt 1: Hosting

    Und jetzt kommt noch ein Extra: einen zusätzlichen 10%-Rabatt! Kopiere diesen Coupon und füge ihn ins entsprechende Feld unter der Preisübersicht ein:

    TRUS10CODE
  3. Klick auf „Apply“ und dein Endpreis reduziert sich um 10%. Falls der Coupon nicht klappt, probiere SPECIAL15 für 7% Rabatt – und sag uns gerne in den Kommentaren Bescheid!

    Blog erstellen Schritt 1: Hostinger-Coupon angewendet

  4. Nun wirst du aufgefordert, ein Konto zu erstellen und die Bestellung abzuschließen. Glückwunsch! Dein Blog hat jetzt ein Zuhause 🏠

Sobald die Zahlung durch ist, leitet dich Hostinger direkt zum Einrichtungsassistenten weiter, um deinen Blog einzurichten und WordPress zu installieren (das schauen wir uns gleich an).

* * *

WICHTIG: Denk parallel über Domains nach:

Du kannst unseren Blog Name Generator nutzen, um kreative Ideen für eine .com-Domain zu finden –

– oder wenn du lieber eine regionale Endung wie .de oder etwas Nischiges wie .org möchtest, nutze einfach die Domain-Suche bei Hostinger.

Ziel ist etwas Kurzes, Klartextiges und leicht zu merkendes – mehr Tipps findest du in unserem Domain-Guide.

Gib dir Zeit, einen Domainnamen zu finden, der sich richtig anfühlt – wir registrieren und richten ihn dann am Ende ein, wenn dein Blog live geht.

Für jetzt: arbeite einfach weiter an deinem Blog:

Schritt 2: WordPress oder eine andere Blog-Engine installieren

Gehen wir gemeinsam durch den Hostinger-Einrichtungsassistenten, um deinen WordPress-Blog in unter 5 Minuten aufzusetzen:

  1. Die erste Frage kannst du ignorieren (sie ändert nichts), bei der zweiten wählst du “Website erstellen“:

    Blog erstellen 2025: Hostinger Assistent 1

  2. Im nächsten Schritt bekommst du drei Optionen: WordPress installieren, den Hostinger-eigenen Website-Baukasten nutzen oder mit einer leeren PHP/HTML-Seite starten. Auch wenn ihr Baukasten in 2025 recht ordentlich geworden ist, nehmen wir WordPress für maximale Einfachheit:

    Blog erstellen 2025: WordPress installieren

  3. Im nächsten Schritt wirst du aufgefordert, ein Passwort für deinen WordPress-Adminbereich zu erstellen (manchmal wird es für dich vorgegeben – stelle sicher, dass du dein eigenes festlegst!). Auch E-Mail-Adresse und Sprache kannst du hier anpassen:

    Blog erstellen 2025: WordPress Admin-Passwort festlegen

  4. Nun hast du die Wahl zwischen einer vorgefertigten Website (mit Design, Demo-Inhalten usw.), einem der Partner-Themes von Hostinger (allesamt Freemium) oder einer komplett leeren Installation.

    Wir empfehlen die Option „leere Seite“, da es buchstäblich tausende großartige kostenlose Themes gibt, die deinem Blog ein viel individuelleres Aussehen geben, als eine von zehn Standard-Vorlagen, die Hostinger Millionen Nutzern anbietet:

    Blog erstellen 2025: leeres WordPress installieren

  5. Als Nächstes wirst du nach dem Domainnamen gefragt – wähle einfach “Temporäre Domain verwenden“, wenn du dir noch unsicher bist. Wir verbinden deine endgültige Domain direkt vor dem Start in Schritt 4.
  6. Im nächsten Schritt kannst du einstellen, in welchem von Hostingers 12 globalen Rechenzentren dein Blog gespeichert wird.

    Je näher der Server an deinem Hauptpublikum, desto schneller lädt deine Seite (also wähle nicht Singapur, wenn deine Leser hauptsächlich in Deutschland oder den USA sitzen!).

    Zum Schluss klickst du auf “WordPress installieren“.

  7. Nach ein paar Sekunden ist deine WordPress-Installation abgeschlossen 🪄 – und dein neuer Blog ist damit schon halb fertig!

Lass uns nun die wichtigsten Einstellungen vornehmen:

Schritt 3: Deinen Blog smart konfigurieren

Bevor wir ins Design oder Schreiben von Inhalten einsteigen, nehmen wir uns ein paar Minuten, um grundlegende Einstellungen zu optimieren. Glaub uns – ein paar schnelle Anpassungen jetzt ersparen dir Stunden an Verwirrung später.

Um dich in dein WordPress-Adminpanel einzuloggen, kannst du entweder in Hostingers Dashboard auf „Website bearbeiten“ klicken oder einfach deinblog.com/wp-admin besuchen und dich mit der E-Mail und dem Passwort anmelden, die du zuvor eingerichtet hast.

Das solltest du zuerst tun:

  • Gehe zu Einstellungen → Allgemein
    Aktualisiere hier unbedingt deinen Seitentitel und deine Tagline. Diese erscheinen im Browser-Tab und manchmal auch in den Suchergebnissen – also halte sie kurz und beschreibend. Überprüfe hier auch gleich deine Zeitzone und dein bevorzugtes Datumsformat.
  • Als Nächstes: Einstellungen → Permalinks
    Wähle die Option Beitragsname – so erhältst du saubere, lesbare URLs wie deinblog.com/mein-erster-post statt deinblog.com?p=123. Besser für Nutzer, besser für Google.
  • Noch dabei? Super – weiter geht’s mit Einstellungen → Diskussion
    Scrolle runter zu Bevor ein Kommentar erscheint und setze ein Häkchen bei „Kommentar muss manuell genehmigt werden“. So hältst du Spam-Bots und Trolle aus deinem Kommentarbereich fern.
  • Bonus: Gehe zu Benutzer → Profil
    Ändere deinen Anzeigenamen, sonst werden deine Beiträge als „admin“ unterschrieben – wähle etwas, das wie ein echter Name klingt.

Natürlich wirst du im Laufe der Zeit noch weitere Einstellungen finden und anpassen – dies ist das absolute Minimum, damit du sofort starten kannst, ohne einen ganzen Tag in Konfiguration zu verlieren.

Jetzt ist es Zeit, diesen Blog wirklich zu deinem zu machen – mit einem passenden Theme und ein paar unverzichtbaren Plugins:

Schritt 4: Design auswählen und wichtige Plugins hinzufügen

Dein Blog ist live. Er funktioniert. Aber mal ehrlich – im Moment sieht er wahrscheinlich noch wie eine generische Platzhalter-Seite aus 2008 aus 🔲

Zeit, das zu ändern.

In diesem Schritt 🎨 wählen wir ein Theme (das definiert, wie dein Blog aussieht) und installieren ein paar 🧩 wichtige Plugins (die deinem Blog zusätzliche Funktionen geben).

Keine Sorge – du kannst Themes später jederzeit wechseln, ohne deine Inhalte zu verlieren, und die meisten Plugins sind in unter 10 Sekunden installiert oder deinstalliert.

Schritt 4.1: Ein Theme auswählen

Gehe in deinem WordPress-Adminbereich zu Design → Themes und klicke auf „Hinzufügen

Blog erstellen: aus tausenden kostenlosen WordPress-Themes auswählen

Dort findest du tausende kostenlose Themes – filtere nach Beliebtheit oder nutze die Suchfunktion, um die Auswahl einzugrenzen.

  • Wenn du einen soliden Allrounder suchst, empfehlen wir schamlos unser eigenes kostenloses Template: Bento ;)
  • Du kannst auch beliebte Multipurpose-Themes wie Astra oder GeneratePress ausprobieren, wenn du mehr Optionen möchtest.
  • Für Power-User eignet sich vielleicht ein Premium-Theme wie Divi – es bringt viele Funktionen, professionelle Designs und Extras wie Formulare oder E-Mail-Marketing gleich mit.

Merke dir dabei:

Wähle etwas Sauberes und Leichtgewichtiges – Extras kannst du später jederzeit hinzufügen.

Schritt 4.2: Plugins installieren

Plugins erweitern die Funktionalität deines Blogs; denk an: SEO-Tools, Analytics, Kontaktformulare, Backups – alles modular, alles optional.

(Das heißt: Installieren/Deinstallieren hat keinen Einfluss auf deine Inhalte oder dein Design).

Hier sind die ersten, die wir direkt empfehlen:

  • All in One SEO – damit steuerst du, wie deine Beiträge in den Suchergebnissen erscheinen (Meta-Titel, Beschreibungen usw.).
  • UpdraftPlus – einfache, automatische Backups, die deinem Blog (und dir) den Hals retten, falls mal etwas schiefgeht.
  • Site Kit by Google – verbindet deinen Blog mit Google Analytics und der Search Console in wenigen Klicks.
  • Akismet Anti-Spam – hält deinen Kommentarbereich sauber und frei von Bots.
  • WPForms – ein super einfacher Drag-and-Drop-Formular-Builder (z. B. für eine Kontaktseite).

Um ein Plugin zu installieren, gehe zu Plugins → Installieren, suche nach dem Namen, und klicke auf „Installieren“ und dann „Aktivieren“.

Das war’s!

Normalerweise erscheint danach ein neuer Menüpunkt im Adminmenü links – falls nicht, schau im Bereich „Einstellungen“, dort könnte es ein Untermenü sein.

Dein Blog hat nun ein solides Design, die wichtigsten Funktionen – und Raum zum Wachsen 🌱

* * *

Kommen wir zurück zum Domainnamen, bevor wir live gehen:

Deinen Blog auf eine Domain setzen

Falls du in Schritt 1 noch keinen Domainnamen gewählt hast: jetzt ist dein Blog bereit zum Start, also wird es Zeit, diesen Schritt abzuschließen:

  1. Gehe zu deinem Hostinger-Dashboard und wähle im linken Menü „Websites“. Unter deinem neuen Blog klickst du auf „Domain ändern“:

    Blog erstellen 2025: Domain bei Hostinger hinzufügen

  2. Im neuen Fenster gibst du deinen gewünschten Domainnamen ein und es erscheint ein Pop-up: Wähle deine Anfangslaufzeit (danach verlängert sich die Domain automatisch); wir empfehlen 1 Jahr zum Testen deines Blogs.

    Blog erstellen 2025: Domain-Details bei Hostinger

  3. Im selben Fenster klickst du auf „Hinzufügen“ neben dem Gutscheinfeld und fügst folgenden Code ein, um einen zusätzlichen Rabatt zu erhalten:

    TRUS10DOMAIN
  4. Jetzt kannst du die Bestellung abschließen und die neue Domain registrieren. Dein WordPress wird automatisch auf diese Domain umgezogen!

Bevor wir fertig sind, folgen noch ein paar Empfehlungen, wie du deinen Blog schützt, optimierst – und vielleicht sogar dafür sorgst, dass er sich selbst bezahlt:

Bonus-Schritt: Schütze deinen Blog und mach ihn schnell

Du hast deinen Blog erstellt, das Design angepasst, Funktionen hinzugefügt – jetzt sorgen wir dafür, dass er sicher, stabil und schnell lädt.

Hier ein paar schnelle Tipps, die dich nichts extra kosten und dich nicht in ein Technik-Kaninchenloch ziehen:

Tipp #1: Automatische Backups

🔐 Du kennst das Sprichwort – es gibt zwei Arten von Bloggern: die, die Backups machen, und die, die irgendwann nachts um 2 Uhr heulend ins Kissen schauen.

Lass uns nicht zur zweiten Sorte gehören.

Hostinger (und die meisten anderen großen Hoster) bietet wöchentliche Backups in allen Tarifen, aber wenn du mehr Kontrolle möchtest, empfehlen wir das kostenlose Plugin UpdraftPlus

Es erstellt tägliche automatische Backups deines Blogs und erlaubt es dir, sie extern zu speichern (z. B. auf Google Drive oder Dropbox) – so ist dein Content selbst dann sicher, wenn der Server abstürzt oder deine WordPress-Installation zerschossen wird.

Tipp #2: Grundlegende Blog-Sicherheit

🛡️ Du brauchst keine Militär-Verschlüsselung – nur ein paar einfache Regeln:

  • Verwende starke Passwörter: bitte kein admin123. Nutze Tools wie NordPass oder 1Password, um sichere Passwörter aufzubewahren.
  • Halte alles aktuell: WordPress-Core, Themes und Plugins. Updates schließen oft Sicherheitslücken.
  • Füge 2-Faktor-Login hinzu, z. B. über dieses Plugin – damit wird bei jedem Login ein Einmalcode vom Handy verlangt, was es Cyberkriminellen extrem schwer macht, in deinen Blog einzubrechen.

Tipp #3: Speed-Boosts

🚀 Selbst der schönste und informativste Blog ist nutzlos, wenn er eine halbe Minute zum Laden braucht. Tatsächlich verlassen die meisten Nutzer eine Seite nach ~3 Sekunden Ladezeit!

Das solltest du tun:

  • Caching aktivieren: installiere ein kostenloses Plugin wie LiteSpeed Cache (ideal für Hostinger) oder WP Super Cache.
  • Bilder komprimieren: lade Bilder im .webp-Format hoch oder nutze ein Plugin wie ShortPixel, um sie automatisch zu komprimieren und zu optimieren.
  • Plugins schlank halten: vermeide 20+ Plugins in deinem WordPress – vor allem nicht „nur zum Ausprobieren“. Bleib bei dem, was du wirklich brauchst, und lösche alles, was du nicht aktiv verwendest.

Extra-Tipp: Hostinger (und andere moderne Hoster) nutzen bereits schnelle globale CDNs, SSD-Speicher und PHP 8+, also hast du in Sachen Performance einen guten Start.

Voila – du hast jetzt einen Blog, der schnell, sicher und zukunftsfähig ist. Natürlich kannst du in all diesen Bereichen noch viel tiefer einsteigen – aber das liegt weit außerhalb unseres Rahmens heute.

Bereit für den letzten Schritt?

Dann lass uns darüber reden, wie du deinen Blog in eine Geldmaschine verwandelst 💸

So verdienst du Geld mit deinem Blog

Klar, die meisten starten keinen Blog mit dem ausdrücklichen Ziel, reich zu werden.

Aber wenn du einmal großartige Inhalte veröffentlichst und eine echte Leserschaft aufbaust… warum sollte dein Blog nicht auch die Rechnungen bezahlen?

Blog erstellen 2025: Monetarisierung

Hier sind drei der beliebtesten und bewährtesten Wege, einen Blog zu monetarisieren – klein anfangen und mit dem Wachstum skalieren:

Option 1: Affiliate Marketing (ideal für Einsteiger)

💰 Du verlinkst Produkte oder Services, die du wirklich magst – und wenn jemand über deinen speziellen Tracking-Link kauft, verdienst du eine Provision.

Ein paar Beispiele:

  • Reviews: schreibe einen Beitrag über deine liebsten digitalen Tools und verlinke ihre Websites mit deinen Affiliate-Links
  • Guides: erstelle einen Vergleichsartikel (wie unser Website-Builder-Vergleich) und füge Affiliate-Links zu den einzelnen Produkten ein

Du brauchst dafür keine riesige Reichweite oder Massen an Besuchern – wichtig sind Vertrauen, Relevanz und Konsistenz.

Starte, indem du Affiliate-Programme wie Amazon Associates, Impact, PartnerStack, ShareASale beitrittst – sowie spezifische Programme deines Hosting-Anbieters, VPNs oder SaaS-Tools.

Pro-Tipp: Empfiehl nur Dinge, an die du wirklich glaubst. Sonst ist es nur Werbung – und Leser merken das sofort.

Option 2: Werbung (ideal für populäre Blogs)

📢 Sobald dein Blog regelmäßig Traffic hat, kannst du noch mehr passives Einkommen erzielen, indem du Werbeanzeigen schaltest.

Am einfachsten startest du mit Google AdSense – es platziert automatisch relevante Anzeigen auf deiner Seite und zahlt pro Klick oder Ansicht.

Weitere beliebte Plattformen sind Mediavine, Ezoic und BuySellAds.

Bedenke: Werbeeinnahmen sind meist winzig, solange du nicht hunderte Besucher pro Tag hast.

Wenn deine Nische jedoch hochpreisigen Traffic hat (z. B. Finanzen, Software, B2B) oder dein Blog wirklich große Besuchszahlen erreicht, kann dieser Weg sehr lukrativ sein – besonders in Kombination mit Affiliate Marketing!

Option 3: Eigene Produkte oder Services verkaufen

🛍️ Sobald dein Blog eine Leserschaft hat, kannst du ihn auch als Shop nutzen, um Dinge zu verkaufen:

  • Digitale Produkte: Nischen-E-Books, Online-Kurse, Checklisten, Templates usw.
  • Physische Produkte: eigene Kreationen oder über Dropshipping / Print-on-Demand
  • Dienstleistungen: Business-Coaching, professionelle Beratung, Freelance-Texte oder Design

Du kannst deinem Blog mit einem kostenlosen Plugin wie WooCommerce E-Commerce-Funktionalität hinzufügen – oder auf externe Plattformen wie Gumroad und Etsy verlinken.

Denk dran: Monetarisierung braucht Zeit. Konzentriere dich zuerst auf Inhalte, die Menschen wirklich lesen wollen – das Geld folgt, wenn Vertrauen aufgebaut ist.

Blogging FAQ

🧠 Noch Fragen? Hier sind einige der häufigsten, die uns neue Blogger stellen:

Muss ich programmieren können, um einen Blog zu starten?

Nein. Mit WordPress und modernen Hostern kannst du alles über visuelle Editoren und einfache Menüs erstellen – ganz ohne Code.

Wie lange dauert es, einen Blog zu starten?

Mit dieser Anleitung etwa 30 Minuten – inklusive Einrichtung, Design und ersten Anpassungen. Du kannst zwischendurch sogar Pausen machen, um dein Werk zu bewundern.

Wie viel kostet es, einen Blog zu starten?

Du musst mit etwa 2–3 €/Monat für Hosting und Domain rechnen (bei jährlicher Abrechnung). Die meisten Themes und Plugins, die du brauchst, sind kostenlos.

Wird überhaupt jemand meinen Blog finden?

Ja – wenn du hilfreiche, gut geschriebene Inhalte erstellst und grundlegende SEO-Prinzipien beachtest. Plugins wie All in One SEO und Site Kit helfen dabei enorm.

Kann ich meinen Blog später zu einem anderen Hoster umziehen?

Absolut. Mit WordPress ist es relativ einfach, zu einem anderen Hosting-Anbieter zu wechseln oder die Domain zu ändern. Deine Inhalte sind portabel.

Wie lange dauert es, mit Bloggen Geld zu verdienen?

Das variiert – aber die meisten Blogs verdienen in den ersten Monaten kein nennenswertes Einkommen. Fokus zuerst auf Inhalte und Vertrauen; das Geld kommt danach.

Immer noch unsicher? Stell deine Frage im Kommentarbereich – wir helfen dir gerne 🧵

Abschlussgedanken + Ein ehrliches Geheimnis

Du hast es bis hierhin geschafft – starke Leistung!

Du hast jetzt alles, was du brauchst, um einen Blog aufzubauen, der gut aussieht, schnell läuft und echte Leser anzieht (nicht nur Bots und deine Mama).

Und hier kommt die ehrliche Wahrheit – die, die ich mir damals selbst gewünscht hätte:

Der größte Unterschied zwischen einem erfolgreichen Blog und einem toten? Es ist nicht die Technik. Nicht die Schreibfähigkeiten. Nicht mal Glück. Es ist: dranbleiben.

Die meisten Blogs scheitern, weil ihre Autoren einfach aufhören – sehr oft genau dann, wenn es langsam anfängt zu funktionieren!

Blog erstellen 2025: Dranbleiben

Also veröffentliche deinen ersten Artikel.
Dann den nächsten.
Und noch einen.

Du wirst besser, schneller, präziser.

Und irgendwann schreibt dir jemand, den du noch nie getroffen hast, einen Kommentar wie: Das hat mir so sehr geholfen, danke! – und genau dann macht es Klick.

Bis dahin gilt: mach weiter – du schaffst das.

Und wenn du mal festhängst oder Fragen hast – scrolle runter zum Kommentarbereich und diskutiere mit.

Danke fürs Lesen – und willkommen auf der Blogger-Seite des Internets 🖖

Recensione (1&1) nel 2025: Vale la pena spendere i tuoi soldi nel più grande hosting europeo?

Ionos? No, non è una remota isola greca. Si tratta del nuovo nome di 1&1 (chiamato anche 1and1), uno dei più grandi hosting provider del mondo. Mentre l’azienda festeggia il suo trentesimo compleanno con un /leggero/ simpatico rebranding, noi ci siamo presi tempo ad andare ad esaminare attentamente 1&1 Ionos dal punto di vista del cliente e rispondere alla seguente domanda:

Dovresti scegliere Ionos per ospitare i tuoi siti web, domini e altre risorse online o ci sono alternative migliori?

A parte questo, leggendo fino in fondo questa recensione otterrai un’immagine più chiara della gamma di prodotti offerta da 1&1, consentendoti di fare una scelta migliore in caso decidessi di diventare un loro cliente. In altre parole, imparerai

  • 👍Quale è il miglio piano di hosting per i nuovi clienti Ionos?
  • 🔧Quali sono gli extra che vale la pena usare ae quali no?
  • 💳Ci sono degli costi nascosti ai quali devo fare attenzione?
  • 💬Quale è la qualità del supporto e dei consulenti personali?

Sveleremo insieme anche alcuni dei “misteri” che magari ti avranno lasciato perplesso dopo aver visitato il sito web di Ionos. Per esempio, quale è la differenza tra “WordPress Hosting” e un semplice “Web Hosting” nel quale possiamo anche installare WordPress?

Un’altra cosa prima di addentrarci: pensiamo che sia giusto informarti che alcuni dei link (non necessariamente quelli verso Ionos) presenti in questo articolo sono dei link di affiliazione, il che significa che potremmo ottenere una commissione quando una persona fa clic su tale link e fa poi un acquisto. Tuttavia, la buona notizia è che –

– a) questo non aumenta il prezzo da pagare su Ionos o altrove (al contrario, grazie alla partnership possiamo offrire prezzi migliori ai nostri visitatori), e b) più che a facili guadagni teniamo alla nostra reputazione guadagnata nel tempo, dunque non ti andremo a consigliare qualcosa di scadente solo per guadagnare qualche centesimo in più.

Bene, ora che questo è stato chiarito, facciamo un breve viaggio con la macchina del tempo per capire le origini e il background di 1&1 Ionos –

Dalle pubblicità all’Hosting: Il viaggio nei trent’anni di 1&1

Con oltre tre decenni alle spalle, Ionos può essere considerato un vero mastodonte del settore dei servizi online. Ammettiamolo, anche solo sopravvivere così a lungo in un mercato di tale rapida evoluzione è un risultato di per sé, per non parlare dell’essere diventato uno tra i più rinomati fornitori globali.

Dai suoi umili inizi nel 1988 come venditore di annunci online chiamato 1&1 EDV Marketing, la società ha fatto nel corso degli anni molti cambi strategici, espandendosi infine sull’arena internazionale e concentrandosi quasi interamente sui servizi di web hosting.

Solo esaminando brevemente il sito web ufficiale, ci si può fare una buona idea sulle origini dell’azienda: fedele alle sue radici tedesche, 1&1 Ionos presta molta attenzione a trasparenza, a privacy e alla qualità. Difficilmente troverai note a piè di pagina o scritte in piccolo: tutti i dettagli sono chiaramente visibili dove ci si aspetterebbe di trovare tale informazione.

Vista l’ampia gamma di servizi disponibili potresti sentirti un pò disorientato: troviamo web hosting, cloud hosting, hosting dedicato, “online starter kits”, website builders, HiDrive storage, Kubernetes as a Service… cioé cosa ?!

Per non mandarti completamente in stato confusionale con tutta questa marea di opzioni, facciamo un passo indietro e concentriamoci sulle principali categorie di utenti che ci interessano: un privato, una piccola-media impresa ed uno sviluppatore/libero professionista. Nei prossimi capitoli di questa guida discuteremo quali dei servizi di Ionos sono più adatti per ciascuna di queste categorie.

Avrai notato che non abbiamo incluso le grandi aziende tra le nostre categorie di utenti, e le abbiamo tralasciate intenzionalmente. Se sei una grande azienda affermata, probabilmente sai già quello che vuoi o puoi permetterti di assumere costosi consulenti che diranno al posto tuo quello che vuoi. In ogni caso, discutere di questa categoria non aggiungerebbe alcun valore a questa umile recensione :)

Scegliere un piano hosting di Ionos, basandoti sulle tue esigenze

Se stai creando un sito web per te stesso (tuo zio, un amico, ecc.) oppure per la tua azienda di piccola-media dimensione, ci sono fondamentalmente due gamme di prodotti per te su 1and1 Ionos: lo standard hosting condiviso (che loro chiamano semplicemente “Web Hosting”) oppure l’hosting WordPress.

Questa differenza ti potrebbe sembrare un pò tirata, perché è altrettanto facile installare WordPress (chiamato in seguito anche WP) sul loro hosting condiviso. C’è persino un sistema
automatizzato incluso in qualsiasi pacchetto di Web Hosting che fa proprio questo.

Per aiutarti (e per aiutare noi stessi) a capirlo, abbiamo creato una tabella con le differenze più importanti tra le linee di prodotto Web Hosting e WordPress Hosting su Ionos:

Web Hosting WordPress Hosting
Archiviazione file HDD (lento) SSD (veloce)
Numero di siti Nessuna restrizione Limitati per account
Aggiornamenti WP automatici Devi impostarli da solo Inclusi
Installazione WP automatica Di base Avanzata
Prezzo dopo il periodo promozionale di 12 mesi Leggermente meno costoso Leggermente più costoso

Vale la pena sottolineare che queste sono le uniche reali differenze che abbiamo identificato. In altre parole, non abbiamo incluso nessuna delle funzionalità che sono menzionate come vantaggi nella loro pagina che promuove il WP hosting, ma che in realtà sono disponibili anche per il pacchetto Web Hosting.

Puoi impostare aggiornamenti automatici tu stesso? Ma certo. Hai davvero bisogno di un installatore automatico avanzato che ti aggiunge subito temi e plugin aggiuntivi? Probabilmente no. Ma c’è una cosa nel pacchetto WordPress Hosting che tu vuoi però!

L’SSD (Solid State Drive) è una tipologia di archiviazione relativamente nuova che funziona come una flash memory stick piuttosto che il disco di alluminio che ruota nei tradizionali dischi fissi (HDD). Grazie al suo design, l’SSD è molto, ma molto più veloce di un HDD e questa differenza è di enorme importanza per la velocità del tuo sito internet.

Per essere chiari, non c’è alcun particolare vantaggio nell’usare un SSD specificatamente per WordPress, come potrebbe farti credere il sito di Ionos, ma aiuta a rendere il sito internet più veloce, indipendentemente dal sistema di gestione dei contenuti (CMS) che stai utilizzando.

Per riassumere, se hai bisogno di uno o due siti e hai già considerato di utilizzare WP, allora scegli il WordPress Hosting, selezionando il pacchetto in base al numero di siti web che necessiti. Qui vale la pena avere il vantaggio di velocità dato dall’SSD.

Se hai intenzione di utilizzare un altro sistema per il tuo sito o se devi metter su dozzine di siti WP in un singolo account, allora i pacchetti Web Hosting potrebbero essere una migliore alternativa.

Ora ti verrà da chiedermi qualcosa sul loro website builder (costruttore sito web), sembra più facile che non imparare ad usare un sistema di content management. Ti basta scegliere un template e semplicemente sostituire poi il testo con il tuo, giusto?

Sebbene offra in qualche modo un sistema più veloce per completare un sito, se ci pensi, ci sono alcuni elementi che lo rendono meno attraente di quel che sembra:

  • Se usi WordPress, la tua scelta sarà molto, ma molto più ampia sotto ogni aspetto. Sebbene il numero di template (oltre 400) offerti nel Ionos Site Builder è di certo impressionante, molti di essi hanno un aspetto molto datato in termini di design e di funzionalità, almeno rispetto alla maggior parte degli attuali temi di WordPress (anche quelli gratuiti come Bento, per non parlare dei temi iper-avanzati a pagamento come Avada).
  • Come sopra, la scelta di funzionalità ed extra nel Site Builder è nulla a confronto con gli oltre 50.000 plugin disponibili per WP. E ho contato solo quelli gratuiti! Poiché lo sviluppo di un website builder non è l’obiettivo principale di Ionos (e con molta probabilità non lo sarà mai), questo prodotto non è in grado di competere con piattaforme specializzate come WordPress o Wix in termini di potenza e flessibilità.
  • Se stai usando il Ionos Site Builder, sarai costretto a lavorare attraverso questa piattaforma per tutto il tempo di vita del tuo sito, migrando poi ad un altro sistema di content manager, magari anche uno open-source. Questo significa che se Ionos decide di cambiare qualcosa in futuro o di aumentare i prezzi, tu non avrai altre alternative se non quella di ricreare completamente il tuo sito da zero da qualche altra parte.

A differenza di altri fornitori, come ad esempio Hostinger, Ionos non permette di provare il website builder prima di pagarlo, quindi abbi fiducia nelle mie parole su questo: non ne vale la pena. Prendendo in considerazione gli argomenti appena detti, non vedo proprio perché qualcuno dovrebbe scegliere il site builder proprietario di Ionos, al posto di un WordPress completo.

Va bene, va bene, ma che mi dici del Kit online di base? Beh, in sostanza si tratta di una versione semplificata del website builder che cerca di fare ulteriori vendite ad ignari clienti. Dopo tutto quello che ti ho detto sopra, sarebbe incoerente ora raccomandare questo.

Questa è stata una lunga spiegazione, sono d’accordo. E non è ancora finita, perché abbiamo promesso di guardare ai prodotti Ionos per gli utenti più esperti! Quindi striracchiati, prendi magari un caffè, e torna per la seconda parte. Oppure se hai già visto tutto quello che ti serviva, puoi usare questo link in pagina per scorrere già alla prossima sezione, che riassume di pro e contro di 1&1 Ionos.
..
..

Se siti web ed applicazioni per internet sono quello che fai di mestiere (sei un libero professionista, uno sviluppatore, un imprenditore online, ecc.), potresti aver bisogno di qualcosa di più potente e personalizzabile del semplice hosting condiviso. Questo significa che hai la scelta tra queste offerte di Ionos:

  • Server Virtuali (VPS), o vServer, offre risorse dedicate e accesso di root al server, così da poter configurare ogni dettaglio esattamente come lo desideri. Qui è dove brillando tutti i vantaggi di Ionos nell’essere un gigante internazionale: una infrastruttura solida con sicurezza integrata, storage SSD al 100%, così come un supporto personalizzato 24/7, rendono questo pacchetto davvero interessante. Come bonus aggiuntivo avrai prestazioni ottimali potendo scegliere tra data center in Europa, Inghilterra e Stati Uniti.
  • Cloud Hosting lo si trova in diversi formati in Ionos, il che può essere piuttosto confuso fino a che non ti accorgi che le offerte Cloud Hosting sono esattamente le stesse di IONOS Cloud, incluso un dominio gratuito. In ogni caso, le specifiche sembrano buone, fino a che non inizi a confrontarle con quelle offerte da aziende che sono specializzate in cloud hosting: piani molto simili costano molto meno su Digital Ocean, che ha più data center e probabilmente molte più funzionalità per gli utenti professionali.
  • Server dedicato, adatto per i progetti più esigenti, è un altro esempio di prodotto che utilizza i competitivi vantaggi e la grandezza di Ionos in misura più ampia. Se sei sicuro di aver bisogno di un hardware dedicato, non c’è ragione per non scegliere uno dei pacchetti di Ionos (magari se non sei proprio sicuro, diciamo che allora non lo sei e un VPS potrebbe essere la soluzione più adatta per te).

Riassumiamo quello che abbiamo discusso sopra: se hai bisogno di un hosting più potente e flessibile, prendi il Ionos vServer, che ha offerte che sfruttano appieno l’infrastruttura all’avanguardia e una dimensione internazionale.

Per ribadire, gli altri tipi di hosting valgono la pena di essere considerati solo se sai specificatamente che hai bisogno di cloud o di dedicato.

Rispetto al primo, raccomanderei di andare dal leader del settore piuttosto che con Ionos, perché il cloud hosting è il cavallo di battaglia di Digital Ocean e investono chiaramente molto più tempo e denaro per migliorarlo continuamente. Per lo stesso motivo sono in grado di offrire una qualità di cloud superiore ma a prezzi inferiori.

Per quanto riguarda l’hosting dedicato, Ionos è una scelta perfetta, considerando la loro attenzione su hardware di qualità e sicurezza.

Bene, quello che sta dietro alla loro gamma di prodotti sembra più chiaro. Nel prossimo capitolo condivideremo le nostre impressioni generali nell’uso di 1&1 Ionos, prima di concludere con i pro e contro ed anche con un verdetto finale.

Le nostre impressioni su Ionos

Oltre alle caratteristiche e alle specifiche, l’assistenza clienti è una parte vitale di ogni offerta di hosting. Indipendentemente dal tuo livello di competenza, prima o poi avrai delle domande, sia che si tratti di stupidi errori da principiante o di qualcosa che non funziona da loro.

Da quello che abbiamo visto, Ionos prende sul serio il supporto. A giudicare dal loro passaggio verso un concetto di consulente personale, un rappresentante dell’azienda che funge da principale punto di contatto con l’hosting, che conosce la tua situazione in modo più dettagliato di un addetto al supporto.

Questo consulente personale funziona così: dopo che hai creato un account su Ionos, puoi “attivare” questa funzione dal tuo pannello di amministrazione hosting. Dopo aver fatto clic sul pulsante di attivazione, vedrai il nome e il numero di telefono diretto del tuo contatto diretto su Ionos.

Si potrebbe pensare che un’azienda con diversi milioni di clienti non sia fisicamente in grado di metterlo in atto, ma facciamo un rapido calcolo:

Ionos afferma di avere oltre 8 milioni di clienti e 7000 dipendenti in totale. Anche se solo la metà di questi lavora al supporto al cliente, e assumiamo che ogni cliente fa 3 richieste di supporto all’anno, per ogni anno, arriviamo ad una stima di 25 richieste di supporto per specialista al giorno, o 3 all’ora, che sono una quantità abbastanza gestibile.

Detto questo, ovviamente non è ancora possibile garantirti che parlerai sempre con il tuo manager quando contatti Ionos (senza considerare che i server possono anche avere problemi di sera o di notte, ad esempio), ma ad ogni modo è un bel tocco e un lodevole tentativo, in particolare in un settore che sembra per lo più andare nella direzione contraria quando si tratta di assistenza ai clienti (vale a dire che cercano di sbarazzarsi dell’interazione umana il più possibile).

D’altra parte, non c’è ancora nessuna opzione di live chat su Ionos come ad esempio su GoDaddy. Questo è un peccato perché poter scrivere in tempo reale ad una persona, a volte può essere un vero risparmio di tempo. Pensiamo che una chat (o un sistema ibrido di chat-email) sarebbe una aggiunta gradita alla già forte assistenza di Ionos, anche se il più delle volte non sarà possibile chattare direttamente con il tuo consulente personale.

Oltre al supporto diretto, Ionos si è assicurato che il maggior numero possibile di domande frequenti trovino risposta delle guide scritte. Infatti l’hanno preso così sul serio da aver creato per questo tre guide separate: la Community, che è una raccolta di articoli relativi all’hosting in generale, la Startup Guide specificatamente creata per le nuove imprese, ed infine anche una Digital Guide che copre un’ampia gamma di argomenti che vanno dalla promozione del tuo sito web alle leggi e ai regolamenti digitali.

Sono davvero utili? Assolutamente. Perché Ionos abbia avuto bisogno di creare tre guide informative separate invece di un unico grande archivio di informazioni utili? Non riesco proprio a capirlo.

Dal momento che non è la prima volta che osserviamo qualcosa del genere (ricordate la moltitudine di site builders riproposti ed il cloud hosting?), forse è proprio quello che Ionos ama fare. Gonfiarsi come un piccione alfa-maschio per sembrare grande e serio.

Anche se è una pulsione assolutamente ragionevole per una multinazionale con milioni di clienti (e anche molti degli altri grandi provider di hosting lo fanno, ovviamente), sento che di questi tempi sia trendy concentrarsi sull’essere più semplici e snelli. Ma è solo un’opinione personale.

Ma sto divagando!

Avrai notato che Ionos ha anche un app mobile che permette di gestire il tuo account di hosting da qualsiasi dispositivo Android o iOS:

Ed è un’app decente, da qualsiasi punto di vista. Puoi usarla per verificare che tutto vada bene con il tuo server, chiedere supporto, visualizzare fatture, modificare i dettagli del tuo account e persino ricevere consigli automatici per migliorare il tuo sito web.

Detto questo, non sembra ancora una componente essenziale, voglio dire, se la gestione di un sito web non è la tua occupazione principale, non utilizzerai spesso il pannello di hosting in nessun modo. Se, d’altra parte, la maggior parte del tuo lavoro ruota attorno ai siti web, sei già online la maggior parte del tuo tempo dal tuo dispositivo principale.

O forse sono solo io che sono di vecchia scuola, chi lo sa. Ad ogni modo, una app per il pannello di hosting non è qualcosa che installerei nel mio telefono, perché mi è perfettamente sufficiente il pannello di hosting online.

I pro e contro di 1&1 Ionos

Bene, ora che abbiamo esaminato Ionos da varie prospettive, è tempo di riassumere i suoi vantaggi e i suoi punti deboli. Non menzioneremo le cose ovvie e ci concentreremo solo sulle reali differenze rispetto ad altri hosting provider:

  • Hardware all’avanguardia: oltre 90.000 potenti server in 10 data center in Europa e negli Stati Uniti. Installati e gestiti da Ionos, nessun outsourcing.
  • Elevati standard di sicurezza su entrambi i livelli di hardware e di software. Tutti i data center Europei di 1&1 Ionos hanno i certificati ISO 27001:2013.
  • Uptime del tuo sito web che sfiora il 100% grazie all’architettura georidondante ed alte velocità grazie ai data center con 360 Gbit/s di connettività.
  • Sistema di ridimensionamento flessibile per le prestazioni del server: è possibile aggiungere più potenza di elaborazione o più memoria in un clic e pagare giornalmente. Se poi vedi che che le risorse extra non sono più necessarie, anche un downgrade è sorprendentemente facile.
  • In questo momento offrono alcuni dei migliori pacchetti di hosting WordPress, con archiviazione dei file su veloci SSD, che puoi ottenere sul web.
  • Ogni cliente Ionos ha un assistente personale per rispondere a domande e problemi. Con la qualità del supporto che potrebbe essere migliorata ancora un pò, questo è sicuramente un approccio positivo per un grande fornitore internazionale di hosting.
  • Un certificato SSL (Secure Socket Layer) incluso in ogni piano di hosting, che consente di rendere il sito web più sicuro per i visitatori crittografando il traffico. I siti con SSL utilizzano https:// davanti ai loro indirizzi e visualizzano un amichevole lucchetto verde nella barra degli indirizzi del browser.
  • Un CDN (Content Delivery Network) integrato con alcuni piani di hosting: il tuo sito web viene automaticamente distribuito tra diversi data center in diverse parti del mondo, massimizzando così la velocità di caricamento della pagina indipendentemente da dove si trovano fisicamente i tuoi visitatori.
  • Anche se il loro site builder sembra più moderno di altri offerti da altre società di hosting, è ancora molto indietro rispetto anche ai content builder gratuiti per WordPress o altri popolari site engines.
  • Il pannello di controllo hosting personalizzato di Ionos appare pulito, pratico e funziona abbastanza bene, ma non è cPanel o Plesk, quindi se hai già avuto a che fare con i più popolare pannelli amministrativi di hosting, dovrai abituarti ad usarne uno completamente nuovo.
  • Il processo di creazione di un nuovo account potrebbe essere reso più agevole, in particolare il modulo dei dettagli personali costituito principalmente da campi di testo in formato libero come per il codice postale e l’indirizzo che vengono convalidati solo dopo aver inviato il modulo.
  • Una chat in tempo reale potrebbe probabilmente essere una aggiunta gradita alle opzioni di supporto, anche se il più delle volte non potresti parlare con tuo consulente personale.
  • La gamma di prodotti al momento sembra gonfiata, con alcune offerte quasi identiche rielaborate come prodotti diversi, ad esempio il Website Builder per il Website Starter Kit o il Cloud Hosting per il Ionos Cloud.

Wow, quanto da digerire! Quindi qual è il morale della favola? L’hosting con 30 anni alle spalle è ancora in prima linea o è meglio che vai a spendere i tuoi soldi da un altra parte?

Il nostro verdetto su Ionos + opinioni degli utenti

Come avrai notato, non abbiamo ancora provato a valutare 1&1 Ionos nel suo insieme. Questa è stata una scelta consapevole: quando un’azienda diventa così grande, inevitabilmente ci saranno dei prodotti che vanno davvero forte, così come altre offerte che sono pensate solo per riempire i buchi nel ventaglio dei prodotti.

Quindi potremmo naturalmente dire che Ionos è un gigante internazionale di tutto rispetto nell’hosting, con un’infrastruttura ed un supporto di prim’ordine, che probabilmente continuerà ad offrire servizi affidabili per altri 30 anni (e probabilmente altri 30)…

… ma questa caratteristica superficiale, anche se vera, non potrà aiutarti molto nel decidere se spendere i tuoi soldi su Ionos o portarli altrove. Perché ognuno è interessato a risolvere un suo problema specifico, da qui la necessità di guardare con più attenzione.

Con questo in mente, ecco i principali aspetti riassunti dalla più dettagliata analisi fatta sopra:

  • Se vuoi creare un sito web relativamente semplice (1-50 pagine) per un uso personale o come piccola-media impresa, la loro offerta di WordPress Hosting è la soluzione migliore, con l’archiviazione veloce su SSD e altre ottimizzazioni che possono significare una maggiore velocità di caricamento e quindi visitatori più soddisfatti.
  • Se il tuo lavoro è strettamente connesso con siti web e app web (ad esempio sei un freelancer o parte di un team di sviluppatori), scegli uno dei pacchetti Ionos vServer VPS. Questi riescono a utilizzare tutti i punti forti di questo hosting provider multinazionale e ben capitalizzato.
  • La pletora di servizi cloud di Ionos sembra più un tentativo di recupero da parte loro che un prodotto di punta, quindi potresti invece considerare l’hosting di Digital Ocean. Almeno per ora, DO è molto più avanti in termini di funzionalità e rapporto qualità-prezzo.

Ancora perplesso? Non sei sicuro se uno dei prodotti Ionos sia adatto al tuo progetto? Sai cosa fare! Scorri verso il basso fino alla sezione commenti sottostante e dicci cosa ti dà fastidio. Le opinioni personali e le esperienze di vita reale con Ionos sono ovviamente le benvenute. Discutiamone!

Le point sur (1&1) en 2025: Le leader de l’hébergement en Europe vaut-il votre argent ?

Ionos ? Non, ce n’est pas une île Grecque reculée, mais bien le nouveau nom de 1&1 (ou encore 1et1), l’un des plus grands hébergeurs Web du monde. Alors que la société fête son 30ème anniversaire avec une nouvelle image (légèrement) funky, nous allons prendre le temps d’analyser minutieusement 1&1 Ionos du point de vue des clients pour répondre à la question suivante :

Devriez-vous choisir Ionos pour héberger vos sites Web, domaines et autres actifs en ligne – ou existe-t-il de meilleures alternatives ?

En plus de cela, cette analyse vous offrira un meilleur aperçu du portefeuille de produits de 1&1 Ionos, vous permettant de faire un choix éclairé si vous décidez de devenir un de leurs clients. Autrement dit, vous découvrirez…

  • 👍Le meilleur pack d’hébergement pour les nouveaux clients ?
  • 🔧Quels extras en valent la peine, et lesquels non ?
  • 💳Y a-t-il des frais cachés dont vous devriez être au courant ?
  • 💬Les conseillers personnels sont-ils adéquats ?

Nous résoudrons également certains « mystères » qui vous ont peut-être rendu perplexe en explorant le site Web d’Ionos. Par exemple, quelle est la différence entre « Hébergement WordPress » et un simple « Hébergement Web », qui offre également l’option d’installer WordPress ?

Une dernière chose avant de nous y mettre : nous pensons approprié de vous avertir que certains liens (pas nécessairement vers Ionos) insérés dans cet article sont des liens affiliés, qui peuvent générer une commission si une personne clique sur un tel lien et effectue un achat. Cependant, la bonne nouvelle, c’est que :

– a) cela n’augmente pas le prix que vous payerez chez Ionos ou ailleurs (au contraire, grâce à ces partenariats, nous pouvons offrir un meilleur prix à nos visiteurs), et b) nous accordons plus de valeur à notre réputation à long-terme qu’à des gains à court-terme, et ne recommandons aucun produit de qualité inférieure juste pour augmenter nos gains.

Sur ce, maintenant que tout est clarifié, effectuons un court voyage dans le temps pour comprendre les origines et le passé de 1&1 Ionos…

Des pubs à l’hébergement : Les 30 ans de parcours de 1&1

Avec plus de trois décennies à son actif, Ionos peut être considéré comme un véritable mastodonte de l’industrie des services en ligne. Reconnaissons-le : le simple fait de survivre si longtemps sur un marché à l’évolution si rapide est un accomplissement en soi – sans parler d’en devenir l’un des principaux acteurs mondiaux.

Depuis ses humbles débuts en 1998 en tant que 1&1 EDV Marketing, revendeur de publicités en ligne, la société a pris des virages stratégiques au fil des ans, se développant sur la scène internationale pour finir par se focaliser presque entièrement sur les services d’hébergement Web.

Un bref aperçu du site Web officiel suffit pour deviner les origines de la société : fidèle à ses racines allemandes, 1&1 Ionos prête une attention toute particulière à la transparence, à la confidentialité et à la qualité. Les notes en bas de page et autres textes en petits caractères sont rares – tous les détails sont clairs et les informations situées où vous vous y attendez.

La gamme de services offerts peut cependant être écrasante : Hébergement Web, Hébergement Cloud, Hébergement dédié, « Kit premier site », Créer un site Internet, Stockage en ligne HiDrive, Kubernetes as a service… Hein? Quoi ?!

Afin de ne pas s’y perdre face à une telle abondance d’options, prenons du recul et convenons des principales catégories utilisateur qui nous intéressent : une personne privée, une petite/moyenne entreprise et un développeur/indépendant. Dans le chapitre suivant de ce guide, nous discuterons des services Ionos les plus adaptés à chacune de ces catégories.

Vous avez probablement remarqué que nous n’avons pas mentionné les grandes entreprises dans nos groupes d’utilisateurs, et c’est intentionnel – si vous êtes une entreprise établie et prospère, vous savez sans doute ce que vous voulez, ou pouvez embaucher un consultant expert pour vous dire ce que vous voulez. Dans tous les cas, considérer cette catégorie n’apportera que peu de valeur à cette modeste analyse :)

Choisir un pack d’hébergement sur Ionos, en fonction de vos besoins

Si vous créez un site Web pour vous-même (votre oncle, votre ami, etc.) ou êtes une entreprise de taille modeste, vous avez en gros le choix entre deux gammes de produits sur 1and1 Ionos : l’hébergement standard mutualisé (qu’ils appellent simplement « Hébergement Web ») et la formule Hébergement WordPress.

Cette division vous paraît peut-être un peu artificielle, car il est relativement facile d’installer WordPress (abrégé en WP ci-dessous) sur leur formule d’hébergement mutualisé – un système automatisé pour ce faire est d’ailleurs inclus dans chaque pack Hébergement Web.

Pour vous aider (et nous aider) à comprendre, nous avons dressé un tableau mettant en avant les principales différences entre les gammes de produits Hébergement Web et Hébergement WordPress chez Ionos :

Hébergement Web Hébergement WordPress
Stockage des fichiers HDD (plus lent) SSD (plus rapide)
Nombre de sites Web Sans limitation Limité par compte
Mise à jour WP automatique À installer vous-même Inclus
Installation WP automatique Basique Avancée
Plan tarifaire après période promotionnelle de 12 mois Légèrement moins cher Légèrement plus cher

Soulignons tout de même que ce sont les seules vraies différences que nous avons pu identifier. Autrement dit, nous n’avons pas inclus les fonctionnalités qui étaient mentionnées comme avantages sur leur page promotionnelle pour l’hébergement WP, mais qui sont en réalité également disponibles pour les packs Hébergement Web.

Pouvez-vous installer une mise à jour automatique vous-même ? Bien sûr. Avez-vous vraiment besoin d’un installateur automatique avancé qui ajoute d’emblée des plugins et thèmes supplémentaires ? Probablement pas. Cependant, il y a bien une chose dans le pack Hébergement WordPress que vous voulez !

Le SSD (Solid State Drive) est une technologie de stockage relativement récente, qui stocke les données sur une mémoire flash plutôt que sur le disque tournant magnétique utilisé dans les disques durs traditionnels (HDD). Grâce à son design, le support SSD est bien plus rapide que l’HDD, et cette différence a des conséquences importantes sur la vitesse de votre site Web.

Pour être clair, il n’y a pas d’avantage particulier à utiliser la technologie SSD spécifiquement avec WordPress, comme le site d’Ionos pourrait vous le faire croire – mais cette technologie peut aider à rendre votre site plus rapide, indépendamment du système de gestion de contenu (SGC) que vous utilisez.

Pour résumer, si vous n’avez besoin que d’un ou deux sites Web et avez déjà considéré utiliser WP, optez pour l’Hébergement WordPress et choisissez un pack selon le nombre de sites désirés. L’avantage en termes de rapidité du SSD en vaut la peine.

Si vous comptez utiliser un autre moteur de sites que WP, ou devez faire tourner des dizaines de sites WP sur un seul compte d’hébergement, le pack Hébergement Web pourrait être une meilleure alternative.

Qu’en est-il de leur option Créer un site Internet/MyWebsite, vous demandez-vous ? N’est-ce pas une alternative plus simple qu’apprendre à utiliser un système de gestion de contenu ? Il suffit de choisir un template et de remplacer le texte par le mien, non ?

Bien qu’elle offre une voie plus rapide vers un site Web complet, si vous y réfléchissez un peu, vous verrez que deux ou trois choses rendent cette option moins intéressante :

  • Si vous optez pour WordPress, votre choix sera bien plus vaste sous tous les abords. Bien que le nombre de templates offerts (plus de 400) dans le créateur de site MyWebsite d’Ionos soit assez impressionnant, la plupart paraissent démodés en termes de designs et de fonctionnalités, du moins en comparaison avec les templates WordPress les plus modernes (même les gratuits comme Bento, et pas seulement les templates hyper-avancés payants comme Avada).
  • Dans la foulée, le choix de fonctionnalités et d’extras du créateur de site MyWebsite est incomparable à celui offert par WP (plus de 50 000 plugins). Et ce ne sont que les gratuits ! Puisque le développement de concepteurs de sites n’est pas l’objectif principal d’Ionos (et ne le sera probablement jamais), ce produit ne peut tout simplement pas rivaliser avec les plateformes spécialisées comme WordPress ou même Wix en matière de puissance et de flexibilité.
  • Si vous utilisez le créateur de site MyWebsite d’Ionos, vous serez lié à cette plateforme tant que votre site Web existera – il n’y a pas d’option pour migrer à un autre système de gestion de contenu plus tard, même à un système open source. Cela signifie que si Ionos décide de modifier quelque chose ou d’augmenter ses prix, vous n’aurez pas d’autre alternative que celle de recréer votre site Internet de zéro ailleurs.

Contrairement à d’autres hébergeurs comme par exemple Hostinger, Ionos n’offre pas l’option de tester le créateur de site avant d’acheter la formule, donc vous allez devoir me croire sur parole : c’est une perte de temps. Prenant en compte les arguments ci-dessus, je ne vois pas pourquoi quiconque choisirait le créateur de site breveté d’Ionos plutôt que la formule WordPress complète.

Voilà, c’est dit… Mais alors, qu’en est-il du Kit premier site ? Eh bien, c’est fondamentalement une version simplifiée du créateur de site MyWebsite, qui cherche à vendre des services en plus en chemin. Après mon analyse des paragraphes précédents, il serait incohérent de ma part de recommander cette option.

La justification a été longue, je vous l’accorde. Et elle n’est pas terminée, puisque nous avons promis d’analyser également les produits Ionos pour les utilisateurs plus avancés ! Donc étirez-vous, allez vous chercher un café et revenez pour la seconde partie. Ou, si vous avez déjà tout ce dont vous aviez besoin, cliquez sur ce lien interne pour passer à la section suivante, qui résume les avantages et les inconvénients de 1&1 Ionos.
..
..

Si les sites Internet et applications Web constituent votre principale source de revenus (p.ex. vous êtes indépendant, développeur ou entrepreneur en ligne, etc.), vous avez sans doute besoin d’un produit plus puissant et plus modulable qu’un simple hébergement mutualisé. Dans ce cas, vous avez le choix entre les offres Ionos suivantes :

  • Serveurs virtuels (VPS) ou Hébergement VPS, offrant des ressources dédiées et un accès root afin que vous puissiez configurer chaque détail selon vos besoins. C’est ici que toutes les ressources et avantages d’Ionos en tant que géant international brillent vraiment : infrastructure robuste et sécurité intégrée, stockage 100% SSD, ainsi qu’une assistance personnalisée jour et nuit forment un pack assez attractif. De plus, vous pouvez choisir librement entre un data center en Europe, au Royaume-Uni ou aux États-Unis pour une performance optimale.
  • L’Hébergement Cloud se décline en différents parfums chez Ionos, ce qui peut être assez déroutant jusqu’à ce que vous réalisiez que les packs de l’Hébergement Cloud sont exactement les mêmes que ceux de Cloud IONOS, avec en plus les domaines gratuits. Dans tous les cas, les spécifications paraissent honnêtes, jusqu’à ce que vous les compariez à celles de sociétés qui se spécialisent dans l’hébergement Cloud : des packs très similaires coûtent considérablement moins chez Digital Ocean, qui possède plus de data centers et sans doute plus de fonctionnalités orientées vers les utilisateurs professionnels.
  • L’Hébergement dédié, adapté aux projets les plus exigeants, est un autre exemple de produit qui met les avantages compétitifs et l’ampleur d’Ionos à profit. Si vous êtes sûr d’avoir besoin d’un hardware dédié, il n’y a aucune raison de ne pas choisir l’un des packs Ionos (cependant, si vous n’en êtes pas sûr, c’est que vous n’en avez probablement pas besoin ; un VPS pourrait être une solution plus adaptée).

Résumons ce dont nous avons discuté ci-dessus : s’il vous faut juste un hébergeur puissant et flexible, optez pour le Serveur virtuel Ionos. Leurs offres sont décentes et bénéficient pleinement de l’infrastructure dernier cri et de l’échelle internationale.

Au risque de me répéter : en règle générale, ne considérez les autres types d’hébergement que si vous avez spécifiquement besoin d’un hébergement Cloud ou dédié.

En ce qui concerne l’hébergement Cloud, je vous recommanderais d’opter pour un leader de l’industrie plutôt qu’Ionos, principalement parce que l’hébergement Cloud est le produit phare de Digital Ocean et qu’ils investissent considérablement plus de temps et d’argent dans son amélioration continuelle. Pour la même raison, ils peuvent offrir une qualité Cloud supérieure pour un prix moindre.

Quant à l’hébergement dédié, Ionos est un très bon choix, étant donné l’attention qu’ils portent à la qualité et la sécurité hardware.

Bien, la logique derrière leur gamme de produits semble à présent plus claire. Dans le chapitre suivant, nous partagerons nos impressions globales d’utilisation d’1&1 Ionos, avant de terminer par les avantages et les inconvénients et par un verdict final.

Nos impressions sur Ionos

En plus des fonctionnalités et des spécificités, le support aux utilisateurs est un aspect essentiel dans un pack d’hébergement. Indépendamment de vos compétences, vous aurez des questions à un moment donné, que ce soit à cause d’une erreur de débutant ou d’un problème du côté de l’hébergeur.

De ce que j’ai pu voir, Ionos prend l’assistance client très au sérieux. C’est manifeste dans leur concept de conseiller personnel – un représentant de la société qui constitue votre point de contact principal avec l’hébergeur, et en sait plus sur votre cas particulier qu’un interlocuteur au hasard.

Voici comment fonctionne le conseiller personnel : après avoir ouvert un compte chez Ionos, vous pourrez « activer » cette fonctionnalité depuis votre panneau d’administrateur. Quand vous aurez cliqué sur le bouton « activer », vous verrez le nom et le numéro de téléphone direct de votre interlocuteur privilégié chez Ionos.

Vous pourriez penser qu’une société ayant plusieurs millions de clients soit physiquement incapable d’offrir un tel service, mais effectuons un rapide calcul :

Ionos prétend avoir plus de 8 millions de clients et 7 000 employés au total. Même si seule la moitié d’entre eux travaillent au support client, et en supposant que chaque client fasse 3 demandes d’assistance par an, chaque année, nous parvenons à une estimation de 25 demandes d’assistance par spécialiste par jour, ou 3 par heure – relativement gérable.

Cela étant dit, il est bien entendu impossible d’assurer que vous parlerez toujours à votre conseiller personnel chaque fois que vous contacterez Ionos (sans mentionner que les serveurs peuvent avoir des ratés en soirée ou la nuit, par exemple) – mais c’est un petit plus et un geste louable, surtout dans une industrie qui fait souvent la sourde oreille en matière d’assistance (p.ex. en tentant de réduire le plus possible l’interaction humaine).

D’un autre côté, il n’y a pas d’option de chatter en direct chez Ionos, contrairement à p.ex. GoDaddy, ce qui est vraiment dommage car la possibilité d’écrire directement à une vraie personne peut parfois économiser beaucoup de temps. Un chat (ou un système hybride chat/e-mail) nous semblerait être une addition bienvenue à l’offre déjà solide d’assistance d’Ionos, même si, la plupart du temps, vous ne parlerez pas à votre conseiller personnel.

En plus de l’assistance en tête-à-tête, Ionos a tenté de répondre au plus de questions types possibles dans ses guides écrits. En fait, ils ont pris cet aspect tellement au sérieux qu’ils ont créé trois ressources distinctes pour ce faire : la Community, une collection d’articles liés à l’hébergement en général, le Startup Guide, spécifiquement pour les nouvelles entreprises, ainsi que le Digital Guide, qui couvre un éventail de sujets allant de promouvoir votre site Web aux lois et règlements digitaux.

Ces ressources sont-elles vraiment utiles ? Absolument. Pourquoi Ionos a-t-il besoin de trois sources de connaissances distinctes au lieu d’une archive unique comprenant tous les matériaux utiles ? Aucune idée.

Ce n’est certainement pas la première fois que nous observons une telle chose (vous vous souvenez des innombrables moteurs de sites et hébergeurs Cloud reconditionnés ?), et peut-être est-ce simplement une chose qui plaît à Ionos – de se gonfler comme un pigeon mâle alpha pour avoir l’air plus imposant et être pris au sérieux.

Bien que les ressources soient parfaitement raisonnables pour une société multinationale aux millions de clients (et que la majorité des autres grands hébergeurs fassent évidemment la même chose), j’ai l’impression qu’à notre époque, se concentrer sur la facilité d’utilisation et la simplification est encore plus cool. Cela dit, ce n’est que mon opinion personnelle.

Mais je m’écarte du sujet !

Vous avez peut-être même remarqué qu’Ionos dispose d’une application mobile qui vous permet de gérer votre compte d’hébergement à partir de n’importe quel appareil Android ou iOS :

Et cette appli est tout à fait honnête, en tous points – vous pouvez l’utiliser pour vérifier si tout fonctionne bien sur votre serveur, demander de l’assistance, afficher vos factures, modifier les détails de votre compte, et même recevoir des conseils automatisés pour améliorer votre site Web.

Cela étant dit, l’appli ne donne pas l’impression d’être un composant essentiel – disons que si gérer un site Web n’est pas votre occupation principale, vous n’utiliserez sans doute pas votre panneau d’administrateur très souvent, que ce soit depuis votre téléphone ou depuis votre ordinateur. D’un autre côté, si l’essentiel de votre travail tourne autour des sites Web, vous passez sans doute déjà la plupart de votre temps en ligne depuis votre appareil principal.

Ou peut-être est-ce moi qui suis de la vieille école ? Qui sait ? Dans tous les cas, une appli pour accéder à mon panneau d’administrateur n’est pas quelque chose que je téléchargerais sur mon téléphone, car le panneau d’administrateur en ligne me convient parfaitement.

Avantages et Inconvénients de 1&1 Ionos

Bien, maintenant que nous avons analysé Ionos selon différentes perspectives, il est temps de résumer ses points forts et ses points faibles. Nous ne mentionnerons pas les évidences, mais nous concentrerons uniquement sur les différences réelles comparées aux autres hébergeurs sur le marché :

  • Hardware dernier cri : plus de 90 000 serveurs puissants dans 10 data centers en Europe et aux États-Unis. Installés et gérés par Ionos, sans sous-traitance.
  • Standards de sécurité élevés au niveau hardware comme au niveau software. Tous les data centers européens de 1&1 Ionos sont certifiés ISO 27001:2013.
  • Disponibilité proche de 100% pour votre site web grâce à l’infrastructure géo-redondante, et haut débit grâce à la connectivité de 360 Gbits/s des data centers.
  • Système d’échelle tarifaire flexible en ce qui concerne la performance du serveur : vous pouvez ajouter plus de mémoire ou de puissance de traitement en un clic et être facturé par jour. Si par la suite, vous sentez que les ressources supplémentaires ne sont plus nécessaires, passer à une version inférieure est étonnamment facile.
  • Un excellent rapport qualité/prix pour les packs d’hébergement WordPress, avec un stockage de données SSD rapide qui constitue l’une des meilleures offres disponibles en ligne pour le moment.
  • Chaque client Ionos reçoit l’aide d’un conseiller personnel pour répondre à ses questions et régler ses problèmes. Bien que la qualité de l’assistance puisse encore être améliorée, c’est une approche positive pour un leader de l’hébergement mondial.
  • Certificat SSL (Secure Socket Layer) inclus dans chaque pack d’hébergement, chiffrant le trafic pour rendre votre site Web plus sûr pour vos visiteurs. Les sites dotés du protocole SSL utilisent le préfixe https:// devant l’adresse URL et affichent un cadenas vert dans la barre d’adresse du navigateur.
  • Un CDN (Content Delivery Network) intégré à certains packs d’hébergement : votre site Web est automatiquement distribué entre plusieurs data centers dans différentes parties du monde, optimisant la vitesse de chargement des pages indépendamment de l’emplacement physique de vos visiteurs.
  • Bien que leur créateur de site MyWebsite paraisse plus moderne que les offres similaires d’autres hébergeurs, il est toujours loin derrière les créateurs de contenu gratuits disponibles pour WordPress et pour d’autres moteurs de sites populaires.
  • Le panneau d’administrateur fait sur mesure d’Ionos est épuré et fonctionne bien, mais ce n’est quand même pas cPanel ou Plesk. Si vous avez déjà utilisé ces panneaux d’hébergement populaires, vous devrez vous habituer à un tout nouveau système.
  • La procédure de création d’un nouveau compte pourrait être simplifiée, en particulier le formulaire de renseignements personnels, qui comprend principalement des champs de texte libre pour l’adresse et le code postal, et qui ne sont validés qu’une fois le formulaire soumis.
  • Un chat en direct serait une addition bienvenue aux options d’assistance, même si vous ne parleriez pas forcément à votre conseiller personnel la plupart du temps.
  • La gamme de produits paraît actuellement gonflée, avec des offres pratiquement identiques reconditionnées sous forme de différents produits ; par exemple Créer un site Internet vs. Kit premier site, ou Hébergement Cloud vs. Cloud IONOS.

Ouf ! Ce n’est pas rien, tout ça. Alors, que faut-il en retenir ? L’hébergeur aux 30 ans d’ancienneté est-il toujours au top – ou mieux vaut-il dépenser votre argent ailleurs ?

Notre verdict sur Ionos et discussion

Comme vous pourriez l’avoir remarqué, nous n’avons jusqu’ici pas cherché à évaluer 1&1 Ionos dans sa globalité. Et c’est un choix intentionnel : quand une société devient aussi vaste, elle offrira inévitablement des produits vraiment robustes, ainsi que d’autres qui ne sont là que pour combler les trous dans son portefeuille.

Aussi, nous pourrions bien entendu dire qu’Ionos est un géant international respectable de l’hébergement Web, avec des infrastructures et une assistance de premier ordre, qui continuera sans doute à offrir des services fiables pendant encore 30 ans (et 30 ans après ça)…

… mais de telles platitudes superficielles – quoique vraies – ne vous aideraient pas beaucoup à décider si oui ou non vous allez dépenser des sous chez Ionos ou ailleurs. Chacun s’occupant à résoudre ses problèmes particuliers, d’où le besoin d’approfondir la question.

Dans cette optique, voici les principaux points à retenir de notre analyse approfondie :

  • Si vous voulez créer un site Web relativement simple (1-50 pages) pour un usage personnalisé ou en tant que petite/moyenne entreprise, leur pack Hébergement WordPress est la meilleure solution, grâce à son stockage SSD rapide et autres optimisations qui signifient un chargement plus rapide et donc des visiteurs plus satisfaits.
  • Si votre travail est étroitement lié aux sites Internet et applications Web (p.ex. vous êtes indépendant ou faites partie d’une équipe de développeurs), optez pour un des packs VPS Ionos. Ceux-ci exploitent et mettent à profit tous les points forts de cet hébergeur multinational bien rodé.
  • La pléthore de services Cloud d’Ionos ressemble plus à une tentative de rattrapage qu’à un produit phare, donc considérez plutôt un hébergement chez Digital Ocean – du moins à ce jour, DO est très en avance en matière de fonctionnalités et de rapport qualité/prix.

Toujours perplexe ? Vous n’êtes pas sûr qu’un produit Ionos convienne bien à votre projet ? Vous savez quoi faire ! Défilez jusqu’à la section commentaire ci-dessous et dites-nous ce qui vous travaille. Les opinions personnelles et expériences concrètes avec Ionos sont bien entendu également appréciées. Discutons-en !

Reseña sobre (1&1) en 2025: ¿Es el mayor hosting de Europa digno de tu dinero?

¿Ionos? No, no es alguna remota isla griega – es el nuevo nombre de 1&1 (también escrito 1and1), uno de los mayores proveedores de hosting del mundo. Mientras la compañía celebra su 30° aniversario con un reposicionamiento de marca vibrante, nos tomaremos el debido tiempo para examinar 1&1 Ionos minuciosamente desde la perspectiva del cliente y responderemos la siguiente pregunta:

¿Deberías elegir Ionos para alojar tus sitios web, dominios y otros activos online – o existen mejores alternativas?

Además de eso, hacia el final de esta reseña tendrás un panorama más claro de la gama de productos de 1&1, permitiéndote elegir mejor en caso de que si decidas ser su cliente. En otras palabras, aprenderás…

  • 👍¿Cuál es el mejor plan de hosting para los nuevos clientes?
  • 🔧¿Cuales extras vale la pena usar y cuales no?
  • 💳¿Hay algún cargo extra sobre el cual deberías saber?
  • 💬¿Cuán buenos son el soporte y los asesores personales?

También resolveremos algunos de los “misterios” que quizás te dejaron desconcertado luego de explorar el sitio web de Ionos. Por ejemplo, cuál es la diferencia entre “WordPress Hosting” y un simple “Web Hosting” donde también puedes instalar WordPress.

Una cosa más antes de sumergirnos: creemos que es justo que sepas que algunos de los links (no necesariamente a Ionos) en este artículo son links de afiliados, es decir que puede que obtengamos una comisión si alguien hace click en ese link y genera una compra. De todos modos, las buenas noticias son que –

– a) esto no aumenta el precio que le pagas a Ionos u otros (de hecho, gracias a estas colaboraciones podemos ofrecer mejores ofertas a nuestros visitantes), y b) valoramos nuestra reputación a largo plazo más que nuestras ganancias a corto plazo y no recomendamos algo de menor calidad solo para ganar un centavo extra.

Entonces, ahora que todo ha sido aclarado, hagamos un corto viaje en una máquina de tiempo para entender los orígenes y el trasfondo de 1&1 Ionos.

De Ads a Hosting: La Travesía de 30 Años de 1&1

Con más de tres décadas en su haber, Ionos puede ser considerado un verdadero mastodonte de la industria de servicios online. Admitámoslo: el mero hecho de sobrevivir tanto tiempo en un mercado en permanente cambio es un logro en sí mismo, sin mencionar su crecimiento hasta convertirse en uno de los mayores actores globales.

Desde sus humildes comienzos en 1988 como una compañía que vendía ads online llamada 1&1 EDV Marketing, la firma ha hecho muchos cambios estratégicos a lo largo de los años, expandiéndose eventualmente en la esfera internacional y enfocándose casi totalmente en los servicios de web hosting.

Sólo examinando brevemente el sitio web oficial, uno puede imaginarse los orígenes de la compañía: fiel a sus raíces alemanas, 1&1 Ionos le presta muchísima atención a la transparencia, la privacidad y la calidad. Es raro encontrar notas al pie o letra chiquita – todos los detalles son aclarados justo donde esperas ver esa información.

Sin embargo, la enorme oferta de servicios disponibles puede resultar abrumadora: hay web hosting, cloud hosting, hosting dedicado, “web starter kits”, website builders (creadores de sitios web), almacenamiento HiDrive, Kubernetes como parte de sus servicios… ¡¿Qué?!

Para no entrar en estupor debido a la abundancia de opciones, demos un paso atrás y pongámonos de acuerdo en las principales categorías en las que estamos interesados: una persona particular, una PyME y un desarrollador/freelancer. En los siguientes capítulos de esta guía, discutiremos qué servicios Ionos son los más adecuados para cada uno de estos casos.

Quizás has notado que no mencionamos grandes empresas entre nuestros grupos de usuarios, y eso es intencional – si eres una empresa grande y establecida, es probable que ya sepas cuánto quieres o puedes permitirte para contratar asesores costosos para decirte lo que quieres. De todos modos, discutir este segmento no añadirá valor a esta humilde reseña :)

Elegir un Plan de Hosting en Ionos, Basado en Tus Necesidades

Si estás armando un sitio web para tí mismo (tu tío, tu amigo, etc.) o para tu empresa de tamaño moderado, hay básicamente dos rangos de producto para tí en 1and1 Ionos: el hosting compartido estándar (llamado simplemente “Web Hosting”) así como también WordPress Hosting.

Esta división puede parecer un poco artificial, porque también es bastante fácil instalar WordPress (WP) en su hosting compartido– hay incluso un sistema automatizado para hacer esto incluido con cualquier paquete de Web Hosting.

Para ayudarte (y a nosotros mismos) a resolver esto, armamos un cuadro comparativo con las diferencias más importantes entre las líneas de productos Web Hosting y WordPress Hosting en Ionos:

Web Hosting WordPress Hosting
Almacenamiento de archivos HDD (más lento) SSD (más veloz)
Número de sitios web Sin restricciones Limitado por cuenta
Actualizaciones automáticas de WP Necesitas configurarlo tú mismo Incluído
Autoinstalador WP Básico Avanzado
Precio luego del período de promoción de 12 meses. Un poco menos costoso Un poco más costoso

Vale remarcar que estas son las únicas diferencias reales que hemos podido identificar. En otras palabras, no hemos incluído ninguna de las características mencionadas como ventajas en la página de promoción de WP sino las que también están disponibles para los paquetes de Web Hosting.

¿Puedes configurar actualizaciones automáticas tú mismo? Pues claro. ¿Realmente necesitas un autoinstalador que agrega plugins y temas extras de inmediato? Probablemente no. Sin embargo, ¡hay una cosa en los paquetes de WordPress Hosting que sí quieres!

SSD (Disco de Estado Sólido o Solid State Drive según sus siglas en inglés) es un tipo de almacenamiento relativamente nuevo que funciona como un flash memory stick en vez de como un disco de aluminio giratorio usado en los discos rígidos tradicionales (HDD). Gracias a su diseño, el SSD es mucho pero mucho más veloz que el HDD, y esta diferencia importa bastante para la velocidad de tu sitio web.

Para ser más claros – no hay una ventaja particular al usar un SSD específicamente con WordPress, como el sitio web de Ionos podría llevarte a pensar – pero si ayuda a hacer tu página web más rápida, sin importar qué sistema de gestión de contenido estés utilizando.

Para redondear, si necesitas uno o dos sitios web y has considerado usar WP, escoge el WordPress Hosting, eligiendo el paquete de acuerdo a la cantidad de sitios web que necesites. La ventaja de la velocidad de SSD lo vale.

Si estás planeando usar otro motor de sitio web o si necesitas juntar docenas de sitios web WP en una única cuenta de hosting, los paquetes de Web Hosting pueden resultar una mejor alternativa.

Qué sucede con su creador de sitios web (website builder) te estarás preguntando – parece más fácil que aprender a usar un sistema de gestión de contenidos – solo elige una plantilla y reemplaza el texto con el tuyo, ¿no?

Si bien ofrece una vía algo más rápida a un sitio web completo, hay algunas cosas que lo hace menos atractivo si lo piensas:

  • Si eliges WordPress, tu elección será mucho, mucho más amplia en todo aspecto. Mientras que el número de plantillas disponibles (más de 400) en el Website Builder de Ionos es bastante admirable, muchos de ellos se quedaron en el tiempo de acuerdo al diseño y las funcionalidades, al menos en comparación a la mayoría de los temas modernos de WordPress (incluso los gratuitos como Bento, ni siquiera estamos hablando de temas pagos híper avanzados como Avada).
  • En la misma nota, la elección de funcionalidades y extras en el Website Builder es incomparable con los más de 50,000 plugins disponibles para WP. ¡Y aquellos son solo los gratuitos! Como desarrollar sitios web no es el mayor enfoque de Ionos (y probablemente nunca lo sea), este producto es simplemente incapaz de competir con plataformas especializadas como WordPress, o incluso Wix, en términos de poder y flexibilidad.
  • Si estás utilizando el Website Builder de Ionos, estás ligado a esa plataforma por el tiempo que tu sitio web exista – migrando a otro sistema de gestión de contenido luego, incluso los open-source. Esto significa que si Ionos luego decide cambiar algo o aumentar los precios, no tendrás ninguna otra alternativa más que recrear tu sitio web completamente de cero en otra parte.

A diferencia de otros proveedores, como por ej. Hostinger, Ionos no te permite probar el website builder antes de pagar por él, así que tendrás que confiar en mí en esta: no vale tu tiempo. Tomando en consideración los argumentos antes mencionados, no veo porque alguien elegiría el creador de sitios web patentado de Ionos por sobre un WordPress hecho y derecho.

Está bien, está bien. ¿Qué sucede con el Comienzo fácil online? Bien, es esencialmente una versión simplificada de un website builder que intenta generar aumentos de ventas adicionales sobre la marcha.

Esta fue una explicación larga, estamos de acuerdo. Y no ha acabado, ¡porque prometimos echarle un vistazo a los productos Ionos para usuarios más avanzados! Así que ve a elongar, quizás prepárate un café, y vuelve por la segunda parte. O, si ya has visto todo lo que necesitabas, puedes utilizar este link en texto para deslizar hacia abajo a la siguiente sección que resume los pros y los contras de 1&1 Ionos.

..
..

Si los sitios y aplicaciones web son tu trabajo (i.e. si eres freelancer, desarrollador, un emprendedor online, etc.) – quizás necesites algo más poderoso y adaptable que un simple hosting compartido. Lo que significa que tienes las siguientes ofertas de Ionos para elegir:

  • Servidores Virtuales (VPS), o vServer, ofreciendo recursos especializados y accesos como administrador para que puedas configurar cada detalle exactamente como lo necesitas. Aquí es donde todas las ventajas de Ionos, como el gigante internacional que es, realmente brillan: infraestructura sólida y seguridad integrada, 100% de almacenamiento SSD, así como también, soporte técnico personalizado 24 Hs., lo vuelven un paquete bastante atractivo. Como bonus agregado, puedes escoger entre data centers europeos, británicos y estadounidenses para una performance óptima.
  • Servidores Cloud viene en varios sabores en Ionos, lo cual puede ser un poco confuso hasta que te das cuenta de que Cloud Hosting ofrece exactamente lo mismo que IONOS Cloud, añadiéndole los dominios gratuitos sobre eso. En cualquier caso, las especificaciones se ven bien hasta que comienzas a comparar las ofertas con compañías que realmente se especializan en cloud hosting: planes muy similares cuestan significativamente menos en Digital Ocean, que tiene más data centers y tiene presumiblemente más funcionalidades para usuarios profesionales.
  • Hosting Dedicado, apto para los proyectos más demandantes, es otro ejemplo de un producto que usa las ventajas competitivas y la enorme escala de Ionos al máximo. Si tienes la certeza de que necesitas hardware dedicado, no hay razón alguna para no elegir uno de los paquetes de Ionos (asimismo, si no la tienes, entonces probablemente no lo necesitas; un VPS puede ser una solución más apta).

Resumamos lo discutido arriba: si necesitas un hosting más poderoso y flexible, escoge Ionos vServer, tienen ofertas muy decentes que toman total ventaja de la infraestructura de punta y la escala internacional.

Para reiterar – vale la pena considerar los otros tipos de hosting solamente si sabes que específicamente necesitas cloud o dedicado.

Respecto al primero, recomendaría ir con el líder de la industria en vez de Ionos, porque cloud hosting es el producto emblema de Digital Ocean y claramente invierten más tiempo y dinero en mejorarlo continuamente. Por la misma razón, tienen la posibilidad de ofrecer una calidad de cloud superior por menores precios.

En cuanto a hosting dedicado, Ionos es una opción perfectamente viable, considerando su enfoque en calidad de hardware y seguridad.

Bien, la lógica detrás de su gama de productos parece más clara ahora. En el siguiente capítulo compartiremos nuestras impresiones generales tras usar 1&1 Ionos, antes de concluir con los pros y los contras, así como el veredicto final.

Nuestras Impresiones sobre Ionos

Aparte de las funcionalidades y especificaciones, el soporte técnico es una parte vital de cualquier oferta de hosting. Independientemente de tu nivel de competencia, tarde o temprano tendrás preguntas, ya sea errores tontos de novato o algo que no está funcionando bien de parte del proveedor.

Por lo que hemos visto, Ionos toma el soporte muy seriamente, a juzgar por su paso hacia el concepto de asesor personal – un representante de la compañía que actúa como tu principal punto de contacto con el hosting, y conoce tu situación en mayor detalle que un agente de soporte aleatorio.

El tema del asesor personal funciona así: una vez que registras una cuenta en Ionos, estás apto para “activar” esta funcionalidad desde tu panel de control de hosting. Una vez que haces click sobre el botón de activación, verás el nombre y el número de teléfono directo de tu contacto directo en Ionos.

Uno pensaría que una compañía con varios millones de clientes está simplemente incapacitada para lograr esto, pero hagamos un cálculo rápido:

Ionos afirma tener 8 millones de clientes y 7000 empleados en total. Incluso si tan solo la mitad de ellos trabajaran en el sector de soporte al cliente, y asumiendo que cada cliente realiza 3 solicitudes de soporte al año, cada año, llegamos a un estimativo de 25 solicitudes de soporte por especialista por día, o 3 por hora – absolutamente manejable.

Habiendo dicho esto, claro que no es posible asegurar que siempre hables con tu manager cuando te contactes con Ionos (sin mencionar que los servidores pueden portarse mal hacia el final de la tarde o a la noche, por ejemplo) – pero es un bonito detalle y una tentativa loable de todos modos – especialmente en una industria donde generalmente se ve algo completamente opuesto en lo que respecta a soporte (i.e. tratar de evitar la interacción humana lo más possible).

Por otro lado, no hay opción de live chat como por ejemplo en GoDaddy, lo cual es una lástima porque poder escribirle a una persona real, en tiempo real, a veces puede ser un verdadero ahorro de tiempo. Sentimos que un chat (o un sistema híbrido chat-email) sería una grata incorporación a la ya fuerte oferta de soporte de Ionos, incluso si no hablas con tu asesor personal durante la mayor parte del tiempo.

Además del soporte cara a cara, Ionos se ha asegurado de que la mayor cantidad de preguntas estándar posibles estén cubiertas en sus guías escritas. De hecho, se lo tomaron tan en serio que han creado tres ambientes separados para este fin: la Comunidad, que es una colección de artículos generales relacionados a hosting, la Guía Startup específicamente para nuevas empresas, así como la Guía Digital que cubre una variedad de temas más amplia, desde promover tu sitio web hasta leyes y regulaciones digitales.

¿Son realmente útiles? Absolutamente. ¿Por qué Ionos necesita tres bases de conocimientos separadas en lugar de un único gran archivo de materiales útiles? Me supera.

Como no es la primera vez que observamos algo parecido (¿recuerdas la multitud de website builders y cloud hosting re-empaquetados?), quizás es solamente lo que a Ionos le gusta hacer – inflarse como un palomo macho alfa para verse grande y serio.

Mientras es una compulsión perfectamente razonable para una compañía multinacional con millones de clientes (y la mayoría de los otros grandes proveedores de hosting también lo hacen, obviamente), aún creo que en los tiempos que corren, enfocarse en ser simple y fácil de usar es aún mejor. Solo una opinion personal.

¡Pero me estoy yendo por las ramas!

Quizás hayas notado que Ionos tiene una aplicación móvil que te permite manejar tu cuenta de hosting desde cualquier dispositivo Android o iOS:

Y es una aplicación bastante decente, desde cualquier punto de vista – puedes usarla para chequear que todo esté bien con tu servidor, pedir soporte, ver recibos, cambiar tus detalles de cuenta, e incluso recibir consejos automatizados para mejorar tu sitio web.

Con eso dicho, aún no se siente como un componente esencial – quiero decir, si manejar un sitio web no es tu ocupación principal, no utilizarás el panel de control muy seguido en ninguna de sus formas. Si, por otro lado, la mayor parte de tu trabajo gira en torno a sitios web, ya te encuentras conectado la mayor parte del tiempo desde tu dispositivo principal.

O quizás soy solo yo siendo anticuado, quien sabe. De cualquier modo – una aplicación de panel de control de hosting no es algo que descargaría en mi móvil, porque estoy más que bien con el panel de control de hosting online.

Pros y Contras de 1&1 Ionos

Está bien, ahora que hemos examinado Ionos desde varias perspectivas, es momento de resumir sus ventajas y sus puntos más débiles. No mencionaremos las cosas obvias y solo nos enfocaremos en las diferencias reales en comparación a otros proveedores de hosting:

  • Hardware de punta: más de 90.000 servidores poderosos en 10 data centers en Europa y E.E.U.U. instalados y manejados por Ionos, sin tercerización.
  • Estándares altos de seguridad tanto en niveles de hardware como de software. Todos los data centers de la UE de 1&1 Ionos tienen certificados ISO 27001:2013.
  • Cerca de 100% de disponibilidad para tu sitio web gracias a la arquitectura geográficamente redundante, así como altas velocidades gracias a la conectividad con el data center de 360 Gbit/s.
  • Sistema de ajuste flexible para una mayor performance del servidor: puedes aumentar el poder de procesamiento o la memoria en un click y que se facture el importe en el mismo día. Si luego piensas que los recursos adicionales ya no son necesarios, bajar de categoría es sorprendentemente fácil.
  • Algunos de los paquetes de hosting para WordPress con la mejor relación calidad-dinero, con almacenamiento de archivos SSD veloz, puedes llegar a cualquier sitio en la web ahora mismo.
  • Cada cliente Ionos obtiene un asistente personal para ayudarle con cualquier pregunta y asunto. Mientras que la calidad del soporte puede aun ser mejorada, este es definitivamente un enfoque positivo para un gran proveedor de hosting internacional.
  • Certificado SSL (Secure Socket Layer) incluído en cada plan de hosting, permitiéndote hacer tu sitio web más seguro para los visitantes al encriptar el tráfico. Sitios con SSL usan el prefijo https:// delante de sus direcciones y muestran un amigable candado verde en la barra de direcciones del navegador.
  • Un CDN (Content Delivery Network) incorporado con algunos planes de hosting: tu sitio web es distribuido entre varios data centers en diferentes partes del mundo automáticamente, de este modo maximizando la velocidad de carga de la página, independientemente de donde estén localizados físicamente tus visitantes.
  • Mientras que su creador de sitio web se ve más moderno que otras ofertas similares de compañías de hosting, aún está muy detrás de los incluso gratuitos creadores de contenidos disponibles para WordPress en otros motores de sitios populares.
  • El panel de control hecho a medida de Ionos se ve despojado y funciona sin trabas la mayor parte del tiempo, pero sigue sin ser cPanel o Plesk, así que si ya has lidiado con cualquiera de los administradores de hosting populares, necesitarás acostumbrarte a uno completamente nuevo.
  • El proceso de crear una nueva cuenta podría mejorar, especialmente el formulario de datos personales que consiste en su mayor parte en campos de texto libre como código postal y calle que solo se validan una vez que intentas enviar el formulario.
  • Un live chat podría ser una grata incorporación a las opciones de soporte, incluso si no hablarías con tu asesor personal la mayor parte del tiempo.
  • La gama de productos se ve un poco inflamada en este momento, con algunas ofertas casi idénticas re-empaquetadas como productos diferentes, por ejemplo Website Builder Vs. Website Starter Kit, o Cloud Hosting Vs. Ionos Cloud.

¡Vaya, eso es mucho para procesar! Entonces, ¿cuál es la conclusión? ¿Está el proveedor de hosting de 30 años aún en la cresta de la ola – o es mejor invertir tu dinero en otro sitio?

Nuestro Veredicto sobre Ionos + Debate

Como habrás notado, no hemos intentado evaluar 1&1 Ionos en su totalidad hasta ahora. Y esa es una elección hecha a conciencia: cuando una compañía se vuelve tan grande como esta, inevitablemente va a haber algunos productos muy fuertes así como también ofertas increíbles que están hechas solo para eliminar agujeros del portfolio de productos.

Así que podríamos, claro, decir que Ionos es un respetable gigante internacional de hosting con infraestructura y soporte de primera categoría, y que probablemente continuará ofreciendo servicios confiables por otros 30 años (y probablemente 30 años más)…

…pero una característica tan superficial, no obstante verdadera, no te ayudará demasiado a decidir si gastarás tu dinero en Ionos o lo llevarás a otro sitio. Porque cada uno está interesado en resolver su problema específico, de ahí la necesidad de profundizar.

Con eso en mente, aquí están las principales conclusiones del análisis arriba más detallado:

  • Si deseas crear un sitio web relativamente simple (1 – 50 páginas) para uso personal o como PyME, su oferta de Hosting WordPress Gestionado es la mejor solución, con su rápido almacenamiento SSD y otras optimizaciones que se pueden traducir en una velocidad de carga mayor y, en consecuencia, más visitantes satisfechos.
  • Si tu trabajo está fuertemente conectado con sitios y aplicaciones web (por ejemplo, eres un freelancer o parte de un equipo de desarrolladores), escoge uno de los paquetes Ionos VPS. Estos potencian exitosamente todos los puntos fuertes de este bien capitalizado proveedor de hosting multinacional.
  • La plétora de servicios de cloud en Ionos parece más una tentativa de su parte de ponerse al día que un producto emblema, así que podrías considerar el hosting de Digital Ocean en su lugar – al menos por ahora, DO está mucho más adelantado en lo que refiere a ambas funcionalidades y relación calidad-precio.

¿Aún perplejo? ¿No estás seguro de que alguno de los productos Ionos sea una buena opción para tu proyecto? ¡Ya sabes que hacer! Solo desplázate hacia la sección de comentarios debajo y cuéntanos tus dudas. Las opiniones personales y las experiencias reales con Ionos son también muy bienvenidas, claro. ¡Debatamos!

(1&1) Expertenbewertung 2025: Ist Europas Größter Hosting-Anbieter Ihr Geld Wert?

Ionos? Nein, das ist keine abgelegene griechische Insel – es ist der neue Name von 1&1 (auch 1und1 geschrieben), einem der größten Hosting-Anbieter weltweit. Während das Unternehmen seinen 30. Geburtstag mit einem /leicht/ flippigen Rebranding feiert, nehmen wir uns die Zeit, um 1&1 Ionos aus der Kundenperspektive zu begutachten und folgende Frage zu beantworten:

Sollten Sie Ionos wählen, um Ihre Website, Domains und anderen Online Ressourcen zu hosten – oder gibt es bessere Alternativen?

Abgesehen davon werden Sie am Ende dieser Review eine klare Übersicht über das Produktangebot von 1&1 haben, sodass Sie informierte Entscheidungen treffen können, falls Sie ein Kunde von Ionos werden möchten. Folgende Fragen werden wir uns im Detail anschauen:

  • 👍Was ist das beste Hosting-Angebot für neue Ionos Kunden?
  • 🔧Welche Extras lohnen sich und welche nicht?
  • 💳Gibt es versteckte Kosten, von denen Sie wissen sollten?
  • 💬Wie gut sind der Kundendienst und die persönlichen Berater?

Wir werden also einige der „Rätsel“ lösen, die bei Ihnen bestimmt Fragezeichen im Kopf hinterlassen haben, nachdem Sie sich die Ionos Website angeschaut haben. Zum Beispiel: Was ist der Unterschied zwischen “WordPress Hosting” und dem einfachen “Web Hosting“, bei dem Sie auch WordPress installieren können?

Noch eine Sache bevor es losgeht: Wir denken es ist nur fair Sie darüber zu informieren, dass einige der Links (nicht zwangsläufig zu Ionos) in diesem Artikel Affiliate-Links sind, wir also eine Kommission erhalten, wenn eine Person auf solch einen Link klickt und einen Einkauf tätigt. Die guten Neuigkeiten sind jedoch, dass –

– a) dies nicht den Preis erhöht, den Sie bei Ionos oder woanders zahlen (tatsächlich können wir unseren Lesern aufgrund von Partnerschaften bessere Angebote bieten) und b) uns unser langfristiger Ruf wichtiger ist als kurzfristige Gewinne und wir keine unzureichenden Produkte empfehlen, nur um ein paar zusätzliche Cents zu verdienen.

So, lassen Sie uns nun eine kurze Reise mit der Zeitmaschine unternehmen, um die Ursprünge und den Hintergrund von 1&1 Ionos zu verstehen –

Von Anzeigen zum Hosting: Die 30-jährige Reise von 1&1

Mit mehr als drei Jahrzehnten Erfahrung ist Ionos ein wahrer Dinosaurier der Onlinedienstbranche. Wenn wir ehrlich sind: das schlichte Überleben in einem sich so schnell entwickelnden Markt ist eine Leistung an sich ¬– sich währenddessen zu einem der weltweit größten Player zu entwickeln verdient Respekt.

Seit seinen bescheidenen Anfängen in 1988 als Online Anzeigenverkäufer mit dem Namen 1&1 EDV Marketing hat das Unternehmen in den Jahren viele strategische Richtungswechsel vorgenommen und sich schließlich auf der internationalen Arena ausgebreitet, wo es sich fast ausschließlich auf Webhosting-Dienste konzentriert.

Bereits ein kurzer Blick auf die offizielle Website reicht, um einen guten Eindruck von den Ursprüngen des Unternehmens bekommen: Gemäß seiner deutschen Wurzeln stehen Transparenz, Privatsphäre und Qualität an oberster Stelle. Es gibt kaum Fußnoten oder Kleingedrucktes – alle Details stehen genau dort, wo man diese Informationen erwarten würde.

Die schiere Anzahl an verfügbaren Diensten kann jedoch erschlagend wirken: es gibt Domains, Webhosting, WordPress Hosting, Cloudhosting, Enterprise Cloud, Website Baukasten, Dedicated Server… ähem, wie bitte?!

Um bei dieser Menge an Optionen nicht komplett die Übersicht zu verlieren, sollten wir zunächst einen Schritt zurück machen und uns darauf einigen, dass uns die folgenden Nutzerkategorien am meisten interessieren: eine Privatperson, ein kleines/mittelgroßes Unternehmen, und ein Entwickler/Freelancer. In den nächsten Kapiteln dieser Review werden wir besprechen, welche Ionos Dienste für jeden dieser Anwendungsfälle am geeignetsten ist.

Sie haben wahrscheinlich gemerkt, dass wir große Unternehmen nicht bei unseren Nutzergruppen mitgezählt haben und das ist so gewollt – als großes und etabliertes Unternehmen wissen Sie wahrscheinlich, was Sie wollen oder Sie können teure Berater anstellen, die Ihnen sagen können, was Sie wollen. In jedem Fall bringt es für diese Review keinen Mehrwert, dieses Segment zu besprechen. :)

Ein Hostinganbot bei Ionos wählen – Basierend auf Ihren Bedürfnissen

Wenn Sie eine Website für sich selbst (Ihren Onkel, Freund etc.) oder Ihr kleines oder mittleres Unternehmen erstellen, dann gibt es quasi zwei Produktangebote für Sie von 1und1 Ionos: das standard Shared Hosting (sie nennen es einfach “Webhosting”) sowie WordPress Hosting.

Diese Unterteilung mag auf den ersten Blick etwas künstlich wirken, schließlich ist es relativ einfach WordPress (unten auch WP genannt) mit Shared Hosting zu installieren – es gibt hierfür sogar ein automatisiertes System, das Teil eines jeden Webhosting Pakets ist.

Um Ihnen (uns uns) zu helfen, die Unterschiede zu verstehen, haben wir eine Tabelle mit den wichtigsten Unterschieden zwischen den Produktlinien Webhosting und WordPress Hosting bei Ionos zusammengestellt:

Webhosting WordPress Hosting
Dateispeicherung HDD (langsamer) SSD (schneller)
Anzahl der Websites Keine Begrenzung Begrenzung pro Konto
Automatische WP Updates Muss selber eingerichtet werden Enthalten
WP Auto-Installer Einfach Fortgeschritten
Preis nach der 12-monatigen Werbeperiode Etwas günstiger Etwas teurer

Es ist wichtig zu betonen, dass dies die einzigen wirklichen Unterschiede sind, die wir gefunden haben. Anders ausgedrückt: wir haben keine Funktionen einbezogen, die auf der WP Hosting Werbeseite als Vorteile genannt werden, aber die auch für Webhosting Pakete verfügbar sind.

Können Sie die automatischen Updates selber einstellen? Natürlich. Benötigen Sie wirklich einen fortgeschrittenen Auto-Installer, der zusätzliche Plug-Ins und Themen unmittelbar hinzufügt? Wahrscheinlich nicht. Es gibt jedoch eine Sache in dem WordPress Hostingpaket, die Sie definitiv haben möchten!

SSD (Solid State Drive) ist eine relativ neue Speicherungsform, die eher wie ein Flash-Speicher-Stick funktioniert als eine rotierende Aluminiumscheibe, die in den traditionellen Festplatten (HDD) genutzt wird. Aufgrund dieses Designs ist SSD viel, viel schneller als HDD und dieser Unterschied ist relevant für die Geschwindigkeit Ihrer Website.

Um ganz deutlich zu sein – es gibt keinen besonderen Vorteil, wenn man SSD spezifisch mit WordPress nutzt (so wie Ionos’ Website das vermitteln könnte) – aber es hilft dabei, Ihre Website schneller zu machen, ganz egal welches Content Management System Sie verwenden.

Zusammenfassend: Wenn Sie eine oder zwei Websites benötigen und sich bereits für WP entschieden haben, dann sollten Sie WordPress Hosting nehmen und das passende Paket auswählen für die Anzahl der benötigten Websites. Der Geschwindigkeitsvorteil von SSD lohnt sich.

Wenn Sie eine andere Site-Engine verwenden möchten oder wenn Sie auf einem einzigen Hosting-Konto Dutzende WP Websites erstellen müssen, dann sind die Webhosting Pakete wahrscheinlich die bessere Alternative.

Sie fragen sich vielleicht, wie es mit dem Website-Builder aussieht – das scheint einfacher zu sein, als zu lernen, wie man ein Content Management System bedient – man wählt eine Vorlage aus und fügt seinen eigenen Text ein, richtig?

Während man mit dem Website-Builder in gewisser Weise schneller zu einer vollständigen Website kommt, gibt es bei näherer Betrachtung viele Aspekte, die ihn weniger attraktiv machen:

  • Wenn Sie sich für WordPress entscheiden, haben Sie in so ziemlich jedem Bereich mehr Auswahlmöglichkeiten. Zwar ist die Anzahl der verfügbaren Vorlagen (über 400) bei dem Ionos Site-Builder ziemlich beeindruckend, aber die meisten Vorlagen sehen in Bezug auf Design und Funktionen veraltet aus, zumindest im Vergleich zu den modernen WordPress Themen (sogar die kostenlosen Themen wie Bento, von den hyper-fortgeschrittenen Themen wie Avada sprechen wir erst gar nicht).
  • Ebenso ist die Auswahl an Funktionen und Extras in dem Site-Builder nicht vergleichbar mit den 50,000+ Plug-Ins, die für WP verfügbar sind. Und das sind bloß die kostenlosen Plug-Ins! Da die Entwicklung von Website-Buildern nicht der Hauptfokus von Ionos ist (und wahrscheinlich auch nie sein wird), kann dieses Produkt in Bezug auf Leistung und Flexibilität einfach nicht mit spezialisierten Plattformen wie WordPress oder sogar WIX mithalten.
  • Wenn Sie den Ionos Site-Builder verwenden, sind Sie für so lange an diese Plattform gebunden, wie Ihre Website existiert – später zu einen anderen Content Management System zu wechseln, selbst zu den Open Source Systemen, ist nicht möglich. Das bedeutet konkret: Sollte Ionos später entscheiden Veränderungen vorzunehmen oder seine Preise zu erhöhen, haben Sie keine andere Alternative, als Ihre Website woanders komplett neu zu erstellen.

Im Gegensatz zu anderen Anbietern, wie z.B. Hostinger, erlaubt Ionos Ihnen nicht, den Website-Builder auszuprobieren, bevor Sie Ihn bezahlen. Daher müssen Sie mir hier einfach vertrauen: Er ist Ihr Geld nicht wert. Wenn man sich die obengenannten Argumente anschaut, verstehe ich nicht, warum irgendjemand den Ionos Site-Builder statt dem vollwertigen WordPress System wählen würde.

Ok, verstanden. Wie sieht es mit dem Online-Schnellstart aus? Tja, das ist im Wesentlichen eine vereinfachte Version des Website-Builders, der während der Anwendung noch zusätzliche Kaufoptionen bietet. Nachdem, was ich im vorherigen Paragraphen gesagt habe, wäre es widersprüchlich diesen nun zu empfehlen.

Ich gebe zu, das war eine etwas längere Erklärung. Und wir sind noch nicht am Ende, denn wie versprochen werden wir uns auch die Ionos Produkte für fortgeschrittene Nutzer anschauen! Also los, einmal aufstehen und dehnen, machen Sie sich einen Kaffee und kommen Sie zurück für den zweiten Teil der Review. Falls Sie schon alles gesehen haben, was Sie brauchen, können Sie auch diesen Textlink nutzen, um zum nächsten Bereich zu gelangen, in dem die Vor- und Nachteile von 1&1 Ionos zusammengefasst werden.
..
..

Wenn Sie mit dem Erstellen von Websites und Webanwendungen Ihr Geld verdienen (z.B. als Freelancer, Entwickler oder Online-Unternehmer) – dann benötigen Sie wahrscheinlich mehr Leistung und Individualisierbarkeit als das einfache Shared Hosting. Das bedeutet, dass Sie aus den folgenden Ionos Angeboten wählen können:

  • Virtual Private Server (VPS), oder vServer, bietet dedizierte Ressourcen und Root-Zugriff, sodass Sie alle Details genauso konfigurieren können, wie Sie möchten. Hier kommen alle Vorteile des internationalen Giganten Ionos zum Vorschein: solide Infrastruktur und integrierte Sicherheit, 100% SSD Speicher und 24/7 personalisierter Kundenservice sorgen für ein ziemlich attraktives Angebot. Als zusätzliches Angebot können Sie für eine optimale Leistung zwischen Rechenzentren in Europa, Großbritannien oder den USA wählen.
  • Cloud Hosting gibt es bei Ionos in verschiedenen Ausführungen, was etwas verwirrend sein kann, bis Sie feststellen, dass die Cloud Hosting Angebote genau dasselbe sind wie IONOS Cloud, plus zusätzliche kostenlose Domains. In jedem Fall sehen die Spezifikationen gut aus, bis Sie die Angebote mit Firmen vergleichen, die sich auf Cloud Hosting spezialisieren: sehr ähnliche Angebote kosten deutlich weniger bei Digital Ocean, die über mehr Rechenzentren verfügen und professionellen Nutzern weitaus mehr Funktionen bieten.
  • Dedicated Hosting, geeignet für die anspruchsvollsten Projekte, ist ein weiteres Beispiel für ein Produkt, das den Wettbewerbsvorteil und die schiere Größe von Ionos in vollstem Umfang ausnutzt. Wenn Sie dedizierte Hardware benötigen, gibt es keinen Grund nicht eines von Ionos’ Paketen zu wählen (und wenn Sie sich nicht sicher sind, ob sie diese brauchen, dann brauchen Sie sie wahrscheinlich nicht; ein VPS ist dann sehr wahrscheinlich die bessere Lösung).

Lassen Sie uns kurz zusammenfassen, was wir bisher besprochen haben: Wenn Sie ein leistungsfähiges und flexibles Hosting benötigen, dann ist der Ionos vServer genau richtig für Sie. Es gibt hier sehr gute Angebote, die die modernste Infrastruktur und internationale Reichweite voll ausnutzen.

Ich wiederhole noch einmal – die anderen Hosting-Typen lohnen sich in der Regel nur, wenn Sie wissen, dass Sie insbesondere Cloud oder Dedicated benötigen.

Bei Cloud empfehle ich, dass Sie den Branchenführer statt Ionos wählen, denn Cloud Hosting ist das Aushängeschild von Digital Ocean und sie investieren daher sehr viel Zeit und Geld in die Weiterentwicklung und Verbesserung der Angebote. Aus diesem Grund können Sie eine bessere Cloud Qualität zu günstigeren Preisen anbieten.

Für Dedicated Hosting ist Ionos die richtige Wahl, denn der Fokus des Unternehmens liegt auf Hardware Qualität und Sicherheit.

So, die Logik hinter dem Produktangebot scheint nur klarer geworden zu sein. Im nächsten Kapitel teilen wir unseren allgemeinen Eindruck von 1&1 Ionos, bevor wir die Vor- und Nachteile zusammenfassen und unser finales Urteil fällen.

Unsere Erfahrung mit Ionos

Abgesehen von den Funktionen und Spezifikationen ist der Kundenservice ein wichtiger Bestanteil eines jeden Hosting-Angebots. Ganz egal welchen Kenntnisstand Sie haben, früher oder später werden Sie Fragen haben, sei es zu dummen Anfängerfehlern oder Dingen, die am anderen Ende nicht funktionieren.

Unser Eindruck ist, dass Ionos den Kundenservice sehr ernst nimmt. Das zeigt sich an dem neu eingeführten Konzept des Persönlichen Kundenberaters – ein Unternehmensvertreter, der als Ihr primärer Ansprechpartner fungiert und Ihre Situation besser kennt als ein beliebiger Service-Mitarbeiter.

Die Sache mit dem persönlichen Berater funktioniert wie folgt: Sobald Sie ein Konto bei Ionos anmelden, können Sie diese Funktion in Ihrem Hosting Admin Panel „aktivieren“. Sobald Sie auf den Aktivierungs-Button klicken, sehen Sie den Namen und die Telefondurchwahl Ihres direkten Kontakts bei Ionos.

Man könnte meinen, dass ein Unternehmen mit ein paar Millionen Kunden so einen Service unmöglich stemmen kann, aber lassen Sie uns das einmal kurz durchrechnen:

Ionos gibt an, insgesamt mehr als 8 Millionen Kunden und 7000 Mitarbeiter zu haben. Wenn wir nun annehmen, dass nur die Hälfte der Mitarbeiter im Kundenservice arbeiten und wir weiter annehmen, dass jeder Kunde 3 Anfragen pro Jahr stellt, dann kommen wir auf 25 Kundenanfragen pro Kundenberater pro Tag, oder 3 pro Stunde – das ist machbar.

Natürlich kann dennoch nicht sichergestellt werden, dass Sie immer mit Ihrem persönlichen Kundenberater sprechen, wenn Sie Ionos kontaktieren (ganz abgesehen davon, dass sich Server auch abends oder nachts danebenbenehmen können) – aber es ist dennoch eine nette Geste und ein löblicher Versuch – insbesondere in einer Industrie, die beim Thema Kundenservice normalerweise in die andere Richtung schaut (und z.B. versucht die menschliche Interaktion so weit wie möglich zu reduzieren).

Auf der anderen Seite bietet Ionos keine Live Chat Option, wie z.B. GoDaddy, was wirklich schade ist, denn manchmal kann es eine wirkliche Zeitersparnis sein, wenn man jemandem in Echtzeit schreiben kann. Wir haben das Gefühl, dass ein Chat (oder ein Hybrid Chat-Email-System) ein wertvoller Zusatz für Ionos’ starken Kundenservice sein würde (auch wenn man meistens nicht mit seinem persönlichen Berater chatten würde).

Abgesehen von dem persönlichen Kundensupport hat Ionos sichergestellt, dass so viele Standardfragen wie möglich in den geschriebenen Leitfäden beantwortet werden. Tatsächlich haben sie das Thema so ernst genommen, dass sie drei voneinander getrennte Umgebungen hierfür geschaffen haben: Die Community, eine Sammlung an allgemeinen Hosting bezogenen Artikeln, den Startup Guide für neue Unternehmen, sowie den Digital Guide, der eine größere Auswahl an Themen abdeckt, von Website promoten bis hin zu digitalen Gesetzen und Regularien.

Sind diese Ressourcen wirklich hilfreich? Absolut! Warum hat Ionos drei verschiedene Ressourcensammlungen geschaffen, statt ein großes Archiv mit nützlichen Materialien? Keine Ahnung.

Da dies nicht das erste Mal ist, dass wir etwas in dieser Art beobachten (denken Sie an die Vielzahl an neu-verpackten Site Buildern und Cloud Hosting Optionen), ist es vielleicht einfach etwas, was Ionos macht – sich aufblasen wie ein Alpha-Männchen, um groß auszusehen und ernst genommen zu werden.

Und obwohl dies für ein multinationales Unternehmen mit Millionen von Kunden wohl ein komplett normaler Drang ist (und die meisten anderen Hosting-Anbieter dies ebenfalls tun), finde ich, dass es in unserer heutigen Zeit um einiges cooler ist, schlank und einfach zu sein. Aber das ist nur eine persönliche Meinung.

Ich schweife ab!

Sie haben vielleicht schon gemerkt, dass Ionos sogar eine Mobile App hat, mit der Sie Ihren Hosting Account von jedem Android oder iOS Gerät verwalten können:

Und es ist sogar eine ziemlich anständige App – Sie können überprüfen, ob Ihr Server einwandfrei funktioniert, nach Hilfe fragen, Rechnungen ansehen, Ihre Kontoinformationen ändern und sogar automatische Ratschläge erhalten, um Ihre Website zu verbessern.

Allerdings bin ich mir nicht sicher, ob die App wirklich von großer Relevanz ist – wenn Sie sich nicht primär mit der Verwaltung von Websites beschäftigen, werden Sie das Hosting Panel nicht besonders häufig nutzen. Wenn Sie sich auf der anderen Seite hauptsächlich mit Websites beschäftigen, dann sind Sie eh die meiste Zeit mit Ihrem primären Gerät online und brauchen nicht unbedingt eine App.

Vielleicht bin ich hier aber auch ein bisschen old-school, wer weiß. Eine Hosting Panel App würde ich jedoch nicht nutzen, denn ich bin voll und ganz zufrieden mit dem Online Hosting Panel.

Vor- und Nachteile von 1&1 Ionos

So, nachdem wir Ionos aus verschiedenen Perspektiven betrachtet haben, wird es nun Zeit, die Vor- und Nachteile zusammenzufassen. Wir werden hierbei nicht auf die offensichtlichen Dinge eingehen, sondern uns auf die wirklichen Unterschiede zu anderen Hosting-Anbietern konzentrieren:

  • Modernste Hardware: mehr als 90,000 leistungsstarke Server in 10 Rechenzentren in Europa und den USA. Installiert und verwaltet bei Ionos, kein Outsourcing.
  • Hohe Sicherheitsstandards und Softwareebenen. Alle EU Rechenzentren von 1&1 Ionos haben ISO 27001:2013 Zertifikate.
  • Nahezu 100% Verfügbarkeit für Ihre Website dank der geographisch redundanten Architektur, sowie hohe Geschwindigkeiten aufgrund der 360 Gbit/s Rechenzentrum Verbindung.
  • Flexibles Skalierungssystem für Serverleistung: Sie können mit einem Klick mehr Rechenleistung oder Speicher hinzufügen und noch am selben Tag die Rechnung erhalten. Wenn Sie später das Gefühl haben, dass Sie die zusätzlichen Ressourcen nicht mehr benötigen, ist auch die Herabstufung erstaunlich einfach.
  • Bestes Preis/Leistungs-Verhältnis auf dem Markt für WordPress Hosting Angebote mit schnellem SSD Datenspeicher.
  • Jeder Ionos Kunde bekommt einen persönlichen Kundenberater für Fragen und mögliche Probleme. Auch wenn die Qualität des Kundenservice weiter verbessert werden kann, ist das definitiv ein positiver Ansatz für große internationale Hosting-Anbieter.
  • SSL (Secure Socket Layer) Zertifikat als fester Bestandteil jedes Hosting-Angebots, damit Ihre Website durch die Verschlüsselung von Traffic sicherer für Ihre Besucher wird. Seiten mit SSL nutzen das https:// Handle vor ihrer Adresse und zeigen ein freundliches grünes Schloss in der Browser-Adresszeile.
  • Ein eingebautes CDN (Content Delivery Network) bei einigen Hosting-Angeboten: Ihre Website wird automatisch zwischen verschiedenen Rechenzentren in unterschiedlichen Teilen der Welt verteilt. Dadurch wird die Ladegeschwindigkeit der Seite maximiert, ganz egal wo sich Ihre Besucher befinden.
  • Der Ionos Site Builder sieht zwar moderner aus als vergleichbare Angebote anderer Hosting Firmen, bleibt aber dennoch weit hinter den kostenlosen Content Buildern zurück, die für WordPress und andere beliebte Site-Engines verfügbar sind.
  • Ionos’ kundenspezifische Systemsteuerung sieht gut aus und funktioniert einwandfrei, ist aber immer noch nicht vergleichbar mit cPanel oder Plesk. Wenn Sie also bereits mit einer dieser beliebten Hosting Systemsteuerungen gearbeitet haben, müssen Sie sich an ein komplett neues System gewöhnen.
  • Der Prozess einen neuen Account zu erstellen könnte einfacher gestaltet werden, insbesondere das Formular mit den persönlichen Daten, das hauptsächlich aus freien Textflächen besteht wie Postleitzahl und Adresse. Die Informationen werden erst validiert, wenn man versucht, das Formular einzureichen.
  • Ein Live Chat wäre ein willkommener Zusatz beim Kundenservice, auch wenn man meistens nicht mit dem persönlichen Berater sprechen würde, den man zugeteilt bekommen hat.
  • Das Produktangebot erscheint im Moment aufgebläht und es gibt fast identische Angebote, die als unterschiedliche Produkte angeboten werden, zum Beispiel Website Builder vs Website Starter Kit, oder Cloud Hosting vs Ionos Cloud.

Puh, das waren ganz schön viele Informationen! Was ist nun also das Fazit? Ist der 30-jährige Hosting-Anbieter seinen Wettbewerbern immer noch einen Schritt voraus? Oder geben Sie Ihr Geld besser woanders aus?

Unser Urteil zu Ionos + Diskussion

Wie Sie vielleicht gemerkt haben, haben wir nicht versucht 1&1 Ionos als Ganzes zu evaluieren. Und das war eine bewusste Entscheidung: Wenn ein Unternehmen so groß wird, gibt es automatisch einige wirklich starke Produkte und einige Angebote, die nur als Lückenfüller im Portfolio agieren.

Wir könnten natürlich sagen, dass Ionos ein respektabler internationaler Hosting-Gigant mit erstklassiger Infrastruktur und fantastischem Service ist, und dass er wahrscheinlich für weitere 30 Jahre (und länger) zuverlässige Services anbieten wird…

aber so eine oberflächliche Beschreibung, wenn auch wahr, würde Ihnen nicht wirklich bei der Entscheidung helfen, ob Sie Ihr Geld bei Ionos ausgeben sollten oder besser woanders. Da jeder daran interessiert ist, ein ganz spezifisches Problem zu lösen, müssen wir genauer hinschauen.

Das vorausgeschickt, sind hier die wesentlichen Punkte aus unserer detaillierten Analyse:

  • Wenn Sie eine relativ einfache Website (1-50 Seiten) für den persönlichen Gebrauch oder als kleine/mittlere Firma erstellen möchten, dann ist das WordPress Hosting Angebot von Ionos die beste Lösung mit dem schnellen SSD Speicher und anderen Optimierungen, die zu einer höheren Ladegeschwindigkeit und daher zu zufriedenen Besuchern führen.
  • Wenn Sie viel mit Websites und Web Apps arbeiten (z.B. als Freelancer oder Teil eines Entwicklerteams), dann wählen Sie eines von Ionos VPS Paketen. Diese nutzen erfolgreich alle Vorteile dieses kapitalkräftigen multinationalen Hosting-Anbieters.
  • Die Fülle an Cloud-Diensten wirkt bei Ionos eher wie der Versuch etwas aufzuholen, als ein Kernprodukt, daher sollten Sie stattdessen Digital Ocean Hosting in Erwägung ziehen – zumindest zurzeit ist DO Ionos weit voraus in Bezug auf Funktionen und Preis/Leistungs-Verhältnis.

Sie sind immer noch verwirrt und wissen nicht genau, welches Ionos Produkt am geeignetsten für Ihr Projekt ist? Sie wissen, was Sie zu tun haben! Scrollen Sie einfach nach unten zu den Kommentaren und erzählen Sie uns, was Ihnen auf dem Herzen liegt. Persönliche Meinungen und reale Erfahrungen mit Ionos sind natürlich auch sehr willkommen. Lassen Sie uns diskutieren!

Ionos (1&1) Review 2025: Is the Largest European Hosting Provider Worth Your Money?

Ionos? No, that’s not some remote Greek island – it’s the new name of 1&1 (also spelled 1and1), one of the biggest hosting providers in the world. As the company celebrates its 30th birthday with a /slightly/ funky rebranding, we will take our time to thoroughly examine 1&1 Ionos from a customer’s perspective and answer the following question:

Should you choose Ionos to host your websites, domains, and other online assets – or are there better alternatives?

Apart from that, by the end of this review you will get a clearer picture of 1&1’s product range, allowing you to make a better choice if you do decide to become their client. In other words, you will learn..

  • 👍What is the best hosting plan for new Ionos clients?
  • 🔧Which extras are worth using and which aren’t?
  • 💳Are there any hidden fees you should know about?
  • 💬How good is 1&1 support and personal consultants?

We will also solve some of the “mysteries” which might have left you puzzled after exploring the Ionos website. For example, what’s the difference between “WordPress Hosting” and a simple “Web Hosting” where you can also install WordPress. But first, a summary for those who are in a hurry:

TLDR;

1&1 Ionos is a relatively unremarkable hosting company when it comes to product range, pricing, or support – complicated offerings, prices that can change in subsequent billing cycles, client service that near-impossible to get through.

If you’re after value-for-money hosting, we recommend other options, like Warpgate (for non-professionals) and Digital Ocean (for developers).

You can use Warpgate for 30 days free of charge, without entering any credit card details – it takes just a couple of seconds to create a new WordPress website using their official Warp Wizard:

Get 30 days free at Warpgate ›

Want to know more details about Ionos and understand exactly why we don’t recommend getting a hosting account with this provider? Read on in our detailed review:

The 30-Year Journey of 1&1

Before we go on to evaluate Ionos, let’s take a short trip in a time machine to understand the origins and background of 1&1 –

With more than three decades under its belt, Ionos can be considered a true mastodon of the online services industry. Let’s admit it: even just surviving for that long in such a rapidly changing market is an achievement in itself, let alone growing into one of the largest global players.

From its humble beginnings in 1988 as an online ad seller called 1&1 EDV Marketing, the company has made many strategic switches over the years, eventually expanding on the international arena and focusing almost entirely on web hosting services.

Just by briefly examining the official website, one can make a good guess about the origins of the company: true to its German roots, 1&1 Ionos pays a great deal of attention to transparency, privacy, and quality. There are hardly any footnotes or extra-fine print – all details are made clear right where you’d expect to see that information.

The sheer range of available services might get overwhelming, though: there’s web hosting, cloud hosting, dedicated hosting, “online starter kits”, website builders, HiDrive storage, Kubernetes as a service.. Say what?!

In order to not go into stupor over this abundance of options, let’s take a step back and agree on the major user categories we’re interested in: a private person, a small/medium business, and a developer/freelancer. In the next chapters of this guide we will discuss which Ionos services are most suitable for each of these use cases.

You might have noticed we didn’t mention large businesses among our user groups, and that’s intentional – if you are a big, established enterprise, you probably know what you want or can afford to hire expensive consultants to tell you what you want. In any case, discussing this segment is unlikely to add value to this humble review :)

Choosing a Hosting Plan at Ionos, Based on Your Needs

If you’re making a website for yourself (your uncle, your friend, etc) or for your moderately sized business, there are basically two product ranges for you at 1&1 Ionos: the standard shared hosting (they call it simply “Web Hosting”) as well as WordPress Hosting.

This division might seem a bit artificial, because it’s also quite easy to install WordPress (below also WP) on their shared hosting – there’s even an automated system for doing just that included with any Web Hosting package.

To help you (and ourselves) figure this out, we have put together a table of the most important differences between the Web Hosting and WordPress Hosting product lines at Ionos:

Web Hosting WordPress Hosting
File storage HDD (slower) SSD (faster)
Number of websites No restrictions Limited per account
Automatic WP updates Need to set up yourself Included
WP auto-installer Basic Advanced
Pricing after the 12-month promo period Slightly less expensive Slightly more expensive

It’s worth stressing that these are the only real differences we could identify. In other words, we did not include any features that are mentioned as advantages on their WP hosting promo page but which are actually also available for Web Hosting packages.

Can you set up automatic updates on your own? Of course. Do you really need an advanced auto-installer which adds extra plugins and themes right away? Probably not. There’s one thing in the WordPress Hosting packages that you do want, though!

SSD (Solid State Drive) is a relatively new type of storage which works like a flash memory stick rather than a rotating aluminium disk used in the traditional hard drives (HDD). Thanks to its design SSD is way, way faster than HDD, and this difference matters quite a lot for your website speed.

To be clear – there’s no particular advantage to using SSD specifically with WordPress, as Ionos’ website might lead to believe – but it does help to make your website faster, regardless of which content management system you are using.

To sum up, if you need one or two websites and have already considered using WP, go for the WordPress Hosting, choosing the package according to how many websites you need. The speed advantage of SSD is worth it.

If you’re planning to use another site engine or if you need to spin up dozens of WP websites on a single hosting account, the Web Hosting packages might be a better alternative.

What about their website builder, you might ask – seems easier than learning to use a content management system – just choose a template and replace the text with your own, right?

While it does offer a somewhat faster way to a completed website, there are a couple of things that make it less attractive if you think about it:

  • If you go with WordPress, your choice will be much, much wider in just about every aspect. While the number of available templates (over 400) in the Ionos Site Builder is quite impressive, most of them look dated in terms of both design and features, at least in comparison to most of the modern WordPress themes (even the free ones like Bento, we’re not even talking about hyper-advanced paid themes like Avada).
  • On the same note, the choice of features and extras in the Site Builder is incomparable with the 50,000+ plugins available for WP. And those are only the free ones! Since developing website builders is not the main focus of Ionos (and probably never will be), this product is just unable to compete with specialized platforms like WordPress or even Wix in terms of power and flexibility.
  • If you’re using Ionos Site Builder, you are bound to that platform for as long as your website exists – there’s no option of migrating to another content management system later on, even the open-source ones. This means that if Ionos decides to change something later on or increase prices, you won’t have any alternatives other than completely re-creating your website from scratch somewhere else.

Unlike other providers like e.g. Hostinger, Ionos does not allow you to actually try the website builder before you pay for it, so you’ll have to just trust me on this one: it’s not worth your time. Taking into account the above arguments, I don’t see why anyone would choose the Ionos proprietary site builder over a full-fledged WordPress.

Alright, alright. What about the Website Starter Kit? Well, it’s essentially a simplified version of the website builder which tries to make additional upsells along the way. After what I’ve stated in the previous paragraph it would be inconsistent to recommend this one.

This was a long explainer, I agree. And it’s still not over, because we promised to also look at Ionos products for more advanced users! So go stretch, grab a coffee maybe, and come back for the second part. Or, if you’ve seen everything you need already, you can use this in-text link to scroll down to the next section which summarizes the pros and cons of 1&1 Ionos.
..
..

If websites and web applications is what you do for a living (i.e. you’re a freelancer, a developer, an online entrepreneur, etc) – you might need something more powerful and customizable than simple shared hosting. Which means you have the following Ionos offers to choose from:

  • Virtual Private Server (VPS), or vServer, offering dedicated resources and root-level access so that you can configure each detail exactly as you need. Here’s where all the advantages of Ionos as an international giant really shine: solid infrastructure and built-in security, 100% SSD storage, as well as 24/7 personalized support make for a fairly attractive package. As an added bonus, you can choose between European, UK, and US data centers for optimal performance.
  • Cloud Hosting comes in various flavours at Ionos, which can be rather confusing until you realize that the Cloud Hosting offers are exactly the same as IONOS Cloud, plus free domains on top. In any case, the specs look good until you start comparing the offers with companies which actually specialize on cloud hosting: very similar plans cost significantly less at Digital Ocean, which has more data centers and arguably more features for professional users.
  • Dedicated Servers, suitable for the most demanding projects, is another example of a product which uses the competitive advantages and the sheer scale of Ionos to the fullest extent. If you’re sure you need dedicated hardware, there’s no reason not to choose one of Ionos’ packages (also, if you’re not sure, then probably you don’t; a VPS might be a more suitable solution).

By the way, if you’re still a bit confused about the differences between shared, VPS, cloud, and dedicated – or just want to refresh your memory, there’s a summary table in our in-depth guide on choosing hosting in the Satori Webmaster Academy.

Let’s summarize what we’ve discussed above: if you just need a more powerful and flexible hosting, go for Ionos vServer, they have very decent offers which fully take advantage of the state-of-the-art infrastructure and international scale.

To reiterate – the other hosting types are usually worth considering only if you know that you specifically need cloud or dedicated.

Regarding the first one, I’d recommend going with the industry leader rather than Ionos, because cloud hosting is Digital Ocean’s flagship product and they clearly invest more time and money into continuously improving it. For the same reason, they are able to offer superior cloud quality for lower prices.

As for dedicated hosting, Ionos is a perfectly fine choice, considering their focus on hardware quality and security.

Alright, the logic behind their product range seems clearer now. In the next chapter we will share our overall impressions from using 1&1 Ionos, before wrapping up with pros and cons as well as the final verdict.

Our Impressions Of Ionos

Apart from features and specs, customer support is a vital part of any hosting offer. Regardless of your proficiency level, you will have questions sooner or later, be it silly rookie mistakes or something not working fine on their end.

From what we’ve seen, Ionos does take support seriously, judging by their move towards the concept of a personal consultant – a company representative who acts as your primary point of contact with the hosting, and knows your situation in more detail than a random support officer.

The personal consultant thing works like this: once you register an account at Ionos, you are able to “activate” this feature from your hosting admin panel. Once you click the activation button, you will see the name and the direct phone number of your direct contact at Ionos.

One might think that a company with several million clients is just physically unable to pull this off, but let’s do a quick calculation:

Ionos claims to have over 8 million clients and 7000 employees in total. Even if just half of them work in the client support function, and assuming each client makes 3 support requests per year, every year, we arrive at an estimate of 25 support requests per specialist per day, or 3 per hour – quite manageable.

Having said that, of course it’s still not possible to ensure you’ll always be talking to your manager when you contact Ionos (not even mentioning that servers can also misbehave in the evening or at night, for example) – but it’s a nice touch and a laudable attempt nevertheless – especially in an industry which mostly looks the opposite way when it comes to support (i.e. trying to get rid of human interaction as much as possible).

On the other hand, there’s no live chat option at Ionos like e.g. at GoDaddy, which is a pity because being able to write in real time, to a real person, can sometimes be a real time-saver. We feel like a chat (or a hybrid chat-email system) would be a welcome addition to Ionos’ already strong support offer, even if you won’t be chatting with your personal consultant most of the time.

Apart from tete-a-tete support, Ionos has made sure that as many standard questions as possible are covered by its written guides. In fact, they took it so seriously that they’ve created three separate environments for that: the Community, which is a collection of general hosting-related articles, the Startup Guide specifically for new businesses, as well as the Digital Guide which covers a wider range of topics from promoting your website to digital laws and regulations.

Are those really useful? Absolutely. Why did Ionos need three separate knowledge bases instead of a single massive archive of useful materials? Beats me.

Since it’s not the first time we’re observing something like that (remember the multitude of re-packaged site builders and cloud hosting?), maybe it’s just what Ionos likes to do – puffing up like an alpha-male pigeon to look big and serious.

While it’s a perfectly reasonable compulsion for a multinational company with millions of clients (and most other large hosting providers do that too, of course), I still feel like in this day and age, focussing on being lean and easy to use is even cooler. Just a personal opinion.

But I digress!

You might have noticed that Ionos even has a mobile app which allows managing your hosting account from any Android or iOS device:

And it’s a pretty decent app, by any standard – you can use it to check if everything’s alright with your server, ask for support, view invoices, change your account details, and even get automated advice for improving your website.

With that being said, it still doesn’t feel like a very essential component – I mean, if managing a website is not your primary occupation, you won’t be using the hosting admin panel too often in any form. If, on the other hand, most of your work revolves around websites, you are already online most of the time from your primary device.

Or maybe it’s just me being old-school, who knows. In any case – a hosting panel app is not something I would download on my phone, because I’m totally fine with the online hosting panel.

Pros and Cons of 1&1 Ionos

Alright, now that we’ve examined Ionos from various perspectives, it’s time to summarize its advantages and weaker points. We will not mention the obvious things and only focus on the real differences compared to other hosting providers:

  • State-of-the-art hardware: over 90,000 powerful servers in 10 data centers in Europe and the US. Installed and managed by Ionos, no outsourcing.
  • High security standards on both hardware and software levels. All EU data centers of 1&1 Ionos have ISO 27001:2013 certificates.
  • Close to 100% availability for your website thanks to geographically redundant architecture, as well as high speeds thanks to 360 Gbit/s data center connectivity.
  • Flexible scaling system for server performance: you can add more processing power or memory in a click and get billed by the day. If you afterwards feel that the extra resources are not needed anymore, downgrading is also surprisingly easy.
  • Some of the best value for money WordPress hosting packages with fast SSD file storage you can get anywhere on the web right now.
  • Each Ionos client gets a personal assistant to help with any questions and issues. While the quality of support can still be improved, this is definitely a positive approach for a large international hosting provider.
  • SSL (Secure Socket Layer) certificate included with each hosting plan, allowing you to make your website safer for visitors by encrypting traffic. Sites with SSL use the https:// handle in front of their addresses and display a friendly green lock in the browser address bar.
  • A built-in CDN (Content Delivery Network) with some hosting plans: your website automatically gets distributed between several data centers in different parts of the world, thus maximizing page load speed regardless of where your visitors are physically located.
  • While their site builder looks more modern than other similar offers by hosting companies, it’s still far behind even the free content builders available for WordPress or other popular site engines.
  • Ionos’ custom-built hosting control panel looks clean and works smoothly enough, but it’s still not cPanel or Plesk, so if you’ve already dealt with any of the popular hosting admins, you’ll need to get used to a completely new one.
  • The process of creating a new account could be made smoother, especially the personal details form which consists mostly of free-form text fields like postal index and street address which only get validated after you try to submit the form.
  • Live chat could arguably be a welcome addition to the support options, even if you wouldn’t be talking to your personal consultant most of the time.
  • The product range seems bloated at the moment, with some near-identical offers re-packaged as different products, for example Website Builder vs Website Starter Kit, or Cloud Hosting vs Ionos Cloud.

Whew, that’s a lot to take in! So what’s the bottom line? Is the 30-year-old hosting provider still on top of its game – or is your money better spent elsewhere?

Our Verdict on Ionos + Discussion

As you might have noticed, we haven’t tried to evaluate 1&1 Ionos as a whole so far. And that’s a conscious choice: when a company gets as large as that, there will inevitably be some really strong products as well as some offers which are meant to just pluck holes in the product portfolio.

So we could, of course, say that Ionos is a respectable international hosting giant which top-notch infrastructure and support, and that it will probably keep offering reliable services for another 30 years (and probably 30 more)..

..but such superficial characteristic, albeit true, would not help you much in deciding whether to spend your actual money at Ionos or take it elsewhere. Because everyone is interested in solving their specific problem, hence the need to look deeper.

With that in mind, here are the main takeaways from the more detailed analysis above:

  • If you want to build a relatively simple website (1-50 pages) for personal use or as a small/medium organization, you’d better off creating a WordPress website with the likes of Warpgate – faster, easier, and at a lower cost.
  • If your work is tightly connected with websites and web apps (e.g. you’re a freelancer or a part of a developer team), go for one of Ionos VPS packages. These successfully leverage all the strong sides of this well-capitalized multinational hosting provider.
  • The plethora of cloud services at Ionos seems more like a catching-up attempt on their part than a flagship product, so you might consider Digital Ocean hosting instead – at least for the time being, DO is way ahead in terms of both features and value for money.

Still perplexed? Not sure if one of Ionos products is a good fit with your project? You know what to do! Just scroll down to the comments section below and tell us what’s bothering you. Personal opinions and real-life experiences with Ionos are also very welcome, of course. Let’s discuss!

Cara Membuat Blog di 2025: Jadi Blogger dalam Waktu 30 Menit (dan Mungkin Menghasilkan Uang)

Jadi, Anda punya sesuatu yang ingin dibagikan. Atau mungkin bos Anda yang punya ide 🤷

Apa pun alasannya, Anda sudah lelah dengan “aturan main” algoritma media sosial dan batasan yang mereka tetapkan. Yang Anda butuhkan adalah ruang online yang sebenarnya

🎛️ Kendali penuh atas konten dan desain
📍 Alamat unik milik Anda
😎 Bikin orang berpikir: “Oke, dia tahu apa yang dia lakukan”

…Nah, sekarang Anda bisa menutup tab Google Search dengan tenang – karena Anda sudah sampai di tempat yang tepat.

Ya, tutup saja. Bagus.

Buat blog Anda dan jadi independen dari platform

Ngomong-ngomong, panduan ini akan memandu Anda melalui semua langkah untuk mulai ngeblog, selangkah demi selangkah – dari memilih nama sampai menekan tombol “Publikasikan” untuk postingan pertama Anda.

Dan yang paling keren? Anda bisa membangun blog seperti itu dalam waktu kurang dari setengah jam – bahkan jika belum pernah menyentuh kode sekalipun.

Siap meluncurkan blog Anda sekarang, dan siapa tahu bisa membiayai kebiasaan ngopi Anda? 🤑

Yuk mulai:

Mulai di Sini: Apa yang Akan Anda Dapatkan dari Panduan Ini

Biar jelas dulu: ini bukan cerita samar-samar “bikin blog dalam 3 klik” – juga bukan kursus 97 bab yang butuh 6 minggu untuk diselesaikan.

Ini adalah jalur cepat Anda. Kita akan pakai alat yang sederhana tapi ampuh, melewati detail yang tidak perlu, dan fokus hanya pada hal-hal yang benar-benar penting:

  • Pilih nama domain keren yang tidak terdengar seperti penipuan atau salah ketik
  • Siapkan hosting yang lancar dipakai dan tidak bikin kantong jebol
  • Instal WordPress dengan cara termudah – tanpa drama FTP
  • Kustomisasi blog dengan tema dan plugin yang layak dipakai
  • Amankan dan buat backup tanpa mengeluarkan biaya
  • Mulai menerbitkan postingan yang enak dibaca dan enak dilihat
  • Dan kalau mau: ubah blog jadi mesin penghasil uang (tambahan) 💸

Anda tidak perlu jadi developer;
Anda tidak perlu keluar Rp6 juta-an untuk kursus blogging;
Anda hanya perlu browser, sedikit anggaran – dan 30 menit fokus.

Oke? Kalau begitu, mari kita jawab dulu satu pertanyaan penting:

Gratis vs Berbayar: Apa Kekurangannya?

Tentu saja, Anda bisa memulai blog secara gratis. Dan kalau tujuannya hanya untuk membuat semacam buku harian digital berisi foto kucing atau cerita liburan – silakan saja.

Tapi kalau Anda bahkan sedikit saja serius soal menulis untuk audiens yang sebenarnya, mengembangkan situs, atau (nantinya) menghasilkan uang dari blog, inilah kenyataannya:

  • Blog gratis selalu ada “syarat dan ketentuan” tersembunyi. Biasanya berupa alamat yang jelek (misalnya namakamu15.platform.com) dan iklan yang dipasang paksa – tapi penghasilannya tidak masuk ke kantong Anda.
  • Kustomisasi terbatas. Kebanyakan platform gratis mengunci Anda di tata letak dan desain yang mereka sediakan. Mau pasang plugin, ubah warna, atau tambahkan mailing list? Tidak bisa.
  • Kendali bukan di tangan Anda. Platform bisa mengubah aturan, menghapus fitur, bahkan menutup layanan kapan saja – dan audiens yang sudah susah payah Anda bangun bisa hilang begitu saja.

Ibaratnya, seperti membangun rumah di tanah milik orang lain. Awalnya memang praktis – tapi kalau mereka memutuskan untuk membangun tempat parkir, Anda akan diusir.

Buat blog dan bebaskan diri dari platform

Kalau Anda ingin blog berkembang, dianggap serius, dan tetap jadi milik Anda – mengeluarkan sedikit biaya di awal itu benar-benar sepadan.

Kabar baiknya? Kita akan jaga biaya setup tetap super-rendah:

…dengan nama domain asli, hosting asli, dan kepemilikan penuh – semuanya seharga satu pizza per bulan 🍕 (oke, mungkin pizza spesial).

Pertama-tama, blog Anda butuh rumah dan alamat. Mari kita urus itu dulu:

Langkah 1: Dapatkan Hosting dan Domain (dengan Plot Twist)

Nama domain 🌐 adalah alamat unik blog Anda di internet (contohnya blog.com), sedangkan web hosting 🖥️ adalah layanan yang menyimpan situs Anda dan membuatnya bisa diakses online 24/7 di alamat tersebut.

Kabar baiknya? Anda tidak perlu membeli keduanya secara terpisah – kebanyakan penyedia hosting modern sudah menyediakan paket bundling. Itulah yang akan kita gunakan di sini.

Kita mencari hosting yang:

  • Mudah digunakan, bahkan untuk pemula total
  • Cepat dan andal
  • Terjangkau tanpa terkesan murahan

Kita tidak akan mempersulit diri – kita akan menggunakan WordPress, platform blog gratis paling populer di dunia – dan salah satu dari tiga host yang direkomendasikan resmi oleh WordPress.org:

👌 Paket hosting termurah di Hostinger sudah lebih dari cukup untuk blog kita.

Kalau mau, Anda bisa pilih host berkualitas lain seperti Kinsta atau SiteGround – atau bahkan website builder drag-and-drop (lihat perbandingannya di sini).

* * *

Kita akan memakai sedikit trik psikologi supaya tidak mandek di awal:

…alih-alih mulai dari mencari nama domain (dan menghabiskan berjam-jam untuk menemukan yang “sempurna”!) kita langsung saja membuat versi pengembangan dari blog WordPress terlebih dahulu!

Anda bisa mulai memikirkan nama domain di belakang kepala, tapi jangan biarkan itu jadi penghalang 🚧 untuk benar-benar mulai membangun blog – percaya deh, kami sudah sering melihat orang terjebak di situ ;)

Sekarang, kita butuh tempat untuk mulai mengerjakan blog Anda. Kita akan pakai kode kupon supaya dapat harga terbaik di Hostinger.

Berikut panduan langkah demi langkahnya:

  1. Buka halaman penawaran hosting web Hostinger dan klik “Claim deal” (atau cukup gulir ke bawah untuk melihat paket harga):

    Dapatkan harga terbaik di Hostinger ›

    Kita akan pilih paket paling dasar karena sudah mencakup semua yang kita butuhkan untuk blog (namanya Premium, iya :)

  2. Di layar berikutnya, kami merekomendasikan 12 bulan sebagai keseimbangan terbaik antara harga dan komitmen – tapi tentu saja Anda bebas memilih periode penagihan lain:

    Buat blog langkah 1: hosting

    Ada satu hal lagi yang harus kita lakukan di halaman ini – dapatkan diskon tambahan 10%! Salin dan tempel kode kupon ini ke kolom yang tersedia di bawah perhitungan harga:

    TRUS10CODE
  3. Klik “Apply” dan Anda akan melihat harga akhir berkurang 10%. Kalau kupon ini tidak bekerja, coba SPECIAL15 untuk diskon 7% – dan beri tahu kami di kolom komentar!

    Buat blog langkah 1: kupon Hostinger terpasang

  4. Anda akan diminta membuat akun dan menyelesaikan pesanan. Selamat! Sekarang blog baru Anda sudah punya rumah 🏠

Setelah pembayaran selesai, Anda akan langsung dibawa ke wizard onboarding Hostinger untuk mengatur blog dan menginstal WordPress (nanti kita akan pandu langkah ini).

* * *

PENTING: Pada saat yang sama, mulailah memikirkan nama domain:

Anda bisa gunakan Blog Name Generator kami untuk membantu mencari ide nama domain .com yang keren untuk blog Anda –

– atau kalau ingin ekstensi regional seperti .id, .my, atau yang lebih spesifik seperti .org, cukup gunakan pencarian domain di Hostinger untuk cek ketersediaannya.

Pilih nama yang singkat, jelas, dan mudah diingat – lihat panduan domain kami untuk tips lainnya.

Luangkan waktu untuk menemukan nama domain yang pas di hati – kita akan mendaftarkannya di akhir, ketika Anda siap go live.

Untuk sekarang, lanjutkan mengerjakan blog Anda:

Langkah 2: Instal WordPress atau Mesin Blog Lain

Mari kita ikuti wizard onboarding Hostinger untuk menyiapkan blog WordPress Anda dalam waktu kurang dari 5 menit:

  1. Pertanyaan pertama bisa Anda lewati (tidak berpengaruh apa-apa) dan jawab “Create a website” untuk pertanyaan kedua:

    Buat blog 2025: Hostinger wizard 1

  2. Di langkah berikutnya, Anda akan diberi tiga pilihan: instal WordPress, gunakan website builder bawaan Hostinger, atau mulai dengan situs kosong berbasis PHP/HTML.
    Walaupun website builder mereka sudah cukup oke di 2025, kita akan pilih WordPress untuk kesederhanaan maksimal:

    Buat blog 2025: instal WordPress

  3. Selanjutnya, Anda akan diminta membuat kata sandi untuk area admin WordPress (perhatikan bahwa kata sandi bisa saja sudah dibuat otomatis – pastikan Anda mengganti dengan milik sendiri!). Anda juga bisa mengatur email dan bahasa jika mau:

    Buat blog 2025: setel password admin WordPress

  4. Berikutnya, Anda bisa memilih antara menggunakan situs siap pakai (lengkap dengan desain, konten dummy, dll), salah satu tema WordPress partner Hostinger (semuanya freemium), atau situs kosong.

    Kami sarankan memilih opsi situs kosong, karena ada ribuan tema gratis berkualitas di luar sana yang akan membuat blog Anda jauh lebih unik dibanding 10-an opsi template yang sama untuk jutaan orang:

    Buat blog 2025: instal WordPress kosong

  5. Lalu, Anda akan ditanya tentang nama domain – pilih saja “Use temporary domain” jika Anda masih memikirkannya; kita akan hubungkan domain final tepat sebelum peluncuran di langkah 4.
  6. Langkah berikutnya memungkinkan Anda memilih di salah satu dari 12 pusat data global Hostinger tempat blog akan disimpan.

    Semakin dekat server ke audiens utama Anda, semakin cepat situs akan dimuat (jadi jangan pilih Singapura kalau target utama pembaca Anda di AS!).

    Terakhir, klik “Install WordPress“.

  7. Setelah beberapa detik, instalasi WordPress selesai 🪄 yang berarti blog baru Anda sudah setengah jadi!

Sekarang, mari kita atur pengaturan pentingnya:

Langkah 3: Konfigurasi Blog Anda, dengan Cerdas

Sebelum kita masuk ke desain atau mulai menulis konten, luangkan beberapa menit untuk mengatur pengaturan dasar. Percayalah, sedikit penyesuaian sekarang akan menghemat berjam-jam kebingungan nanti.

Untuk masuk ke panel admin WordPress, Anda bisa klik “Edit Website” di dashboard Hostinger, atau langsung buka namablog.com/wp-admin lalu login dengan email dan password yang Anda buat sebelumnya.

Berikut yang perlu dilakukan terlebih dahulu:

  • Masuk ke Settings → General
    Pastikan Anda memperbarui Site Title dan Tagline. Keduanya akan muncul di tab browser dan kadang di hasil pencarian – jadi buatlah singkat dan jelas. Sekalian, cek kembali zona waktu dan format tanggal sesuai preferensi.
  • Lalu, buka Settings → Permalinks
    Pilih opsi Post name – ini akan membuat URL yang rapi dan mudah dibaca seperti namablog.com/post-pertama daripada namablog.com?p=123. Lebih enak untuk pembaca, lebih ramah untuk Google.
  • Masih semangat? Bagus – sekarang buka Settings → Discussion
    Gulir ke bagian Before a comment appears dan centang kotak “Comment must be manually approved”. Ini akan mencegah bot spam dan troll masuk ke kolom komentar blog Anda.
  • Bonus: buka Users → Profile
    Ubah display name Anda, supaya postingan tidak ditandatangani dengan nama “admin” – pilih sesuatu yang terdengar seperti nama asli.

Nanti Anda pasti akan menemukan dan menyesuaikan lebih banyak pengaturan seiring berjalannya waktu – tapi inilah minimum yang wajib untuk mulai tanpa harus menghabiskan seharian di menu konfigurasi.

Sekarang saatnya membuat blog ini benar-benar milik Anda – dengan tema yang tepat dan beberapa plugin penting:

Langkah 4: Pilih Desain dan Tambahkan Plugin Penting

Blog Anda sudah online. Sudah berfungsi. Tapi jujur saja – sekarang kemungkinan tampilannya seperti placeholder generik dari tahun 2008 🔲

Saatnya mengubah itu.

Di langkah ini, kita akan 🎨 memilih tema (yang menentukan tampilan blog Anda) dan memasang beberapa 🧩 plugin penting (yang menambah fitur ekstra pada blog).

Tenang saja – Anda bisa mengganti tema kapan saja tanpa merusak konten, dan sebagian besar plugin bisa dipasang/dihapus dalam waktu kurang dari 10 detik.

Langkah 4.1: Memilih Tema

Masuk ke menu Appearance → Themes di panel admin WordPress, lalu klik “Add New

Buat blog: pilih dari ribuan tema gratis di WordPress

Di sini Anda akan menemukan ribuan tema gratis – filter berdasarkan popularitas atau gunakan kolom pencarian untuk mempersempit pilihan.

  • Kalau mau tema serbaguna yang solid untuk memulai, kami tanpa malu merekomendasikan template gratis buatan kami sendiri: Bento ;)
  • Anda juga bisa mencoba tema multipurpose populer seperti Astra atau GeneratePress jika ingin lebih banyak opsi.
  • Untuk pengguna yang ingin fitur maksimal, tema premium seperti Divi bisa jadi pilihan – sudah termasuk desain profesional, banyak fitur bawaan, dan add-on seperti form, email marketing, dsb.

Ingat:

Pilih tema yang bersih dan ringan — Anda selalu bisa menambahkan sentuhan kreatif nanti.

Langkah 4.2: Memasang Plugin

Plugin memperluas fungsi blog Anda; misalnya: alat SEO, analitik, formulir kontak, backup – semuanya modular dan opsional.

(artinya memasang/menghapus plugin tidak akan memengaruhi konten atau desain Anda).

Berikut beberapa plugin yang kami sarankan untuk langsung dipasang:

  • All in One SEO – mengatur bagaimana postingan Anda muncul di hasil pencarian (judul meta, deskripsi, dll).
  • UpdraftPlus – backup otomatis yang mudah, menyelamatkan blog (dan kewarasan Anda) jika ada masalah.
  • Site Kit by Google – menghubungkan blog Anda dengan Google Analytics dan Search Console hanya dengan beberapa klik.
  • Akismet Anti-Spam – menjaga kolom komentar tetap bersih dari bot.
  • WPForms – builder formulir drag-and-drop yang sangat mudah (misalnya untuk halaman kontak).

Untuk memasang plugin, masuk ke Plugins → Add New, cari namanya, lalu klik “Install” dan “Activate.”

Selesai!

Biasanya Anda akan melihat menu baru di sisi kiri admin – kalau tidak muncul, cek di bagian “Settings”, mungkin jadi submenu di sana.

Sekarang blog Anda sudah punya desain yang solid, fitur inti yang penting, dan ruang untuk berkembang 🌱

* * *

Sekarang mari kita kembali ke nama domain sebelum peluncuran:

Menghubungkan Blog ke Domain

Kalau Anda belum memilih domain di langkah 1, sekarang saatnya memfinalisasi sebelum blog diluncurkan:

  1. Buka dashboard Hostinger dan pilih “Websites” di menu kiri. Di bawah blog baru Anda, klik “Change domain”:

    Buat blog 2025: tambahkan domain di Hostinger

  2. Di tampilan baru, ketik nama domain yang diinginkan dan Anda akan melihat pop-up: pilih periode registrasi awal (setelah itu akan diperpanjang otomatis); kami sarankan 1 tahun untuk masa percobaan blog Anda.

    Buat blog 2025: detail domain di Hostinger

  3. Di jendela yang sama, klik “Add” di samping kolom kupon dan tempel kode berikut untuk mendapatkan diskon tambahan:

    TRUS10DOMAIN
  4. Sekarang Anda bisa menyelesaikan pesanan dan mendaftarkan domain baru. WordPress Anda akan berpindah ke domain tersebut secara otomatis!

Sebelum kita menutup panduan ini, berikut beberapa rekomendasi lanjutan untuk melindungi blog Anda, mengoptimalkannya – dan siapa tahu, membuatnya membiayai dirinya sendiri:

Langkah Bonus: Lindungi Blog Anda dan Percepat Kinerjanya

Blog Anda sudah jadi, sudah rapi, sudah punya fitur – sekarang mari pastikan blog ini aman, stabil, dan cepat dimuat.

Berikut beberapa tips cepat untuk mencapainya tanpa biaya tambahan atau harus terjun ke dunia teknis yang rumit:

Tips #1: Backup Otomatis

🔐 Ada pepatah – hanya ada dua tipe blogger: yang rutin backup, dan yang akhirnya nangis ke bantal jam 2 pagi.

Kita jelas tidak mau jadi tipe kedua.

Hostinger (dan sebagian besar host besar lainnya) menawarkan backup mingguan di semua paket, tapi kalau mau kontrol lebih, kami rekomendasikan plugin gratis UpdraftPlus

Plugin ini membuat backup otomatis harian blog Anda dan menyimpannya di luar server (misalnya Google Drive atau Dropbox) – jadi meskipun server crash atau instalasi WordPress rusak, konten Anda tetap aman.

Tips #2: Keamanan Dasar Blog

🛡️ Anda tidak perlu enkripsi tingkat militer – cukup beberapa aturan sederhana:

  • Pakai password kuat: jangan admin123 ya. Gunakan alat seperti NordPass atau 1Password untuk menyimpan password kuat dengan aman.
  • Selalu perbarui semuanya: inti WordPress, tema, dan plugin. Update sering kali menutup celah keamanan.
  • Tambahkan login 2-faktor dengan plugin seperti ini – memerlukan kode sekali pakai dari ponsel saat login, membuat peretas jauh lebih sulit membobol blog Anda.

Tips #3: Percepat Blog

🚀 Blog yang cantik dan informatif akan percuma kalau butuh setengah menit untuk dimuat. Faktanya, kebanyakan pengguna meninggalkan halaman setelah ~3 detik waktu loading!

Lakukan ini:

  • Aktifkan caching: pasang plugin gratis seperti LiteSpeed Cache (terbaik untuk Hostinger) atau WP Super Cache.
  • Gunakan gambar terkompresi: unggah gambar dalam format .webp atau gunakan plugin seperti ShortPixel untuk mengompres dan mengoptimalkan gambar secara otomatis.
  • Hemat plugin: hindari memasang 20+ plugin di WordPress, apalagi “cuma untuk coba-coba.” Gunakan yang benar-benar perlu dan hapus yang tidak dipakai.

Bonus: Hostinger (dan host modern lainnya) sudah memakai CDN global cepat, penyimpanan SSD, dan PHP 8+, jadi dari sisi performa Anda sudah punya modal bagus.

Voila – sekarang blog Anda cepat, aman, dan siap untuk masa depan. Tentu saja, masih banyak hal yang bisa dieksplor di setiap poin ini – tapi itu jauh di luar cakupan panduan kita hari ini.

Siap ke langkah terakhir?

Mari kita bahas cara mengubah blog ini jadi mesin penghasil uang 💸

Cara Menghasilkan Uang dari Blog

Memang, kebanyakan orang tidak memulai blog dengan tujuan eksplisit untuk jadi kaya.

Tapi begitu Anda rutin menerbitkan konten berkualitas dan membangun audiens yang nyata… kenapa tidak membiarkan blog membayar tagihan?

Buat blog 2025: monetisasi

Berikut tiga cara paling populer dan terbukti untuk monetisasi blog – mulai dari skala kecil, lalu berkembang seiring pertumbuhan Anda:

Pilihan 1: Pemasaran Afiliasi (Terbaik untuk Pemula)

💰 Anda menautkan produk atau layanan yang memang Anda sukai – dan jika seseorang membeli lewat tautan khusus Anda, Anda mendapat komisi.

Contoh penerapannya:

  • Ulasan: tulis postingan yang mengulas alat digital favorit Anda dan tautkan ke situs mereka menggunakan link afiliasi
  • Panduan: buat panduan perbandingan (seperti ringkasan website builder kami) dan sertakan link afiliasi ke setiap produk

Anda tidak perlu audiens besar atau banyak pengunjung untuk mulai – yang penting adalah kepercayaan, relevansi, dan konsistensi.

Mulailah dengan bergabung di program afiliasi seperti Amazon Associates, Impact, PartnerStack, ShareASale – serta program khusus dari penyedia hosting, VPN, atau SaaS yang Anda gunakan.

Pro tip: Rekomendasikan hanya produk yang benar-benar Anda percaya. Kalau tidak, itu cuma iklan – dan pembaca bisa langsung merasakannya.

Pilihan 2: Iklan (Terbaik untuk Blog dengan Trafik Tinggi)

📢 Setelah blog mulai mendapat trafik yang konsisten, Anda bisa mendapatkan penghasilan pasif tambahan dengan menampilkan iklan.

Cara termudah adalah dengan Google AdSense – secara otomatis menempatkan iklan yang relevan di situs Anda dan membayar per tayang atau per klik.

Platform iklan populer lainnya termasuk Mediavine, Ezoic, dan BuySellAds.

Perlu diingat bahwa pendapatan dari iklan cenderung sangat kecil kecuali Anda mendapatkan ratusan pengunjung per hari.

Namun, jika niche Anda memiliki trafik bernilai tinggi (misalnya finansial, software, B2B) atau blog Anda sudah mendapat volume kunjungan besar, jalur monetisasi ini bisa sangat menguntungkan (apalagi jika digabung dengan afiliasi seperti di atas!).

Pilihan 3: Jual Produk atau Layanan Sendiri

🛍️ Setelah blog memiliki audiens, Anda bisa menggunakannya sebagai toko untuk menjual berbagai hal:

  • Produk digital: ebook niche, kursus online, checklist, template, dll
  • Produk fisik: karya Anda sendiri atau produk siap jual lewat dropshipping atau print-on-demand
  • Layanan: coaching bisnis, konsultasi profesional, jasa menulis atau desain

Anda bisa menambahkan fitur e-commerce ke blog menggunakan plugin gratis seperti WooCommerce – atau tautkan ke platform eksternal seperti Gumroad dan Etsy.

Ingat: monetisasi butuh waktu. Fokus dulu membuat konten yang benar-benar ingin dibaca orang – uang akan datang setelah ada kepercayaan.

FAQ Blogging

🧠 Masih punya pertanyaan? Berikut beberapa yang paling sering ditanyakan oleh blogger baru:

Apakah saya harus bisa coding untuk mulai ngeblog?

Tidak. WordPress dan host modern memungkinkan Anda membuat semuanya lewat editor visual dan menu yang mudah – tanpa perlu coding sama sekali.

Berapa lama waktu yang dibutuhkan untuk meluncurkan blog?

Dengan panduan ini, sekitar 30 menit – termasuk setup, desain, dan sedikit penyesuaian awal. Bahkan Anda bisa sempat istirahat sambil mengagumi hasilnya.

Berapa biaya untuk memulai blog?

Anda perlu mengeluarkan sekitar Rp30–50 ribu/bulan untuk hosting dan domain (jika dibayar tahunan). Sebagian besar tema dan plugin yang dibutuhkan adalah gratis.

Apakah ada orang yang akan menemukan blog saya?

Ya – jika Anda membuat konten yang bermanfaat, ditulis dengan baik, dan mengikuti prinsip SEO dasar. Plugin seperti All in One SEO dan Site Kit sangat membantu.

Bisakah saya memindahkan blog ke host lain nanti?

Tentu saja. WordPress cukup mudah dipindahkan ke penyedia hosting lain atau mengganti domain. Konten Anda bisa dibawa ke mana saja.

Berapa lama sampai bisa menghasilkan uang dari blog?

Bervariasi – tapi kebanyakan blog tidak menghasilkan pendapatan signifikan dalam beberapa bulan pertama. Fokus dulu pada konten dan membangun kepercayaan; uang akan datang belakangan.

Masih penasaran dengan hal lain? Tulis pertanyaan Anda di kolom komentar – kami dengan senang hati akan membantu 🧵

Penutup + Satu Rahasia Jujur

Selamat, Anda berhasil membaca sampai akhir – kerja bagus!

Sekarang Anda sudah punya semua yang dibutuhkan untuk membangun blog yang enak dilihat, cepat diakses, dan punya peluang nyata menarik pembaca sungguhan (bukan cuma bot atau ibu Anda).

Dan inilah kenyataan jujur – hal yang saya harap ada orang yang memberitahukan lebih awal:

Perbedaan terbesar antara blog yang sukses dan blog yang mati? Bukan teknologinya. Bukan kemampuan menulis. Bahkan bukan keberuntungan. Ini: terus muncul dan konsisten.

Kebanyakan blog gagal karena penulisnya berhenti – sering kali tepat sebelum semuanya mulai berjalan!

Buat blog 2025: konsistensi

Jadi, terbitkan artikel pertama Anda.
Lalu yang kedua.
Lalu yang berikutnya.

Anda akan semakin baik, semakin cepat, semakin tajam.

Dan suatu hari, seseorang yang belum pernah Anda kenal akan meninggalkan komentar tulus seperti: Ini sangat membantu saya, terima kasih! Saat itulah semuanya terasa “klik”.

Sampai saat itu, tetaplah jalan terus: Anda pasti bisa.

Kalau suatu saat Anda buntu atau punya pertanyaan – cukup gulir ke bawah ke kolom komentar dan ikut berdiskusi.

Terima kasih sudah membaca – dan selamat datang di dunia blogging di internet 🖖

How to Create a Blog in 2025: Become a Blogger in Under 30 Minutes (and Maybe Even Earn Some Money)

So, you’ve got something to say. Or maybe your boss does 🤷

Either way, you’re tired of the whims of the algorithms and artificial limitations of social networks. What you need is a proper space online

🎛️ a place where you have full control over content and design
📍 a shareable address that’s uniquely yours
😎 one that says: “Yep, this person knows what they’re doing”

…Well, you can safely close your Google search results now – you’ve come to the right place.

Yes, go on, close it. Good.

Create your blog and become platform-independent

Jokes aside: this easy guide will walk you through everything you need to start blogging, step by step – from picking a name to hitting “Publish” on your first post.

And the best part? You can build that kind of blog in less than half an hour – even if you’ve never touched code in your life.

Ready to launch your blog right now, and maybe even make it pay for your coffee habit? 🤑

Let’s go:

Start Here: What You’ll Get from This Guide

Let’s be clear: this isn’t one of those vague “start a blog in 3 clicks” stories – nor is it a 97-part course that takes you six weeks to finish.

This is your fast lane. We’ll use simple but powerful tools, side-step the unnecessary details, and focus only on the parts that matter:

  • Pick a great domain name that doesn’t sound like a scam or a typo
  • Set up hosting that works smoothly and doesn’t break your bank
  • Install WordPress the easy way – no FTP drama required
  • Customize your blog with themes and plugins that don’t suck
  • Secure and back it up without spending a cent
  • Start publishing posts that read and look good
  • And if you want: turn your blog into a (side) income machine 💸

You don’t need to be a developer;
you don’t need to spend $399.99 on a blogging course;
you just need a browser, a tiny budget – and 30 minutes of focus.

Sound good? Then let’s answer one burning question first:

Free vs Paid: What’s the Catch?

Sure, you can start a blog for free. And if you just want a digital diary to share photos of your cat or document vacations – go for it.

But if you’re even slightly serious about writing for a real audience, growing your site, or (eventually) making money from it, here’s the reality:

  • Free blogs come with strings attached. Most notably in the form of ugly addresses (think yourname15.platform.com) and forced ads that you don’t earn from.
  • Customization is limited. Most free platforms lock you into their layout and design choices. Want to install a plugin, change colors, or add a mailing list? Nope.
  • You’re not really in control. Platforms can change the rules, remove features, or shut down altogether – and your hard-earned audience can vanish in an instant.

It’s kind of like building a house on someone else’s land. Convenient at first – but if they decide to build a parking lot instead, you’ll get evicted.

Create a blog, free yourself from platforms

If you want your blog to grow, be taken seriously, and stay yours – spending a little upfront is absolutely worth it.

The good news? We’ll keep your setup cost ultra-low:

…with a real domain name, real hosting, and real ownership – all for the price of a monthly pizza 🍕 (well a fancy one, maybe).

For starters, your blog needs a home and an address. Let’s get that sorted:

Step 1: Get Hosting and Domain (with a Plot Twist)

A domain name 🌐 is your blog’s unique address on the web (like blog.com), while web hosting 🖥️ is a service that stores your site and makes it visible online 24/7 at your domain.

The good news? You don’t need to get these separately – most modern hosts bundle them together. That’s what we’ll do here.

We’re looking for something that’s:

  • Easy to use, even for total beginners
  • Fast and reliable
  • Affordable without being sketchy

No need to reinvent the wheel – we’ll stick with WordPress, the most popular free blog platform in the world – and one of three hosts officially recommended by WordPress.org:

👌 The cheapest hosting plan at Hostinger will do just fine.

Feel free to choose any other quality host like Kinsta or SiteGround – or even a drag-and-drop website builder (here’s our comparison guide).

* * *

We will employ a psychology trick to avoid getting stuck right away:

…instead of starting with the domain name (and spending hours picking the perfect one!) we’ll go ahead and create a development version of a WordPress blog first!

You can start thinking about the domain in the back of your mind, but don’t let it block you 🚧 from actually setting up your blog – believe us, we’ve seen countless cases like that ;)

Right now, we need a place to work on your blog. We’ll use a coupon code to get the best possible price at Hostinger.

Here’s a step-by-step guide:

  1. Go to Hostinger’s web hosting offer page and click “Claim deal” (or simply scroll down the page to see the pricing plans):

    Get the best deal at Hostinger ›

    We’ll go for the most basic option as it has all we need for our blog (it’s called Premium, yes :)

  2. On the next screen, we recommend 12 months as the optimal balance between price and commitment – but you’re free to choose any billing cycle, of course:

    Create blog step 1: hosting

    There’s one more thing we need to do on that page – obtain a further 10% discount! Copy and paste this coupon code into the respective field below the price calculations:

    TRUS10CODE
  3. Hit “Apply” and you should see your final price reduced by 10%. If the coupon doesn’t work, try SPECIAL15 for a 7% discount – and please let us know in the comments!

    Create blog step 1: Hostinger coupon applied

  4. You will be prompted to create an account and finally complete the order. Congratulations! You now have a home for your new blog 🏠

Once the payment goes through, you’ll immediately be taken to Hostinger’s onboarding wizard to set up your blog and install WordPress (we’ll walk you through it in a second)

* * *

IMPORTANT: At the same time, start thinking about domains:

You can use our Blog Name Generator to help you brainstorm a killer .com domain name for your blog –

– or in case you want a regional extension like .ca or something more niche like .org simply use Hostinger’s search to check availability.

Aim for something short, clear, and easy to remember – check out our domain guide for more tips.

Give yourself some time to come up with a domain name that feels right – we will register and set it up at the very end, when you’re ready to go live.

For now, keep on working on your blog:

Step 2: Install WordPress or Another Blog Engine

Let’s go through Hostinger’s onboarding wizard to set up your WordPress blog in under 5 minutes:

  1. Feel free to the first question (it doesn’t change anything) and answer “Create a website” in the second one:

    Create blog 2025: Hostinger wizard 1

  2. In the next step, you’ll be given three options: install WordPress, use Hostinger’s own website builder, or start with an empty PHP/HTML website. While their side builder has become quite alright by 2025, we’ll go for WordPress for maximum simplicity:

    Create blog 2025: installing WordPress

  3. In the next step, you will be prompted to create a password for your WordPress admin area (note that it may be pre-generated for you – make sure you use your own!). You can also adjust the email and language if you want:

    Create blog 2025: set WordPress admin password

  4. Next, you will have a choice between using a pre-built website (complete with design, content dummies, etc), one of Hostinger’s partner WordPress themes (all freemium, mind you!) or a blank site.

    We recommend going for the blank site option, since there are literally thousands great free themes out there that will make your blog more unique than one of ten pre-made options Hostinger offers to millions of people:

    Create blog 2025: install blank WordPress

  5. Next, you will be asked about the domain name – just choose “Use temporary domain” if you’re still thinking about yours; we will connect your final domain name right before launch in step 4.
  6. In the next step you will be able to adjust in which of Hostinger’s 12 global datacenters your blog will be stored.

    The closer your server to your main audience, the faster it will load your website (so don’t choose Singapore if your blog is primarily for US readers!).

    Finally, click on “Install WordPress“.

  7. After a few seconds, your WordPress blog install is completed 🪄 which means your shiny new blog is halfway done!

Let’s take care of essential settings:

Step 3: Configure Your Blog, the Smart Way

Before we jump into design or content, let’s take a few minutes to tweak some basic settings. Trust us, a few quick adjustments now will save you hours of confusion later.

To log into your WordPress admin panel you can either click “Edit Website” in Hostinger’s dashboard, or just visit yourblog.com/wp-admin and log in with the email and password you set up earlier.

Here’s what to do first:

  • Go to Settings → General
    Be sure to update your Site Title and Tagline. These will appear in your browser tab and sometimes in search results – so make them short and descriptive. While you’re here, double-check your timezone and preferred date format.
  • Next, head to Settings → Permalinks
    Select the Post name option – this gives you clean, readable URLs like yourblog.com/my-first-post instead of yourblog.com?p=123. Better for users, better for Google.
  • Still with me? Great – now go to Settings → Discussion
    Scroll down to Before a comment appears and check the box for “Comment must be manually approved”. This keeps spammy bots and trolls out of your blog’s comments section.
  • Bonus step: go to Users → Profile
    Change your display name, otherwise your posts be signed by “admin” – pick something that sounds like a real person.

You will no doubt find and adjust more settings as you go along – this is the bare minimum that allows you to get started without spending a day on configuration.

Now it’s time to make this blog truly yours – with a proper theme and a few essential plugins:

Step 4: Choose Design and Add Essential Plugins

Your blog is live. It’s functional. But let’s be honest – it probably looks like a generic placeholder from 2008 right now 🔲

Time to change that.

In this step, we’ll 🎨 pick a theme (that defines how your blog looks) and install a few 🧩 key plugins (that add extra features to your blog).

Don’t worry – you can change themes later without damaging your content, and most plugins take under 10 seconds to install/uninstall.

Step 4.1: Choosing a Theme

Head over to Appearance → Themes in your WordPress admin panel and click “Add New

Create blog: choose from thousands of free themes in WordPress

Here you’ll find thousands of free themes – filter by popularity or use the search bar to narrow things down.

  • If you want a solid all-rounder to start with, we shamelessly recommend our own free template: Bento ;)
  • You might also want to explore popular multipurpose themes like Astra or GeneratePress if you want more options.
  • For the power users, a premium theme like Divi might be more suitable – it comes packed with features and professional designs, as well as powerful add-ons such as forms, email marketing, etc

Just remember:

Pick something clean and lightweight — you can always add flair later.

Step 4.2: Installing Plugins

Plugins extend your blog’s functionality; think: SEO tools, analytics, contact forms, backups – all modular, all optional.

(which means installing/uninstalling them will not affect your content or your design).

Here are the first few we recommend installing right away:

  • All in One SEO – lets you control how your posts appear in search results (meta titles, descriptions, etc).
  • UpdraftPlus – easy, automatic backups that save your blog’s life (and your sanity) if something breaks.
  • Site Kit by Google – integrates your blog with Google Analytics and Search Console in a couple of clicks.
  • Akismet Anti-Spam – keeps your comments section clean and bot-free.
  • WPForms – super simple drag-and-drop form builder (e.g. for a contact page).

To install a plugin, go to Plugins → Add New, search for its name, and click “Install” and then “Activate.”

That’s it!

You should typically see a new section in the admin menu on the left – if it doesn’t appear, check the “Settings” section, it might be a submenu.

Your blog now has a solid design, key functionality, and room to grow 🌱

* * *

Let’s get back to our domain name before we launch:

Putting Your Blog on a Domain

If you haven’t chosen a domain name in step 1, we’re now ready to launch the blog, so it’s time we finalize that bit:

  1. Go to your Hostinger dashboard and choose “Websites” in the left menu. Under your new blog, click on “Change domain”:

    Create blog 2025: add domain in Hostinger

  2. In the new view, type in your desired domain name and you’ll see a pop-up: choose your initial registration period (it will renew automatically after that); we recommend 1 year for testing your blog.

    Create blog 2025: domain details at Hostinger

  3. In the same window, click on “Add” next to the coupon code and paste the following to get an additional discount:

    TRUS10DOMAIN
  4. You are now ready to complete the order and register the new domain. Your WordPress will migrate onto that domain automatically!

Before we wrap things up, here are some follow-up recommendations for protecting it, optimizing it – and maybe even making it pay for itself:

Bonus Step: Protect Your Blog and Make it Fast

You’ve built your blog, styled it up, added features – now let’s make sure it’s secure, stable – and loads fast.

Here’s a few quick tips to achieve that without paying extra or going down a tech rabbit hole:

Tip #1: Automatic Backups

🔐 You know the saying – there are two types of bloggers: those who back up, and those who eventually cry into a pillow at 2am.

Let’s not be the second kind.

Hostinger (and most other big hosts) offers weekly backups on all plans, but if you want more control, we recommend the free UpdraftPlus plugin –

It creates daily automatic backups of your blog and lets you store them offsite (e.g. on Google Drive or Dropbox) – so even if your server crashes or WordPress install gets messed up, your content is safe.

Tip #2: Basic Blog Security

🛡️ You don’t need military-grade encryption – just a few simple rules:

  • Use strong passwords: no admin123, please. You can use a tool like NordPass or 1Password to store your strong passwords securely.
  • Keep everything updated: WordPress core, themes, and plugins. Updates often fix security holes.
  • Add 2-factor login via e.g. this plugin – it requires a one-time code from your phone when logging in and makes it much, much harder for cybercriminals to break into your blog.

Tip #3: Speed Boosts

🚀 Even the prettiest, most informative blog is pointless if it takes half a minute to load. In fact, most users tend to abandon a page after ~3 seconds of loading time!

Here’s what to do:

  • Enable caching: install a free plugin like LiteSpeed Cache (best for Hostinger) or WP Super Cache.
  • Use compressed images: upload images in .webp format or use a plugin like ShortPixel to automatically compress and optimize them.
  • Keep plugins lean: avoid installing 20+ plugins in your WordPress, especially “just to try them out.” Stick to what you need and remove anything you’re not actively using.

Bonus: Hostinger (and other modern hosts) already use fast global CDNs, SSD storage, and PHP 8+, so you’re off to a good start performance-wise.

Voila – you now have a blog that’s fast, safe, and future-proof. Of course, there’s much more you can explore within any of these directions – but that’s way beyond our scope today.

Ready for the final step?

Let’s talk about turning this blog into a money machine 💸

How to Make Money With Your Blog

Sure, most people don’t start a blog with an explicit goal to get rich.

But once you’re publishing great content and building a real audience… why not let your blog pay the bills?

Create blog 2025: monetization

Here are three of the most popular and proven ways to monetize a blog – starting small, scaling as you grow:

Option 1: Affiliate Marketing (Best for Beginners)

💰 You link to products or services you genuinely like – and if someone buys through your special tracking link, you earn a commission.

To give a couple of examples:

  • Reviews: write a post reviewing your favorite digital tools and link to their websites using your affiliate links
  • Guides: create a comparison guide (like our site builder roundup) and include affiliate links to each product

You don’t need a huge audience or lots of visitors for this to work – just trust, relevance, and consistency.

Get started by joining affiliate programs like Amazon Associates, Impact, PartnerStack, ShareASale – as well as specific programs of your hosting provider, VPN, or SaaS tool

Pro tip: Only recommend stuff you actually believe in. Otherwise it’s just advertising – and readers can smell that a mile away.

Option 2: Ads (Best for Popular Blogs)

📢 Once your blog starts getting consistent traffic, you can earn even more passive income by showing ads.

The easiest way to start is with Google AdSense – it automatically places relevant ads on your site and pays you per view or per click.

Other popular ad platforms to check out include Mediavine, Ezoic, and BuySellAds.

Keep in mind that ad income tends to be minuscule unless you’re getting hundreds of daily visitors.

But if your niche has high-value traffic (e.g. finance, software, B2B) or you’re getting serious volumes on your blog, this monetization path can be a boon (especially if combined with affiliate marketing mentioned earlier!)

Option 3: Sell Your Own Products or Services

🛍️ Once your blog has an audience, you can start using it as a store to sell stuff:

  • Digital products: niche ebooks, online courses, checklists, templates, etc
  • Physical products including your own creations or pre-made via dropshipping or print-on-demand
  • Services: business coaching, professional consulting, freelance writing or design

You can add e-commerce functionality to your blog using a free plugin like WooCommerce – or link to an external platform like Gumroad and Etsy.

Remember: monetization takes time. Focus first on creating content people actually want to read – the money comes after the trust.

Blogging FAQ

🧠 Still got questions? Here are some of the most common ones we get from new bloggers:

Do I need to know how to code to start a blog?

Nope. WordPress and modern hosts let you create everything through visual editors and easy menus – no coding required at all.

How long does it take to launch a blog?

With this guide, around 30 minutes – including setup, design, and your first few tweaks. You can even take breaks to admire your work.

How much does it cost to start a blog?

You’ll need to spend around $2–3/month for hosting and domain (when billed yearly). Most themes and plugins you’ll need are free.

Will anyone actually find my blog?

Yes – if you create helpful, well-written content and follow basic SEO principles. Plugins like All in One SEO and Site Kit help a lot.

Can I move my blog to a different host later?

Absolutely. WordPress makes it fairly easy to migrate to another hosting provider or change domains. Your content is portable.

How long does it take to earn money from blogging?

It varies – but most blogs don’t earn meaningful income in the first few months. Focus on content and trust first; the money comes after.

Still wondering about something? Drop your question in the comments section – we’ll be happy to help 🧵

Final Thoughts + One Honest Secret

You made it all the way through, nice work!

You now have everything you need to build a blog that looks good, works fast, and actually has a shot at attracting real readers (not just bots and your mom).

And here’s the honest truth – the one I wish someone told me earlier:

The biggest difference between a successful blog and a dead one? It’s not tech. Not writing skills. Not even luck. It’s this: keep showing up.

Most blogs fail because their authors simply stop – very often right before things start working!

Create blog 2025: persistence

So post your first article.
Then another.
And another.

You’ll get better, faster, sharper.

And one day, someone you’ve never met will leave a genuine comment that says something like: This helped me so much, thank you! That’s when it clicks.

Until then, keep going: you’ve got this.

And if you ever get stuck or have questions – just scroll down to the comments section and join the discussion.

Thanks for reading – and welcome to the blogging side of the internet 🖖

X Theme vs Avada: the Fierce Battle for ThemeForest Domination

Alright, ladies and gentlemen, things just got serious! We’re not here to ramble over some niche themes this time: it’s giant versus giant. Two of the best-selling ThemeForest items of all time, and also top premium WordPress themes ever to exist on the face of this planet, Avada and X Theme are competing for your web projects. Let’s do it!

A Close-up View

Never in the history of WP theme comparisons have we had such a close match: both themes are so well-built, well-designed and well-supported (and their user ratings diverge by just 0.02!) that one really needs to seek out the differences with a magnifying glass. First, let’s summarize some of the comparable parameters in a table:

Avada X Theme
Year created 2012 2013
Content builder Fusion (custom) Cornerstone (custom)
Builder elements 55 42
Pre-built styles 1 4
One-click demos 27 12
ThemeForest sales 300,000+ 150,000+
Average rating 4.77 4.75
Price $60 $39

Avada as well as X Theme strive to be the “ultimate WordPress theme” – in order words, be able to support any style and type of website one could possible wish to build. The most important components of this capability are theme options, or the customization settings which allow changing the color, size, and other properties of website elements – as well as a content builder, a visual tool enabling creating complex page layouts from pre-coded and pre-styled functional elements, such as text, images, buttons, etc.

Both themes contain a enormous number of settings in their custom-built options panels, and each uses a proprietary content builder: Fusion for Avada and Cornerstone for X Theme. The former offers a wider choice of building blocks, at 55 compared to 42 for the Cornerstone. All frequently used one are still thoroughly covered in both, though.

As if that wasn’t enough, both Avada and X Theme go further by introducing one-click demos and stacks. One-click demos are full website designs prefabricated by the theme authors, focusing on a specific niche, like corporate, agency, or nonprofit. They are easy to import and apply, giving you a fleshed-out sample to work from, instead of a black canvas: simply add your text and images, and tweak the part that need to be adjusted – and voila, you’ve got a website in under an hour! Avada is clearly more diverse when it comes to demos, providing 27 for its users.

X Theme currently has only 12, but they’re adding new ones every now and then, so the tally might shift in the future. The creators of the X Theme have another ace up their sleeves, though: the so-called stacks, or pre-made visual systems which effectively mean that you get 4 themes instead of one. Each stack has its own distinctive style, while still adhering to the theme’s overarching aim at simplicity, clarity and minimalism. While Avada is theoretically also capable of producing distinct visual styles, this requires altering multiple theme settings to achieve, while X Theme provides this functionality with a single click.

The Winner?

Looking at the capabilities reveals that Avada is still a more diverse product, while X Theme does everything to make it as simple as possible to use. One more important component that we can’t leave out is the pricing. In this area, X Theme is an undisputable winner: providing most of the same features for $39, which is a 35% difference with Avada, priced at $60.

In the end, it all boils down to your needs and preferences, of course, but here’s the gist: if you want a high-quality website fast, and at a minimum price – go for X Theme. If you like to have as many options and features as possible and appreciate a coherent design system, then Avada is what you’re after.