
So, you’ve got something to say. Or maybe your boss does 🤷
Either way, you’re tired of the whims of the algorithms and artificial limitations of social networks. What you need is a proper space online –
📍 a shareable address that’s uniquely yours
😎 one that says: “Yep, this person knows what they’re doing”
…Well, you can safely close your Google search results now – you’ve come to the right place.
Yes, go on, close it. Good.

Jokes aside: this easy guide will walk you through everything you need to start blogging, step by step – from picking a name to hitting “Publish” on your first post.
And the best part? You can build that kind of blog in less than half an hour – even if you’ve never touched code in your life.
Ready to launch your blog right now, and maybe even make it pay for your coffee habit? 🤑
Let’s go:
Free vs Paid: What’s the Catch?
Step 1: Get a Domain and Hosting
Step 2: Install WordPress (or another blog engine)
Step 3: Configure Your Blog (The Smart Way)
Step 4: Themes and Plugins (Don’t Get Overwhelmed)
Bonus: Free Security and Backup Tools
How to Make Money With Your Blog
FAQ: Stuff Beginners Always Ask
Final Thoughts + Next Steps
Start Here: What You’ll Get from This Guide
Let’s be clear: this isn’t one of those vague “start a blog in 3 clicks” stories – nor is it a 97-part course that takes you six weeks to finish.
This is your fast lane. We’ll use simple but powerful tools, side-step the unnecessary details, and focus only on the parts that matter:
- Pick a great domain name that doesn’t sound like a scam or a typo
- Set up hosting that works smoothly and doesn’t break your bank
- Install WordPress the easy way – no FTP drama required
- Customize your blog with themes and plugins that don’t suck
- Secure and back it up without spending a cent
- Start publishing posts that read and look good
- And if you want: turn your blog into a (side) income machine 💸
You don’t need to be a developer;
you don’t need to spend $399.99 on a blogging course;
you just need a browser, a tiny budget – and 30 minutes of focus.
Sound good? Then let’s answer one burning question first:
Free vs Paid: What’s the Catch?
Sure, you can start a blog for free. And if you just want a digital diary to share photos of your cat or document vacations – go for it.
But if you’re even slightly serious about writing for a real audience, growing your site, or (eventually) making money from it, here’s the reality:
- Free blogs come with strings attached. Most notably in the form of ugly addresses (think
yourname15.platform.com) and forced ads that you don’t earn from. - Customization is limited. Most free platforms lock you into their layout and design choices. Want to install a plugin, change colors, or add a mailing list? Nope.
- You’re not really in control. Platforms can change the rules, remove features, or shut down altogether – and your hard-earned audience can vanish in an instant.
It’s kind of like building a house on someone else’s land. Convenient at first – but if they decide to build a parking lot instead, you’ll get evicted.

If you want your blog to grow, be taken seriously, and stay yours – spending a little upfront is absolutely worth it.
The good news? We’ll keep your setup cost ultra-low:
…with a real domain name, real hosting, and real ownership – all for the price of a monthly pizza 🍕 (well a fancy one, maybe).
For starters, your blog needs a home and an address. Let’s get that sorted:
Step 1: Get Hosting and Domain (with a Plot Twist)
A domain name 🌐 is your blog’s unique address on the web (like blog.com), while web hosting 🖥️ is a service that stores your site and makes it visible online 24/7 at your domain.
The good news? You don’t need to get these separately – most modern hosts bundle them together. That’s what we’ll do here.
We’re looking for something that’s:
- Easy to use, even for total beginners
- Fast and reliable
- Affordable without being sketchy
No need to reinvent the wheel – we’ll stick with WordPress, the most popular free blog platform in the world – and one of three hosts officially recommended by WordPress.org:
👌 The cheapest hosting plan at Hostinger will do just fine.
Feel free to choose any other quality host like Kinsta or SiteGround – or even a drag-and-drop website builder (here’s our comparison guide).
* * *
We will employ a psychology trick to avoid getting stuck right away:
…instead of starting with the domain name (and spending hours picking the perfect one!) we’ll go ahead and create a development version of a WordPress blog first!
You can start thinking about the domain in the back of your mind, but don’t let it block you 🚧 from actually setting up your blog – believe us, we’ve seen countless cases like that ;)
Right now, we need a place to work on your blog. We’ll use a coupon code to get the best possible price at Hostinger.
Here’s a step-by-step guide:
-
Go to Hostinger’s web hosting offer page and click “Claim deal” (or simply scroll down the page to see the pricing plans):
Get the best deal at Hostinger ›
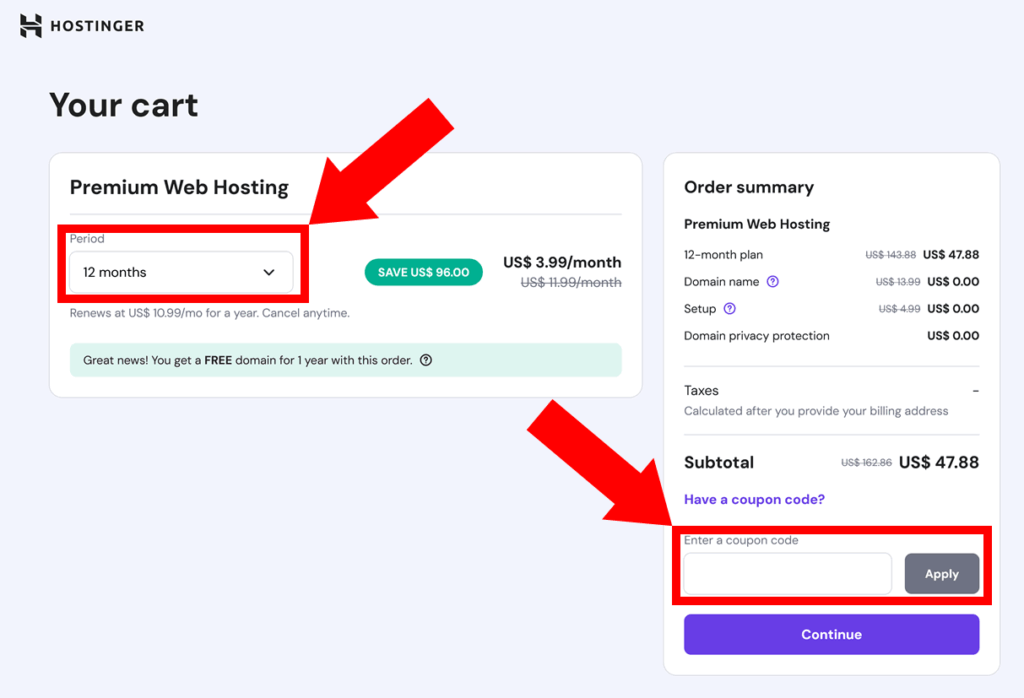
We’ll go for the most basic option as it has all we need for our blog (it’s called
Premium, yes :) -
On the next screen, we recommend 12 months as the optimal balance between price and commitment – but you’re free to choose any billing cycle, of course:

There’s one more thing we need to do on that page – obtain a further 10% discount! Copy and paste this coupon code into the respective field below the price calculations:
TRUS10CODE -
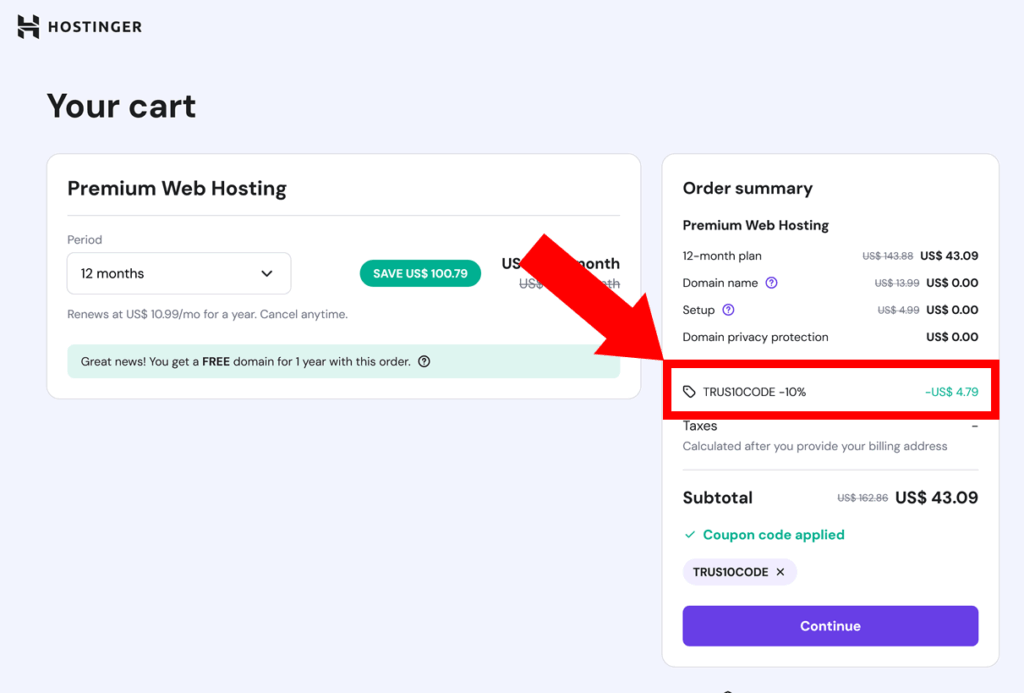
Hit “Apply” and you should see your final price reduced by 10%. If the coupon doesn’t work, try
SPECIAL15for a 7% discount – and please let us know in the comments!
- You will be prompted to create an account and finally complete the order. Congratulations! You now have a home for your new blog 🏠
Once the payment goes through, you’ll immediately be taken to Hostinger’s onboarding wizard to set up your blog and install WordPress (we’ll walk you through it in a second)
* * *
IMPORTANT: At the same time, start thinking about domains:
You can use our Blog Name Generator to help you brainstorm a killer .com domain name for your blog –
– or in case you want a regional extension like .ca or something more niche like .org simply use Hostinger’s search to check availability.
Aim for something short, clear, and easy to remember – check out our domain guide for more tips.
Give yourself some time to come up with a domain name that feels right – we will register and set it up at the very end, when you’re ready to go live.
For now, keep on working on your blog:
Step 2: Install WordPress or Another Blog Engine
Let’s go through Hostinger’s onboarding wizard to set up your WordPress blog in under 5 minutes:
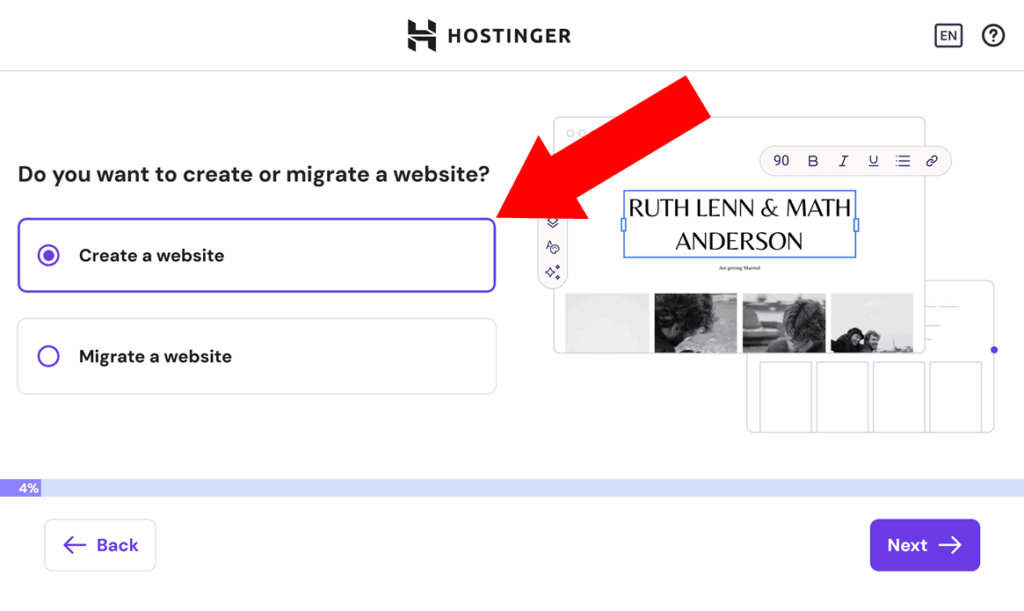
-
Feel free to the first question (it doesn’t change anything) and answer “Create a website” in the second one:

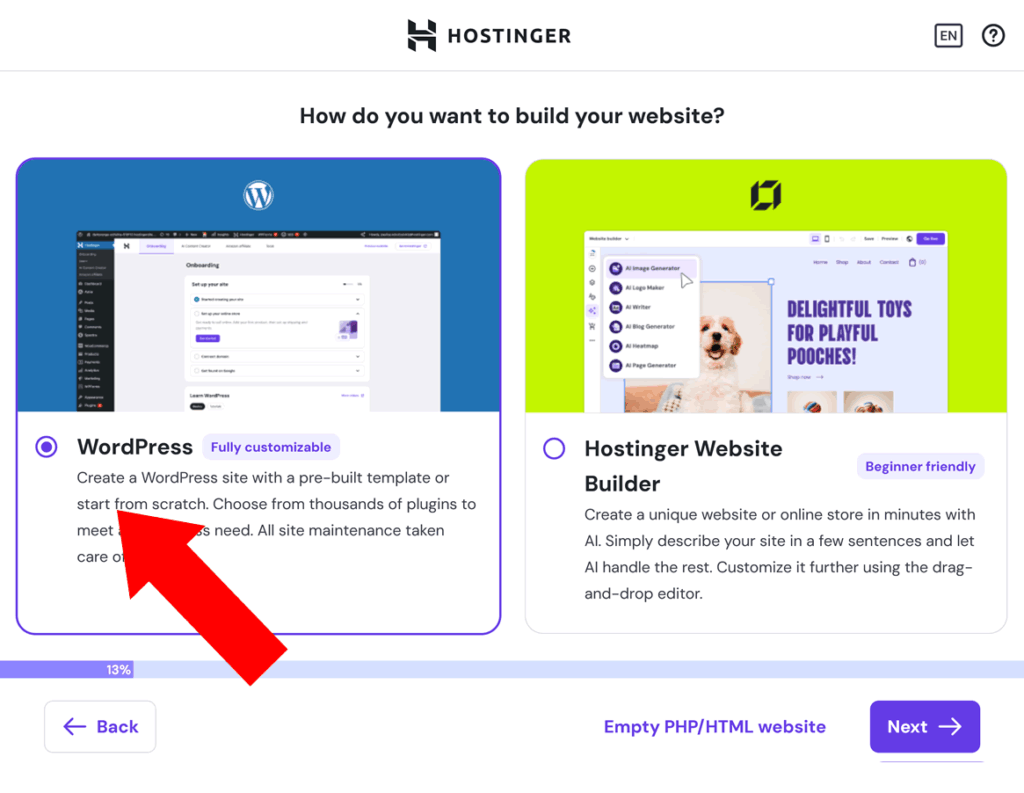
-
In the next step, you’ll be given three options: install WordPress, use Hostinger’s own website builder, or start with an empty PHP/HTML website. While their side builder has become quite alright by 2026, we’ll go for WordPress for maximum simplicity:

-
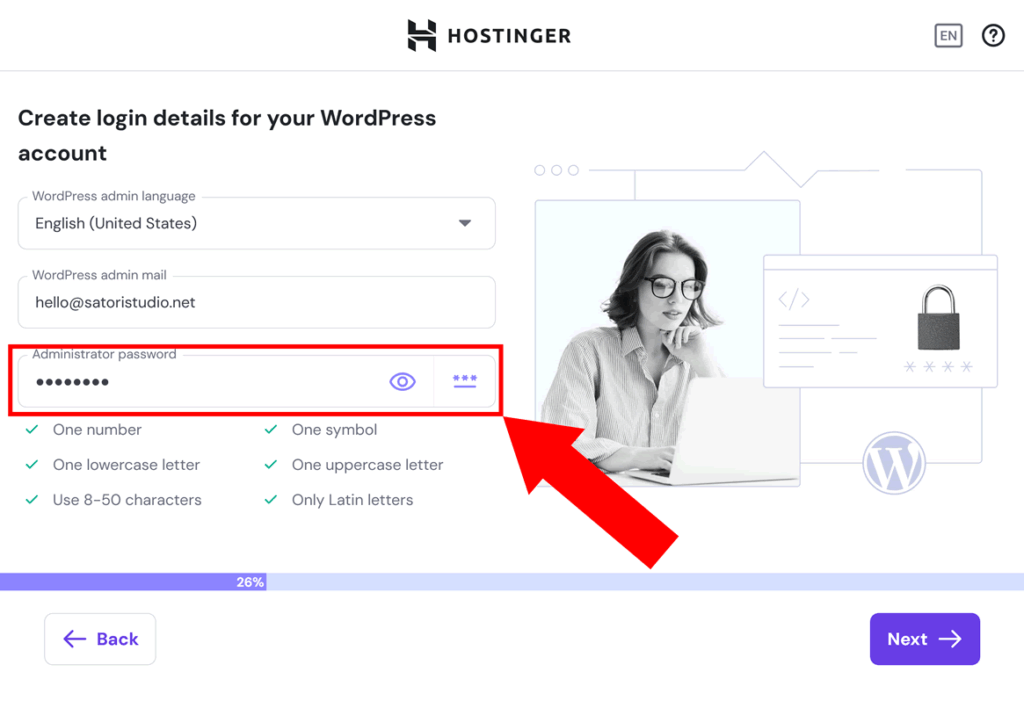
In the next step, you will be prompted to create a password for your WordPress admin area (note that it may be pre-generated for you – make sure you use your own!). You can also adjust the email and language if you want:

-
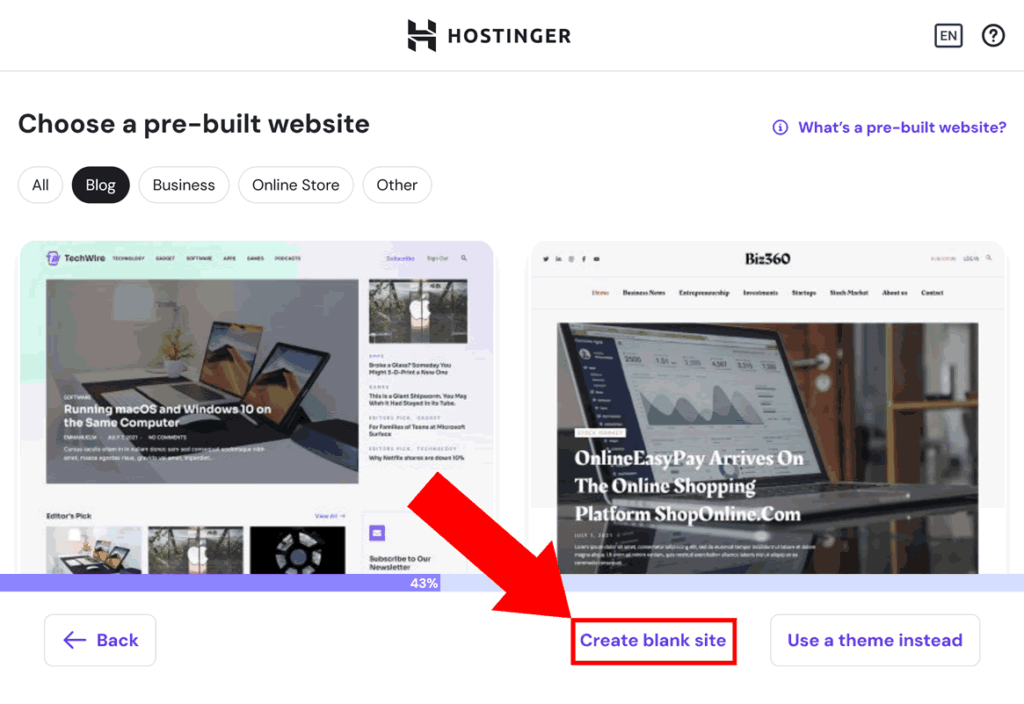
Next, you will have a choice between using a pre-built website (complete with design, content dummies, etc), one of Hostinger’s partner WordPress themes (all freemium, mind you!) or a blank site.
We recommend going for the blank site option, since there are literally thousands great free themes out there that will make your blog more unique than one of ten pre-made options Hostinger offers to millions of people:

- Next, you will be asked about the domain name – just choose “Use temporary domain” if you’re still thinking about yours; we will connect your final domain name right before launch in step 4.
-
In the next step you will be able to adjust in which of Hostinger’s 12 global datacenters your blog will be stored.
The closer your server to your main audience, the faster it will load your website (so don’t choose Singapore if your blog is primarily for US readers!).
Finally, click on “Install WordPress“.
- After a few seconds, your WordPress blog install is completed 🪄 which means your shiny new blog is halfway done!
Let’s take care of essential settings:
Step 3: Configure Your Blog, the Smart Way
Before we jump into design or content, let’s take a few minutes to tweak some basic settings. Trust us, a few quick adjustments now will save you hours of confusion later.
To log into your WordPress admin panel you can either click “Edit Website” in Hostinger’s dashboard, or just visit yourblog.com/wp-admin and log in with the email and password you set up earlier.
Here’s what to do first:
-
Go to Settings → General
Be sure to update your Site Title and Tagline. These will appear in your browser tab and sometimes in search results – so make them short and descriptive. While you’re here, double-check your timezone and preferred date format. -
Next, head to Settings → Permalinks
Select the Post name option – this gives you clean, readable URLs likeyourblog.com/my-first-postinstead ofyourblog.com?p=123. Better for users, better for Google. -
Still with me? Great – now go to Settings → Discussion
Scroll down to Before a comment appears and check the box for “Comment must be manually approved”. This keeps spammy bots and trolls out of your blog’s comments section. -
Bonus step: go to Users → Profile
Change your display name, otherwise your posts be signed by “admin” – pick something that sounds like a real person.
You will no doubt find and adjust more settings as you go along – this is the bare minimum that allows you to get started without spending a day on configuration.
Now it’s time to make this blog truly yours – with a proper theme and a few essential plugins:
Step 4: Choose Design and Add Essential Plugins
Your blog is live. It’s functional. But let’s be honest – it probably looks like a generic placeholder from 2008 right now 🔲
Time to change that.
In this step, we’ll 🎨 pick a theme (that defines how your blog looks) and install a few 🧩 key plugins (that add extra features to your blog).
Don’t worry – you can change themes later without damaging your content, and most plugins take under 10 seconds to install/uninstall.
Step 4.1: Choosing a Theme
Head over to Appearance → Themes in your WordPress admin panel and click “Add New”
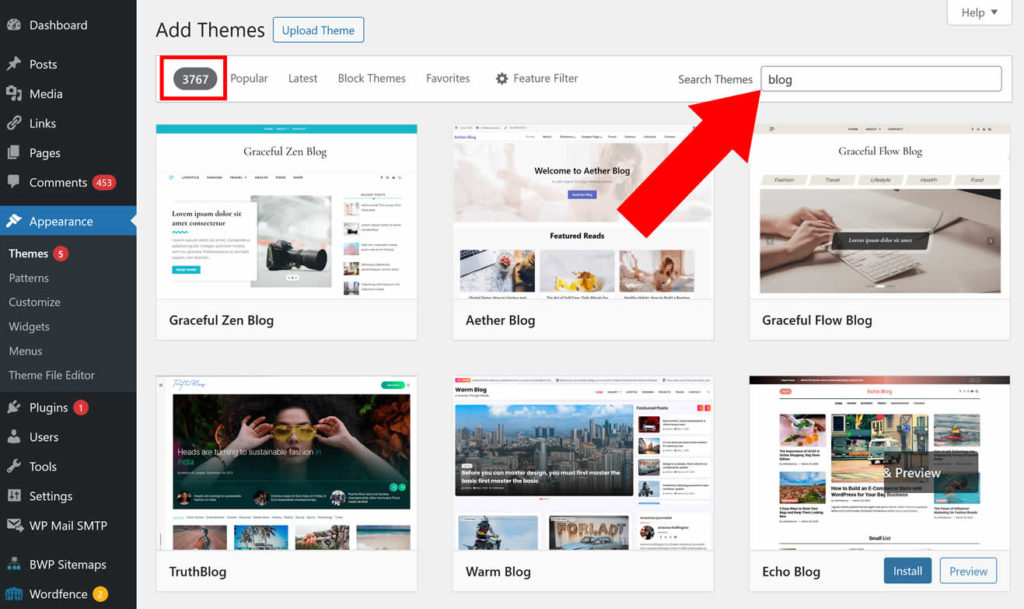
Here you’ll find thousands of free themes – filter by popularity or use the search bar to narrow things down.
- If you want a solid all-rounder to start with, we shamelessly recommend our own free template: Bento ;)
- You might also want to explore popular multipurpose themes like Astra or GeneratePress if you want more options.
- For the power users, a premium theme like Divi might be more suitable – it comes packed with features and professional designs, as well as powerful add-ons such as forms, email marketing, etc
Just remember:
Pick something clean and lightweight — you can always add flair later.
Step 4.2: Installing Plugins
Plugins extend your blog’s functionality; think: SEO tools, analytics, contact forms, backups – all modular, all optional.
(which means installing/uninstalling them will not affect your content or your design).
Here are the first few we recommend installing right away:
- All in One SEO – lets you control how your posts appear in search results (meta titles, descriptions, etc).
- UpdraftPlus – easy, automatic backups that save your blog’s life (and your sanity) if something breaks.
- Site Kit by Google – integrates your blog with Google Analytics and Search Console in a couple of clicks.
- Akismet Anti-Spam – keeps your comments section clean and bot-free.
- WPForms – super simple drag-and-drop form builder (e.g. for a contact page).
To install a plugin, go to Plugins → Add New, search for its name, and click “Install” and then “Activate.”
That’s it!
You should typically see a new section in the admin menu on the left – if it doesn’t appear, check the “Settings” section, it might be a submenu.
Your blog now has a solid design, key functionality, and room to grow 🌱
* * *
Let’s get back to our domain name before we launch:
Putting Your Blog on a Domain
If you haven’t chosen a domain name in step 1, we’re now ready to launch the blog, so it’s time we finalize that bit:
-
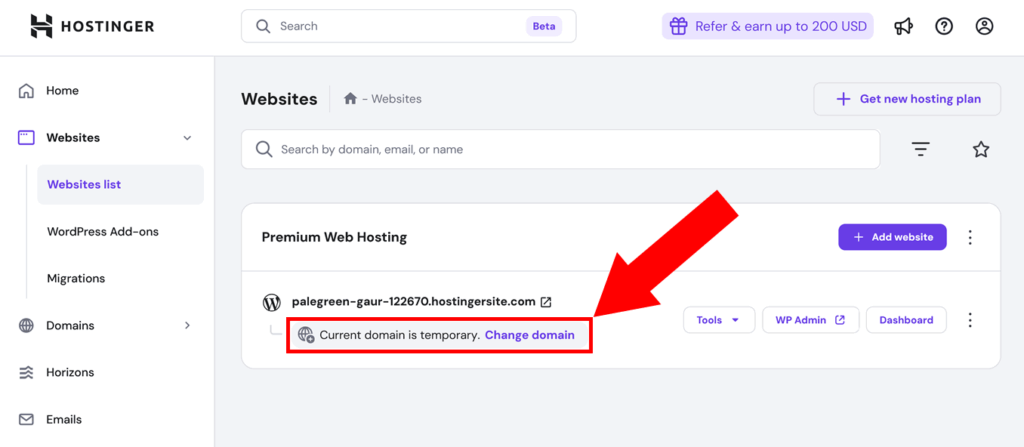
Go to your Hostinger dashboard and choose “Websites” in the left menu. Under your new blog, click on “Change domain”:

-
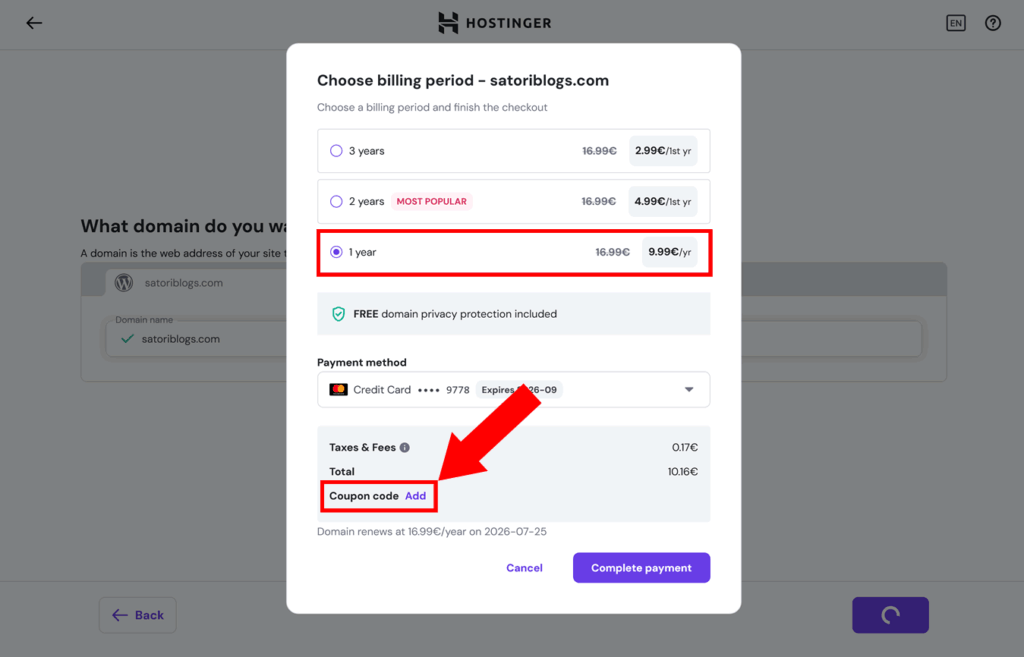
In the new view, type in your desired domain name and you’ll see a pop-up: choose your initial registration period (it will renew automatically after that); we recommend 1 year for testing your blog.

-
In the same window, click on “Add” next to the coupon code and paste the following to get an additional discount:
TRUS10DOMAIN
- You are now ready to complete the order and register the new domain. Your WordPress will migrate onto that domain automatically!
Before we wrap things up, here are some follow-up recommendations for protecting it, optimizing it – and maybe even making it pay for itself:
Bonus Step: Protect Your Blog and Make it Fast
You’ve built your blog, styled it up, added features – now let’s make sure it’s secure, stable – and loads fast.
Here’s a few quick tips to achieve that without paying extra or going down a tech rabbit hole:
Tip #1: Automatic Backups
🔐 You know the saying – there are two types of bloggers: those who back up, and those who eventually cry into a pillow at 2am.
Let’s not be the second kind.
Hostinger (and most other big hosts) offers weekly backups on all plans, but if you want more control, we recommend the free UpdraftPlus plugin –
It creates daily automatic backups of your blog and lets you store them offsite (e.g. on Google Drive or Dropbox) – so even if your server crashes or WordPress install gets messed up, your content is safe.
Tip #2: Basic Blog Security
🛡️ You don’t need military-grade encryption – just a few simple rules:
- Use strong passwords: no
admin123, please. You can use a tool like NordPass or 1Password to store your strong passwords securely. - Keep everything updated: WordPress core, themes, and plugins. Updates often fix security holes.
- Add 2-factor login via e.g. this plugin – it requires a one-time code from your phone when logging in and makes it much, much harder for cybercriminals to break into your blog.
Tip #3: Speed Boosts
🚀 Even the prettiest, most informative blog is pointless if it takes half a minute to load. In fact, most users tend to abandon a page after ~3 seconds of loading time!
Here’s what to do:
- Enable caching: install a free plugin like LiteSpeed Cache (best for Hostinger) or WP Super Cache.
- Use compressed images: upload images in
.webpformat or use a plugin like ShortPixel to automatically compress and optimize them. - Keep plugins lean: avoid installing 20+ plugins in your WordPress, especially “just to try them out.” Stick to what you need and remove anything you’re not actively using.
Bonus: Hostinger (and other modern hosts) already use fast global CDNs, SSD storage, and PHP 8+, so you’re off to a good start performance-wise.
Voila – you now have a blog that’s fast, safe, and future-proof. Of course, there’s much more you can explore within any of these directions – but that’s way beyond our scope today.
Ready for the final step?
Let’s talk about turning this blog into a money machine 💸
How to Make Money With Your Blog
Sure, most people don’t start a blog with an explicit goal to get rich.
But once you’re publishing great content and building a real audience… why not let your blog pay the bills?

Here are three of the most popular and proven ways to monetize a blog – starting small, scaling as you grow:
Option 1: Affiliate Marketing (Best for Beginners)
💰 You link to products or services you genuinely like – and if someone buys through your special tracking link, you earn a commission.
To give a couple of examples:
- Reviews: write a post reviewing your favorite digital tools and link to their websites using your affiliate links
- Guides: create a comparison guide (like our site builder roundup) and include affiliate links to each product
You don’t need a huge audience or lots of visitors for this to work – just trust, relevance, and consistency.
Get started by joining affiliate programs like Amazon Associates, Impact, PartnerStack, ShareASale – as well as specific programs of your hosting provider, VPN, or SaaS tool
Pro tip: Only recommend stuff you actually believe in. Otherwise it’s just advertising – and readers can smell that a mile away.
Option 2: Ads (Best for Popular Blogs)
📢 Once your blog starts getting consistent traffic, you can earn even more passive income by showing ads.
The easiest way to start is with Google AdSense – it automatically places relevant ads on your site and pays you per view or per click.
Other popular ad platforms to check out include Mediavine, Ezoic, and BuySellAds.
Keep in mind that ad income tends to be minuscule unless you’re getting hundreds of daily visitors.
But if your niche has high-value traffic (e.g. finance, software, B2B) or you’re getting serious volumes on your blog, this monetization path can be a boon (especially if combined with affiliate marketing mentioned earlier!)
Option 3: Sell Your Own Products or Services
🛍️ Once your blog has an audience, you can start using it as a store to sell stuff:
- Digital products: niche ebooks, online courses, checklists, templates, etc
- Physical products including your own creations or pre-made via dropshipping or print-on-demand
- Services: business coaching, professional consulting, freelance writing or design
You can add e-commerce functionality to your blog using a free plugin like WooCommerce – or link to an external platform like Gumroad and Etsy.
Remember: monetization takes time. Focus first on creating content people actually want to read – the money comes after the trust.
Blogging FAQ
🧠 Still got questions? Here are some of the most common ones we get from new bloggers:
Do I need to know how to code to start a blog?
Nope. WordPress and modern hosts let you create everything through visual editors and easy menus – no coding required at all.
How long does it take to launch a blog?
With this guide, around 30 minutes – including setup, design, and your first few tweaks. You can even take breaks to admire your work.
How much does it cost to start a blog?
You’ll need to spend around $2–3/month for hosting and domain (when billed yearly). Most themes and plugins you’ll need are free.
Will anyone actually find my blog?
Yes – if you create helpful, well-written content and follow basic SEO principles. Plugins like All in One SEO and Site Kit help a lot.
Can I move my blog to a different host later?
Absolutely. WordPress makes it fairly easy to migrate to another hosting provider or change domains. Your content is portable.
How long does it take to earn money from blogging?
It varies – but most blogs don’t earn meaningful income in the first few months. Focus on content and trust first; the money comes after.
Still wondering about something? Drop your question in the comments section – we’ll be happy to help 🧵
Final Thoughts + One Honest Secret
You made it all the way through, nice work!
You now have everything you need to build a blog that looks good, works fast, and actually has a shot at attracting real readers (not just bots and your mom).
And here’s the honest truth – the one I wish someone told me earlier:
The biggest difference between a successful blog and a dead one? It’s not tech. Not writing skills. Not even luck. It’s this: keep showing up.
Most blogs fail because their authors simply stop – very often right before things start working!

So post your first article.
Then another.
And another.
You’ll get better, faster, sharper.
And one day, someone you’ve never met will leave a genuine comment that says something like: This helped me so much, thank you! That’s when it clicks.
Until then, keep going: you’ve got this.
And if you ever get stuck or have questions – just scroll down to the comments section and join the discussion.
Thanks for reading – and welcome to the blogging side of the internet 🖖