..Hace unos años, me vi creando una lista de “libros por leer” que no paraba de crecer — recomendaciones de amigos, menciones en medios, descubrimientos personales.
Nunca leí ninguno. La lista simplemente se hacía más y más larga.
Blinkist cambió eso.
Avanzamos hasta hoy, y he pasado por cientos de libros mientras camino al trabajo, espero un vuelo o pongo la lavadora:
Así que si te estás preguntando si Blinkist realmente vale la pena en 2026 — aquí tienes todo lo que me hubiera gustado saber antes de suscribirme.
NOTA DEL AUTOR por qué puedes confiar en esta reseña:
He usado Blinkist personalmente durante más de 36 meses como parte de mi rutina diaria. Esta reseña no es una mirada rápida — es una evaluación basada en casos reales, desde escalas en aeropuertos hasta descansos de domingo en casa. Mi objetivo aquí es simple: darte la respuesta más clara sobre si Blinkist vale tu dinero en 2025.
…Por cierto, si el video de arriba no funciona, aquí tienes el enlace directo a YouTube.
Y ten en cuenta que el resto de la reseña contiene muchísima más información que el clip — incluyendo nuestro cupón exclusivo del 40%.
Empecemos con la pregunta más importante sobre Blinkist:
¿Por Qué Usar Blinkist?
Dicho simple: hay demasiados libros y muy poco tiempo. Cada día, cada hora, cada minuto, hay mil cosas compitiendo por tu atención.
Y como si eso no fuera suficiente, la cantidad de libros nuevos publicados ha estado creciendo a un ritmo tan brutal en las últimas décadas que algunos ya lo llaman una “explosión de libros”:
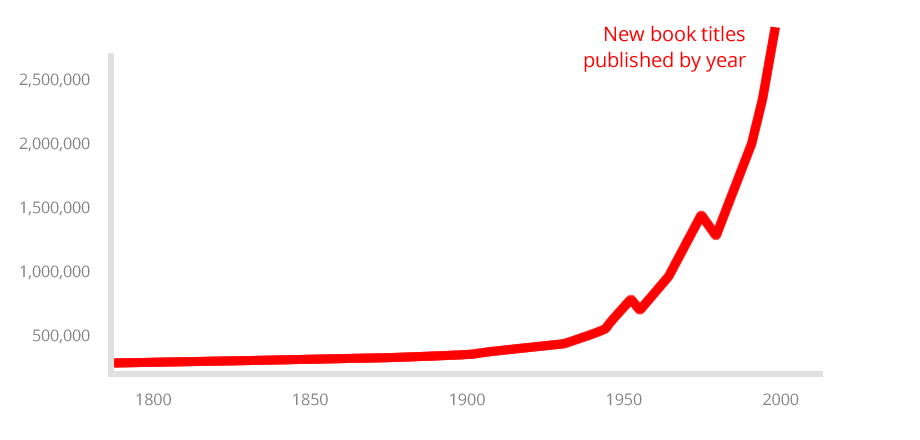
Fuente: ourworldindata.org/books
Con miles de títulos nuevos saliendo cada año — y solo 24 horas en el día, ¿cómo se supone que mantengas al día una lista de lectura que no deja de crecer?
Ahí es donde entra Blinkist: al ofrecer versiones resumidas y fáciles de digerir de libros populares, te ayuda a navegar mejor este océano infinito de conocimiento humano.
En este análisis a fondo, vamos a ver Blinkist desde todos los ángulos posibles, basado en nuestros 36 meses de pruebas, con el objetivo de responder las siguientes preguntas:
- 💰¿Vale la pena pagar una suscripción a Blinkist?
- 🏆¿Hay alternativas que sean mejores?
- 📚¿Puede Blinkist reemplazar la lectura de libros completos?
- ⚡¿Cómo usar Blinkist de la forma más eficaz?
Al final de esta reseña de Blinkist tendrás todo lo que necesitas para decidir si realmente vale tu tiempo y dinero — y cómo usarlo para leer docenas de libros al mes de forma eficiente. Vamos allá:
Entonces, ¿Qué Es Blinkist, Exactamente?
En pocas palabras, Blinkist es un servicio de resúmenes de libros de no ficción. Hay miles de resúmenes —o blinks— en la biblioteca de Blinkist, y se añaden nuevos títulos constantemente.
¿Cómo funciona Blinkist?
Cada blink está estructurado como una mini narrativa independiente que puedes leer (o escuchar) en unos 15 minutos.
Cada resumen incluye entre 7 y 12 secciones, con un repaso de las ideas clave del libro [sí, ¡un resumen del resumen 💎!] y consejos prácticos aplicables.
Los blinks están disponibles en formato de texto y de audio, lo cual veremos más adelante en la siguiente sección; pero para resumir, aquí van las 3 cosas esenciales que debes saber:

Blinkist se asegura de que puedas acceder a los resúmenes en casi cualquier situación, ofreciendo múltiples formas de consumir el contenido: mediante su servicio web en el navegador, una app móvil, e incluso una integración directa con Kindle.
A continuación analizamos cada una de estas opciones –
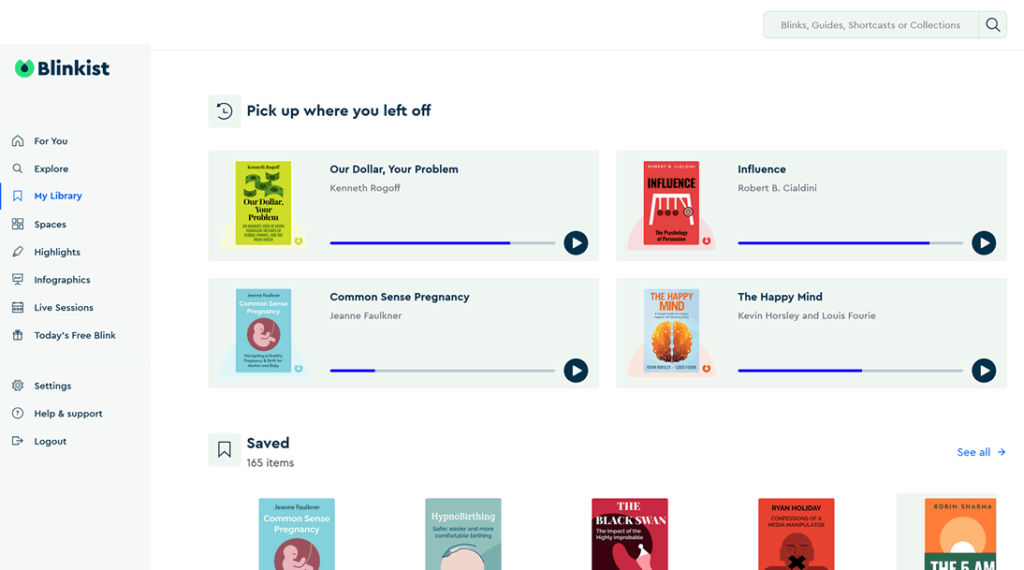
App de Blinkist: La Experiencia Móvil
La interfaz que probablemente usarás más es la app de Blinkist, porque cubre los escenarios más comunes.
Hablamos, por supuesto, de leer o escuchar blinks sobre la marcha: al ir al trabajo, caminando, o esperando a que llegue un amigo en ☕ una cafetería
La app está dividida en cuatro secciones accesibles desde las pestañas inferiores: Para ti, Shorts, Explorar y Mi Biblioteca.
La interfaz de lectura es minimalista y sin distracciones: los únicos botones visibles son atrás, audio y tamaño de texto, y hasta esos puedes ocultarlos con un simple toque en el texto principal:
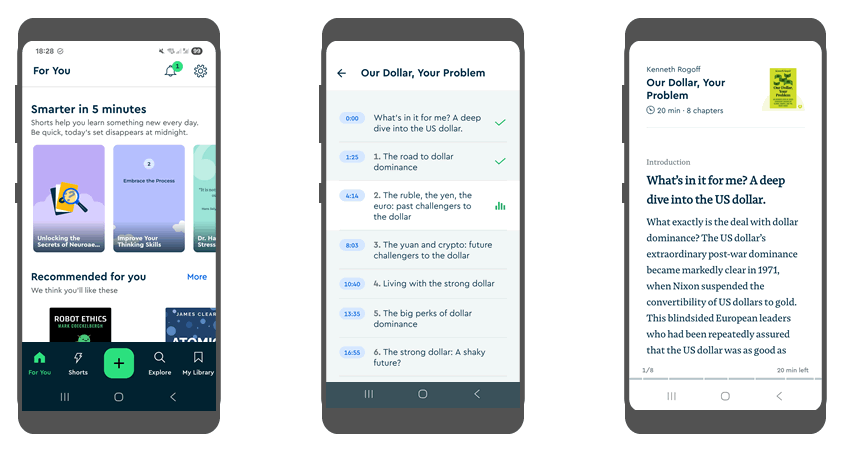
Deslizar hacia la izquierda o derecha pasa de página, y la barra de progreso en la parte inferior te indica en qué punto del blink estás, sin molestar.
Y ahora, la función estrella:
Después de usar Blinkist durante más de 3 años, podemos afirmar con seguridad que una de las funciones más útiles de la app son las versiones en audio de los blinks, que te permiten mantener los ojos y las manos libres para otras tareas.
Puedes tocar el icono de descarga para guardar la versión en audio en la memoria interna de tu dispositivo y así escuchar sin conexión — muy útil para vuelos o momentos sin internet. También puedes activar la descarga automática de todos los blinks que guardes en tu biblioteca.
Más impresiones sobre los blinks en audio:
- hay narradores tanto 💁♀️ mujeres como hombres, lo que implica voces variadas y en su mayoría agradables,
- gracias a esa variedad, 📣 no te cansas de escuchar siempre la misma voz,
- y en cuanto a 🎧 calidad de sonido, los fallos son muy pocos, y los problemas han ido disminuyendo con el tiempo.
El problema más común es que el audio se congele al pasar de una sección a otra, algo que puede ocurrir con una conexión débil o al perder la red de repente. Para solucionarlo, basta con cerrar y volver a abrir la app.
Ahora, vamos a cerrar (virtualmente) la app y mirar la versión web del servicio:
Versión Web de Blinkist
La versión de navegador de Blinkist es básicamente una extensión de la app, con el menú al lado izquierdo y algunas opciones adicionales (como el audio) no escondidas tras menús:
Al igual que en la app, la interfaz de lectura en navegador ha sido diseñada en un estilo minimalista, con cada detalle pensado para una experiencia sin distracciones.
En general, según nuestras pruebas a lo largo de varios años, la versión web se usa mucho menos que la app.
Probablemente porque en un smartphone puedes seguir escuchando blinks en modo manos libres, mientras que en el navegador hay muchas más cosas compitiendo por tu atención ;)
Recomendaciones Personalizadas por IA
Una de las incorporaciones más importantes a Blinkist en 2026 es su nuevo feed de descubrimiento impulsado por inteligencia artificial. Analizando tu historial de lectura y escucha, Blinkist ahora te sugiere contenido personalizado — una función parecida al “Discover Weekly” de Spotify, pero aplicada al conocimiento.
Con el tiempo, la IA se vuelve más afinada al predecir qué temas y autores probablemente te van a gustar.
Esta función también se integra con Blinkist Spaces (algo así como playlists de Spotify), lo que te permite crear colecciones temáticas para distintos estados de ánimo o metas (por ejemplo, “Lunes de Liderazgo” o “Hacks de Salud en 5 Minutos”).
Esto ayuda a que el microaprendizaje se convierta en parte real de tu día, en vez de algo que “algún día” harás.
…Ahora que hemos visto cómo funciona Blinkist en distintas plataformas, pasemos a hablar de los precios y de si la suscripción vale la pena:
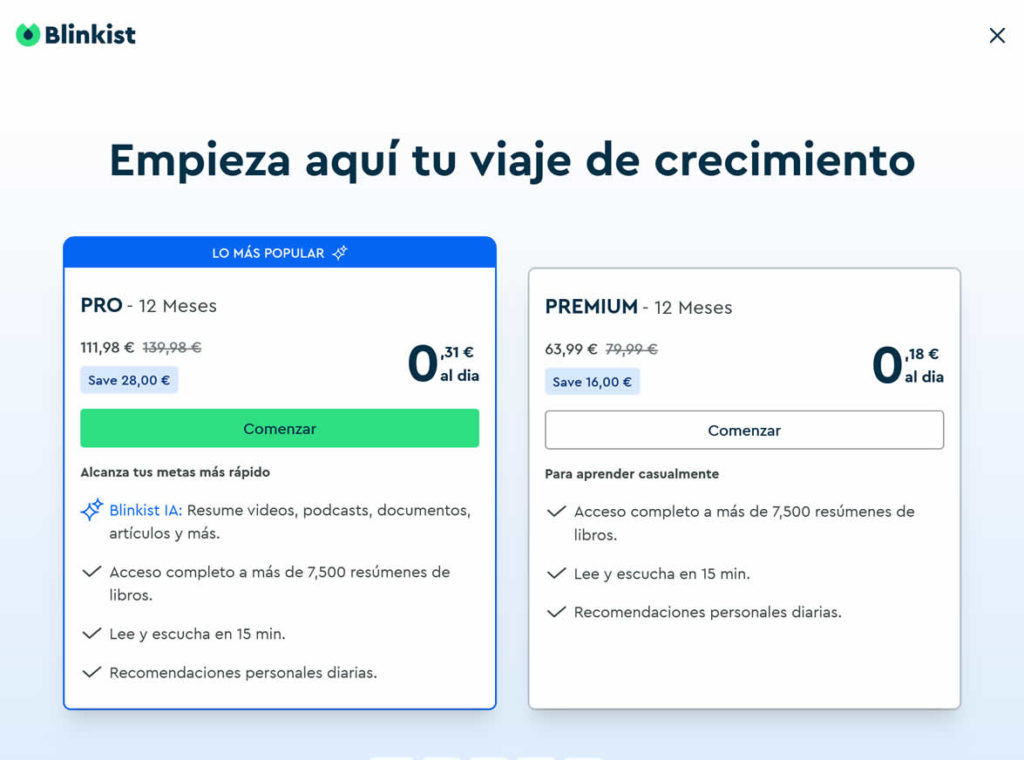
¿Cuánto Cuesta Blinkist?
Una suscripción a Blinkist Premium cuesta €63,99 al año, aunque puedes reducirlo a unos 60 USD usando nuestro descuento exclusivo del 40%.
Al registrarte obtienes acceso inmediato a toda la biblioteca de más de 7500 resúmenes de no ficción, además de funciones como Spaces e infografías.
Si quieres probarlo antes de pagar, siempre puedes registrarte en la cuenta Free Daily, que te permite leer un blink aleatorio al día:
Probar Blinkist gratis ›
No puedes elegir qué libro te toca, pero no hay límite de tiempo y puedes cambiarte al plan de pago en cualquier momento.
Y eso no es todo:
Ahora también existe un plan Pro por €111,98 al año, que incluye la nueva función Blinkist AI, con la que puedes resumir vídeos, documentos, pódcasts o prácticamente cualquier tipo de contenido en cualquier formato.
Más adelante hablaremos de si creemos que estos planes valen lo que cuestan en detalle.
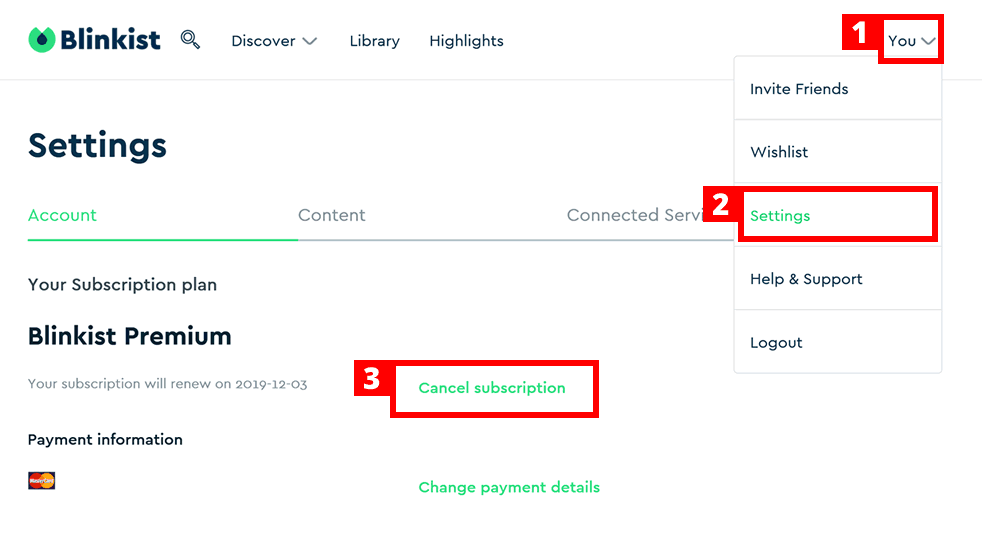
¿Es Fácil Cancelar?
Mientras preparábamos esta reseña, probamos diferentes formas de cancelar una suscripción Premium de Blinkist, y lo más importante que descubrimos:
las opciones de cancelación dependen de la plataforma en la que te hayas suscrito:
Si compraste tu suscripción Premium desde su sitio web, puedes hacer clic en “Tú → Configuración” en la esquina superior derecha de la interfaz web de Blinkist, y luego en “Cancelar suscripción” dentro de la pestaña “Cuenta”. ¡Bastante directo!
Si te suscribiste desde un teléfono Android, el plan Premium (como casi todo lo que compras en Android) estará dentro de la app de Play Store – así que deberás cancelar desde ahí:
toca el botón de menú con tres líneas en la esquina superior izquierda, y luego ve a “Cuenta → Suscripciones” en el menú desplegable.
Si usas un iPhone, deberás ir a la app de “Ajustes”, tocar “iTunes y App Store”, seleccionar tu Apple ID y luego pulsar en “Ver Apple ID”. En ambos casos verás una lista de tus suscripciones activas; solo tienes que buscar Blinkist Premium y hacer clic en “Cancelar”.
Si tienes cualquier problema con el plan de pago, te recomendamos contactar al equipo de soporte de Blinkist – responden rápido y suelen ser muy amables.
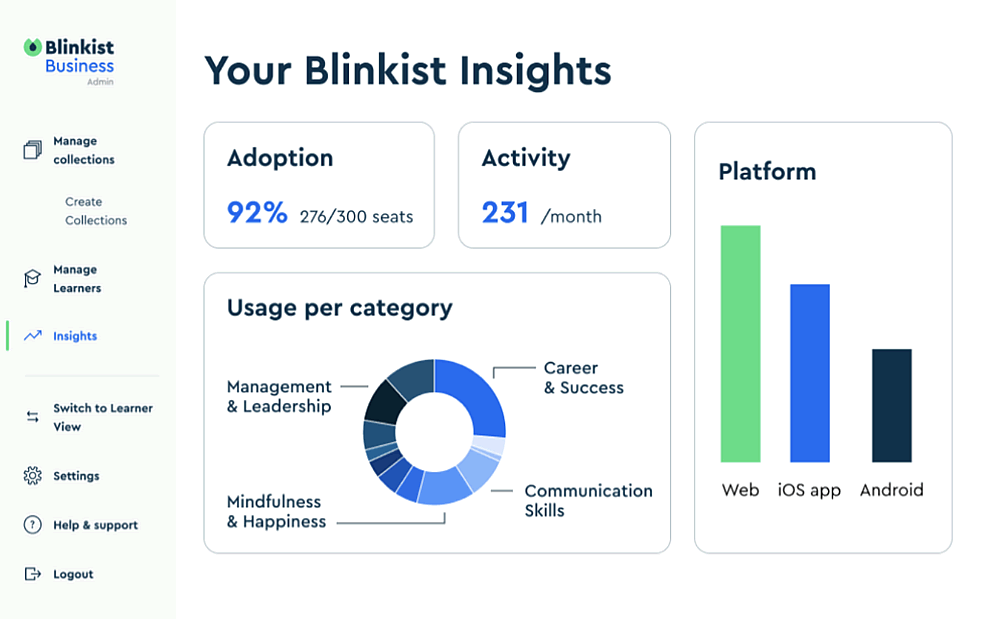
Blinkist para Empresas
Si tu equipo necesita grandes ideas en bloques pequeños — durante los trayectos, las pausas para el café o en sesiones de brainstorming — Blinkist para Empresas puede ser tu arma secreta.
Se trata de la versión corporativa de Blinkist, pensada para el aprendizaje en el trabajo.
Imagina acceso ilimitado a resúmenes condensados de libros y pódcasts de no ficción, junto con herramientas diseñadas para formación en equipo: paneles de administración, integración con LMS, rutas de aprendizaje personalizadas e incluso módulos de coaching.
Según la propia Blinkist, aquí hay algunas razones para considerarlo:
- Alta adopción y renovación: el 68% de los empleados participa en los primeros 3 meses, y el 93% de las empresas renuevan tras el primer año.
- Aprendizaje en cualquier momento y lugar: el 67% del uso ocurre fuera del horario laboral — ideal para modelos de aprendizaje flexibles.
- Construye cultura: fomenta el coaching, la diversidad e inclusión, la recapacitación y el desarrollo de liderazgo — todo mediante rutas de aprendizaje compartidas.
El precio depende del volumen, empezando desde 5 licencias a 99 USD/año cada una en el plan Team. El plan Business (100+ usuarios) añade créditos de coaching en vivo para cada miembro del equipo, mientras que el plan Enterprise (200+ usuarios) incluye SSO, un gestor de cuenta dedicado y otras ventajas pensadas para grandes empresas. Para estos últimos planes es necesario contactar directamente con Blinkist.
¿Vale la pena Blinkist para Empresas?
Todo indica que sí: Blinkist asegura que más de 1.500 compañías ya utilizan la plataforma, con excelentes valoraciones de equipos de RRHH y formación.
Probar Blinkist para Empresas ›
Si tu organización prioriza el aprendizaje continuo, el crecimiento en liderazgo y la capacitación transversal, añadir Blinkist a tus herramientas es definitivamente algo a considerar.
En resumen: Blinkist para Empresas no es solo un beneficio extra: es una inversión inteligente en cultura de aprendizaje. Si tu equipo carece de tiempo pero busca nuevas ideas, este puede ser el impulso de microaprendizaje que no sabías que necesitabas.
Ventajas y Desventajas
En esta sección vamos a resumir los beneficios de usar Blinkist, así como señalar algunas áreas que podrían mejorar:
- Acceso a una biblioteca en crecimiento con 7500+ resúmenes de alta calidad de los mejores libros de no ficción actuales.
- Disponibilidad multiplataforma: interfaz web y apps móviles para Android e iOS. Posibilidad de sincronizar la biblioteca personal con Kindle.
- Más económico que cualquier otro servicio similar de resúmenes, considerando el tamaño del catálogo y las funciones disponibles.
- Versiones en audio narradas profesionalmente que permiten absorber contenido sobre la marcha, incluso sin conexión (ideal para aviones u otros trayectos).
- La función de resaltado permite guardar fragmentos clave y recuperarlos fácilmente después.
- Recomendaciones basadas en IA según el tipo de libros que lees, para ayudarte a ampliar tu biblioteca de forma inteligente.
Blinkist Pro te permite resumir tus propios documentos, vídeos, pódcasts, etc. con IA y crear tu propia colección de conocimiento condensado.
- En la app móvil, a veces es necesario actualizar manualmente la biblioteca (arrastrando hacia abajo) para ver los blinks añadidos desde la web.
- El audio puede congelarse en ocasiones al pasar de una sección a otra, especialmente si la conexión es débil.
- Todavía no es posible recomendar directamente blinks a otros usuarios de Blinkist desde la app (hay que compartir un enlace).
Preguntas Frecuentes
Antes de entrar en cómo se compara Blinkist con otros servicios y cómo usarlo de la forma más eficiente, aquí tienes un resumen de las dudas más comunes que hemos recibido a lo largo de los años:
¿Qué hace exactamente Blinkist?
Blinkist convierte los libros de no ficción más vendidos en resúmenes de 15 minutos que puedes leer o escuchar. Está diseñado para un aprendizaje rápido, dándote las ideas clave sin necesidad de leer el libro completo.
¿Blinkist ofrece audiolibros completos?
No — Blinkist se centra en resúmenes cortos. Sin embargo, muchos blinks incluyen enlaces a las versiones completas en plataformas como Audible o Amazon, por si quieres profundizar.
¿Puedo usar Blinkist sin conexión?
Sí. Puedes descargar cualquier blink —en texto o audio— y acceder a él más tarde incluso sin conexión a internet. Ideal para vuelos o trayectos con poca cobertura.
¿Cuál es la diferencia entre Blinkist Premium y Pro?
Premium te da acceso completo a la biblioteca de Blinkist. Pro añade una potente herramienta de IA que te permite crear resúmenes tipo blink a partir de tus propios PDFs, pódcasts, vídeos de YouTube y más.
¿Puedo compartir mi cuenta de Blinkist?
Con Blinkist Connect, ¡sí! Puedes añadir gratis a otra persona en tu plan Premium — es básicamente una suscripción dos-por-uno incluida.
¿Existe una versión gratuita de Blinkist?
Sí. El plan Free Daily te permite leer un blink aleatorio al día. No podrás elegir el título, pero es gratis para siempre y sin condiciones ocultas.
¿Es fácil cancelar Blinkist?
Bastante sencillo – si te suscribiste en su web, basta con ir a Configuración → Cuenta → Cancelar. Si lo hiciste desde la App Store o Google Play, tendrás que cancelar desde esas plataformas.
¿Es Blinkist adecuado para adolescentes o estudiantes?
Blinkist no está pensado para niños, pero muchos títulos tratan sobre habilidades de vida, creatividad y motivación. Con algo de orientación, los adolescentes mayores pueden beneficiarse bastante.
¿Puede Blinkist ayudarme a decidir qué libros leer completos?
Exacto. Uno de los mejores usos de Blinkist es como filtro previo. Puedes hojear docenas de resúmenes y luego escoger solo los títulos más prometedores para leer enteros.
¿Es Blinkist mejor que los pódcasts?
Depende de tus objetivos. Los pódcasts son geniales para explorar y entretenerse. Blinkist es mejor cuando buscas conocimiento estructurado y de alto rendimiento sin relleno. Muchos usuarios combinan ambos.
¿Cómo se escribe “Blinkist”?
Es comprensible la confusión porque “BlinkList” suena más lógico. Para hacerlo más enredado, de hecho existió un sitio web con ese nombre, pero no tiene relación alguna y lleva inactivo desde 2017. Así que ya sabes: ni “BlinkList”, ni “BlinkEst”, ni “Blikist” son correctos 😉
Competidores Destacados: ¿Hay Algo Mejor Que Blinkist?
Como ocurre con casi todos los servicios online, sería raro que Blinkist estuviera solo en su nicho — de hecho, puedes encontrar resúmenes de libros en otros lugares también, incluyendo apps especializadas.
Entre los competidores más cercanos, vale la pena mencionar getAbstract e Instaread, siendo el primero el más completo en cuanto a funcionalidades.
Aunque Blinkist no es el único servicio de resúmenes de libros de no ficción que existe, hay ciertos aspectos clave que lo diferencian del resto. Así que, vamos a meternos en los detalles y ver cómo se compara Blinkist con cada uno:
Blinkist vs getAbstract
Mientras que Blinkist se enfoca principalmente en usuarios individuales y empresas pequeñas o medianas, getAbstract está orientado al público corporativo, ofreciendo una biblioteca con resúmenes de libros de no ficción (algunos bastante técnicos), artículos, charlas en video y reportes económicos.
Su colección es mucho más amplia que la de Blinkist, con más de 22,000 títulos incluidos en el plan Pro — pero eso tiene un precio: con la suscripción anual, te costará 299 USD al año.
Aunque también ofrecen dos planes especiales para estudiantes, uno de ellos da acceso gratuito a 5,000 títulos si verificas tu identidad; el plan Student Pro te permite acceder a toda la biblioteca de 22,000+ por 99 USD al año.
getAbstract destaca por funciones adicionales como puntuaciones multidimensionales en los resúmenes y la posibilidad de organizar tu biblioteca personal mediante etiquetas — muy útil para usuarios avanzados.
El precio juega claramente a favor de Blinkist, pero si buscas la mayor variedad posible de títulos y formatos, el plan getAbstract Pro puede ser una inversión interesante para tu crecimiento personal y profesional.
Blinkist vs Instaread
Como suele ocurrir en nichos específicos de servicios digitales, siempre hay un competidor centrado en lo móvil y enfocado en Apple. En el caso de los resúmenes de libros, ese competidor es Instaread — una app para iPhone y iPad con una biblioteca de unos 700 resúmenes de libros populares de no ficción. Cada uno está disponible en texto y en formato de audio, y si te gusta el resumen, puedes comprar el audiolibro completo directamente desde la app.
Una de las diferencias clave con Blinkist es que Instaread también ofrece resúmenes de ficción, como “1984” de Orwell o “El gran Gatsby” de Fitzgerald — lo que la convierte en una opción interesante si quieres mezclar lectura rápida de no ficción con clásicos literarios.
La app ofrece una prueba gratuita de 7 días, tras la cual deberás elegir entre dos planes de pago: uno mensual por 8,99 USD al mes, o un plan anual por 79,99 USD.
Esto es apenas un 10% más caro que Blinkist Premium, pero hay que tener en cuenta que Blinkist está disponible en más plataformas, incluyendo Android. Además, la biblioteca de Instaread es bastante más pequeña, por lo que podrías quedarte sin títulos en las categorías que te interesan.
Blinkist vs 12min
Uno de los competidores más recientes es 12min. Este servicio de resúmenes se parece tanto a Blinkist que algunos podrían llamarlo una imitación, pero si lo miras de cerca, tiene diferencias importantes que lo hacen digno de considerar.
Originario de Brasil, 12min ha apostado por una audiencia multilingüe desde el inicio — a pesar de ser una plataforma joven, ya ofrecen resúmenes en inglés, portugués y español, con planes de añadir más idiomas próximamente. Su biblioteca actual ronda los 200 títulos, lo cual no es demasiado (Blinkist tiene más de 7500), pero la empresa los está agregando a buen ritmo, lo que lo convierte en un proyecto prometedor.
Ofrecen una prueba gratuita de 3 días, tras la cual tienes dos opciones: quedarte en el plan gratuito (un resumen por semana) o pasarte al plan Premium por 69,30 USD al año. Para el tamaño actual de su biblioteca, ese precio es algo elevado, aunque viene con garantía de devolución de 30 días, así que no hay mucho que perder por probarlo.
En resumen, 12min aún se siente como una plataforma en fase temprana, pero es un competidor interesante, especialmente para quienes leen o están aprendiendo otros idiomas.
Blinkist vs Accel5
Accel5 es el nuevo nombre de Bizsum, un servicio de resúmenes enfocado específicamente en libros de negocios, como su antiguo nombre lo sugería. Además de versiones en texto y audio de libros populares, Accel5 ofrece acceso a una biblioteca de videos educativos impartidos por figuras destacadas en áreas como gestión, finanzas, marketing, etc. — una adición muy interesante para quienes buscan una experiencia de aprendizaje más completa.
Hay planes tanto para empresas como para usuarios individuales. Estos últimos cuestan 14,95 USD al mes, o 149 USD al año (es decir, 12,41 USD/mes si se paga anualmente). Aunque esto es bastante más caro que Blinkist Premium, los videos adicionales y la disponibilidad en varios idiomas (incluyendo español, francés y chino) pueden resultar atractivos para lectores con un enfoque más empresarial — especialmente si su empleador cubre el costo.
Blinkist vs SumizeIt
Y hablando de competidores recientes, aquí tenemos a SumizeIt — una plataforma nueva en el mundo de los resúmenes de libros, con una estrategia que claramente apuesta por el precio agresivo: su plan Premium con acceso ilimitado cuesta solo 4,99 USD al mes o 39,99 USD al año, casi la mitad que Blinkist.
¿La trampa? SumizeIt tiene una biblioteca mucho más pequeña, con apenas 150+ libros en total (eso es menos que una sola categoría en Blinkist).
Quienes solo quieran leer unos cuantos resúmenes concretos podrían encontrar útil el plan mensual; pero una suscripción anual no tiene mucho sentido, a menos que estés dispuesto a leer absolutamente todo lo que tienen.
SumizeIt está disponible tanto en app móvil como en versión web; también hay una versión gratuita que te deja leer 3 resúmenes sin pagar. Cada resumen incluye una versión en audio, aunque los archivos de audio no están divididos por secciones como en Blinkist, lo que los hace menos prácticos de escuchar.
Blinkist vs Soundview
Soundview es otro competidor relevante de Blinkist, que lleva ofreciendo educación ejecutiva desde 1978 y recientemente renovó su presencia online con un nuevo sitio web (Summary.com).
El servicio está disponible tanto en versión web como en app móvil, así que puedes llevarte Soundview a donde vayas.
La diferencia principal con Blinkist es que la oferta básica de Soundview consiste en un paquete mensual en lugar de acceso completo a la biblioteca: los suscriptores del plan Standard (99 USD/año) reciben resúmenes de los 3 libros nuevos más destacados cada mes, tanto en texto como en audio.
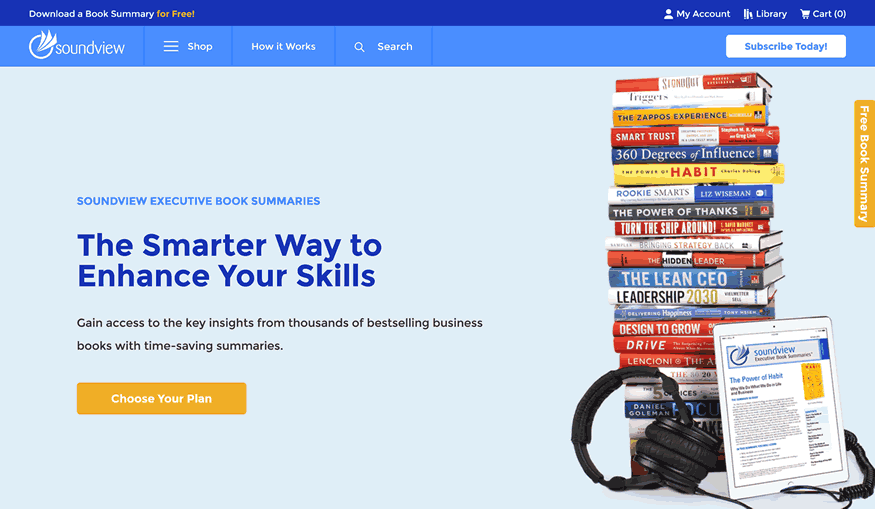
El acceso ilimitado al archivo completo cuesta 199 USD (plan Professional), y el plan Premier (299 USD/año) también incluye una videoteca con resúmenes y consejos de negocios.
Otro plus interesante de Soundview son los webinars en vivo con autores y expertos, que se ofrecen regularmente a todos los suscriptores.
En resumen, es una alternativa más cara que Blinkist, pensada para quienes se enfocan sobre todo en literatura de negocios y quieren mantenerse al día con las novedades — pero el acceso ilimitado sigue siendo mucho más costoso que los 79,99 USD de Blinkist Premium.
Para visualizar mejor las diferencias clave entre Blinkist y sus competidores —como el precio y el tamaño de sus catálogos de resúmenes— hemos preparado esta tabla:
|
Plan más económico |
Tamaño del catálogo |
 |
79,99 USD |
7500+ |
 |
299,00 USD |
22000+ |
 |
89,99 USD |
700+ |
 |
69,30 USD |
200+ |
 |
39,99 USD |
150+ |
 |
99,99 USD |
2000+ |
Los datos anteriores muestran que Blinkist no solo tiene un precio más competitivo que muchos de sus principales rivales, sino que también sale bien parado cuando comparamos el tamaño de su biblioteca: su relación calidad-precio mejora aún más si tomamos en cuenta su interfaz y sus funciones.
Cómo Usar Blinkist de Forma Eficiente
Lo más importante que hay que entender sobre Blinkist es que no está reñido con leer libros completos: aunque sí te ayuda a reducir parte de esa lectura, el verdadero poder de Blinkist se desbloquea cuando lo usas en conjunto con libros completos. Veamos cómo puedes hacerlo:
📚 Preseleccionar libros: hay demasiados libros ahí fuera y muy poco tiempo en cada día; eso significa que tienes que ser selectivo si quieres aprovechar tu tiempo al máximo.
Aquí es donde Blinkist resulta muy útil: al revisar los blinks puedes filtrar fácilmente aquellos libros que no merecen la pena por distintos motivos (pocas ideas nuevas, argumentos flojos, irrelevancia personal o simplemente aburridos).
Esto te puede ahorrar mucho dinero (y tiempo), ayudándote a pagar solo por los libros que realmente lo valen. En la siguiente sección te damos algunos datos concretos que apoyan esta idea.
🔍 Explorar antes de leer: antes de sumergirte en un libro nuevo, puede ser útil hacer una lectura rápida para entender de qué va en general.
Esta estrategia fue detallada en el clásico de 1940 de Mortimer J. Adler: “How to Read a Book”. El autor argumenta que conviene abordar un libro por etapas, y que esta “pre-lectura” —o lectura de inspección, como la llama él— ayuda a absorber lo esencial de forma eficiente y decidir si merece la pena profundizar.
Por cierto, ese libro también está disponible en Blinkist :)
💡 Refrescar lo aprendido: otra forma de usar Blinkist es para recordar el contenido esencial de un libro que leíste hace tiempo. Hay títulos tan buenos que merece la pena volver a ellos cada cierto tiempo y reintegrar sus ideas a tu pensamiento actual.
Además, a veces un libro puede resultarte más valioso con el tiempo – y releer su blink puede ayudarte a refrescar su mensaje rápidamente.
A continuación, veamos un ejemplo concreto de cómo combinar Blinkist con la lectura de libros completos:
- Primero, haz una lista larga de libros que te interesen — por ejemplo, sacados de artículos tipo “lo que leen las personas exitosas” o de recomendaciones personales recientes. (Tener una nota dedicada a esto en Evernote, Google Keep o Notion ayuda).
- Cuando tengas al menos unas cuantas docenas de títulos, añade sus respectivos blinks a tu biblioteca en Blinkist y revísalos de forma metódica (por ejemplo, 2-3 por semana). Si algún libro no está en Blinkist (me pasa con uno de cada diez), puedes buscar su resumen en alguno de los servicios alternativos que vimos antes.
- Haz anotaciones en tu lista después de leer cada blink, indicando si te interesa leer el libro completo. Al final, tendrás una lista filtrada de libros “que valen la pena” para ir comprando o sacando de la biblioteca.
- También es útil repasar el resumen justo antes de empezar el libro completo y un tiempo después de terminarlo — eso ayuda a reforzar la asimilación al recordar las ideas clave sin distracciones ni detalles secundarios.
Puedes repetir este proceso regularmente con los libros nuevos que vayas descubriendo o con tu lista existente. Lo mejor es que te permite equilibrar la profundidad con la amplitud: sacar el máximo provecho de los libros buenos y, al mismo tiempo, mantenerte informado sobre el resto – optimizando tanto tu tiempo como tu dinero.
¿Es Blinkist Mejor Que los Podcasts?
Buena pregunta, especialmente en 2026, cuando plataformas como Spotify o Apple Podcasts están llenas de entrevistas con expertos y debates sobre libros. Pero Blinkist ofrece algo que los podcasts no tienen:
📋 consistencia y estructura.
Cada blink sigue un formato probado diseñado para extraer las ideas clave de un libro – no solo opiniones aleatorias o charlas sin guion. Además, con el nuevo sistema de recomendaciones por IA que mencionamos antes, ahora tienes un feed de resúmenes alineados con tus objetivos personales de aprendizaje.
Los podcasts son geniales para explorar temas nuevos, pero Blinkist es mejor para apilar conocimiento de forma eficiente. Muchos usuarios – incluyéndome – encuentran útil usar ambos: Blinkist para construir una base sólida y podcasts para profundizar en nichos más específicos.
¿Vale la Pena Pagar por Blinkist?
Aquí tienes una forma de poner el coste de la suscripción Blinkist Premium en perspectiva:
Por €63,99 al año, el pago anual se traduce en unos €5.33 al mes – lo que equivale a un par de cafés en tu cafetería favorita.
…¿Vale la pena? Tú decides; pero definitivamente no es un precio alto por tener acceso a un repositorio de más de 7500 resúmenes de conocimiento condensado de la humanidad, si me preguntas a mí.

Otra manera de ver el precio de Blinkist es desde la perspectiva de “preseleccionar” los libros de tu lista de lectura. El precio medio de los títulos más populares de Blinkist ronda los €10 en Amazon (versión Kindle).
Si tenemos en cuenta que la calidad de los libros varía y que no todos parecen haber valido tu tiempo después de leerlos, podrías acabar gastando €15-20 por cada libro realmente valioso. Blinkist puede ayudarte a reducir ese coste varias veces, a un precio fijo de menos de €6 al mes, al ayudarte a decidir cuáles leer completos.
En resumen: aunque el pago se hace anual, Blinkist cuesta menos que un par de cafés para llevar al mes, y además te ahorra dinero ayudándote a elegir mejor qué libros comprar 🤑
Una cosa más antes de seguir:
¿Vale la Pena Blinkist Pro?
En resumen: por €50 extra al año obtienes un servicio ilimitado de resúmenes para cualquier contenido externo, ya sea texto (artículos, documentos, etc.), audio, vídeo, lo que sea.
La alternativa más cercana es ChatGPT y otras herramientas basadas en modelos de lenguaje. La versión Plus que permite subir archivos cuesta €20 al mes — es decir, €120 al año, el doble que el coste adicional de Blinkist Pro.
El tema es que ChatGPT Plus puede hacer muchísimo más que simplemente resumir cosas — así que si ya usas el chat gratuito de forma habitual, recomendaría antes actualizar a ChatGPT que a Blinkist Pro.
La única ventaja de Blinkist Pro es tener todo ese contenido resumido en un solo lugar, junto con tus resúmenes de libros. Si este tipo de “hub” ordenado te resulta atractivo, adelante.
Bonus: Descuento Exclusivo en Blinkist, 40% Menos en Premium
Nos alegra poder ofrecerte una promoción especial en colaboración con Blinkist: un enlace exclusivo con el que puedes ahorrar €16 en tu primer año del plan Premium. Es mucho más fácil de usar que un código de cupón y funciona tanto si ya tienes una cuenta gratuita como si vas a crear una nueva.
Para aprovechar el precio promocional, solo tienes que seguir estos pasos:
-
Haz clic en el botón de abajo para ir a la página oficial de la oferta Satori + Blinkist (se abrirá automáticamente en una nueva pestaña):
Obtener 40% de descuento en Blinkist ›
-
El descuento se aplicará automáticamente al precio final de la suscripción. ¡Disfruta de la mejor biblioteca de conocimiento condensado del planeta!
P.D. Si el enlace anterior no funciona (aunque debería), hay un plan B: puedes probar con este otro enlace: haz clic aquí — el sitio de Blinkist te dirá que “la promo ha expirado”, pero aún así te aplicará un buen descuento 😎
Nuestra Conclusión – ¡Y Ahora Te Toca a Ti!
Si eres de los que tienen más de 100 libros pendientes en la lista de lectura (culpable 🙋♂️) y un calendario que parece un Tetris, entonces sí: Blinkist es probablemente la forma más eficiente en tiempo de conectar con grandes ideas.
No estás dejando de leer libros — estás cribando el océano en busca de perlas.
Por 6–7 USD al mes, accedes a una biblioteca curada de conocimiento que encaja perfectamente en tus trayectos, tus ciclos de lavandería o esos 15 minutos antes de dormir que solías gastar en TikTok.
¿Te convertirá en experto de cada tema? No.
¿Te ayudará a encontrar los libros en los que sí vale la pena profundizar? 100%.
Si a eso le sumas los nuevos resúmenes con IA, las recomendaciones inteligentes, el acceso sin conexión y una interfaz limpia y sin distracciones — tienes una herramienta realmente útil, incluso adictiva 🤫
Así que, si te tomas en serio tu crecimiento personal pero eres alérgico a perder el tiempo, Blinkist es un no-brainer.
Probar Blinkist sin Riesgo ›
¿Aún tienes dudas sobre Blinkist? ¿Ya lo estás usando y quieres compartir tu experiencia? No dudes en bajar a la sección de comentarios y contarnos. ¡Hablemos!
Nota de afiliación: creemos que es justo avisarte de que algunos enlaces en este artículo son enlaces afiliados, lo que significa que ganamos una pequeña comisión si compras a través de ellos. La buena noticia: el precio para ti no cambia – así que si este contenido te fue útil (o simplemente quieres usar nuestro cupón al final del post), te animamos a usar nuestros enlaces al contratar Blinkist Premium. ¡Gracias y salud! 🥂
Ci sono i vecchi hosting provider, testati ; ci sono quelli popolari, con milioni di clienti; ci sono quelli che si evolvono costantemente e reinventano sé stessi…
E poi c’è un piccolo gruppo di compagnie di hosting in mezzo a tutte e tre le categorie:
SiteGround sta decisamente in quella fascia.
In questa recensione dettagliata esamineremo questo host al microscopio per avere le risposte alle domande più popolari:
- 🦄Cos’ha di speciale SiteGround?
- 💳Come scegliere il piano di hosting più padatto?
- 👎Ci sono dei lati negativi nell’uso di SiteGround?
- 🎯Chi dovrebbe usare SiteGround e perché?
Iniziamo dando un’occhiata alle cose che probabilmente non troverai da nessun’altra parte; cose che rendono SiteGround unico:
Cos’ha di Speciale SiteGround
Siamo seri.
SiteGround si concentra su WordPress come altri famosi sistemi di gestione di contenuti e costruttori di siti, ci sono piani a pagamento in base alle tue necessità, supporto 24/7…
Suona familiare.
Quello che differenzia SiteGround sono le sue soluzioni tecnologiche, personalizzate dal suo team interno; più specificamente:
- Un set di misure per massimizzare la ⚡ velocità del tuo sito web, cosa di cui parleremo a parte nel prossimo capitolo,
- Funzioni di 🔐 sicurezza all’avanguardia per prevenire e mitigare ogni potenziale attacco, analizzate in dettaglio in questa sezione,
- Alcuni dei i migliori 💵 prezzi tra gli hosting provider del suo calibro, specialmente quando consideriamo i grandi sconti della prima prova,
- Potenti 🛠️ tool per i clienti per collaborazioni convenienti, test e migrazioni, integrati direttamente dal team di SiteGround (parleremo di questo proprio qui!).
Come abbiamo menzionato, gli utenti di SiteGround ottengono molto più che un server; c’è un ventaglio intero di strumenti amministrativi per rendere la tua vita più semplice:
- Un sistema utente flessibile permette l’accesso ad altri membri del team, clienti, o esperti di terze parti per aiutarti a gestire i tuoi progetti web,
- Puoi creare copie di test dei tuoi siti web sul momento con un click e trasferire ogni cambiamento, di nuovo, con un solo click,
- Ai freelancer e alle agenzie piacerà la funzionalità white label, che ti permette di fornire servizi di hosting ai clienti sotto il tuo brand personale.
Tutti gli strumenti sopra menzionati funzionano sulla base di una solida infrastruttura hardware e software per il massimo delle prestazioni e della stabilità:
Infrastruttura e Velocità
Ecco un fatto sorprendente: SiteGround, uno dei più grandi host al mondo, non possiede nessun server fisico!
Invece, usa Google Cloud per la sua infrastruttura principale…
Sì, hai capito bene: quando stai hostando con SiteGround, il tuo sito web si trova sui server di Google.
Tutto ciò non è affatto inusuale al giorno d’oggi…
…infatti, la maggior parte dei moderni hosting provider, sia grandi che piccoli, si concentra su servizi che aggiungono valore 🚀 e affidano l’hardware vero e proprio alle poche compagnie come Google e Amazon che hanno grossi vantaggi di scala ma non forniscono interfacce user-friendly.
I clienti di SiteGround possono scegliere tra diverse regioni quando creano un nuovo sito web, incluse Europa, Stati Uniti, Asia, e Australia:

I punti blu nella mappa rappresentano le 150+ location del network di Cloudflare CDN, incluso in ogni piano di SiteGround.
Il tuo sito carica automaticamente dal nodo del CDN che è più vicino a ogni singolo visitatore, portando miglioramenti significativi alla velocità.
Per migliorare ulteriormente il caricamento delle pagine, i siti di SiteGround girano su un software specificamente ottimizzato (PHP, MySQL, Brotli compression, ecc…), che porta alcuni tra i tempi di risposta più veloci dell’industria:
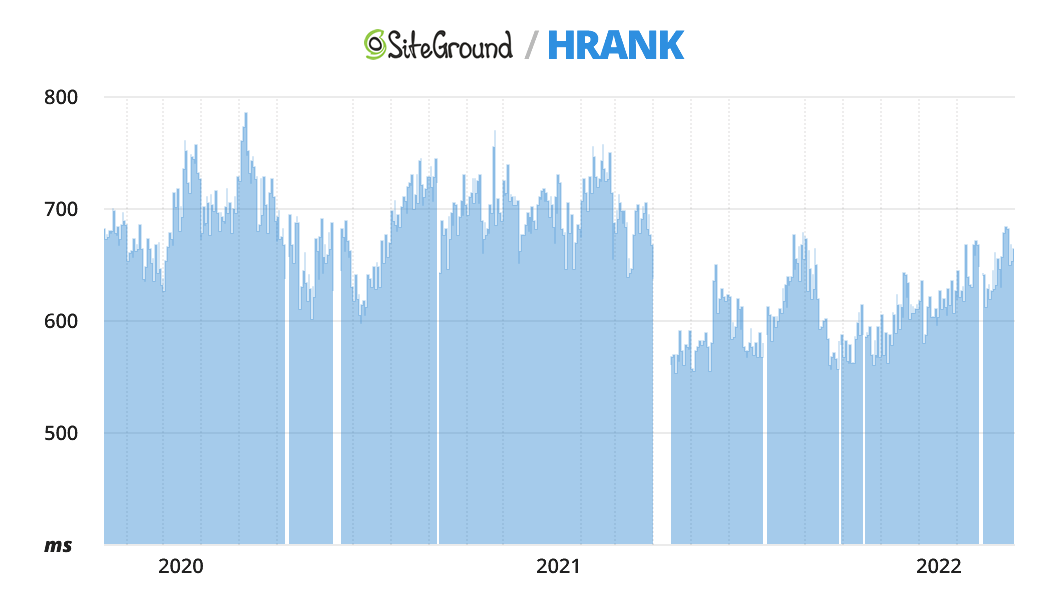
Questa è la ragione principale del perché SiteGround ha mantenuto per anni il podio nelle classifiche di HRank ⚡
Infine, ogni sito web ha in sé uno specifico, preinstallato, plugin di WordPress, che ti permette di controllare facilmente le impostazioni del server e modificare i parametri di caching
Parlando di plugin di WP…
Sicurezza in SiteGround
C’è un altro plugin di WordPress creato dal team di SiteGround per funzionare specificamente sui client dei siti:
SiteGround Security aiuta a prevenire le minacce più comuni e gli attachi al tuo sito web, e anche reagire velocemente in caso di attacco, ad esempio effettuando il logout di tutti gli utenti e resettando le password.
Non è l’unico plugin di sicurezza di WP al mondo, ovviamente, ma è comunque utile avere tutte le varie funzioni in un solo posto, totalmente integrate nel tuo hosting provider.
A livello server, tre misure chiave aiutano ad assicurare la massima sicurezza per ogni cliente di SiteGround:
- Firewall e un filtro su base AI per proteggere automaticamente contro attacchi e hacking 🦺
- Backup giornalieri su vari centri di server indipendenti in diverse aree geografiche assicurano che il tuo sito possa essere ripristinato dopo un qualsiasi disastro 💽
- Sistemi di monitoraggio che controllano ogni status del server e le prestazioni ogni 0.5 secondi, 24/7 🔍
A questo punto potresti dire che ogni host che si rispetti abbia queste funzionalità, e avresti anche ragione.
C’è solo una piccola differenza:
SiteGround riesce a offrire tutto questo ad un prezzo vicino agli hosting provider più “mainstream”:
Piani e Prezzi di SiteGround
A prima vista, sembra un po’ confusionario: quattro diversi tipi di hosting, ognuno con piani a pagamento differenti…
Ma dai un’occhiata più da vicino e noterai che i piani di tipo hosting Web, WordPress, e WooCommerce sono in realtà identici!
Questo perché sono tutti essenzialmente lo stesso tipo di hosting condiviso, con tre livelli di prezzo per bisogni specifici.
Tenendo questo a mente, dimentichiamoci dei tipi di hosting e discutiamo nel dettaglio ciascun piano a pagamento:
StartUp è abbastanza chiaro: ottieni un sito web e risorse server sufficienti a gestire un traffico decente. A meno che tu stia migrando con un progetto più grande, vale sempre la pena di iniziare con questo piano e poi decidere se hai bisogno di un upgrade.- Il piano
GrowBig ti permette di creare siti web illimitati, il che significa che è perfetto per quelli che gestiscono molti progetti o hanno un numero elevato di visitatori (più di 20.000 al mese).
- Infine, con l’ironicamente nominato piano
GoGeek ottieni ancora più risorse computazionali, e anche la soluzione white label che ti permette di offrire hosting web ai tuoi clienti: ottimo per agenzie e freelancer.
Come abbiamo menzionato prima, la parte migliore dell’offerta di SiteGround è il fatto che tutte le funzionalità di livello professionale sono disponibili a un prezzo davvero ragionevole.
Per esempio, ecco un paragone di prezzo con hosting provider premium che usano Google Cloud come loro infrastruttura:
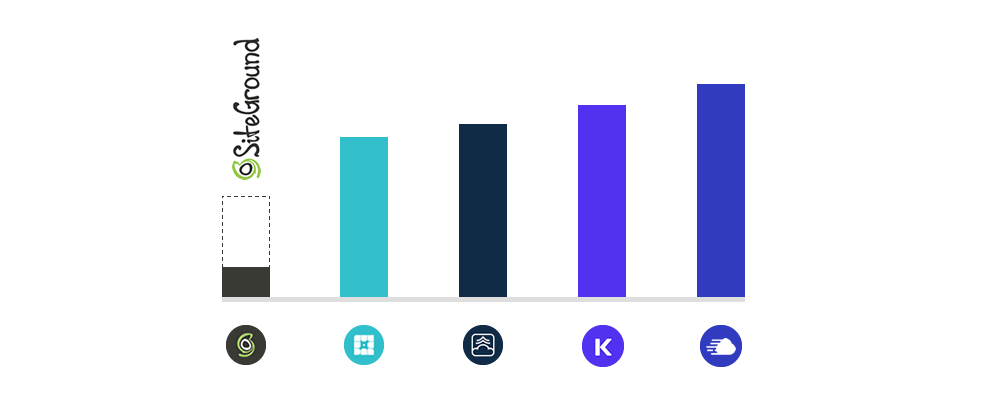
La linea tratteggiata indica il prezzo pieno che si applica dopo il primo ciclo di fatture su SiteGround: persino quello è molto al di sotto delle alternative, e non stiamo nemmeno considerando il prezzo introduttivo fortemente scontato (ovvero la colonnina nera).
Ci sono quattro cicli di fatture disponibili su SiteGround, con quello mensile che è il più costoso e quindi meno utile.
Puoi sempre optare per un ciclo (scontato) più lungo e usare la garanzia di rimborso di 30 giorni se necessario.
Sebbene in media pagheresti meno al mese con l’opzione da 3 anni, lo sconto maggiore sul primo periodo 🤑 è disponibile per il ciclo di fatturazione da 1 anno, dove l’ammontare speso al momento è molto più basso:
Ottieni il 69% di sconto su SiteGround
Un’altra cosa che vale la pena menzionare è la cancellazione: con SiteGround è facile come cliccare un bottone sul tuo pannello di amministrazione dell’hosting, nessun bisogno di contattare il supporto.
Quando cancelli, puoi scegliere se continuare a usare il tuo sito fino alla fine del corrente periodo di fatturazione, o rimuovere tutto immediatamente.
Pro e Contro di SiteGround
Prima di spostarci al verdetto finale riguardo SiteGround, riassumiamo i punti deboli e forti di questo hosting provider:
- Ottieni funzioni di livello premium e strumenti a un prezzo molto più basso della maggior parte degli altri host gestiti di WordPress
- Il parco software ottimizzato integrato sull’infrastruttura di Google Cloud assicura un’esperienza fluida e veloce nei i tuoi siti web
- Ogni account ottiene un sacco di funzioni di sicurezza per prevenire minacce e ridurre i danni, includendo firewall, monitoraggio in tempo reale e backup automatici
- Cloudflare CDN è incluso a zero costi aggiuntivi con ogni account di SiteGround, migliorando sia velocità che sicurezza
- Non ci sono limiti di visitatori su nessuno dei piani, al contrario della maggior parte degli altri hosting provider professionali
- Potenti strumenti per collaborare e gestire con i clienti rendono la vita più facile a freelancer e agenzie
- I plugin di sicurezza, ottimizzazione e migrazione per WordPress integrati dal team di SiteGround per funzionare senza problemi con l’hosting
- Supporto clienti 24/7 tramite live chat, sia per i clienti attuali che quelli potenziali
- Il cloud hosting offerto da SiteGround è meno attraente di quello gestito dalle soluzioni di WordPress, essendo fino a due volte più costoso, per esempio, delle macchine paragonabili di Digital Ocean
- Le risorse disponibili potrebbero essere limitate per siti o account che usano regolarmente troppo potere di calcolo di un server
- Lo strumento per creare una copia di test/sviluppo del tuo sito web non è disponibile col piano StartUp
E ora i risultati finali:
Verdetto: Conviene Usare SiteGround?
20 anni nell’industria e milioni di clienti: può un hosting provider avere più credibilità di questa? 👓 Vediamo:
Nel corso della sua esistenza, SiteGround ha chiaramente provato a mantenere il suo status di host “premium conveniente”, combinando qualità professionale a prezzi competitivi.
In effetti, è più facile definire chi NON dovrebbe usare SiteGround che tutti gli altri (chi dovrebbe)
- Se il tuo budget è considerevole e stai cercando l’hosting più avanzato basato su Google Cloud per un grosso progetto, dai piuttosto un’occhiata a Kinsta,
- Se fai parte di un team di sviluppo che ha bisogno di un hosting cloud scalabile con totale controllo su tutte le impostazioni dei server, una soluzione self-service come Digital Ocean è probabilmente la scelta migliore per te.
A parte questo…
Che ti serva semplicemente un sito web per la tua organizzazione o che tu crei siti per i tuoi clienti, SiteGround ha tutto ciò che ti serve e molto altro, costruito su fondamenta tecniche solide come la roccia💎 nonché anni di esperienza 🏆 e reputazione.
Ottieni il 69% di sconto su SiteGround
Hai un opinione su SiteGround o vorresti condividere un’esperienza personale? Dirigiti alla sezione dei commenti: aiutiamoci l’un l’altro a prendere decisioni migliori!
Existem provedoras de hospedagem antigas e bem estabelecidas; existem provedoras populares, com milhões de clientes; existem aquelas que evoluem e se reinventam constantemente…
E existe um pequeno grupo de empresas de hospedagem que estão na interseção destas três categorias –
Este é o caso da SiteGround.
Em nossa avaliação detalhada, vamos colocar essa hospedagem embaixo de uma lupa e descobrir as repostas para as perguntas mais populares:
- 🦄O que a SiteGround tem de especial?
- 💳Como escolher um plano de hospedagem adequado?
- 👎Há alguma desvantagem em usar a SiteGround?
- 🎯Quem deve usar a SiteGround e por quê?
Vamos começar dando uma olhada nas coisas que você provavelmente não vai encontrar em nenhum outro lugar – coisas que tornam a SiteGround única:
O Que a SiteGround Tem de Especial
A SiteGround foca em WordPress assim como outros criadores de sites e sistemas de gestão de conteúdo populares, há diversos planos de pagamento dependendo das suas necessidades, suporte 24h…
Parece familiar, não é mesmo?
O que realmente diferencia a SiteGround são suas soluções tecnológicas, feitas sob medida por sua própria equipe técnica; mais especificamente:
- Um conjunto de medidas para maximizar a ⚡ velocidade do seu site, que discutiremos separadamente na próxima parte,
- Recursos de 🔐 segurança de última geração para prevenir e mitigar quaisquer ataques potenciais, analisados em detalhes nesta seção,
- Alguns dos melhores 💵 preços entre as provedoras de hospedagem do seu calibre, especialmente quando consideramos os grandes descontos iniciais,
- Poderosas 🛠️ ferramentas para o cliente para facilitar a colaboração, testagem e migrações, criadas internamente pela equipe da SiteGround (vamos falar sobre isso aqui mesmo!).
Como acabamos de mencionar, os usuários da SiteGround ganham mais que apenas um servidor – há toda uma gama de ferramentas administrativas para facilitar sua vida:
- O flexível sistema do usuário permite o acesso de outros membros da equipe, clientes ou especialistas terceirizados para ajudar você a executar seus projetos web,
- Você pode criar cópias-teste do seu site publicado com um clique, e transferir quaisquer alterações de volta para o original – novamente, com um único clique,
- Freelancers e agências vão adorar o recurso de white label, que permite que você forneça serviços de hospedagem para seus clientes com sua própria marca.
Todas as ferramentas acima funcionam com o suporte de uma sólida infraestrutura de hardware e software para o melhor desempenho e estabilidade.
Infraestrutura e Velocidade
Um fato curioso: a SiteGround, uma das maiores provedoras de hospedagem do mundo, não possui nenhum servidor físico!
Em vez disso, ela usa o Google Cloud para sua infraestrutura principal.
Sim, foi isso mesmo que você leu – quando você hospeda seu site com a SiteGround, ele é armazenado em servidores do Google.
Isso não é algo incomum hoje em dia –
– na verdade, a maioria das provedoras de hospedagem modernas, tanto as grandes quanto as pequenas, foca em serviços que agregam valor 🚀 e terceiriza o hardware em si para as poucas empresas como o Google e a Amazon que têm enormes vantagens de escala, mas não fornecem interfaces amigáveis ao usuário.
Os clientes da SiteGround podem escolher entre diversas regiões ao criar um novo site, incluindo Europa, Estados Unidos, Ásia e Austrália:
Os pontos azuis no mapa representam as +150 localizações da rede Cloudflare CDN, incluída em todos os planos da SiteGround –
Seu site automaticamente carrega a partir do nódulo CDN que estiver mais perto de cada visitante em particular, melhorando a velocidade substancialmente.
Para aprimorar ainda mais o carregamento de páginas, os sites da SiteGround operam com softwares exclusivamente otimizados (PHP, MySQL, compressão com Brotli, etc.), o que resulta em alguns dos tempos de resposta mais rápidos na indústria:
Esse é o principal motivo pelo qual a SiteGround há anos vem se mantendo nas posições mais altas nas classificações da HRank. ⚡
Por fim, cada site vem com um plugin para WordPress exclusivo pré-instalado, que permite que você controle as configurações do servidor e ajuste os parâmetros de caching facilmente.
Falando em plugins para WP…
Segurança na SiteGround
Há outro plugin para WordPress feito pela a equipe da SiteGround que trabalha especificamente com sites de clientes:
O SiteGround Security ajuda a prevenir contra as ameaças e ataques mais comuns em seu site, além de reagir rapidamente em caso de uma invasão, por exemplo, fazendo o log out de todos os usuários e redefinindo senhas.
Esse não é o único plugin de segurança para WordPress que existe, é claro, mas é bom ter todos os recursos diferentes em um único lugar, totalmente integrados com sua hospedagem.
A nível de servidor, três medidas principais ajudam a garantir o máximo de segurança para todos os clientes da SiteGround:
- Firewall e um filtro baseado em IA para proteger automaticamente contra ataques e invasões 🦺
- Backups diários em vários centros de servidores independentes em diferentes localizações geográficas garantem que seu site possa ser restaurado depois de qualquer desastre 💽
- Sistemas de monitoramento que verificam o status e desempenho de cada servidor a cada 0,5 segundo, 24horas por dia, 7 dias por semana 🔍
A essa altura, você pode argumentar que toda hospedagem web premium possui esses recursos – e você teria toda razão.
Só tem uma coisinha: a SiteGround consegue oferecer todas essas vantagens por um preço próximo ao das hospedagens “convencionais”.
Planos e Preços da SiteGround
A princípio, parece um pouco confuso: quatro tipos diferentes de hospedagem, cada um com diversos planos de pagamento diferentes…
Mas quando você olha mais de perto, vai perceber que os planos nos tipos de hospedagem Web, Shared e WooCommerce são na verdade idênticos!
Isso porque todos eles são, essencialmente, o mesmo tipo de hospedagem compartilhada, com três níveis de preços para atender às necessidades distintas dos clientes.
Com isso em mente, vamos esquecer os tipos de hospedagem e focar em discutir cada plano de preço mais detalhadamente:
- O plano
StartUp é bastante direto – você tem direito a um site e recursos de servidor suficientes para lidar com um tráfego decente. A menos que você esteja migrando com um projeto grande, sempre vale à pena começar com esse plano e depois decidir se precisa de atualizações.
- O plano
GrowBig permite que você crie sites ilimitados, o que significa que ele é adequado para aqueles que possuem diversos projetos ou que têm um grande número de visitantes (mais de 20.000 por mês).
- Por fim, com o plano
GoGeek (nome sapeca, não acha?), você tem ainda mais recursos de computação, assim como a solução de white label que permite que você ofereça hospedagem web aos seus próprios clientes – ótimo para agências e freelancers.
Como mencionamos antes, a melhor parte da oferta da SiteGround é o fato de que todos os recursos de nível professional estão disponíveis por preços muito razoáveis.
Para exemplificar, aqui está uma comparação entre provedoras de hospedagem premium que usam o Google Cloud como sua plataforma de infraestrutura:
A linha pontilhada indica o valor integral que se aplica depois do primeiro período de cobrança da SiteGround – mesmo isso fica muito abaixo das alternativas, e não estamos nem levando em conta o preço introdutório, que tem descontos consideráveis (a coluna sólida).
Há quatro ciclos de cobrança disponíveis na SiteGround, sendo que o mensal é o mais caro e, portanto, o menos útil –
E você sempre pode optar por um ciclo de cobrança mais longo (com desconto) e usar a garantia de reembolso em 30 dias se necessário.
Embora você acabe pagando menos por mês em média com a opção de 3 anos, o maior desconto inicial 🤑 está disponível para o ciclo de cobrança de 1 ano, no qual a quantia gasta agora é muito mais baixa:
Ganhe 69% de desconto na SiteGround
Mais uma coisa que vale à pena mencionar é o cancelamento: com a SiteGround, é tão simples quanto clicar em um botão em seu painel de admin, nem é necessário entrar em contato com o suporte.
Quando você cancela, pode escolher continuar usando seus sites até o fim do período de cobrança atual ou remover tudo imediatamente.
Prós e Contras da SiteGround
Antes de passarmos para nosso veredito final sobre a SiteGround, vamos resumir os pontos fortes e fracos desta provedora de hospedagem:
- Você tem acesso a ferramentas e recursos de nível premium por um
preço muito mais baixo do que o da maioria das outras hospedagens de WP gerenciado
- Conjunto de soluções otimizado construído sobre a infraestrutura do Google Cloud garante um funcionamento consistentemente rápido e estável dos seus sites
- Todas as contas têm uma gama de recursos de segurança para prevenção e mitigação de ameaças, incluindo firewall, monitoramento ao vivo e backups automáticos
- Cloudflare CDN está incluída, sem custos adicionais, em cada conta SiteGround, melhorando tanto a velocidade quanto a segurança
- Não há limites de visitantes em nenhum dos planos, ao contrário da maioria das outras hospedagens premium
- Poderosas ferramentas de colaboração e gestão de clientes, que facilitam a vida de freelancers e agências
- Plugins para WordPress (segurança, otimização e migração) criados pela equipe da SiteGround para trabalhar perfeitamente com a hospedagem
- Atendimento 24h através de chat ao vivo, tanto para clientes existentes quanto potenciais
- A oferta de hospedagem em nuvem da SiteGround é menos atraente do que suas soluções de WordPress gerenciado, sendo até 2x mais cara do que máquinas comparáveis, por exemplo, da Digital Ocean
- A disponibilidade de recursos pode ser limitada para sites ou contas que regularmente usam muito poder computacional de um servidor
- A ferramenta para criar cópias de desenvolvimento/teste do seu site não está disponível no plano StartUp
E agora, a conclusão:
Veredito: A SiteGround Vale à Pena?
20 anos de empresa e milhões de clientes – será que uma provedora de hospedagem pode ter mais credibilidade do que isso? 👓 Vamos ver:
Ao longo de sua existência, a SiteGround claramente tentou manter seu status de hospedagem “premium acessível”, combinando qualidade profissional com preços competitivos.
Pra falar a verdade, é mais fácil dizer quem NÃO deve usar a SiteGround, em vez de dizer quem deve (todo o resto!) –
- Se você tem um orçamento substancial e está procurando pela mais avançada hospedagem baseada em Google Cloud para um projeto grande, dê uma olhada na Kinsta,
- Se você faz parte de uma equipe de desenvolvimento que precisa de hospedagem em nuvem escalonável com controle total de todas as configurações do servidor, uma solução de autosserviço como a Digital Ocean provavelmente é melhor para você.
Fora isso, esteja você precisando só de um site para sua organização ou se você cria sites para seus próprios clientes, a SiteGround tem tudo que você precisa e mais, construída sobre uma fundação técnica sólida 💎 assim como anos de experiência 🏆 e reputação.
Ganhe 69% de desconto na SiteGround
Você tem uma opinião sobre a SiteGround ou uma experiência pessoal que gostaria de compartilhar? Vá para a seção de comentários abaixo – vamos ajudar uns aos outros a tomar decisões melhores!
There are old, time-tested hosting providers; there are popular ones, with millions of clients; there are those which constantly evolve and reinvent themselves…
And then there’s a small group of hosting companies at the intersection of all three categories –
SiteGround is firmly in that cohort.
In this detailed review, we will examine this host under a magnifying glass to uncover answers to the most popular questions:
- 🦄What’s special about SiteGround?
- 💳How to choose a suitable hosting plan?
- 👎Are there any drawbacks to using SiteGround?
- 🎯Who should use SiteGround and Why?
Let’s start by looking at the things that you probably won’t find anywhere else – things that make SiteGround unique:
What’s Special About SiteGround
Seriously, though?
SiteGround focuses on WordPress as well as other popular content management systems and site builders, there are several pricing plans depending on your needs, 24/7 support…
Sounds familiar.
What really sets SiteGround apart are its technological solutions, custom-built by its technical team; more specifically:
- A set of measures to maximize your website’s ⚡ speed, which we will discuss separately in the next chapter,
- State-of-the-art 🔐 security features to prevent and mitigate any potential attacks, analyzed in detail in this section,
- Some of the best 💵 prices among hosting providers of its caliber, especially when we factor in the large first-period discounts,
- Powerful 🛠️ client tools for convenient collaboration, testing, and migrations, built in-house by the SiteGround team (we’ll talk about this one right here!).
As we just mentioned, SiteGround users get more than just a server – there’s an entire array of administrative tools to make your life easier:
- The flexible user system allows access to other team members, clients, or third-party experts to help you run your web projects,
- You can create test copies of your live website in one click, and transfer any changes back to the original – again, in a single click,
- Freelancers and agencies will like the white label feature, which allows you to provide hosting services to clients under your own brand.
All the tools above function on top of a solid hardware and software infrastructure for maximum performance and stability:
Infrastructure and Speed
Here’s a surprising fact: SiteGround, one of the largest hosts in the world, doesn’t own any actual physical servers!
Instead, it uses Google Cloud for its key infrastructure…
Yes, you understood correctly – when you’re hosting with SiteGround, your website is stored on Google’s servers.
This is not something unusual in our day and age –
– in fact, most modern hosting providers, both big and small, focus on the value-adding services 🚀 and outsource the actual hardware to the few companies like Google and Amazon that have huge scale advantages but don’t provide user-friendly interfaces.
SiteGround clients can choose between several regions when creating a new website, including Europe, United States, Asia, and Australia:
The blue dots on the map represent the 150+ locations of the Cloudflare CDN network, included on every SiteGround plan –
Your website automatically loads from the CDN node that is the closest to each particular visitor, bringing serious improvements in speed.
To further improve page loading, SiteGround websites run on uniquely optimized software (PHP, MySQL, Brotli compression, etc.), which results in some of the fastest response times in the industry:
– this is the main reason why SiteGround has held top positions in HRank ratings for years ⚡
Finally, each website comes with a unique, pre-installed WordPress plugin, that allows you to easily control the server settings and adjust the caching parameters.
Speaking of WP plugins…
Security at SiteGround
There is another WordPress plugin made by the SiteGround team to work specifically with client sites:
SiteGround Security helps prevent the most common threats and attacks on your website, as well as react quickly in case of an attack, e.g. by logging out all users and resetting passwords.
It’s not the only WP security plugin in existence, of course – but it’s still nice to have all the various features in a single place, fully integrated with your hosting provider.
On the server level, three key measures help ensure maximum security for every SiteGround client:
- Firewall and an AI-based filter for automatically protecting against attacks and hacks 🦺
- Daily backups in several independent server centers in different geographical locations ensure that your website can be restored after any disaster 💽
- Monitoring systems that check each server’s status and performance every 0.5 seconds, 24/7 🔍
At this point, you might argue that every premium web host has these features – and you’d be right.
There’s just one nuance:
SiteGround manages to offer all that goodness for a price that is closer to “mainstream” hosting providers:
SiteGround Plans and Pricing
At first glance, it looks a bit confusing: four different types of hosting, each having several pricing plans…
But take a closer look, and you’ll notice that the plans in the Web, Shared, and WooCommerce hosting types are actually identical!
That’s because all of them are essentially the same kind of shared hosting, with three pricing tiers for different client needs.
With that in mind, let’s forget about hosting types and focus on discussing each pricing plan in more detail:
StartUp is quite straightforward – you get one website and enough server resources to handle decent traffic. Unless you are migrating with a large project, it’s always worth starting with this plan and then deciding if you need to upgrade.- The
GrowBig plan allows you to create unlimited websites, which means it’s suitable for those who run several projects or have high visitor traffic (over 20,000 per month).
- Finally, on the cheekily named
GoGeek plan you get even more computing resources, as well as the white label solution that allows you to offer web hosting to your own clients – great for agencies and freelancers.
As we mentioned earlier, the best part of SiteGround’s offer is the fact that all the professional-grade features are available at very reasonable prices –
For example, here’s a price comparison for premium hosting providers which use Google Cloud as their infrastructure platform:
The dashed line indicates the full price that applies after the first billing period at SiteGround – even that is way below the alternatives, and we’re not even considering the heavily discounted introductory pricing (i.e. the solid dark column).
There are four billing cycles available at SiteGround, with monthly being the most expensive and hence the least useful –
You can always opt for a (discounted) longer billing cycle and use the 30-day money-back guarantee if needed.
While you will end up paying less per month on average with the 3-year option, the largest first-period discount 🤑 is available for the 1-year billing cycle, where the amount spent right now is much lower:
Get a 69% discount on SiteGround
One more thing worth mentioning is cancellation: with SiteGround, it’s as easy as clicking on a button in your hosting admin panel, no need to contact support.
When you cancel, you can choose to continue using your websites until the end of the current billing period or to remove everything right away.
Pros and Cons of SiteGround
Before we move on to the final verdict on SiteGround, let’s summarize this hosting provider’s stronger and weaker sides:
- You get premium-grade features and tools at a much lower price than most other managed WordPress hosts
- Optimized software stack built on top of the Google Cloud infrastructure ensures consistently smooth and speedy functioning of your websites
- Every account gets a slew of security features for threat prevention and mitigation, including firewall, live monitoring, and automatic backups
- Cloudflare CDN is included at no additional cost with every SiteGround account, improving both speed and security
- There are no visitor limits on any of the plans, as opposed to most other premium hosting providers
- Powerful tools for collaboration and client management, making life easier for freelancers and agencies
- Security, optimization, and migration plugins for WordPress built by the SiteGround team to work seamlessly with the hosting
- 24/7 customer support via live chat, both for potential and existing clients
- The cloud hosting offer at SiteGround is less attractive than its managed WordPress solutions, being up to 2x more expensive than e.g. comparable Digital Ocean machines
- Resource availability may be limited for websites or accounts that regularly use up too much of a server’s computing power
- The tool for creating a test/development copy of your website is not available on the StartUp plan
And now for the bottom line:
Verdict: Is SiteGround Worth It?
20 years in business and millions of clients – can a hosting provider get any more credible than that? 👓 Let’s see:
Throughout its existence SiteGround has clearly tried to maintain its status as the “affordable premium” host, combining professional quality with competitive prices.
As a matter of fact, it’s somewhat easier to define who should NOT use SiteGround as opposed to everyone else (who should) –
- If your budget is substantial and you’re looking for the most advanced Google Cloud based hosting for a large project, take a look at Kinsta instead,
- If you are part of a developer team that needs scalable cloud hosting with full control over all server settings, a self-service solution like Digital Ocean is probably best for you.
Apart from that –
Whether you just need a website for your organization or you make websites for your own clients, SiteGround has everything you need and more, built on a rock-solid technical foundation 💎 as well as years of expertise 🏆 and reputation.
Get a 69% discount on SiteGround
Have an opinion on SiteGround or a personal experience you’d like to share? Head over to the comments section – let’s help each other make better decisions!
Dato che più del 30% dell’Internet si basa su WordPress, ad oggi solo gli hosting provider più pigri non offrono delle varianti di un’offerta specializzata in WP.
Tuttavia, diversi brand stanno in una categoria a parte – soluzioni di grado professionale dedicate esclusivamente a WordPress, con funzioni premium e costi premium.
Kinsta è uno di questi host di alto livello, e in questa recensione dettagliata scopriremo se è degna di essere chiamata la piattaforma WordPress gestita meglio 👑
10/10
Prestazioni: è veloce e affidabile?
Dettagli
10/10
Costo: buon rapporto qualità prezzo?
Scoprilo
8/10
9/10
Prima diamo un’occhiata a cosa differenzia Kinsta dagli altri hosting provider, cioè sia i suoi concorrenti diretti nel segmento premium, sia il gruppo più ampio di compagnie che offrono hosting di gestione WP:
Caratteristiche Uniche di Kinsta
Potresti aver già notato che non è così semplice distinguere tra gli host specializzati in WordPress – ciascuno di essi sembra dichiarare di essere il provider più veloce e affidabile. Pertanto, come fai a fare una scelta oggettiva?!
Non ti sovraccaricheremo il cervello mettendoci a elencare tutte le funzioni di Kinsta; invece, ecco quelle che davvero la metteno in risalto rispetto alle alternative:
- 28 data center attorno al mondo ti assicurano che il tuo sito web sia sempre il più vicino possibile ai tuoi visitatori; sì, la distanza fisica può fare una grande differenza quando si tratta di millisecondi nei tempi di caricamento ⚡

- L’ottimizzazione C2 sulle virtual machine su tutti i piani di abbonamento offre il massimo delle prestazioni anche per i siti più esigenti; dirigiti verso la sezione della recensione sull’infrastruttura per imparare di più su cosa comporta tutto ciò!
- L’integrazione a Cloudflare fornisce un livello aggiuntivo di sicurezza, proteggendoti da attacchi, bot e altri agenti malevoli; ovviamente, puoi connettere Cloudflare a qualsiasi hosting (a costo zero con il loro piano gratuito), ma Kinsta offre le funzionalità di Cloudflare Enterprise a ogni cliente, che è una cosa un po’ più costosa da ottenere separatamente
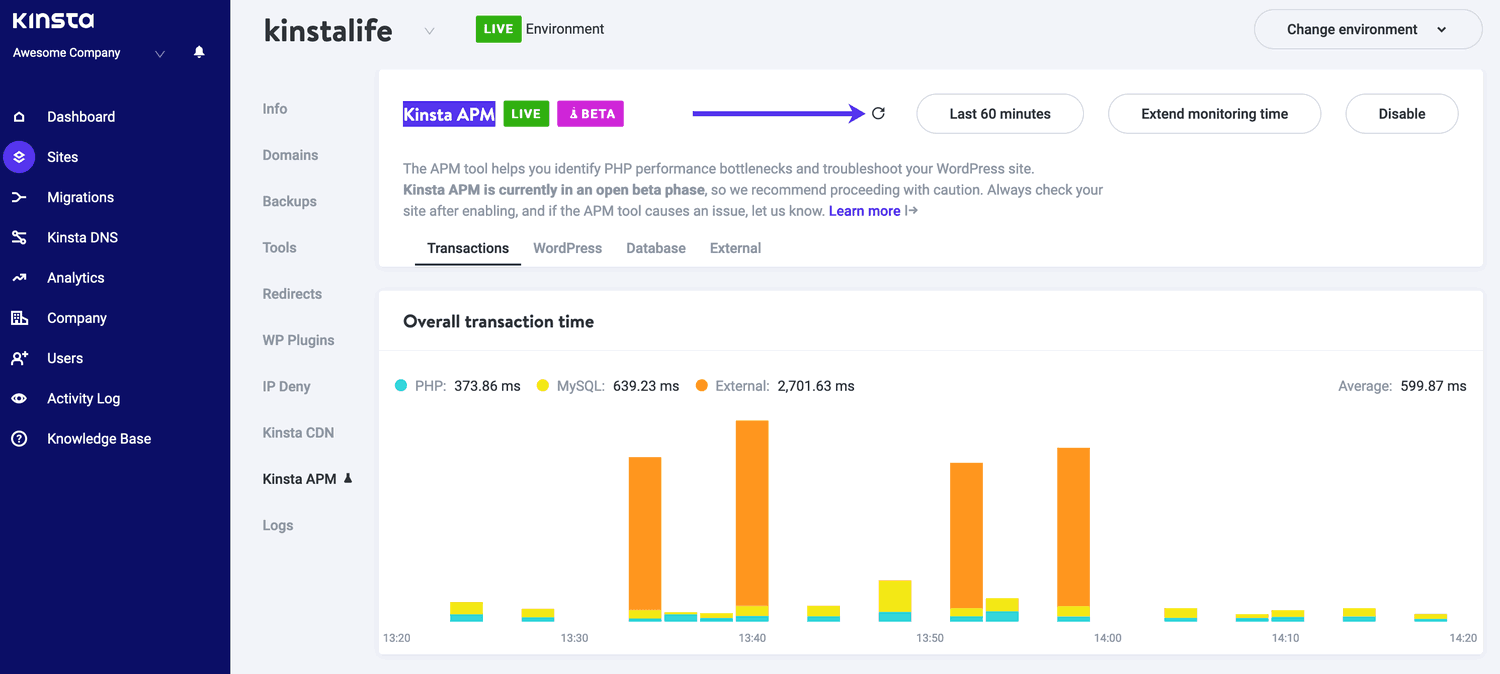
Lo strumento di
- monitoraggio integrato delle prestazioni (Kinsta APM) è un sistema gratuito incluso in tutti i piani di Kinsta che visualizza i lavori interni del tuo sito web e individua potenziali problemi e margini di miglioramento
- Sei tipi di backup sono disponibili per tutti i clienti di Kinsta, includendo sia quelli manuali che automatici, e con frequenze che variano dal giornaliero (default) all’orario (ad un costo addizionale)
- L’ambiente per sviluppatori DevKinsta è uno strumento progettato internamente dal team di Kinsta per supportare agenzie e freelancer di tutti i livelli di esperienza, semplificando lo sviluppo locale, il dislocamento e le consegne dei progetti.
Come probabilmente avrai notato, tutte le caratteristiche sopra menzionate sono relative alla velocità, all’attività di rete e alla sicurezza; il che ha senso, perché è questo che rende buono un hosting provider, dopo tutto. Addentriamoci ancora di più e vediamo come queste funzionalità si uniscono nella piattaforma di Kinsta:
Infrastruttura e Prestazioni
Prima di procedere, c’è una cosa che dovremmo chiarire riguardo a Kinsta in modo da capire come funziona realmente:
– Kinsta è focalizzato esclusivamente in hosting gestito di WordPress, che significa:
a) non offre un portfolio di diversi tipi di hosting (condivisi, dedicati, VPS…) come molti competitor, ma piuttosto diverse varianti dello stesso setup con diverse risorse disponibili,
b) il prodotto di Kinsta non è una semplice installazione di WordPress, ma un server virtuale potente e flessibile che, guarda caso, è anche particolarmente adatto a far girare WordPress (perché è il motore di siti web più popolare al mondo).
A proposito, a questo punto dovremmo probabilmente dirtelo, giusto in caso:
WordPress Gestito implica un servizio di hosting che è esplicitamente ottimizzato per WP e si prende cura di tutti i compiti di gestione e manutenzione come sicurezza, aggiornamento software e backup.
Con tutto questo in mente, diamo un’occhiata dietro la facciata; ecco un utile diagramma che abbiamo creato per l’occasione:
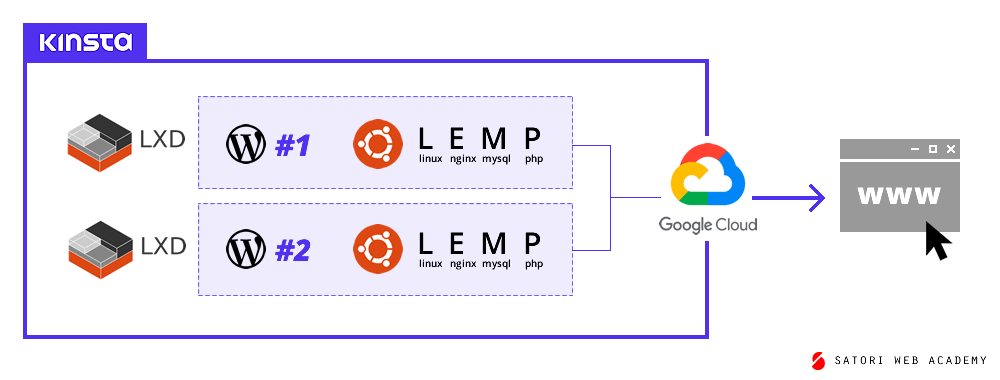
Prima di tutto: similmente ad altri host gestiti di WordPress, Kinsta non possiede in realtà alcun hardware: tutte le infrastrutture fisiche dietro i suoi servizi sono basate su Google Cloud,
…e non un cloud qualsiasi, solo la tecnologia più avanzata sul mercato, chiamata C2 (compute-optimized virtual machines) che combina hardware all’avanguardia con il software più recente, per il massimo delle prestazioni.
Ma ora viene la parte leggermente più complicata:
Kinsta divide i server virtuali (che sono essi stessi astrazioni dei server fisici) in contenitori LXD, con ciascun sito WordPress che gira sul proprio pacchetto software dentro tale contenitore.
In altre parole, i siti dei clienti sono ospitati in compartimenti sicuri e scalabili che hanno accesso a risorse sostanziali (12 CPU e 8 Gb di RAM ciascuno, per essere precisi) sulla migliore infrastruttura di computing che Google può offrire.
Velocizza il tuo sito web con Kinsta
D’accordo, quindi come influiscono tutti questi prodigi tecnologici sulle prestazioni del tuo sito web? Ecco qui le considerazioni più importanti:
- Pagine recentemente aggiornate e generate in modo dinamico (come i carrelli degli acquisti) sono specialmente veloci grazie alla qualità top dei server C2 🏅 su Google Cloud,
- Potenza di calcolo a sufficienza e software ottimizzato WordPress 🚀 assicurano che ogni richiesta al server (quindi il carico del sito) sia processata in un batter d’occhio,
- Cloudflare CDN aggiunge un altro livello all’infrastruttura, depositando le pagine del tuo sito su centinaia di nodi locali 🌎 e consegnandole a ogni visitatore dalla località più vicina (anche nel raro caso in cui il server originale non stia rispondendo in quel momento), massimizzando velocità e affidabilità.
In aggiunta, il Monitoraggio Integrato delle Prestazioni che abbiamo menzionato prima aiuta a tenere d’occhio potenziali inefficienze e punti di rottura.
Questo e altri strumenti sono integrati direttamente dentro il pannello di controllo di Kinsta, totalmente gratis con ogni piano di abbonamento; un altro (spesso trascurato) fatto che lo distingue da altri hosting provider. Parlando di prezzi…
Piani e Prezzi di Kinsta
Ricordi che prima abbiamo detto che essenzialmente Kinsta offre un singolo prodotto di hosting con varie risorse?
Per rendere le cose ancora più facili, i 10 (!) piani di abbonamento disponibili possono essere suddivisi in sole tre categorie, a seconda dell’utente destinato:
| Utenti destinati |
Imprese piccole o individuali |
Freelancer o medie imprese |
Agenzie o grandi imprese |
| Piani di Kinsta |
Starter; Pro |
Business 1..4 |
Enterprise 1..4 |
| Siti WordPress |
1-2 |
5-40 |
60-150 |
| Visite mensili |
25-50 mila |
100-600 mila |
1-3 milioni |
| PHP worker/sito |
2 |
4-6 |
8-16 |
| Cronologia backup |
14 giorni |
Fino a 20 giorni |
Fino a 30 giorni |
Ah, molto meglio adesso; una riga dalla tabella sopra potrebbe necessitare di ulteriori spiegazioni, però: i PHP worker 🧑🔧 sono processi individuali che generano le pagine del tuo sito web per i visitatori, quindi, più il tuo sito si appoggia a pagine generate dinamicamente (es. grandi store e comunità online), più lavoratori PHP ti serviranno affinché il sito giri velocemente.
Tre cose in più che vale la pena ricordare sulle politiche di abbonamento di Kinsta:
- I cicli di fatturazione annuali sono il 16% più economici che pagare mese per mese, e puoi cambiare tra piano annuale e mensile in qualsiasi momento.
- Ci sono limiti di risorse su ogni piano, e cioè visite al sito, spazio su disco e uso di CDN; e tutto ciò che va oltre il limite mensile assegnato è fatturato separatamente.
- Ogni cliente è idoneo a un rimborso completo entro 30 giorni dal loro acquisto iniziale, e a un rimborso parziale dopo quella scadenza (per la porzione non utilizzata della loro iscrizione); altre risorse extra menzionate precedentemente non sono rimborsabili.
Cancellazioni e rimborsi sono abbastanza semplici: il pannello di controllo di Kinsta ti lascia chiudere il tuo account con un solo click; nessun bisogno di contattare il supporto o cercare un pulsante “accidentalmente” ben nascosto.
Prova Kinsta senza alcun rischio per 30 giorni
Per comparare oggettivamente i prezzi di Kinsta ad altri hosting provider di WP gestito; si dovrebbe tenere in considerazione sia la qualità dell’infrastruttura, sia le sue caratteristiche uniche (es. lo strumento APM), e non dimentichiamoci le cose non tangibili:
Supporto e Migrazione
È facile non giudicare il servizio clienti come un punto chiave a favore, o perché non è così facile da valutare e quindi comparare la sua qualità, o semplicemente perché non ci pensi troppo fino a quando non affronti un problema reale 🔥
Tuttavia, l’hosting di siti web è un affare a lungo termine, quindi, quando si tratta di supporto, è solo una questione di “quando”, non “se” ne avrai bisogno…
…e quando quel momento arriverà, vorrai un servizio clienti reattivo, efficiente e paziente, che è esattamente quello che offre Kinsta.
Il team di servizio sembra adeguatamente preparato relativamente al volume delle richieste in entrata, e consiste in larga parte di sviluppatori; questo permette a Kinsta di assicurare un livello di qualità che vince costantemente encomi e classifiche al top nel settore:
- Kinsta è orgogliosa della sua filosofia da supporto unitario, che significa che ogni specialista della cura del cliente è capace di risolvere un problema senza trasferire la tua richiesta attraverso diversi rappresentanti.
- Tutti i clienti hanno accesso a una chat di supporto 24/7/365 in Inglese; nei giorni lavorativi puoi anche ottenere supporto in diverse altre lingue.
- I clienti esistenti possono chiedere aiuto direttamente dentro il pannello di controllo di Kinsta, mentre i clienti futuri possono cercare il pulsante della chat nel lato destro in fondo alla home page
ufficiale.
- Il tempo medio di risposta è riportato essere di 1.5 minuti circa, che sembra coincidere con quello che abbiamo provato nel nostro test del servizio.
In aggiunta alla chat dal vivo, puoi fare domande attraverso il modulo di contatto ufficiale e ottenere una risposta entro 1 giorno lavorativo; c’è anche un’opzione per parlare con il team di supporto tramite telefono se sei locato negli Stati Uniti (o non hai problemi con le chiamate internazionali).
Un’altra funzione importante che è fornita da esseri umani è la 🧳 migrazione: muovere un sito esistente da un altro hosting provider. Ormai non sarai sorpreso di sapere che Kinsta lo rende facile al punto da dover compilare solo un breve modulo:

Ci sono migrazioni base illimitate e un certo numero di migrazioni premium incluse in ogni piano di Kinsta; le seconde sono pensate per siti WordPress complessi come e-commerce e comunità online.
I clienti possono scegliere fra tre opzioni: dare a Kinsta accesso al loro precedente pannello di controllo di hosting (essenzialmente un servizio di valet), fornire un file di backup, o usare un plugin per fare tutto manualmente.
In ogni caso, il risultato sarà che il tuo sito beneficerà dell’hosting di una delle piattaforme migliori attualmente esistenti.
Pro e Contro di Kinsta
Prima di andare al verdetto, riassumiamo tutto quello che abbiamo imparato su Kinsta qui sotto:
- Tutti i siti di Kinsta sono ospitati nell’hardware più avanzato su Google Cloud per avere massima velocità e prestazioni migliori sotto carico pesante.
- Il software dei server è ottimizzato per WordPress in tutto e per tutto, e gli aggiornamenti alle ultime versioni di tutti i componenti sono gestite dal team di Kinsta (ecco perché è chiamato WP gestito).
- L’integrazione a Cloudflare di livello aziendale è disponibile su tutti i piani per garantire sicurezza e affidabilità per i tuoi siti incentrati sul business.
- Ogni account include potenti strumenti unici come il sistema di Monitoraggio Integrato delle Prestazioni e l’ambiente di sviluppo locale DevKinsta, e, ovviamente, lo stesso pannello di controllo myKinsta.
- Sei tipi di backup, inclusi quelli manuali e automatici, assicurano che nessun dato sia mai perso e che il tuo sito web sia velocemente recuperabile nel caso di un incidente o un attacco deliberato.
- Ogni cliente, indipendentemente dal piano, ha eguale accesso al pluripremiato team di supporto di ingegnerei di Kinsta che possono aiutarti a risolvere qualsiasi problema ad ogni ora del giorno.
- Invece di risorse di calcolo fisse, ci sono limiti di utilizzo su ogni piano, il che significa che potresti finire per pagare extra per cose come il numero dei visitatori, lo spazio su disco e il traffico CDN.
- Parlando di limiti, l’unica opzione per aggiungere più PHP worker per sito è di passare al livello di abbonamento successivo, che non è sempre conveniente in relazione ad altri parametri.
- In questo momento, Kinsta non offre nomi di domini, e quindi avrai bisogno di registrare un dominio su un provider di terze parti e connetterlo col tuo sito Kinsta (se preferisci di gran lunga avere entrambi i domini e i siti web sotto un unico tetto, dai un’occhiata a SiteGround invece).
Bene, è tempo di tirare le somme!
Verdetto: Dovresti Usare Kinsta?
Adesso è probabilmente chiaro che Kinsta NON è per coloro che non vedono alcuna differenza tra le varie opzioni di hosting e si concentrano solamente su minimizzare le loro spese annuali.
Ed è assolutamente giusto, perché non tutti i progetti web sono, in tutta franchezza, adatti a un hosting provider di questo livello: ha poco senso pagare di più nel caso in cui il sito della tua azienda esista solo perché “è un po’ strano non averne uno nel 2026”.
Cosa ha senso hostare su Kinsta?
La parola chiave qui è business-critical: ogni sito web che influisca significativamente sulla tua attività (o che siano la tua attività), come siti aziendali 📈 con traffico intenso; editori 📰 come giornali e blog popolari; istituti accademici 🎓 e piattaforme di insegnamento online; e, ovviamente, 💳 e-commerce.
Se sei un’agenzia o uno sviluppatore indipendente, sarà un piacere assoluto lavorare con Kinsta; l’unica eccezione è se ti posizioni nel segmento low-cost, ad esempio lavorando su Fiverr.
Avvia il tuo progetto web su Kinsta
…Bene, supponendo che tu abbia deciso di scegliere Kinsta al posto di un altro hosting provider, quale piano di abbonamento dovresti usare?
Dopo quello che abbiamo imparato prima, è piuttosto chiaro:
- Se ti servono giusto uno o due siti web, prendi lo
Starter o il Pro, rispettivamente; un aggiornamento a Business 1 potrebbe essere necessario solo se pensi che il tuo sito web abbia più pagine dinamiche che statiche e potrebbe beneficiare di più di due PHP worker.
- Se crei siti web per professione o lavori in un’azienda che ha diverse proprietà web separate, scegli uno dei piani
Business a seconda di quante installazioni di WordPress hai bisogno al momento.
- E infine, se fai parte di un team di web development o di una grossa compagnia che gestisce centinaia di siti (ad esempio blog generati dagli utenti), i piani
Enterprise sono la scelta più logica.
C’è qualcos’altro che vorresti sapere su Kinsta? O forse vorresti condividere la tua esperienza personale con questo hosting provider? Unisciti alla discussione nella sezione dei commenti sottostante: aiutiamoci l’un l’altro a fare scelte informate!
Hostinger is tegenwoordig een van de meest betaalbare opties onder de hostingreuzen. Maar ‘groot en goedkoop’ betekent niet per se het beste –
⚓ Titanic was ook groot en sommige tickets waren redelijk betaalbaar…
Dus in plaats van algemeenheden, zullen we in deze diepgaande review feiten en gegevens analyseren om erachter te komen of Hostinger je geld waard is.
10/10
Servers: hoe snel/betrouwbaar zijn ze?
Zie data
7/10
Functies: wat krijg je als klant?
Details
9/10
Klantondersteuning: is het beschikbaar en helpen ze echt?
Ontdek het
8/10
Trouwens, toen Hostinger aan het beslissen was over hun merknaam, voorzagen ze waarschijnlijk niet de vele verschillende manieren waarop deze verkeerd gespeld kon worden.
Dus als je hier bent vanwege het zoeken naar hostenger of hosinger of zelfs hostiger – dit is precies hetzelfde bedrijf als waar we het hier over hebben :)
Hoe groot is Hostinger?
Om je een idee te geven van hoe groot Hostinger is, volgen hier enkele cijfers: het bedrijf heeft momenteel meer dan 30 miljoen klanten in meer dan 170 landen (dit is bijna in elk land ter wereld!).
En er zijn geen tekenen van vertraging – volgens hun gegevens breidt Hostinger nog steeds uit met een snelheid van 1 cliënt per 5 seconden.
Zoals je zou verwachten, is Hostinger echter niet altijd de internationale speler geweest die het vandaag is. Hostinger ontstond in 2004 uit één filosofie:
Mensen willen niet betalen voor marketing alleen voor de hosting: eenvoudig, betrouwbaar en zo goedkoop mogelijk.
Dit principe blijft na vele jaren nog steeds de kern van Hostinger, namelijk hoogwaardige dienstverlening tegen een zo laag mogelijke prijs.
Laten we het aanbod eens bekijken:
Het juiste Hostinger pakket kiezen
Als grote internationale provider biedt Hostinger voor bijna alle privé- en zakelijke behoeften verschillende oplossingen aan.
Shared hosting, cloud hosting, WordPress, VPS – met al die termen kan het snel erg verwarrend worden! 🤯
Geen paniek, hier is een eenvoudige gids:
-
Verwacht je meer dan 10.000 bezoekers/maand op je website? Als je antwoord “NEE” is (of “IK HEB GEEN IDEE”), ga dan voor shared hosting!
We raden het Premium pakket aan omdat je er een gratis domeinnaam bij krijgt, maar als je er al een hebt is het Single pakket prima!
Als je ‘JA’ hebt geantwoord, met andere woorden, als je een website met veel bezoekers bouwt, ga dan verder met de volgende vraag:
-
Heb je zakelijk een sterk geoptimaliseerde WordPress website nodig? Als je antwoord “JA” is, overweeg dan het WordPress hosting plan van Hostinger.
Als je op zoek bent naar iets geavanceerder en flexibeler (je hebt bijvoorbeeld “NEE” geantwoord), bekijk dan de volgende stap:
-
Heb je een professionele server nodig met dedicated resources? Als je “JA” hebt geantwoord, dan zal de Virtual Private Server, ook wel VPS hosting genoemd aan je behoeften voldoen.
Houdt er rekening mee dat VPS hosting gespecialiseerde kennis vereist – als je dus niet bekend bent met server-instellingen, probeer dan één van de voorgaande opties!
VPS hosting biedt de beste prijs-kwaliteitsverhouding voor de kleinere professionele projecten 👓 – er is dus een beter product als je iets groters wilt bouwen:
-
Tot slot, als je een uitbreidbare oplossing nodig hebt voor een groot project, dan moet je zeker voor cloud hosting gaan –
Dit is de meest flexibele optie waarmee je direct resources kunt toevoegen en waarmee je de meeste uptime voor je site of webapp kunt garanderen.
…Maar waarom zou ik überhaupt voor Hostinger kiezen? Ok, goed, je let nog steeds op! Om deze vraag te beantwoorden, hebben we meer gegevens nodig:
– in de volgende delen van deze review zullen we de technische kenmerken van Hostinger 🤓 analyseren, evenals onze eigen ervaringen tijdens het gebruik van deze provider.
Laten we beginnen!
Uptime en snelheid van Hostinger: hoe betrouwbaar is deze provider?
Naast de functies en prijs is er een ander uiterst belangrijk criterium bij het kiezen van een hosting, dat is de stabiliteit – met andere woorden, de uptime en snelheid van de server.
Om de uptime te meten, met andere woorden het deel van de tijd dat de servers van Hostinger actief zijn, kunnen we kijken naar zowel zelfgerapporteerde cijfers als cijfers van derden.
De eerste zijn gratis beschikbaar op hun servermonitorpagina. Het bevat dagelijkse, wekelijkse en maandelijkse statistieken voor alle 150+ Hostinger’s servers, wat er ongeveer zo uitziet:
Onderaan de tabel vind je de gecombineerde cijfers voor alle servers, daar zijn we vooral in geïnteresseerd:
Kijk naar het gemiddelde over 30 dagen om een idee te krijgen hoeveel tijd je website naar verwachting binnen een bepaalde maand offline zal zijn.
Vanaf June2026 ligt dit cijfer bijna op 99,9% – wat betekent dat een gehoste website slechts ongeveer 42 minuten downtime per maand zou moeten ervaren, wat een redelijk normaal resultaat is voor de meeste moderne hostingproviders.
Dit komt ook overeen met het cijfer van 99,908% , wat onafhankelijk door Hrank gemeten is en valt ook binnen de grenzen van de Service Uptime-garantie van Hostinger – die precies 99,9% is volgens sectie 7 van hun Hostingovereenkomst.
***
Hoe zit het met de snelheid? Dit is een beetje lastiger, omdat het van veel verschillende factoren kan afhangen, niet alleen van de hardware van de hostingprovider.
De laadtijd van een webpagina is sterk afhankelijk van zaken als de totale grootte van afbeeldingen op de pagina, het aantal actieve WordPress-plug-ins en andere details die geen verband houden met de hosting.
Het is dus logisch om alleen de responstijd te beschouwen – dit is de gemiddelde tijd (in milliseconden) die een server nodig heeft om te reageren op een inkomend verbindingsverzoek (dwz iemand die probeert toegang te krijgen tot een website op die server).
Volgens de gegevens van de onafhankelijke Hrank-bots, schommelt de gemiddelde responstijd van Hostinger rond de 800 ms:
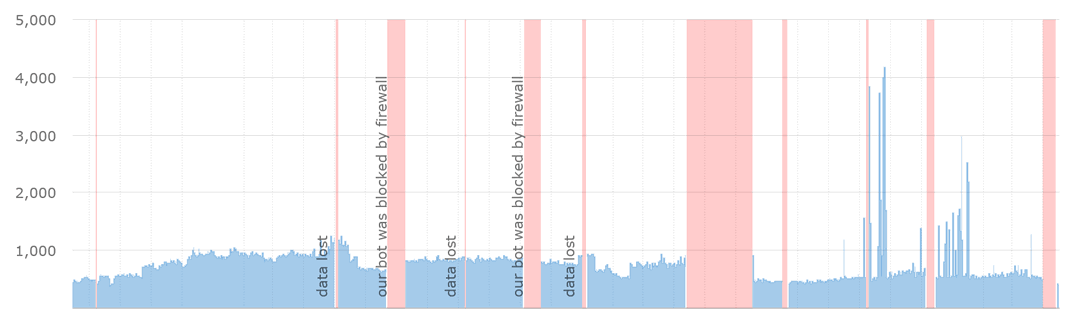 Hostinger’s gemiddelde reactietijd zoals gemeten door Hrank (lager is beter)[/ caption]
In feite is te zien dat de gemiddelde responstijd van Hostinger de afgelopen jaren is afgenomen (=snellere websites), mede dankzij infrastructuurupgrades.
Alles onder de eerste responstijd van 1000 ms is een goed resultaat voor een shared hostingprovider en Hostinger doet het beter dan de meeste andere grote internationale providers.
Oké, nu we naar de feiten hebben gekeken, gaan we van cijfers naar onze persoonlijke ervaring:
Onze ervaring met het gebruik van Hostinger
Zoals we eerder hebben besproken, biedt Hostinger een verscheidenheid aan services aan voor zowel beginners als professionals.
Voor deze review gaan we shared hosting nader bekijken, aangezien dit verreweg het populairste Hostinger-product is.
Zoals gewoonlijk is de eerste stap het kopen van een pakket.
Wanneer je je bestelling voltooid, krijg je toegang tot het hosting admin paneel – dit is de plaats waar je je hosting account gaat beheren:
Hostinger biedt de gebruiker een aangepast admin-paneel, gebouwd door de interne ontwikkelaars van het bedrijf. Naar onze mening is deze redelijk gebruiksvriendelijk en gemakkelijk te navigeren, zelfs in vergelijking met veelgebruikte alternatieven zoals cPanel of Plesk.
Alles wat je nodig hebt, wordt weergegeven door tegels met afbeeldingen en netjes in groepen georganiseerd om je te helpen de diensten sneller te vinden. Je kunt ook de zoekbalk bovenaan gebruiken om makkelijker toegang te krijgen tot de gewenste items.
Om een website te maken, kun je de Auto Installer gebruiken om een inhoudbeheersysteem zoals WordPress op te zetten – of de websitebouwer Zyro met drag-and-drop van Hostinger zelf gebruiken.
Beide opties zijn toegankelijk via het Website gedeelte van het hosting admin-paneel
Overigens is Zyro websitebouwer een interessant voorbeeld van hoe een slecht product een succesvolle comeback kan maken.
Toen we Hostinger voor het eerst in 2017 beoordeelden, was Zyro een puinhoop – het zag eruit als een kruising tussen een vroegtijdig uitgebracht startup-idee en een afgedankt topproduct.
Dit was een tijdje het geval, maar begin 2020 kreeg Zyro een complete revisie:
Nu lijkt het meer op een moderne sitebouwer 😎 De keuze aan sjablonen is nog steeds vrij beperkt, maar de ontwerpen zien er nu in ieder geval netter en up-to-date uit.
Naast verbeterde visuals en een verzameling van meer dan 1 miljoen afbeeldingen, biedt Zyro nu een aantal intrigerende producten op basis van kunstmatige intelligentie:
- AI Writer, een automatisch systeem dat je om een onderwerp vraagt om vervolgens meerdere paragrafen met (zeer menselijk klinkende) tekst over dat onderwerp produceert. Het is nog steeds niet perfect, maar het kan een grote hulp zijn om je writer’s block te doorbreken.
- AI Heatmap Tool, die je webpagina’s analyseert vanuit het oogpunt van de bezoekers en je vertelt waar je de belangrijkste elementen van je pagina moet plaatsen, zoals call-to-action-knoppen.
Het lijkt wel magie!
Over het algemeen kunnen we de nieuwe versie van Zyro aanbevelen aan iedereen die een eenvoudige website wil maken die uit een of meerdere statische pagina’s bestaat. Voor degenen die meer flexibiliteit en meer functies nodig hebben, is WordPress nog steeds de beste keuze.
Hostinger klantenondersteuning
Als je al klant bent, kunt je het Hostinger-team 24/7 om hulp vragen via de live-chat die zich in de rechterbenedenhoek van het hosting admin-paneel bevindt.
Om de kwaliteit van de klantenondersteuning te testen, hebben we hen vragen gesteld via de chat: hun responstijd was supersnel (meestal slechts enkele seconden) en de Hostinger-vertegenwoordiger was altijd vriendelijk, beleefd en behulpzaam.
Er werden grappige kattenfoto’s gebruikt om ons humeur op te vrolijken terwijl we aan het wachtten waren tot ze het antwoord typten 🐈
Naast de live-chat is er een gratis kennisbank met nuttige artikelen over alle Hostinger-producten en -diensten. Je kunt het vinden door op de “Help” link in het bovenste menu van het hosting admin-paneel te klikken.
Het bevat ook een lijst met de meest gestelde vragen – de kans is groot dat je je probleem daar al mee kunt oplossen.
…Wat als je geen klant bent?
In dat geval kun je een bericht sturen naar het Hostinger-team via het contactformulier op hun website.
Het zal natuurlijk niet zo snel zijn als de live-chat, maar je vraag zal waarschijnlijk ook niet zo urgent zijn :) in ieder geval krijg je binnen een paar uur je antwoord; de langste reactietijd in onze tests was 7 uur.
Wist je trouwens dat je ons ook vragen kunt stellen over Hostinger? Bekijk het formulier onderaan de tekst!
Over het algemeen is Hostinger erin geslaagd om onze verwachtingen te overtreffen ivm de kwaliteit van de ondersteuning. We hebben veel erger gezien, zelfs van concurrerende bedrijven met hogere prijzen.
30 dagen geld-terug-garantie en annulering van een Hostinger-account
Als je op de officiële startpagina van Hostinger helemaal naar beneden scrolt, zie je een verklaring waarin je je geld terug kunt vragen gedurende de eerste maand (30 dagen, om precies te zijn) nadat je de betaling hebt uitgevoerd.
Hoewel een geld-terug-garantie een prijzenswaardige functie is voor elke zichzelf respecterende hosting provider, is het de moeite waard om je op een aantal kleine lettertjes te wijzen – zorg ervoor dat je op de hoogte bent van de gevolgen voor het aanvragen van deze terugbetaling:
- Nieuwe domeinnaamregistraties kunnen alleen binnen 4 dagen (96 uur) na voltooiing van de aankooptransactie worden geannuleerd. De meeste andere grote hostingproviders bieden helemaal geen restitutie voor nieuwe domeinnamen.
- Gezien het vorige punt is er nog steeds een lange lijst met domeinnamen die geen restitutie ondersteunen; dit zijn bijna alle landspecifieke en regionale extensies, evenals enkele generieke extensies zoals
.mobi en .info.
- Enkele andere items die niet meetellen voor de 30 dagen geld-terug-garantie zijn domeinverlengingen, privacybeschermingspakketten en SEO-toolkits.
- Ten slotte kunt je geen enkele aankoop terug laten betalen die is gedaan met cryptocurrencies (ja, Hostinger staat het betalen van je bestellingen toe met Bitcoin, Ethereum, Litecoin en een heleboel andere populaire munten).
Oké, wat als je besluit je account na de 30 dagen te annuleren? – je hebt bijvoorbeeld geen hosting meer nodig omdat je het bijbehorende webproject hebt stopgezet.
Je kunt eenvoudig je hosting pakketen en domeinen deactiveren via jehosting admin-paneel, zoek gewoon naar het item “Account deactiveren” met het grote rode stopteken:
Interessant genoeg, hoewel individuele services gemakkelijk geannuleerd en verwijderd kunnen worden, biedt Hostinger geen eenvoudige manier om iemands persoonlijke account bij het bedrijf volledig te verwijderen (onder vermelding van “veiligheidsredenen”).
Hoewel dit geen echte problemen zou moeten opleveren als je eenmaal alle services in dat account hebt gedeactiveerd (er worden zeker geen kosten meer in rekening gebracht), is er voor degenen die graag zelf alles willen verwijderen, een optie die kan werken: vraag gewoon Hostinger-ondersteuning om het account te verwijderen.
Als je je in de Europese Unie bevindt, kun je zelfs woorden als GDPR gebruiken om er zeker van te zijn dat aan je verzoek voldaan wordt; woon je in een andere regio dan zul je meer op de goede wil van het bedrijf moeten vertrouwen.
Wat wil men op het internet nog meer weten over Hostinger?
Voordat we verder gaan met het samenvatten van de sterke en zwakke punten van Hostinger, dit is een verzameling van de meest voorkomende vragen die we op internet en in de berichten op onze website hebben gezien:
Is Hostinger echt gratis? Nou, niet meer… Wat bedoelen we met “niet meer”? Leuk feitje – het was vroeger gratis als onderdeel van de eerste pogingen om snel de verschillende internationale markten te veroveren – maar tegenwoordig is het een betaalde hosting, maar wel een met de focus op een echt goedkope strategie.
Is Hostinger goed voor WordPress? Absoluut. We kunnen het met gemak de beste prijs-kwaliteitsopties noemen voor je zelf gehoste WordPress-website (bekijk onze ranglijst van de beste “goedkoopste” hosts die er zijn).
Is Hostinger betrouwbaar? Kort antwoord – ja, zonder twijfel. Uitgebreid antwoord – voor een retail hosting oplossing die een fractie kost van wat andere grote providers je in rekening zouden brengen, is Hostinger verrassend goed uitgerust om onderbrekingsvrije hosting te leveren met de krachtige ingebouwde beveiligingsfuncties.
Voor en nadelen van Hostinger
Nu we de producten en diensten van Hostinger hebben onderzocht, evenals de klantenondersteuning, laten we de voor en nadelen even samenvatten. We proberen zo objectief mogelijk te zijn:
- Geweldige prijs-kwaliteitsverhouding: zeer concurrerende prijzen voor alle hostingpakketten – zoals Hostinger het zelf zegt, “je betaalt alleen voor de hosting, niet voor de marketing”
- Flexibele aanbiedingen voor elk type klant – van particulieren en kleine bedrijven (shared hosting) tot grote bedrijven en professionele programmeurs (VPS en cloud)
- 99,9% uptime-garantie -Hostinger belooft in feite dat je website altijd online beschikbaar zal zijn. Het cijfer vertaalt zich in een maximum van 44 minuten downtime per maand, wat in de praktijk zo goed als 0 minuten downtime is volgens onze tests.
- Je kunt een gratis domeinnaam krijgen bij je hostingaankoop als je kiest voor een pakket van ten minste 12 maanden
- Je kunt tussen het populaire hosting-dashboards zoals cPanel kiezen of de eigen oplossing van Hostinger gebruiken (wat ook geen slechte optie is)
- WordPress en andere populaire site-engines kunnen met slechts enkele klikken worden geïnstalleerd met behulp van de Auto Installer-functie vanuit het hosting admin-paneel
- De websitebouwer van Hostinger, Zyro genaamd, is in 2020 volledig vernieuwd en is nu prettig in gebruik
- Grote kennisbank met educatieve bronnen over het gebruik van de producten van Hostinger, gratis beschikbaar voor alle klanten
- Eersteklas ondersteuning van een vriendelijk, snel en behulpzaam team dat altijd (24/7) klaar staat om je problemen op te lossen
- Degelijk maar zeker geen bijzonder uptime gemiddelde en server reactiesnelheid
- Relatief beperkte keuze aan sjablonen in hun Zyro websitebouwer
- Geen mogelijkheid voor telefonische ondersteuning – je moet in plaats daarvan gebruik maken van de live-chat, e-mail of het contactformulier
Voordat we deze review afronden met een conclusie en een oordeel (zou je Hostinger moeten gebruiken?), hebben we hier een stapsgewijze gids om een extra korting op je Hostinger-aankoop te krijgen:
We zeggen niet dat je per se Hostinger moet kiezen – maar als je voor deze provider besluit te gaan, is het toch fijn om nog meer op je bestelling te besparen?
Daarom geven we je graag een handige handleiding om extra korting te krijgen bij Hostinger met behulp van een kortingscode:
(aangezien we eerder al hebben geconcludeerd dat het Premium-pakket van 12 maanden in de meeste gevallen de beste keuze is, zullen we het als voorbeeld gebruiken)
-
Bezoek de officiële Hostinger-website door op de onderstaande knop te klikken (de website wordt automatisch in een nieuw venster geopend):
Ontvang de beste deal bij Hostinger ›
-
Klik onder Premium Webhosting (dwz de middelste optie) op de grote rode knop “Toevoegen”. Dit brengt je naar de configuratiepagina.
-
Kies het pakket van 12 maanden door er op te klikken (dit is het goedkoopste abonnement waarbij je een gratis domeinnaam krijgt, het is niet de moeite waard om het abonnement voor 1 maand te kiezen).
-
Op dit punt is dit hoe je configuratiepagina eruit zou moeten zien:
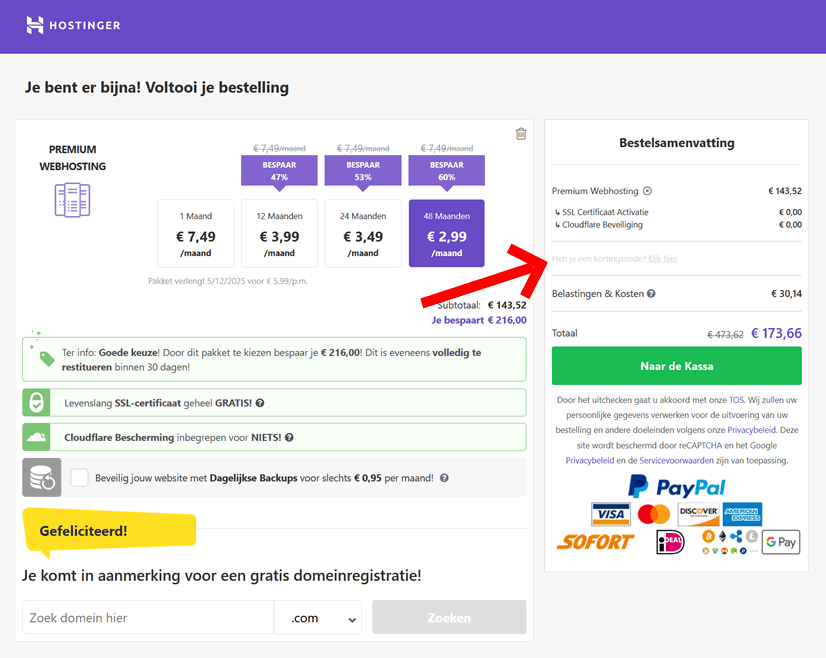
-
Kijk nu onderaan de pagina en zoek de tekst “Heb je een kortingscode?”, Direct onder het totale orderbedrag. Als je op de link klikt, komt er een nieuw veld zichtbaar. Typ de volgende code:
TRUS10CODE
-
Nadat je de code hebt ingevoerd, klik je op het plus pictogram aan de rechterkant (deze moet paars van kleur worden). Je ziet een bericht dat de kortingscode met succes is toegepast en de korting verschijnt in je bestelling!
-
Gefeliciteerd! Je hebt zojuist wat extra geld bespaard op je Hostinger aankoop, waardoor de uiteindelijke prijs nog aantrekkelijker is geworden.
Als de bovenstaande promotiecode in jou geval niet werkt, laat het ons dan weten in een bericht onderaan de pagina – we zullen het onderzoeken en ons best doen om ervoor te zorgen dat je een werkende code ontvangt.
Eindoordeel: is Hostinger je geld waard?
Met bovenstaande informatie in gedachten, zou je Hostinger gebruiken voor je volgende webproject?
Als het op hosting aankomt, is dit het merk van “waar voor je geld” krijgen: je betaalt een redelijke prijs voor wat je krijgt en wat je krijgt is functioneel, praktisch en gebruiksvriendelijk. Hostinger… werkt gewoon ⚡
Maak een website op Hostigner ›
Voor degenen die besluiten om Hostinger te proberen: vergeet niet onze handige handleiding te bekijken om extra te besparen op je eerste bestelling.
***
Heb je nog steeds vragen over de servers, pakketten, ondersteuning, enz.? Of misschien maak je al gebruik van Hostinger en wil je je ervaring delen?
Neem in ieder geval deel aan de discussie hieronder, laten we elkaar helpen om een weloverwogen beslissing te nemen!
Affiliate mededeling: als je deze recensie nuttig vond, overweeg dan om onze blog te steunen door de links in de tekst te gebruiken om Hostinger services aan te schaffen. Dit heeft natuurlijk geen invloed op de prijs die je op je Hostinger aanbieding krijgt.
Most digital services nowadays offer either a free version or a trial period, allowing to actually use the product for a while before deciding whether it’s right for you.
One of the very few exceptions? 🛑 Web hosting.
Not only are there no test versions (i.e. you always pay up-front) – even buying the service is notoriously difficult and time-consuming!
Not to mention the various tricks and dark patterns hosting companies use to lure you in, like conspicuously “promo” prices which later increase dramatically, often x2 or x3-fold.
Apparently, hosting users are not the only ones who are frustrated with these trends – a curious company called Warpgate seems set on re-inventing what it means to be a web host in 2026.
But do they deliver?
In other words, is it actually worth your time and money?
In this detailed review, we will examine Warpgate from all angles and answer the most important questions about this hosting provider:
- 🌀What is Warpgate and how does it work?
- 🦄Is there anything special about this host?
- 💳Is it really cheaper than other providers?
- 🚀Who should use Warpgate and who shouldn’t?
We’ll start by looking at the “non-standard” features and ideas implemented by the service, as well as the philosophy behind it all:
What’s Unique About Warpgate?
Warpgate calls itself a “human- and planet-friendly hosting”. Rather ambitious, yes! What can they offer to back this up?
Here are some of the things about Warpgate that are hard to find in the web hosting industry:
- A novel onboarding experience which focuses on speed and simplicity: you can create a WordPress website in 15 seconds and start working on it straight away – because…
- Warpgate is free for the first 30 days, and requires no card details to complete the set-up of your staging website.
- After the free month is over, you are offered flat, predictable pricing with no hidden fees or subsequent price hikes.
- Apart from the functionality, it’s refreshing to see a company paying as much attention to social responsibility: Warpgate keep their operations carbon-neutral – while also supporting non-profit causes such as child education and the fight against COVID.
The last item is always a good idea, if you ask us…
But as for the other three, we’ll need a closer look to form an objective opinion. Let’s start with creating your own website on Warpgate:
The Onboarding Experience
While Warpgate is still technically a web host (a managed-WordPress host, to be specific), the process of creating a new website here looks more like a site builder – maximum simplicity, no upfront commitments ⚡
-
In order to get started, you’ll need to input the desired subdomain and your email address in the form on the official homepage:
Set up your website with Warpgate ›
-
After you click the big purple “warp in!” button, you’ll get an email with the activation link (check the spam if you haven’t got anything in your mailbox). Click on the link and enjoy 10-15 seconds of nerdy status updates:
-
When the new WordPress site is ready (~ quarter of a minute), you will see the link to your new staging (i.e. temporary) address, which will look like
yourhandle.warpgate.site. Click on the link and complete the standard WP install routines – and you’re done!
Once inside your new WordPress admin, you will find a welcome screen to guide you through the first couple of steps as you set up your website and explore the available features:
This WordPress introduction was custom-made by the Warpgate team, and is a serious improvement over the (rather drab) standard WP screen shown below:
Have you noticed the “Warpgate” item in the left-hand-side admin menu? That’s the hosting panel! And yes, it is a conscious decision –
Warpgate got rid of the complicated hosting admin environment and incorporated their own, greatly simplified and streamlined version right inside your WordPress admin.
For the sake of visual comparison, this is how standard, old-school hosting dashboards like cPanel look:
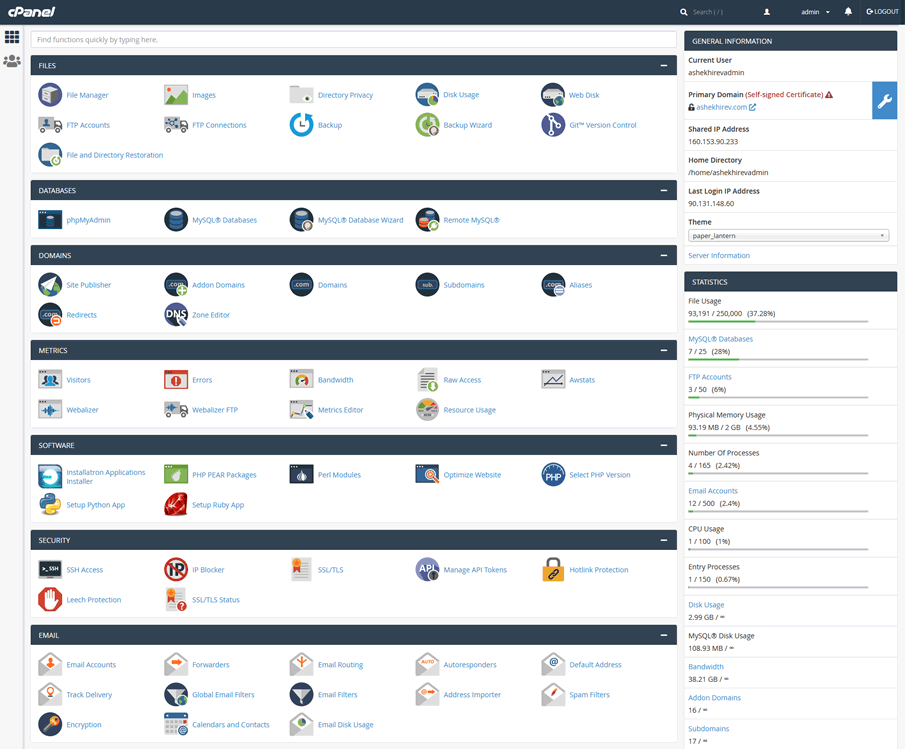
(this isn’t even half of the panel!)
…and this is how Warpgate’s built-in hosting control center looks for an activated account (you’ll see a domain search tool in a staging website’s panel):
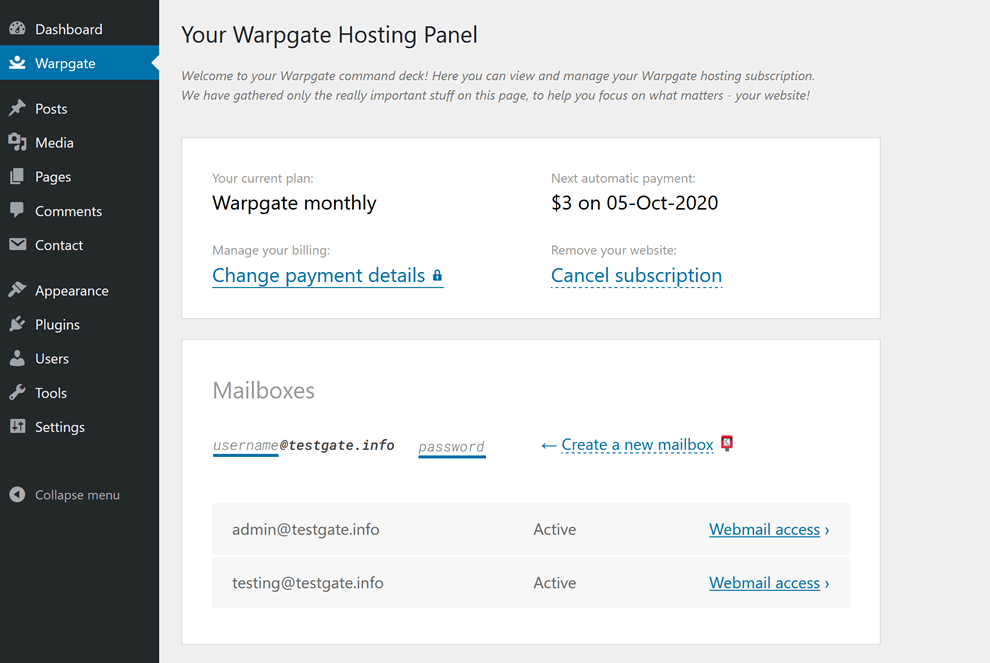
There are many more options, settings, and features in a cPanel dashboard – but the growing popularity of hosts like Warpgate makes you wonder:
…how often do most hosting users really need any of them? (if at all)
And yes, full-time developers do tend to need more nooks and crannies for managing large websites; however, in such cases a professional-grade cloud platform like Amazon AWS is a much more natural choice.
Large retail hosts of the yesteryear, like GoDaddy or Bluehost, are geared towards smaller websites that are often managed by beginner webmasters – but they are still using those huge, incomprehensible hosting panels you saw above.
“Most ordinary people don’t ever use 99% of the hosting panel items, so why keep the clutter?” – ask the creators of Warpgate.
Following through on this minimalist idea, Warpgate declutters the hosting admin experience – but that’s not the entire story. The pricing is also suitably ascetic:
How Much Does Warpgate Cost?
Well, it probably couldn’t get any simpler: Warpgate offers a single hosting plan with monthly ($3 per month) and yearly ($30 per year) billing options.
This includes a free domain name and automatic SSL certificates for added security, which are often charged separately by hosting providers.
The most important difference, though, is the fact that the prices do not change after your first billing period:
You pay the same $3 per month or $30 per year for as long as your Warpgate account is active – no hikes, no hidden fees.
This interactive table on Warpgate’s website really brings home the long-term price advantages vis-à-vis popular classic hosting services:
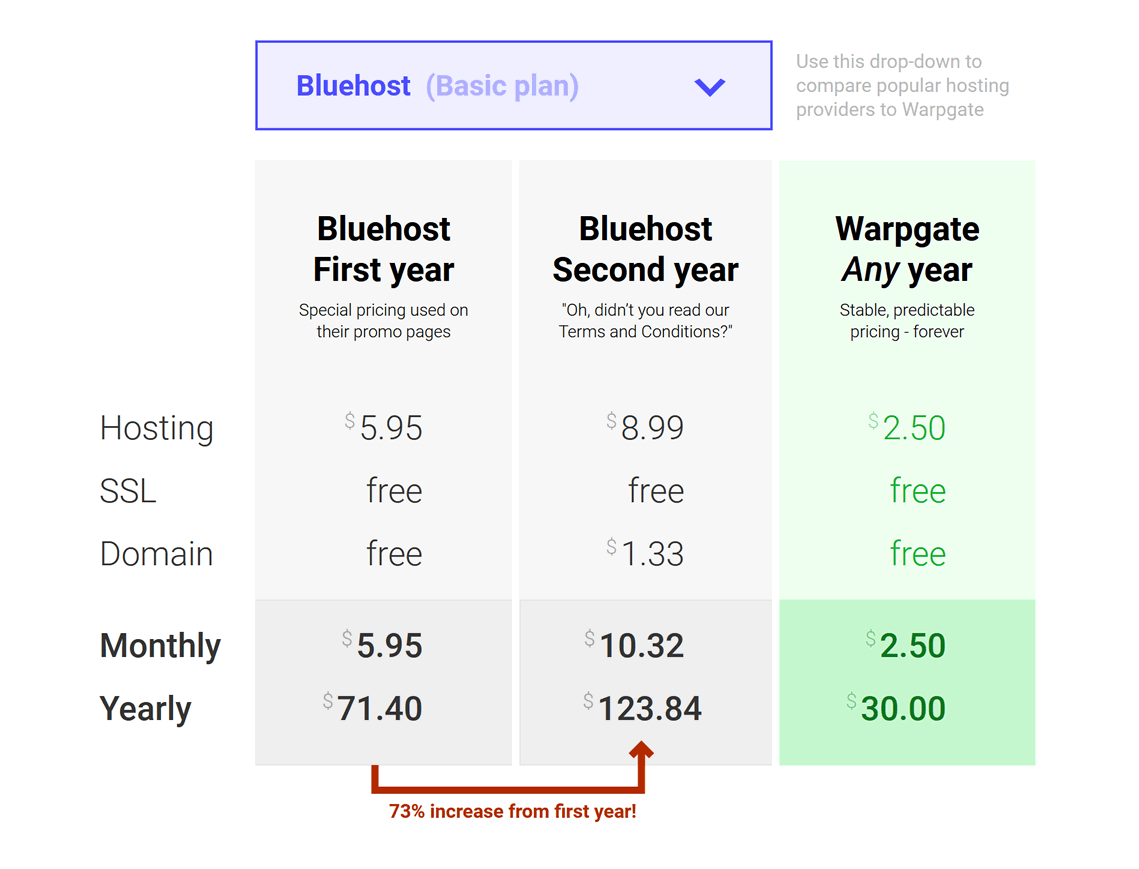
While certain classic hosts do offer ~$2/month prices on some occasions like Black Friday, you will inevitably see your invoice increase by 200-300% after the first billing cycle.
Not on Warpgate, though 💵
It’s up to everyone to decide whether they still prefer paying a bit less initially and then being charged several times more indefinitely – but a promise of a clear, transparent, fixed payment schedule is sure to find its own admirers.
Pros and Cons of Warpgate
Let’s sum up what we’ve learned about this hosting provider by listing all the strong and not-so-strong points:
- Creating a new website at Warpgate takes less than a minute and requires only a valid email address to activate.
- Warpgate is free of charge for the first 30 days, without requiring you to leave your card details.
- You get a fully managed WordPress website with automatic core updates and a custom-made welcome screen for easier onboarding.
- The hosting management dashboard avoids the clutter of traditional panels, and is located right inside the WordPress admin.
- All sites are located on SSD-only servers optimized for WordPress, which results in top-notch loading speed.
- You get a free domain with every subscription, and it doesn’t accrue any hidden charges after your first billing period, unlike with most other hosts.
- The pricing structure is simple and transparent, without any hidden fees or subsequent price hikes.
- Warpgate’s support team leaves a positive impression, all replies we got were friendly and to the point.
- The company actively pursues social causes, including being carbon-neutral, contributing to charity, and hosting non-profits for free.
- Warpgate offers exclusively WordPress websites (fully-managed), so there’s no possibility to install other CMS like Joomla, Drupal, or Ghost.
- The range of features is more basic compared to large hosts like GoDaddy or Bluehost, following Warpgate’s “no-distractions” approach.
- Support is only available by email, there’s no phone or live-chat; expect to get replies within 1-2 days from your initial message.
So, is Warpgate worth using, and if yes – who should use it? Summing up below:
Our Verdict: Is Warpgate Worth It?
There are hosting providers that try to be everything for everyone, and then there are more focused companies like Warpgate.
Consider giving it a try if:
- You need a WordPress website as quickly as possible, fully ready for your customizations and content,
- You like simplicity and transparency when it comes to user interfaces, customer support, and especially pricing,
- You prefer brands that actively direct effort and resources towards noble goals – social causes, environmental protection and charity.
On the other hand, Warpgate is definitely NOT for you if:
- You need something other than WordPress – a different content management system or a completely custom-coded website,
- You have prior experience of managing servers and prefer full control over your server’s parameters and the entire software stack.
One thing about Warpgate that will definitely appeal to everyone is the fact that you can try it free of charge, with zero commitments:
Try Warpgate for free ›
Let us know what you think about Warpgate in the comments below; if you already have experience with this provider, do share your thoughts – let’s help each other make informed choices!
On-demand graphic design services are becoming a staple in business operations – not least thanks to the explosion of social media, which requires high-frequency, regular visual content to stay ahead of the competition.
The most influential representative of a new breed of service providers in this field is Penji: a contract-free, flat-fee service offering unlimited design projects for busy entrepreneurs and business owners.
In this detailed review, we will take a close look at Penji and seek answers to some of the most important questions for anyone considering this service:
- 🦄How is Penji different from other design services?
- 💵How much does Penji cost and what plans are available?
- 🔍Are there better deals for any of the Penji plans?
- 💡Is Penji worth using, and who should use it?
Those who are already familiar with Penji can use the table of contents on the right (full-screen) or below (mobile) to find specific topics, but before we go into the nitty-gritty of Penji, it’s worth starting with the basics:
What Is Penji and How Does It Work?
One of the leading on-demand graphic design services in the market today, Penji is a pride of Camden, New Jersey, that made it to the 2019 Inc. 5000 list snagging the 1006th spot. The founders, Johnathan Grzybowski and Khai Tran, launched Penji to provide reliable, fast, and affordable graphic design.
From having only a handful of clients years ago to catering to big guys like Reebok, UPenn, and AWeber – Penji’s mission is to help small and large businesses grow through quality and unique graphic designs.
At the core of Penji is the simple yet powerful idea of “subscription-based design services”:
for a flat monthly fee, you get unlimited design projects, complete with drafts and revisions – all the while retaining the flexibility of an online subscription (read – no long-term up-front commitments)
This means you don’t need to assemble and manage an in-house design team (or even a remote outsourced team) – you simply get a share of Penji’s vast pool of designers whenever you need them, coordinated by your personal account manager.
Sounds almost too good to be true!
Let’s dig a bit deeper and consider the benefits of Penji for your business, as well as potential risks:
Pros and Cons of Penji
Brands frequently need marketing graphics for their advertising channels — social media, outdoor advertising, online ads, print ads, branding, to name a few.
Subscribing to Penji feels a little like having your own magic army of designers-on-demand: you no longer have to hire separate specialists for every project type:
- Penji offers unlimited graphic designs, web and app designs, illustrations, and infographics. This is beneficial if your company is running on a tight schedule.
Plus, you no longer have to pay hourly or per-project rates… and last but not least, Penji’s plans come with unlimited revisions: unlike other design services that charge extra for revisions, Penji lets you request as many modifications as you like, at no additional cost.
- Penji runs on a subscription-based system that lets its clients pay a fixed fee every month.
Startups and small businesses might be working with a shoestring budget when it comes to marketing – and this is one of the reasons why many choose Penji as their go-to design service: paying a fixed rate every month enables brands to anticipate and allocate their budget without going overboard.
- Pre-vetted designers for the win! Penji only hires the top two percent of graphic designers in the industry. This means you no longer have to go through the rigorous hiring process when searching for quality graphic designers.
Moreover, Penji’s graphic designers have versatile skills and expertise. All your different projects will be assigned to the best suitable designer with similar knowledge.
- Speaking of design quality: Penji’s graphic designers are knowledgeable about graphic design trends, concepts, and principles – not to mention the latest industry tools and best practices.
Plus, all Penji’s designers have years of experience and seem to have worked with various existing brands – a nice touch given that most new design clients need professional guidance when it comes to the visual strategy and implementation.
- Penji’s promise of a 24 to 48-hour turnaround never fails to impress: all you have to do is submit your request and wait for the first draft, which will typically be ready within a working day.
- Penji takes pride in its seamless design process, enabled by the custom online platform they built in-house. This is where all the magic happens: by using Penji’s platform for requesting designs, asking revisions, and downloading, you no longer have to toggle between a myriad of apps and other sites.
- The creators of Penji don’t seem to be fans of excessive paperwork: there are no contracts involved, so every client has the freedom to cancel their subscription anytime, without incurring any cancellation fees.
Your projects will be stored in the Penji platform for 90 more days, so when you cancel your subscription and re-subscribe within 3 months, you’ll still have access to all your design projects.
A cherry on top?
- Penji offers a 15-day money-back guarantee for those who want to try their service, risk-free.
Impressive! Let’s talk about risks and potential drawbacks, though. Here are some of the things you should take into account when using Penji:
- The flat monthly fee might be a blessing for organizations with a constant stream of new design requests – but for those whose design volumes vary a lot from month to month, Penji’s fixed-price plans might not offer the best value during the months of low demand.
- Penji’s core idea is to commoditize design; the flip-side is that designers in Penji are interchangeable, and you will probably be assigned different designers from time to time if your preferred ones are currently busy with other clients or otherwise unavailable.
This also means that in order to get the best value out of Penji, it is always worth being as specific as possible in your design briefs – newly assigned designers might not be familiar with your previous orders and discussions.
- Finally, Penji’s platform allows communicating with designers in written form – via the online dashboard or by email; there’s no possibility to talk on the phone, which makes things a bit more complicated for those who strongly prefer verbal communication.
Just like any other tool, Penji is not necessarily great for everyone – so be sure to evaluate your design needs against how much you will pay for your subscription. Speaking of which:
Penji Plans and Pricing
Clients can choose between 3 affordable plans, depending on their monthly design needs. Here is a breakdown of the rates and included features:
|
Pro |
Team |
Agency |
| Designers |
1 |
1 |
2 |
| User seats |
2 |
5 |
10 |
| Design types |
images |
images, web |
images, web |
| Support |
standard |
standard |
priority |
| Price / mo |
$400 |
$500 |
$900 |
The Professional plan is suitable for solopreneurs, startups, and small businesses with regular visual design needs; it comes with 1 designer and 2 team seats – more than enough for a project with a couple dozen visuals per month.
The Team plan adds more user seats and allows creating a wider range of output compared to Pro – including website designs (not code, though!), custom illustrations, and even infographics. The Agency plan takes it one step further, adding a second designer and priority support to maximize productivity for the most demanding clients.
All plans come with unlimited revisions – this means that you can request changes to the deliverables as often as you like (preparing a clear and detailed brief will still save you lots of time, though).
If you do decide to try Penji, you can save even more by using our exclusive discount offer:
BONUS: -15% Penji Coupon
Yes, we know – 15% discounts are already available for the yearly billing cycles; in this case, however, we will show you how to get the same lower price for a monthly subscription, thus reducing your up-front commitment 12-fold 😎
Follow these steps to get 15% off the monthly plans:
-
Click on the link below to open Penji’s official pricing page; choose the plan you like and hit the big purple button:
Get 15% Off Your Penji Subscription
-
On the next screen, take note of the promo code field under the pricing choice in the right-hand side:
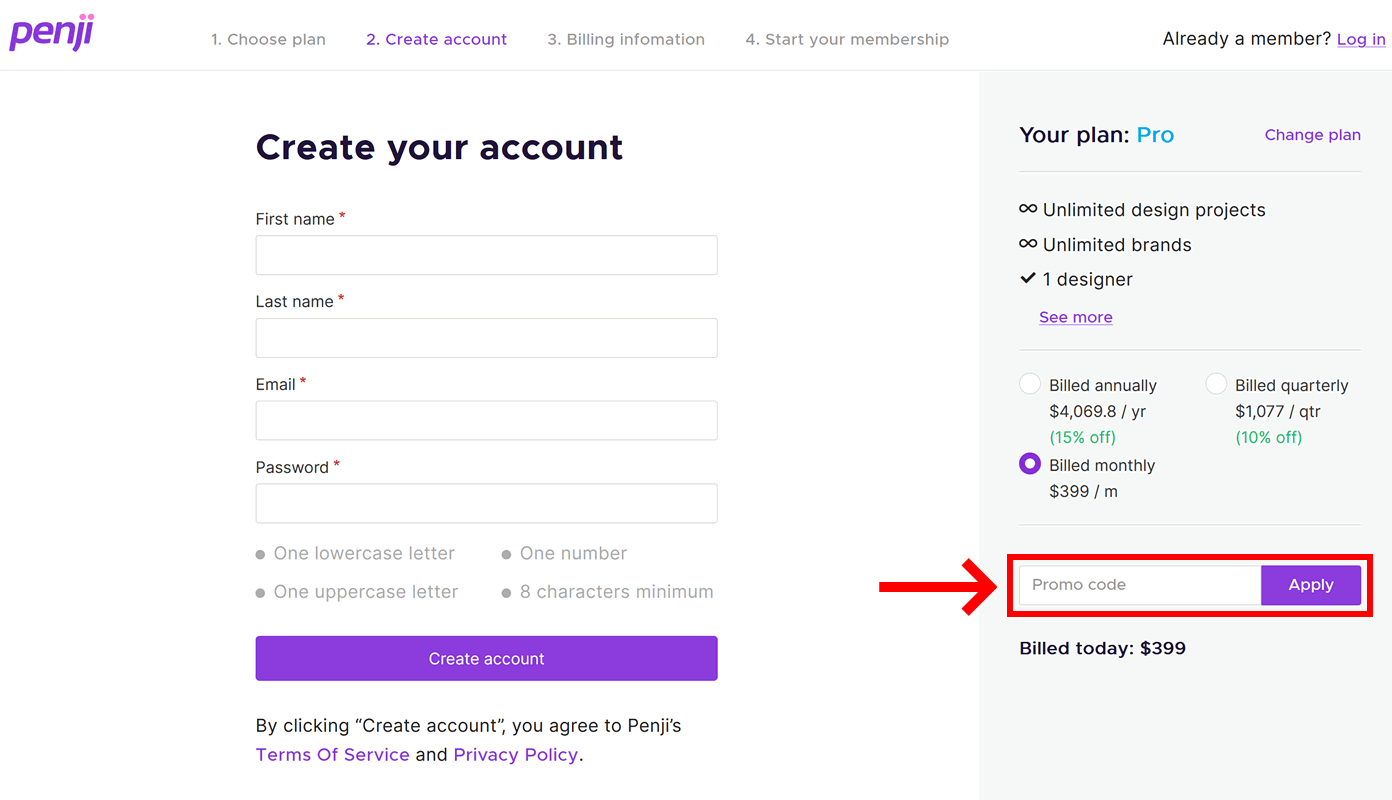
-
If the field is already filled, just hit “Apply”; if the field is blank, copy and paste this coupon code and hit “Apply”:
SATORI15
Voila! Notice how your price became 15% lower – you can now continue with the registration and checkout!
Verdict: Should You Use Penji?
Ours is a visual age! To stand out online and offline, it is imperative to create eye-catching graphics that separate you from the competition.
You can achieve this by perusing pure freelance services like Fiverr, hiring and managing a full-fledged in-house design team – or you can take a simpler approach a use Penji.
Subscribing to Penji is like having your own design team, with none of the hassle:
Startups and small businesses can scale and level the playing field due to cost-efficiency, while agencies can make the most out of a design partner with simple, transparent pricing and dedicated support.
Overall, Penji is a smart choice if you have constant design needs (e.g. social media channels, regular ad campaigns, blog posts, physical promos, etc.
Before subscribing to Penji, though, keep in mind these two things:
- Make sure that your regular design demands are at least several items per day – otherwise you might not get the best value out of a flat-fee tool like Penji. Trying out the cheapest plan is the most sensible option, given the 15-day money-back guarantee.
- If you do decide to subscribe, check out our step-by-step instructions above on how to obtain a better price for your monthly billing cycle – why pay more if you can pay less?
Still have questions about Penji which were not answered in this review? Let us know in the comments section below!
Whether writers and other word-lovers like it or not, the Internet is all about images and videos these days!
If you are managing the visual identity of a brand (even a tiny one), the amount of graphics you need to produce on a daily basis can quickly become overwhelming.
Enter Crello –
This online service wants to revolutionize the way we approach graphic design, and save everyone tons of time in the process. Does it deliver on its promises? Let’s find out!
In this detailed review, we will answer the most important questions about Crello to help you make an informed decision:
- 🎨What is Crello and how does it work?
- 🦄How is Crello different from other similar tools?
- 🤼Is Crello better than Canva, and in which cases?
- 👍Should You Use Crello in your design projects?
Before we discuss the unique features of Crello and compare it with the closest alternatives, it wouldn’t hurt to make sure we understand the basics:
What Is Crello and How Does It Work?
First and foremost, Crello is an online design tool. If you’re reading this article, you probably already know that, so let’s try to be more specific:
Crello is a design automation platform for creating all kinds of visual marketing materials, both digital (social, web, ads) and physical (brochures, labels, posters, etc).
Alright, that’s better, but also less comprehensible 🤔 – what on earth is a “design automation platform”?!
– It means that Crello is much smarter and more practical than the cumbersome design software of the past. The entire workflow is all about saving time:
- No need to start from scratch anymore: Crello offers over 10,000 fully customizable templates for every conceivable purpose (you can always switch back to a blank canvas if you prefer, of course).
- Forget about manually setting the right dimensions for a Facebook image post or an YouTube video cover – Crello has all the presets you’ll ever need, always up to date with the latest requirements of each social media.
- Choose from millions of visual assets – high-quality photos, videos, and illustrations – to customize your designs.
- Quickly scale your media campaigns from a single design by creating unlimited copies of your work in any format or dimensions.
- Share your designs directly from your Crello dashboard: post to social media, generate a link, or download your design as a file in one of 7 available formats.
By the way, the third step is made possible by the fact that Crello is a brainchild of the founders of Depositphotos, one of the largest media marketplaces in the world – which means that…
Crello is fully integrated with the Depositphotos library, giving you instant access to 150+ million stock images, videos, and other graphics files.
These come in 3 varieties: free files (obviously costing zero), stock files (which you can buy separately) – and premium files, which are only available in Crello Pro.
Speaking of which, let’s see what other features you can unlock with the Pro version:
Crello Free or Crello Pro?
First of all, it’s worth spelling out that anyone can use the basic version of Crello free of charge, indefinitely – no need to add your card details or anything.
The paid version (Crello Pro) is meant for those who use Crello regularly and would like to maximize their productivity:
-
Apart from full access to the premium library, Crello Pro removes the monthly download limit for your designs – if you create several designs per day on average, this might be useful.
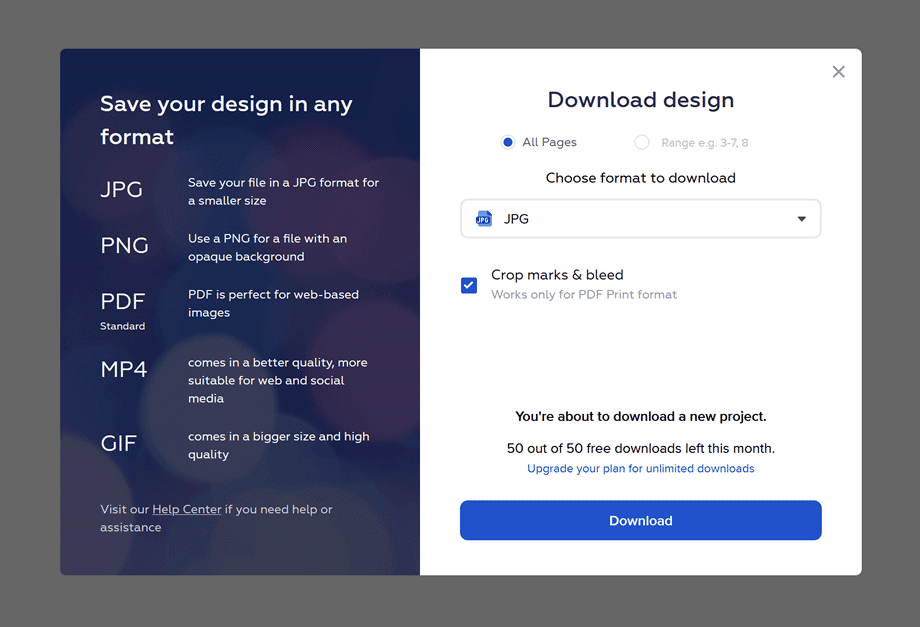
-
The Pro version also unlocks the automatic background removal tool, which works almost like magic:

-
Most importantly, though, Crello Pro allows you to create a team and invite up to 10 other users to collaborate on designs:
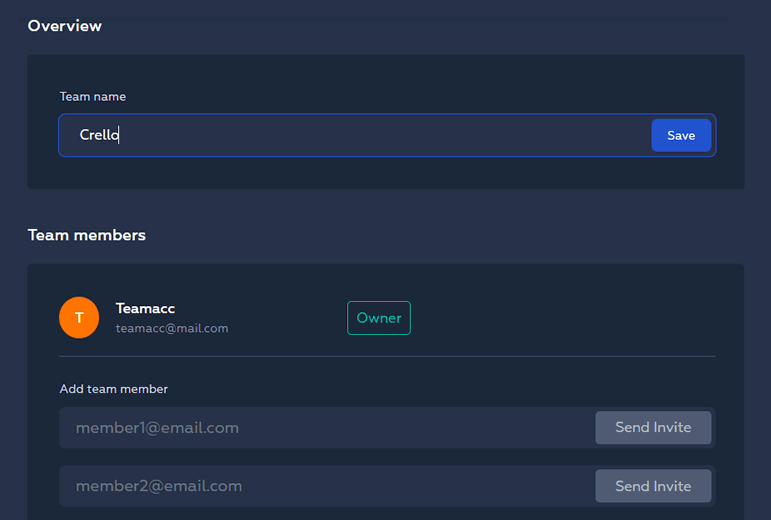
There’s also the priority support offer, which means you’ll always be the first in line to talk to Crello’s support team – but we wouldn’t consider this as a major reason to switch to Pro:
Crello’s interface is quite intuitive and easy to learn, especially given the detailed guides and video tutorials that can be accessed from the bottom menu on the official home page.
Besides, you can get support in the free version as well… just somewhat slower 🐌
For those among you who like things organized into rows and columns, here’s a little summary table we made to give an idea of the main perks of Crello Pro:
| Plan |
Crello Free |
Crello Pro |
| Choice of images |
Limited |
All images |
| Image background removal |
– |
Yes |
| Downloads per month |
Limited |
∞ |
| Priority support |
– |
Yes |
| Collaborate with team members |
– |
Yes |
There are two billing options in the Pro version: monthly and yearly, the latter being 20% cheaper (as is typical for online subscriptions).
Here’s some good news, by the by –
Did you know there’s a way to save an additional 25% on a Crello Pro purchase? Check out the next section to find out how.
If you do decide to go Pro, here’s a step-by-step guide on getting a significant discount on your Crello subscription.
It works both for the monthly and the yearly billing option, but the total savings are obviously 12x bigger with the latter, as the code only applies to the first period:
-
Visit the official Crello homepage following the link below; if you don’t have an account yet, create one – if you do, log in to your control panel.
Get 25% Off Crello Pro ›
-
While in your Crello account, click on the round icon in the top right corner to show the drop-down menu; in the menu, click on “promo code”:
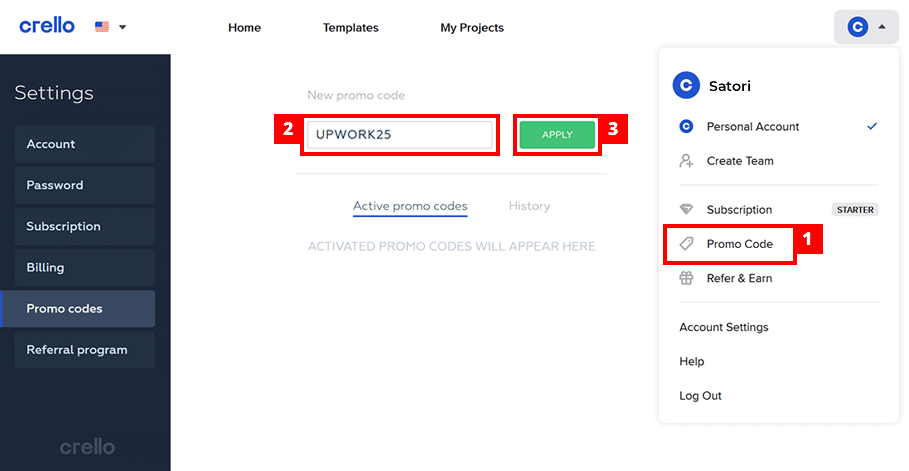
-
On the promo codes management page, enter the following combination into the form and click on the green “Apply” button:
UPWORK25
-
Done? A blue box with coupon details should appear below the form, indicating that the coupon has been successfully applied.
-
You can now switch to Pro using the standard process (i.e. by clicking on “Subscription” in the account menu in the top right corner of the screen). Enjoy!
…Or, alternatively, you can simply click on this direct link that applies the coupon automatically ✨
Nice! Before we move on to the final verdict, there’s one more popular question we need to cover – namely, how does Crello compare to its closest alternative?
Crello vs Canva
If you’re in the design business and considering Crello as your main tool, you’ve probably also heard of Canva by now.
It’s an online platform that is very (I mean, very!) similar to Crello, but there are still some significant differences you should take into account:
- The choice of elements is somewhat wider in Canva, which offers more interactive elements like editable charts, buttons, or forms. The graphic libraries are very similar in size, though (~200 million from Getty for Canva and ~150 million from Depositphotos for Crello).
- Canva has one more type of subscription in addition to the comparable Pro version: the Enterprise option at Canva adds more team-focused features and offers priority support. Both are more or less included in the Crello Pro subscription, for a much lower price.
- Crello is 20% cheaper for both its yearly and monthly plans, if we compare the Pro versions. Again, it should be mentioned that the premium features you get with Canva Pro and Crello Pro are nearly identical.
To sum up, in most cases Crello will work just fine as a substitute for Canva, at a significantly lower price 💰
We recommend considering Canva over Crello if you need a lot of interactive elements in your designs, and/or if you have a large design team (>10 people).
Apart from that, the choice more or less boils down to your personal preferences – both tools are great at increasing your productivity and facilitating collaboration.
…Now that that’s been clarified, let’s summarize what we know about Crello:
Pros and Cons of Crello
- No need to download any software: Crello works from any modern browser, without any special requirements
- Start with a blank sheet or one of the pre-set sizes for social media, your own website, or printed materials
- Thousands of free templates, photos, videos, backgrounds, and animations are available to all users
- Fully integrated with the Depositphotos library of 150+ million images, videos, and illustrations
- Publish directly to social media – or download your designs as images, pdf documents, or videos
- You can organize your work into folders as well as upload your own visual elements and fonts
- The automated image background remover in Crello Pro can save a lot of time
- Invite up to 10 team members to collaborate with you on designs (available in Crello Pro)
- The Crello Pro subscription costs much less than similar online tools like Canva
- More interactive elements like forms, charts, and maps would be a great addition to Crello’s toolkit
- The automatic design resizer needs some more work in terms of fitting images and backgrounds into new dimensions
- While most features of a brand kit are present in Crello, a more complete brand-management package will be a useful development
Alright, now that we examined Crello from different angles, it’s about time we answered the main question posed in the beginning of our review:
Should You Use Crello?
Crello has found a good balance between simplicity and powerful features – you can start creating professional-quality designs in minutes, no steep learning curve involved.
Does it mean everyone should be using this tool?
Well, yes and no:
- If you just need a couple of social media images per month, the basic (free) version of Crello offers everything you need.
- If design is what you do for a living (or if your business/project relies heavily on visuals), consider subscribing to Crello Pro for premium images, advanced tools, unlimited downloads, and teamwork options. Check out the -25% coupon guide above if you do decide to subscribe.
- If you need to use a lot of interactive elements such as forms, charts, and maps in your designs, take a look at Canva Pro (do keep in mind that it costs 20% more than Crello Pro).
- If you are a part of a large design team (>10 people), Canva Enterprise might be the suitable choice, with its advanced collaboration features.
In any case, if you’re still unsure whether Crello is the right tool for you, the best way to find out might be to simply give it a try 🤷 you don’t need to leave credit card details for that:
Try Crello for free ›
…Or maybe you have some additional questions about Crello? Scroll down to the discussion section below and leave your comment – let’s help each other make informed decisions!