Search results for

"multi purpose"

Keep SEO in Mind While Managing a Multilingual Website + Tips for Popular Languages

You’re running a multilingual website, and your content has been localized into, say, three different languages. Given all the effort and time that went into the translations, you pat yourself on the back, awaiting an influx of customers happy to engage with a website that speaks their tongue.

Might it be that you’re celebrating a bit too early?

How Does Translation Influence SEO?

Newsflash: having your website translated into several languages doesn’t guarantee that its will appear on the first page of Google for the people who speak these languages. So, the impact translation on search engine optimization (SEO) is something that your business will have to consider at some point.

Indeed, having a multilingual website means dealing with different search engines in different countries, therefore, some additional website optimization is not only recommended – it’s a must if you want to rank.

Studies on the influence of different languages on eCommerce businesses have long established that translations play a critical role in business success. Here are some interesting outtakes from a study published by CSA Research several years ago, which polled over 3,000 people from 10 countries:

  • 30% of respondents never buy from English-only websites, and 29% rarely do
  • 56% of respondents spend more time on the websites in their native language or boycott English-only websites altogether
  • automotive and financial products are among those that consumers are the least likely to buy if the website isn’t in their native language
  • among the biggest concerns is the lack of payment information in the native language
  • 50% of the respondents also say they prefer at least the navigation elements of the website to be localized

However, a translation itself isn’t enough for a high ranking in Google and the local search engines. Optimizing the translated content is also critical to getting your SEO right – i.e. avoiding pitfalls such as lack of clear localized content structure, which leads to weak search positions, which in turn has an immediate negative impact on customer engagement rates and therefore sales.

What About Auto-Translation?

Some companies avoid investing in professional translation, resorting to auto-translation with tools such as Google Translate.

Google Webmaster Central advises against this practice, saying that ‘…using automated translation tools to directly create content for your site would be seen as creating auto-generated content, which is against Google Webmaster Guidelines’.

And that’s G-speak for ‘you will be punished hard, SEO-wise ‘.

Thus, using auto-translation tools, the abundance of which is offered not just by Google, but by different WordPress plugins as well, negatively impacts SEO results. On the contrary, getting your website professionally translated improves SEO ranking and user experience in general.

Getting Serious About Localization

To translate your website with search engine optimization in mind, we need go beyond word-switching and look at localization as a coherent discipline.

Localization is more extensive than simple translation since it involves adapting the many aspects of your content and products to the target market:

  • converting currencies into local equivalents if applicable – this includes both the sums, the symbols, and the word order
  • localizing units of measurement in case the target country uses a different unit system (e.g. metric vs imperial)
  • changing date formats to those commonly in use by the native speakers of the language
  • using proper formats for geographical and other data such as addresses and phone numbers
  • adjusting images and graphs according to local cultural norms and expectations – including, but not limited to, colors, forms, symbols, etc

If these elements are localized improperly, the search engine algorithm may not recognize them, consequently bringing a negative impact on your SEO results.

So, since localization has a profound impact on SEO, let’s take a look at the most popular languages with SEO in mind. Those were picked according to the ranking by Statista of the most common languages used on the Internet.

How to Localize Content for Chinese Speakers

According to Forbes, over 800 million Internet users are from China. So even despite the fact that most of them are located in a single country, the Chinese language is the second most used language on the Internet.

But the sheer number of users is not the sole reason, why you need to start localizing your website in Chinese and worry about search engine optimization.

China is one of the world’s largest markets for… well, almost anything, not to mention the biggest production and manufacturing area in the world.

If you decide to target the Chinese market, full localization of your website is a must, as only 10 million out of 1.3 billion people in China speak any English.

Localizing a website into Chinese has certain peculiarities you should keep in mind:

  • Word order is essential – as you’re well aware, Mandarin as well as Cantonese use symbolic writing (logograms, to be precise), where almost every symbol carries it own, separate meaning, and a word can be represented by one, two, three, or sometimes four symbols. This also means that rearranging symbols can have a dramatic impact on the message, up to the point where a single shift in position can completely change the meaning of an entire sentence.
  • Date and time order – in Chinese, the year is followed by the month and then the day (which is handy, by the way, when you want to order something by dates on a computer)
  • Name format – unlike in English and most other languages, the last name comes first in Chinese, followed by the first name.

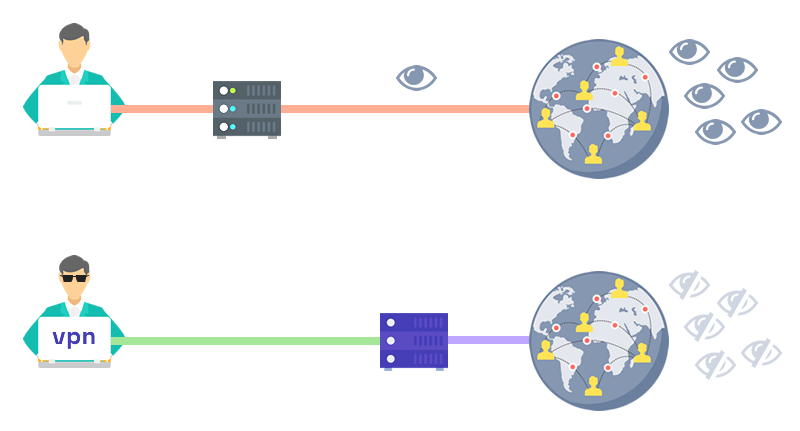
Since Google isn’t popular in China (because it doesn’t work there without a VPN), the majority of Chinese people use Baidu to search the internet. International brands that operate in China therefore rely on the algorithms of this search engine to optimize their websites. Haier, a brand that produces home appliances, is one of the examples of full website localization for the Chinese market:

Haier on Baidu

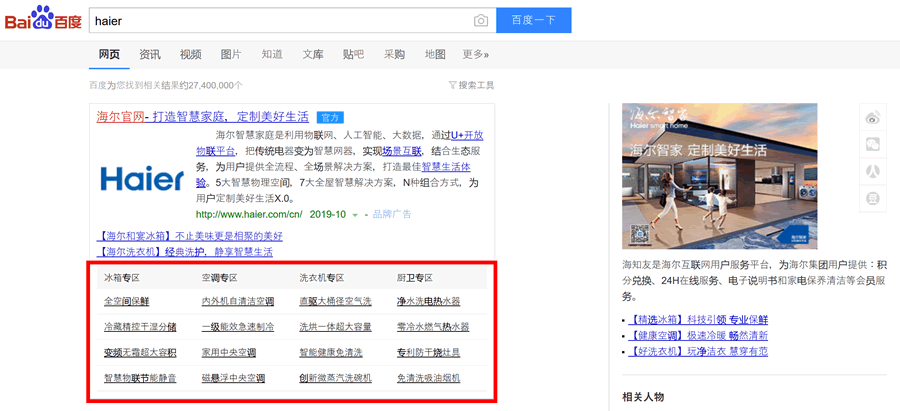
Keywords on the picture above are not auto-translated but localized. You can quickly check it by going to Google Translate and type in the first keyword. The translation into English doesn’t make sense:

Keyword translation - Mandarin

When introducing a website to Mandarin, Japanese or any other language of the Sino-Tibetan group, keep in mind that, for SEO, keywords shouldn’t be auto-translated directly but rather researched, since the meaning of the words depends so much on the particular combination of symbols.

Implications for Localizing your Website into German

Although “only” around 80 million Internet users speak German as their mothertongue (which is peanuts compared to Mandarin), it is still among the top 3 most popular languages on the Internet.

Quite conveniently, English and German share the same language group (so also the character set, mostly) and around 70% of the German-speaking population also speaks pretty good English. So, for SEO purposes, it is usually not necessary to carefully translate your brand name like you’d be doing in Mandarin.

However, it doesn’t mean that you won’t have to face the peculiarities of the German language when doing localization:

  • Capitalization is the name of the game – all nouns, both proper and common, are always capitalized in German. Keep that in mind to avoid silly mistakes that look pretty serious to the native speakers.
  • Nouns have genders, which is identified by the article and the ending of the noun. To spice things up a bit more, there are also noun declensions, which means that “this is a Toyota” and “I saw a Toyota” would use different articles.
  • The German alphabet itself – informally, the extra letters ö,ä,ü,ß are often spelled oe, ae, ue, and ss by Germans themselves to simplify the typing, but for SEO purposes and keyword research, be mindful of the native letters when doing localization.
  • Words are typically longer in German than in English, which you should keep in mind if you have any elements on your website that do not automatically adjust to their content length; also, the SEO meta such as titles and descriptions may overflow the allotted 65/160 symbols if translated literally into German.

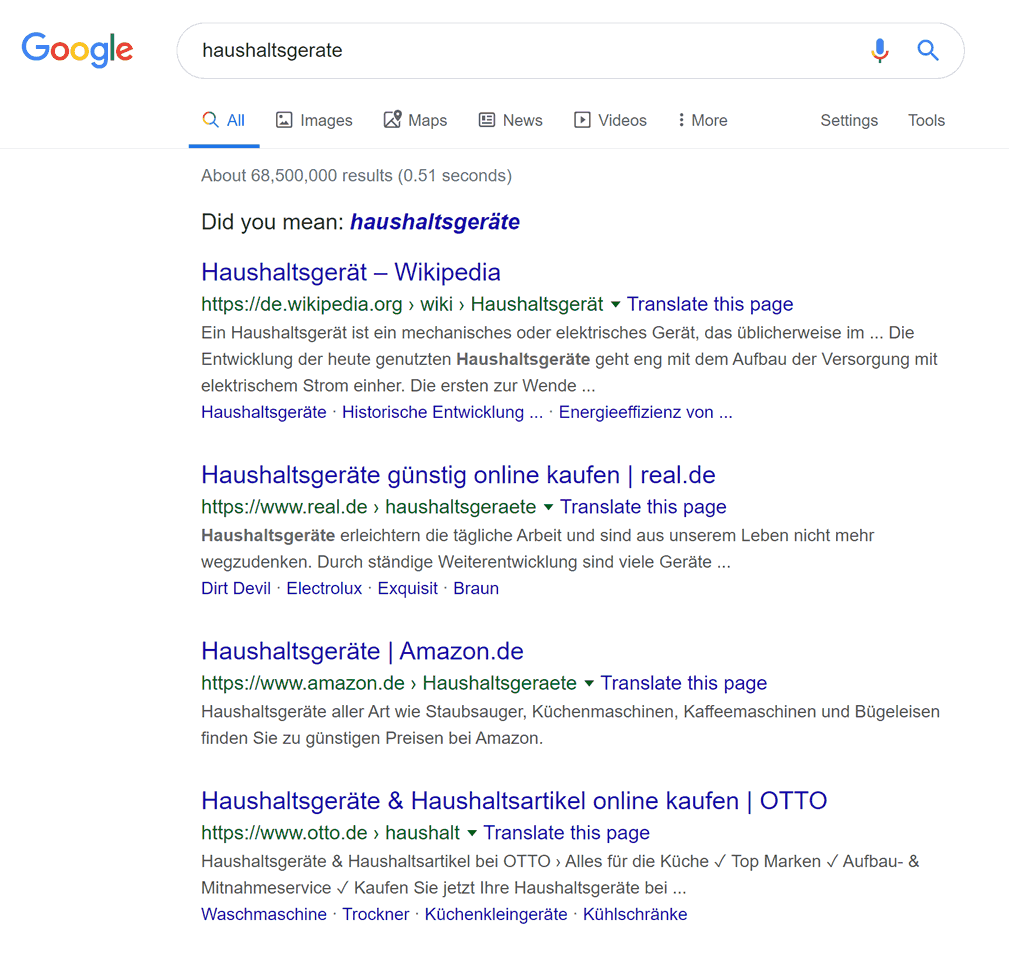
On the latter point, while the standardized replacement letter combinations are quite useful for creating URLs, simply replacing umlauts with their dot-less equivalents doesn’t necessarily keep the word looking the same for a German-speaker (and the German Google – note the clarifying question and how some of the instances aren’t even highlighted in the results):

The extra German letters

Although German is more forgiving than Chinese in terms of localization, it is still better to do your homework before expanding into the German-speaking segment of the Web.

Website Localization and SEO for Arabic Speakers

According to the above-mentioned Statista ranking, Arabic is in the top 5 languages used on the Internet, with ca 168 million Arabic-speaking Internet users worldwide.

Nevertheless, there’s still a rather large gap between how many Arabic-speaking people use the Internet, and how much web content is available in Arabic (e.g. compare the above 5% with the 0.9% of Arabic content on Wikipedia). In addition to this, Arabic has many dialects and variations, which may impact localization in surprising ways:

  • Numbers and dates – ironically, while people in Europe and the Americas use the numeric symbols referred to as the Arabic numerals, a large part of the Arab world uses a different notation which is formally called the Eastern Arabic numerals.
  • Phonetic peculiarities – vowels, for instance, can have signs above or below characters in Arabic. Although there’s a simplified spelling, like in Chinese, the correct use of the Arabic alphabet has a significant impact on SEO results.
  • Right-to-left writing – Arabic uses the right-to-left writing system, which will impact the infrastructure of your website during localization

Due to the peculiarities of the phonetic system, many international businesses do partial localization into Arabic. Zara, for instance, has the website navigation, payment information, and notifications localized while keeping product names and the names of their collections in English:

Zara in Arabic

You can also see how all their content uses the RTL writing system both for localization and SEO purposes.

Optimizing Content for Portuguese Speakers (and SEO)

There are over 170 million Internet users who speak Portuguese, making it one of the most commonly used online languages. Out of the 9 countries that speak Portuguese and its dialects, Brazil is of course by far the largest (and the fastest-growing) market.

Apart from Brazil and Portugal, though, it’s worth keeping in mind that this language is either the primary one or is extensively used by significant minorities in large parts of Africa (such as Angola and Mozambique) as well as Latin America (such as Uruguay, Argentina, and Venezuela).

While being a European (Romance) language by origin, Portuguese has some peculiarities that will impact localization, and, consequently, search engine optimization:

  • Forms of addressing people – keep in mind that in Portuguese there are the formal and informal ways of saying “you”, which use different pronouns – and using the right form of address a much bigger thing than in, say, English.
  • Native words – while Portuguese has a lot of loanwords, it has been a recent trend in the Lusophone countries to prefer using local equivalents instead, which should be considered during localization.
  • Double space – when translating a text into Portuguese, keep in mind that the final version will most probably be longer than the source because of this little quirk of the syntax. It’s also worth keeping in mind which trying to make your website look and feel authentic to the native speakers.

More to the last point, you need to keep in mind that meta titles and meta descriptions for Google search results in Portuguese will have to be adjusted to make them fit into the limited number of characters.

Languages Are Fun, but Require Attention to Details

Trying to reach an international audience in their native tongue is a great strategy that has propelled more than one business to new heights. However, any such undertaking will be less effective if the finer details of the language are not taken into account.

And it’s not just about looking trustworthy and authentic to the native speakers –

Your growth in the new segment of the web will be much more sustainable (and cost-efficient!) if you always keep in mind the implications on search engine optimization – from keyword research to on-page SEO such as meta-data.

***

Planning (or already executing) a localization of your website? Hit us up in the comments below, we’ll be glad to answer any questions you might have about optimizing your efforts for sustainable SEO growth!

Come Creare un Blog nel 2025: Diventa Blogger in Meno di 30 Minuti (e magari guadagna anche qualcosa)

Quindi, hai qualcosa da dire. O forse ce l’ha il tuo capo 🤷

In ogni caso, sei stanco dei capricci degli algoritmi e dei limiti artificiali dei social. Quello che ti serve è uno spazio serio tutto tuo online

🎛️ un posto dove hai il pieno controllo su contenuti e design
📍 un indirizzo condivisibile che sia solo tuo
😎 uno che dica: “Ok, questa persona sa il fatto suo”

…Bene, puoi tranquillamente chiudere la ricerca su Google –
sei nel posto giusto.

Sì, vai pure, chiudila. Ottimo.

Crea il tuo blog ed evita la dipendenza dalle piattaforme

Scherzi a parte: questa guida semplice ti accompagna attraverso tutto quello che ti serve per iniziare a bloggare, passo dopo passo – dalla scelta del nome al momento in cui clicchi “Pubblica” sul tuo primo articolo.

E la parte migliore? Puoi mettere online un blog del genere in meno di mezz’ora – anche se non hai mai toccato una riga di codice in vita tua.

Pronto a lanciare il tuo blog adesso, e magari a farlo pagare il prossimo giro di caffè? 🤑

Andiamo:

Da Qui Si Parte: Cosa Ottieni da Questa Guida

Diciamolo chiaro: questa non è una di quelle storielle vaghe del tipo “apri un blog in 3 clic” – e nemmeno un corso in 97 puntate che ti porta via sei settimane.

Questa è la corsia veloce. Useremo strumenti semplici ma potenti, eviteremo i dettagli inutili e ci concentreremo solo su ciò che conta:

  • Scegliere un nome di dominio efficace che non sembri spam o un refuso
  • Impostare un hosting che funzioni bene e non ti svuoti il portafoglio
  • Installare WordPress nel modo facile – zero drammi con l’FTP
  • Personalizzare il blog con temi e plugin che non facciano schifo
  • Mettere in sicurezza e fare backup senza spendere un centesimo
  • Iniziare a pubblicare articoli piacevoli da leggere e belli da vedere
  • Se vuoi: trasformare il blog in una macchina da entrate extra 💸

Non devi essere uno sviluppatore;
non devi spendere 399,99 $ in un corso sul blogging;
ti bastano un browser, un budget minimo – e 30 minuti di concentrazione.

Suona bene? Allora rispondiamo prima a una domanda che scotta:

Gratis vs a Pagamento: Qual è la Trappola?

Certo, puoi aprire un blog gratis. E se vuoi solo un diario digitale per foto di gatti o vacanze, fallo pure.

Ma se sei anche solo un po’ serio nel scrivere per un pubblico vero, far crescere il sito o (un domani) guadagnarci, ecco la realtà:

  • I blog gratis hanno vincoli. Per lo più sotto forma di indirizzi brutti (tipo tuonome15.piattaforma.com) e pubblicità forzata da cui tu non guadagni.
  • Personalizzazione limitata. Le piattaforme gratuite ti bloccano su layout e scelte di design. Vuoi installare un plugin, cambiare colori o aggiungere una mailing list? Nada.
  • Il controllo non è tuo. Le piattaforme possono cambiare regole, togliere funzioni o spegnersi del tutto – e il pubblico conquistato con fatica sparisce in un attimo.

È un po’ come costruire casa su un terreno di altri. All’inizio comodo – ma se decidono di farci un parcheggio, vieni sfrattato.

Apri un blog e liberati dalle piattaforme

Se vuoi che il blog cresca, sia preso sul serio e resti tuo – spendere qualcosina all’inizio vale assolutamente la pena.

La buona notizia? Terremo i costi iniziali molto bassi:

…con un vero nome a dominio, un vero hosting e una vera proprietà – al prezzo di una pizza al mese 🍕 (ok, magari quella gourmet).

Per cominciare, al tuo blog servono una casa e un indirizzo. Sistemiamo questi due:

Passo 1: Dominio e Hosting (con una piccola sorpresa)

Un nome di dominio 🌐 è l’indirizzo unico del tuo blog sul web (tipo blog.com), mentre l’hosting 🖥️ è il servizio che ospita il sito e lo rende visibile 24/7 al tuo dominio.

La buona notizia? Non devi comprarli separatamente – la maggior parte degli host moderni li offre in bundle. È quello che faremo qui.

Cerchiamo qualcosa che sia:

  • Semplice da usare, anche per chi parte da zero
  • Veloce e affidabile
  • Conveniente senza essere sospetto

Niente ruote reinventate – restiamo su WordPress, la piattaforma gratuita per blog più popolare al mondo – e uno dei tre host ufficialmente consigliati da WordPress.org:

👌 Il piano più economico di Hostinger va benissimo.

Se preferisci, scegli pure un altro host affidabile come Kinsta o SiteGround – o anche un website builder visuale (qui il nostro confronto).

* * *

Useremo un trucchetto psicologico per evitare di bloccarti subito:

…invece di iniziare dal dominio (e perdere ore a trovare il nome perfetto!) andremo avanti creando prima una versione di sviluppo del blog WordPress!

Puoi già pensare al dominio in sottofondo, ma non lasciare che ti blocchi 🚧 nell’impostare il blog – fidati, ne abbiamo visti a centinaia arenarsi lì ;)

Adesso ci serve un posto dove lavorare sul blog. Useremo un coupon per ottenere il prezzo migliore su Hostinger.

Ecco i passaggi:

  1. Vai alla pagina dell’offerta di hosting di Hostinger e clicca su “Claim deal” (oppure scorri per vedere i piani):

    Ottieni la miglior offerta su Hostinger ›

    Sceglieremo l’opzione più base, perché ha tutto ciò che ci serve (si chiama Premium, sì :)

  2. Nella schermata successiva, consigliamo 12 mesi come miglior equilibrio tra prezzo e impegno – ma sei libero di scegliere il ciclo di fatturazione che preferisci:

    Crea un blog passo 1: hosting

    C’è un’ultima cosa da fare in quella pagina – ottenere un ulteriore 10% di sconto! Copia e incolla questo coupon nel campo sotto il riepilogo prezzi:

    TRUS10CODE
  3. Clicca “Apply” e dovresti vedere il prezzo finale ridursi del 10%. Se il coupon non funziona, prova SPECIAL15 per il 7% – e faccelo sapere nei commenti!

    Crea un blog passo 1: coupon Hostinger applicato

  4. Ti verrà chiesto di creare un account e completare l’ordine. Congratulazioni! Ora hai una casa per il tuo nuovo blog 🏠

Una volta effettuato il pagamento, verrai portato subito alla procedura guidata di Hostinger per impostare il blog e installare WordPress (ti accompagniamo tra un attimo)

* * *

IMPORTANTE: Intanto inizia a pensare ai domini:

Puoi usare il nostro Generatore di Nomi per Blog per fare brainstorming su un .com efficace –

– oppure, se vuoi un’estensione locale come .ca o qualcosa di più di nicchia come .org, usa semplicemente la ricerca domini di Hostinger per verificarne la disponibilità.

Punta a qualcosa di corto, chiaro e facile da ricordare – guarda la nostra guida ai domini per altri consigli.

Prenditi il tempo necessario per un nome che ti suoni giusto – lo registreremo e lo collegheremo alla fine, quando sei pronto per andare online.

Per ora, continuiamo a lavorare sul blog:

Passo 2: Installa WordPress o un Altro Motore

Seguiamo l’onboarding di Hostinger per impostare il tuo WordPress in meno di 5 minuti:

  1. Ignora pure la prima domanda (non cambia nulla) e rispondi “Create a website” alla seconda:

    Crea un blog 2025: procedura Hostinger 1

  2. Poi avrai tre opzioni: installare WordPress, usare il website builder di Hostinger o partire da un sito vuoto in PHP/HTML. Anche se il builder è diventato piuttosto valido in 2025, useremo WordPress per la massima semplicità:

    Crea un blog 2025: installazione WordPress

  3. Ora ti verrà chiesto di creare una password per l’area admin di WordPress (potrebbe essere pre-generata – assicurati di metterne una tua!). Puoi anche regolare email e lingua se vuoi:

    Crea un blog 2025: imposta password admin WordPress

  4. Poi potrai scegliere tra un sito preimpostato (con design e contenuti finti), uno dei temi partner di Hostinger (tutti freemium) o un sito vuoto.

    Consigliamo il sito vuoto, perché esistono migliaia di ottimi temi gratuiti che renderanno il tuo blog più unico rispetto alle 10 opzioni prefabbricate viste da milioni di persone:

    Crea un blog 2025: installa WordPress pulito

  5. Al passaggio successivo ti chiederà il nome di dominio – scegli “Use temporary domain” se ci stai ancora pensando; collegheremo il dominio definitivo al passo 4.
  6. Poi potrai impostare in quale dei 12 datacenter globali di Hostinger ospitare il tuo blog.

    Più il server è vicino al tuo pubblico, più veloce sarà il sito (quindi non scegliere Singapore se scrivi principalmente per lettori italiani o USA!).

    Infine clicca “Install WordPress“.

  7. Dopo pochi secondi, l’installazione è completa 🪄 il che significa che il tuo nuovo blog è a metà!

Passiamo alle impostazioni essenziali:

Passo 3: Configura il Blog, Metodo Furbo

Prima di pensare a design o contenuti, prendiamo qualche minuto per ritoccare le impostazioni base. Fidati, pochi aggiustamenti ora ti risparmieranno ore di confusione dopo.

Per accedere al pannello admin di WordPress puoi cliccare “Edit Website” dalla dashboard di Hostinger, oppure visitare tuoblog.com/wp-admin ed entrare con email e password impostate prima.

Ecco cosa fare subito:

  • Vai su Impostazioni → Generali
    Aggiorna Titolo del sito e Motto. Compaiono nella scheda del browser e a volte nei risultati di ricerca – quindi falli brevi e descrittivi. Già che ci sei, verifica fuso orario e formato data.
  • Poi vai su Impostazioni → Permalink
    Seleziona Nome articolo – ti dà URL puliti come tuoblog.com/il-mio-primo-post invece di tuoblog.com?p=123. Meglio per utenti e per Google.
  • Ancora con me? Ottimo – ora Impostazioni → Discussione
    Scorri fino a Prima che appaia un commento e spunta “Il commento deve essere approvato manualmente”. Così tieni lontani bot e troll.
  • Passo bonus: Utenti → Profilo
    Cambia il nome pubblico da visualizzare, altrimenti i post risulteranno firmati “admin” – meglio qualcosa che sembri una persona reale.

Troverai senz’altro altre impostazioni utili man mano – questo è il minimo indispensabile per partire senza perderci una giornata.

Ora rendiamo questo blog veramente tuo – con un tema adatto e qualche plugin essenziale:

Passo 4: Scegli il Design e Aggiungi i Plugin Essenziali

Il blog è online. Funziona. Ma diciamolo – adesso sembra ancora un segnaposto generico del 2008 🔲

È l’ora del restyling.

In questo passo 🎨 scegliamo un tema (decide l’aspetto del blog) e installiamo alcuni 🧩 plugin chiave (aggiungono funzioni extra).

Niente panico – puoi cambiare tema in seguito senza rovinare i contenuti, e la maggior parte dei plugin si installa/disinstalla in meno di 10 secondi.

Passo 4.1: Scelta del Tema

Vai su Aspetto → Temi nella bacheca di WordPress e clicca “Aggiungi nuovo

Crea un blog: scegli tra migliaia di temi gratuiti per WordPress

Troverai migliaia di temi gratuiti – filtra per popolarità o usa la ricerca per restringere.

  • Se vuoi un tuttofare solido per partire, consigliamo spudoratamente il nostro template gratuito: Bento ;)
  • Puoi esplorare temi multipurpose popolari come Astra o GeneratePress se vuoi più opzioni.
  • Per i power user, un tema premium come Divi può essere adatto – ricco di funzionalità e design professionali, con extra come form, email marketing, ecc.

Ricorda solo:

Scegli qualcosa di pulito e leggero – il tocco di stile lo aggiungerai dopo.

Passo 4.2: Installazione dei Plugin

I plugin estendono le funzioni del blog: SEO, analytics, form di contatto, backup… tutto modulare e opzionale.

(il che significa che installarli/disinstallarli non intacca contenuti o design).

Ecco i primi che consigliamo subito:

  • All in One SEO – controlla come i tuoi post appaiono nei risultati di ricerca (title, meta description, ecc).
  • UpdraftPlus – backup automatici facili che ti salvano il blog (e la sanità mentale) se qualcosa si rompe.
  • Site Kit by Google – integra in pochi clic Analytics e Search Console.
  • Akismet Anti-Spam – tiene pulita la sezione commenti dai bot.
  • WPForms – builder di moduli drag-and-drop super semplice (es. per la pagina Contatti).

Per installare un plugin: Plugin → Aggiungi nuovo, cerca il nome, poi “Installa” e “Attiva”.

Fine!

Di solito vedrai una nuova voce nel menu a sinistra – se non appare, guarda in “Impostazioni”, potrebbe essere un sottomenu.

Ora il tuo blog ha un design decente, funzioni chiave e spazio 🌱 per crescere

Torniamo al nome di dominio prima del lancio:

Mettere il Blog sul tuo Dominio

Se non hai scelto il dominio al passo 1, ora siamo pronti per il lancio, quindi è il momento di chiudere il cerchio:

  1. Vai alla tua dashboard Hostinger e scegli “Websites” nel menu a sinistra. Sotto il nuovo blog, clicca su “Change domain”:

    Crea un blog 2025: aggiungere dominio su Hostinger

  2. Nella nuova vista, digita il dominio desiderato e apparirà un pop-up: scegli il periodo di registrazione iniziale (si rinnoverà automaticamente); consigliamo 1 anno per testare il blog.

    Crea un blog 2025: dettagli dominio su Hostinger

  3. Nella stessa finestra, clicca “Add” accanto al coupon e incolla quanto segue per uno sconto extra:

    TRUS10DOMAIN
  4. Ora puoi completare l’ordine e registrare il dominio. Il tuo WordPress verrà migrato su quel dominio in automatico!

Prima di chiudere, qualche consiglio per proteggerlo, ottimizzarlo – e magari farlo ripagare da solo:

Bonus: Proteggi il Blog e Rendi il Sito Veloce

Hai costruito il blog, lo hai sistemato, aggiunto funzioni – ora assicuriamoci che sia sicuro, stabile – e rapido da caricare.

Ecco qualche dritta per riuscirci senza spendere di più o perdersi nei tecnicismi:

Consiglio #1: Backup Automatici

🔐 Lo sai come si dice – ci sono due tipi di blogger: chi fa i backup, e chi prima o poi piange sul cuscino alle 2 di notte.

Evitiamo la seconda categoria.

Hostinger (e gli altri grandi host) offre backup settimanali su tutti i piani, ma se vuoi più controllo, consigliamo il plugin gratuito UpdraftPlus

Crea backup automatici giornalieri e li salva fuori dal server (es. Google Drive o Dropbox) – così, anche se il server crolla o WordPress si incasina, i tuoi contenuti sono al sicuro.

Consiglio #2: Sicurezza Base

🛡️ Non serve la crittografia da esercito – bastano poche regole:

  • Password forti: niente admin123, per favore. Usa un gestore come NordPass o 1Password.
  • Aggiorna tutto: core di WordPress, temi e plugin. Gli aggiornamenti chiudono falle di sicurezza.
  • Aggiungi l’autenticazione a 2 fattori con ad es. questo plugin – richiede un codice una tantum dal telefono e rende molto più difficile l’accesso ai malintenzionati.

Consiglio #3: Sprint di Velocità

🚀 Anche il blog più bello e utile non serve a nulla se impiega mezzo minuto a caricarsi. Molti utenti abbandonano dopo ~3 secondi!

Cosa fare:

  • Abilita la cache: installa un plugin gratuito come LiteSpeed Cache (il migliore su Hostinger) o WP Super Cache.
  • Usa immagini compresse: carica immagini in .webp o usa un plugin come ShortPixel per comprimerle automaticamente.
  • Pochi plugin ma buoni: evita di installarne 20+ “per provare”. Tieni solo ciò che usi e rimuovi il resto.

Bonus: Hostinger (e altri host moderni) usa già CDN veloci, storage SSD e PHP 8+, quindi parti avvantaggiato.

Voilà – ora hai un blog veloce, sicuro e pronto a scalare. Ovviamente c’è molto altro da esplorare in ognuna di queste direzioni – ma oggi ci fermiamo qui.

Pronto per l’ultimo passo?

Parliamo di come trasformare il blog in una piccola macchina da soldi 💸

Come Monetizzare il Blog

Ok, la maggior parte non apre un blog con l’obiettivo esplicito di arricchirsi.

Ma quando inizi a pubblicare contenuti validi e costruire un pubblico reale… perché non lasciare che il blog paghi le spese?

Crea un blog 2025: monetizzazione

Ecco tre metodi tra i più popolari e collaudati per monetizzare un blog – iniziando in piccolo e scalando nel tempo:

Opzione 1: Affiliate Marketing (la migliore per iniziare)

💰 Inserisci link a prodotti o servizi che consigli davvero – e se qualcuno acquista tramite il tuo link tracciato, guadagni una commissione.

Due esempi:

  • Recensioni: scrivi un articolo sugli strumenti digitali che ami e linka i siti con i tuoi link affiliati
  • Guide: crea un confronto (come il nostro roundup dei site builder) e inserisci i link affiliati per ciascun prodotto

Non ti serve un pubblico enorme – servono fiducia, pertinenza e costanza.

Inizia con programmi come Amazon Associates, Impact, PartnerStack, ShareASale – e i programmi specifici del tuo hosting, VPN o SaaS

Pro tip: consiglia solo cose in cui credi davvero. Altrimenti è solo pubblicità – e i lettori lo capiscono lontano un miglio.

Opzione 2: Pubblicità (meglio con tanto traffico)

📢 Quando il blog inizia a macinare visite costanti, puoi ottenere reddito passivo mostrando annunci.

La via più semplice è Google AdSense – posiziona automaticamente annunci pertinenti e ti paga per visualizzazioni o clic.

Altre reti: Mediavine, Ezoic, BuySellAds.

Considera che gli introiti sono minuscoli finché non raggiungi centinaia di visite al giorno.

Ma se la tua nicchia ha CPM alti (es. finanza, software, B2B) o hai volumi seri, questa strada può rendere bene (soprattutto insieme all’affiliazione!)

Opzione 3: Vendi Prodotti o Servizi

🛍️ Quando hai un pubblico, il blog diventa anche un negozio:

  • Prodotti digitali: ebook di nicchia, corsi online, checklist, template
  • Prodotti fisici tuoi o con dropshipping/print-on-demand
  • Servizi: consulenza, coaching, scrittura o design freelance

Puoi aggiungere l’e-commerce con un plugin gratuito come WooCommerce – o linkare a piattaforme esterne come Gumroad e Etsy.

Ricorda: la monetizzazione richiede tempo. Prima crea contenuti che la gente voglia davvero leggere – i soldi arrivano con la fiducia.

FAQ sul Blogging

🧠 Hai ancora domande? Ecco quelle che riceviamo più spesso dai nuovi blogger:

Devo saper programmare per aprire un blog?

No. WordPress e gli host moderni ti permettono di creare tutto con editor visuali e menu semplici – zero codice richiesto.

Quanto ci vuole per lanciare un blog?

Con questa guida, circa 30 minuti – inclusi setup, design e i primi ritocchi. Puoi anche fermarti a contemplare la tua opera, ogni tanto.

Quanto costa iniziare?

Circa 2–3 $/mese per hosting e dominio (con fatturazione annuale). La maggior parte dei temi e plugin che ti servono è gratuita.

Qualcuno troverà davvero il mio blog?

– se crei contenuti utili e ben scritti e segui le basi della SEO. Plugin come All in One SEO e Site Kit aiutano parecchio.

Posso spostare il blog su un altro host in futuro?

Certo. Con WordPress migrare verso un altro hosting o cambiare dominio è piuttosto semplice. I tuoi contenuti restano portabili.

Quanto ci vuole per guadagnare con il blog?

Dipende – ma la maggior parte dei blog non genera entrate significative nei primi mesi. Punta prima su contenuti e fiducia; i soldi vengono dopo.

Hai ancora dubbi? Lascia la tua domanda nella sezione commenti – saremo felici di aiutarti 🧵

Considerazioni Finali + Un Segreto Onesto

Sei arrivato fino in fondo, ottimo lavoro!

Ora hai tutto il necessario per costruire un blog che è bello da vedere, veloce da usare e con reali possibilità di attirare lettori veri (non solo bot e la mamma).

E adesso la verità – quella che avrei voluto sentire prima:

La differenza più grande tra un blog di successo e uno morto? Non è la tecnologia. Non è la scrittura. Non è nemmeno la fortuna. È questa: continua a presentarti.

La maggior parte dei blog fallisce perché gli autori semplicemente smollano – spesso proprio prima che le cose inizino a funzionare!

Crea un blog 2025: perseveranza

Quindi pubblica il tuo primo articolo.
Poi un altro.
E un altro ancora.

Diventerai più bravo, più veloce, più preciso.

E un giorno, qualcuno che non conosci lascerà un commento sincero tipo: Mi ha aiutato tantissimo, grazie! È lì che scatta qualcosa.

Fino ad allora, vai avanti: ce la puoi fare.

E se ti blocchi o hai domande – scorri fino ai commenti e unisciti alla discussione.

Grazie per la lettura – e benvenuto nel lato blogging di Internet 🖖

Jak si založit blog 2025: Staň se blogerem za 30 minut (a třeba si i něco vydělej)

Takže máš co říct. Nebo to má co říct tvůj šéf 🤷

Každopádně už tě nebaví náladové algoritmy a umělá omezení sociálních sítí. Potřebuješ opravdový prostor na webu

🎛️ místo, kde máš plnou kontrolu nad obsahem i vzhledem
📍 sdílitelnou adresu, která je jen tvoje
😎 a hlavně takové, které říká: „Jo, tenhle člověk ví, co dělá.”

…Tak můžeš v klidu zavřít výsledky Googlu – jsi na správném místě.

No tak, klidně je zavři. Dobrý.

Založ si blog a zbav se závislosti na platformách

Teď vážně: tenhle jednoduchý návod tě provede vším, co potřebuješ ke startu blogu, krok za krokem – od výběru jména až po kliknutí na „Publikovat” u prvního článku.

A nejlepší na tom? Takový blog zvládneš postavit za méně než půl hodiny – i když jsi v životě neviděl(a) řádek kódu.

Připraven(a) spustit blog hned teď – a možná si z něj časem platit i kafe? 🤑

Jdeme na to:

Začni tady: Co přesně z tohohle návodu získáš

Upřímně: tohle není žádná mlhavá „blog založíš na 3 kliky” pohádka – ani 97dílný kurz na šest týdnů.

Tohle je rychlý pruh. Použijeme jednoduché, ale silné nástroje, vynecháme zbytečnosti a zaměříme se jen na to, co fakt pomáhá:

  • Vybereš skvělou doménu, která nezní jako překlep ani scam
  • Nastavíš hosting, který běží plynule a nezruinuje rozpočet
  • Nainstaluješ WordPress snadno – žádná FTP dramata
  • Upravíš blog pomocí témat a pluginů, co dávají smysl
  • Zabezpečíš a budeš zálohovat – a to bez placení
  • Začneš publikovat texty, které se dobře čtou i vypadají
  • A pokud chceš: uděláš z blogu vedlejší příjem 💸

Nepotřebuješ být vývojář;
nemusíš utratit 399,99 $ za kurz o blogování;
stačí prohlížeč, malý rozpočet – a 30 minut soustředění.

Zní to dobře? Tak nejdřív si zodpovíme jednu pálivou otázku:

Zdarma vs placeně: Kde je háček?

Jasně, blog můžeš založit i zadarmo. A pokud chceš jen online deníček s fotkami kočky nebo zápisky z dovolených – směle do toho.

Ale pokud to myslíš aspoň trochu vážně s psaním pro skutečné publikum, růstem webu nebo (časem) vyděláváním, tady je realita:

  • Free blogy mají háčky. Typicky ošklivé adresy (třeba tvojejmeno15.platforma.com) a vynucené reklamy, ze kterých nic nemáš.
  • Omezené možnosti úprav. Většina free platforem tě zamkne do jejich vzhledu a rozložení. Chceš plugin, jiné barvy nebo mailing list? Kdepak.
  • Nemáš plnou kontrolu. Platforma změní pravidla, vezme funkce nebo úplně skončí – a tvoje těžce vydřené publikum je pryč.

Je to jako stavět dům na cizím pozemku. Zpočátku pohodlné – ale když se majitel rozhodne pro parkoviště, vystěhuje tě raz dva.

Založ blog a získej nezávislost na platformách

Chceš-li, aby blog rostl, působil důvěryhodně a zůstal tvůj – pár korun na start se vyplatí.

Dobrá zpráva? Náklady udržíme co nejníž:

…dostaneš skutečnou doménu, skutečný hosting a skutečné vlastnictví – za cenu jedné měsíční pizzy 🍕 (no dobře, té lepší).

Začneme tím, že blogu dáme domov a adresu:

Krok 1: Doména a hosting (s malým trikem)

Doména 🌐 je unikátní adresa tvého blogu na webu (např. blog.cz), zatímco webhosting 🖥️ je služba, která web ukládá a zpřístupňuje 24/7 na té doméně.

Dobrá zpráva? Dnes nemusíš řešit zvlášť – většina moderních hosterů to nabízí v balíčku. A tak to uděláme.

Hledáme něco, co je:

  • snadné i pro úplné začátečníky
  • rychlé a spolehlivé
  • cenově rozumné, ale ne podezřelé

Nebudeme vymýšlet kolo – sáhneme po WordPressu, nejpopulárnějším bezplatném blogovacím systému na světě – a jednom ze tří hosterů oficiálně doporučovaných WordPress.org:

👌 Nejlevnější tarif u Hostingeru nám úplně stačí.

Klidně si vyber i jinou kvalitní volbu jako Kinsta nebo SiteGround – případně drag-and-drop builder (tady je naše srovnání).

* * *

A teď malý psychologický trik, aby ses hned na začátku nezasekl(a):

…místo hledání dokonalé domény (u kterého spousta lidí ztratí hodiny) rovnou vytvoříme vývojovou verzi WordPress blogu!

Doménu můžeš promýšlet na pozadí, ale nenech ji brzdit 🚧 skutečné spuštění blogu – věř, viděli jsme to pokaždé ;)

Teď potřebujeme místo, kde na blogu pracovat. Využijeme kupon a získáme co nejlepší cenu u Hostingeru.

Postup krok za krokem:

  1. Přejdi na stránku nabídky webhostingu Hostingeru a klikni na „Claim deal” (nebo prostě sjeď dolů k ceníku):

    Získat nejlepší cenu u Hostingeru ›

    Vezmeme základní variantu – má vše, co pro blog potřebujeme (jmenuje se sice Premium, ano :)

  2. Na další obrazovce doporučujeme 12 měsíců jako ideální kompromis mezi cenou a závazkem – ale zvol si klidně jiný cyklus:

    Krok 1: hosting pro blog

    Ještě jedna věc – získej navíc 10% slevu! Zkopíruj a vlož následující kupon do pole pod souhrnem ceny:

    TRUS10CODE
  3. Klikni na „Apply” a měla by se odečíst 10% sleva. Kdyby kupon nefungoval, zkus SPECIAL15 pro 7% – a dej nám vědět v komentářích!

    Krok 1: Hostinger kupon úspěšně uplatněn

  4. Budeš vyzván(a) k vytvoření účtu a dokončení objednávky. Gratuluju! Tvůj nový blog má domov 🏠

Po zaplacení tě Hostinger hned přesměruje do průvodce, kde blog nastavíš a nainstaluješ WordPress (za chvíli si to projdeme).

* * *

DŮLEŽITÉ: Zároveň začni přemýšlet o doméně:

Na brainstorming chytlavého .com jména můžeš použít náš generátor názvů blogu

– anebo pokud chceš regionální doménu jako .cz či tematickou jako .org, rovnou použij vyhledávání u Hostingeru a zkontroluj dostupnost.

Míři na něco krátkého, jasného a zapamatovatelného – další tipy najdeš v našem průvodci doménami.

Dej si čas na jméno, které ti sedne – doménu zaregistrujeme a nastavíme úplně na konci, až budeš připraven(á) jít live.

Teď pokračuj v práci na blogu:

Krok 2: Instalace WordPressu nebo jiného enginu

Projdi si průvodce u Hostingeru a nastav WordPress blog za méně než 5 minut:

  1. První otázku klidně přeskoč (na nic nemá vliv) a na druhou odpověz „Create a website”:

    Vytvoření webu: krok 1 průvodce Hostinger

  2. Potom si vybereš ze tří možností: instalovat WordPress, použít vlastní builder Hostingeru nebo začít prázdným PHP/HTML webem. Jejich builder je v 2025 docela v pohodě, ale my zvolíme WordPress pro maximální jednoduchost:

    Instalace WordPressu u Hostingeru

  3. V dalším kroku vytvoříš heslo do administrace WordPressu (může být předvyplněné – určitě si dej vlastní!). Můžeš upravit i e-mail a jazyk:

    Nastavení hesla do administrace WordPressu

  4. Pak bude na výběr předpřipravený web (včetně designu a demo obsahu), partnerská WordPress témata Hostingeru (většinou freemium) nebo čistý web.

    Doporučujeme čistou instalaci, protože existují doslova tisíce skvělých free témat a blog tak bude unikátnější než u pár šablon, které Hostinger nabízí milionům lidí:

    Instalace čistého WordPressu

  5. Dále se tě to zeptá na doménu – pokud ještě vybíráš, klikni na „Use temporary domain”. Finální doménu připojíme těsně před spuštěním ve 4. kroku.
  6. V dalším kroku můžeš zvolit, v kterém z 12 globálních datacenter Hostingeru bude blog uložený.

    Čím blíž publiku, tím rychlejší načítání (takže pokud cílíš na ČR/EU, nevol Singapur).

    Nakonec klikni na „Install WordPress”.

  7. Za pár vteřin je WordPress nainstalovaný 🪄 a tvůj nový blog je v půlce cesty!

Teď doladíme základy:

Krok 3: Chytré základní nastavení

Než se vrhneme na vzhled a obsah, věnuj pár minut základním nastavením. Ušetří ti to hodiny zmatků později.

Do administrace WordPressu se přihlásíš přes „Edit Website” v dashboardu Hostingeru, nebo rovnou na tvujblog.cz/wp-admin pomocí e-mailu a hesla z předchozího kroku.

Začni tímhle:

  • Otevři Settings → General
    Uprav Site Title a Tagline. Zobrazují se v záložce prohlížeče a někdy i ve výsledcích vyhledávání – drž je krátké a výstižné. Zkontroluj také časové pásmo a formát data.
  • Pak jdi do Settings → Permalinks
    Vyber Post name – získáš čisté URL jako tvujblog.cz/muj-prvni-clanek místo tvujblog.cz?p=123. Lepší pro lidi i pro Google.
  • Ještě chvilku vydrž: Settings → Discussion
    Sjeď k Before a comment appears a zaškrtni „Comment must be manually approved”. Odfiltruješ tím spam-boty i trollíky.
  • Bonus: Users → Profile
    Změň si display name, jinak budou příspěvky podepsané „admin”. Vyber něco, co zní jako reálné jméno.

Cestou určitě objevíš další nastavení – tohle je minimum, abys mohl(a) pohodlně začít bez celodenního šťourání.

Teď uděláme blog opravdu tvůj – pěkným tématem a pár důležitými pluginy:

Krok 4: Vyber vzhled a přidej základní pluginy

Blog běží. Funguje. Ale upřímně – teď asi vypadá jako generická šablona z roku 2008 🔲

Jdeme to změnit.

V tomhle kroku 🎨 vybereš téma (definuje vzhled) a nainstaluješ pár 🧩 klíčových pluginů (přidávají funkce).

Neboj – téma můžeš kdykoliv změnit bez ztráty obsahu a většina pluginů se instaluje/odinstaluje do 10 vteřin.

Krok 4.1: Výběr tématu

Běž do Appearance → Themes v administraci a klikni na „Add New

Vyber si z tisíců bezplatných WordPress témat

Najdeš tam tisíce free témat – filtruj podle popularity nebo použij vyhledávání.

  • Jestli chceš solidní univerzál na start, bezostyšně doporučíme náš vlastní free motiv: Bento ;)
  • Mrkni i na populární multipurpose témata jako Astra nebo GeneratePress.
  • Pro náročné se hodí prémiové téma jako Divi – spousta hotových layoutů, formuláře, e-mail nástroje atd.

Jen pamatuj:

Vezmi něco čistého a lehkého – parádičky můžeš doladit později.

Krok 4.2: Instalace pluginů

Pluginy rozšiřují funkce blogu; SEO nástroje, analytika, formuláře, zálohy… všechno modulární a volitelné.

(tzn. instalace/odinstalace neovlivní obsah ani vzhled)

Začni těmito:

  • All in One SEO – nastavíš, jak se články zobrazí ve výsledcích (meta titulky, popisy atd.).
  • UpdraftPlus – jednoduché automatické zálohy, které ti zachrání nervy, když se něco pokazí.
  • Site Kit by Google – propojí blog s Google Analytics a Search Console na pár kliků.
  • Akismet Anti-Spam – drží komentáře čisté a bez botů.
  • WPForms – jednoduchý drag-and-drop builder formulářů (např. kontaktní stránka).

Instalace: Plugins → Add New, vyhledej název, „Install” a pak „Activate”.

Hotovo!

Obvykle se vlevo v menu objeví nová sekce – když ne, mrkni do „Settings”, může být jako podmenu.

Tvůj blog má teď solidní vzhled, klíčové funkce a prostor růst 🌱

* * *

Než to odpálíme, vraťme se k doméně:

Přepnutí blogu na vlastní doménu

Jestli jsi v 1. kroku doménu ještě nevybral(a), teď je čas to dokončit:

  1. Běž do dashboardu Hostinger a klikni vlevo na „Websites”. U svého blogu zvol „Change domain”:

    Přidání domény u Hostingeru

  2. Do nového okna napiš vybranou doménu a vyskočí dialog: zvol počet let registrace (po vypršení se automaticky obnoví). Na testování blogu klidně 1 rok.

    Detaily nové domény u Hostingeru

  3. Ve stejném okně klikni na „Add” u kuponu a vlož následující kód pro dodatečnou slevu:

    TRUS10DOMAIN
  4. Dokonči objednávku a registraci. WordPress se na novou doménu přesune automaticky!

Než to uzavřeme, pár tipů, jak blog chránit, zrychlit – a třeba i nechat vydělávat:

Bonus: Chraň svůj blog a udělej ho rychlý

Blog máš, vzhled i funkce taky – teď ať je bezpečný, stabilní a rychle se načítá.

Tady pár rychlých tipů bez placení a bez technického peklíčka:

Tip #1: Automatické zálohy

🔐 Říká se, že jsou dva typy bloggerů: ti, co zálohují, a ti, co jednou ve 2 ráno brečí do polštáře.

My nechceme být ti druzí.

Hostinger (a další velcí hosteři) nabízí týdenní zálohy u všech tarifů, ale chceš-li větší kontrolu, doporučujeme free UpdraftPlus

Dělá denní automatické zálohy a umí je ukládat mimo server (Google Drive, Dropbox). Když server spadne nebo se WP pokazí, obsah je v bezpečí.

Tip #2: Základní bezpečnost

🛡️ Není potřeba vojenské šifrování – stačí pár pravidel:

  • Silná hesla: žádné admin123, prosím. Bezpečně je uloží třeba NordPass nebo 1Password.
  • Aktualizuj vše: WordPress jádro, témata i pluginy. Aktualizace často řeší bezpečnostní díry.
  • Dvoufázové přihlášení přes např. tento plugin – při loginu vyžádá kód z telefonu a výrazně ztíží průnik.

Tip #3: Zrychlení

🚀 I ten nejhezčí a nejchytřejší blog je k ničemu, pokud se načítá půl minuty. Většina lidí odchází po ~3 sekundách.

Co udělat:

  • Zapni cache: free plugin LiteSpeed Cache (ideální pro Hostinger) nebo WP Super Cache.
  • Komprimuj obrázky: nahrávej ve formátu .webp nebo použij ShortPixel pro automatickou optimalizaci.
  • Pluginy drž při zemi: neinstaluj desítky „jen na zkoušku”. Nech jen to, co opravdu používáš.

Bonus: Hostinger (a další moderní hosteři) už používají rychlé globální CDN, SSD a PHP 8+, takže máš slušný náskok.

Voilá – teď máš blog, který je rychlý, bezpečný a připravený na budoucnost. Samozřejmě se dá jít mnohem víc do hloubky – ale to už je mimo náš dnešní rozsah.

Připraven(a) na finále?
Pojďme z blogu udělat i stroj na peníze 💸

Jak blogem vydělávat

Většina lidí si blog nezakládá s explicitním cílem zbohatnout.

Ale když začneš publikovat dobrý obsah a budovat publikum… proč by blog nemohl platit účty?

Monetizace blogu v roce 2025

Tady máš tři nejčastější a osvědčené způsoby monetizace – začni v malém a škáluj:

Varianta 1: Affiliate marketing (nejlepší pro začátečníky)

💰 Odkazuješ na produkty nebo služby, které máš rád(a) – a když někdo nakoupí přes tvůj speciální odkaz, získáš provizi.

Pár příkladů:

  • Recenze: napiš článek o svých oblíbených digitálních nástrojích a použij partnerské odkazy
  • Průvodci: udělej srovnání (jako náš výběr web builderů) a přidej affiliate odkazy ke každému

K tomu nepotřebuješ obří návštěvnost – stačí důvěra, relevance a konzistence.

Začni třeba programy Amazon Associates, Impact, PartnerStack, ShareASale – a také konkrétními programy hostingu, VPN nebo SaaS nástrojů

Tip: Doporučuj jen to, čemu opravdu věříš. Jinak je to jen reklama – a tu čtenáři poznají na kilometr.

Varianta 2: Reklamy (pro blogy s návštěvností)

📢 Jakmile blog přitáhne stabilní traffic, můžeš pasivní příjmy posílit reklamou.

Nejjednodušší start je Google AdSense – na web sám rozmístí relevantní reklamy a platí za zobrazení nebo kliknutí.

Další sítě: Mediavine, Ezoic, BuySellAds.

Počítej s tím, že příjem z reklam bývá malý, dokud nedosahuješ stovek návštěvníků denně.

V oborech s vysokou hodnotou pro inzerenty (finance, software, B2B) nebo s opravdu velkým trafficem umí reklamy fungovat skvěle – obzvlášť v kombinaci s affiliate marketingem.

Varianta 3: Vlastní produkty a služby

🛍️ Jakmile má blog publikum, může sloužit i jako obchod:

  • Digitální produkty: e-booky, online kurzy, checklisty, šablony
  • Fyzické produkty – vlastní tvorba, dropshipping nebo print-on-demand
  • Služby: konzultace, koučink, copywriting, design

E-shop přidáš přes free plugin WooCommerce – nebo odkážeš na externí platformy jako Gumroad a Etsy.

Pamatuj: monetizace chce čas. Nejdřív obsah, který lidé chtějí číst – peníze přijdou s důvěrou.

Blogovací FAQ

🧠 Pořád máš otázky? Tady jsou ty nejčastější, které dostáváme od začátečníků:

Musím umět programovat, abych založil(a) blog?

Ne. WordPress a moderní hostingy umožňují vše přes vizuální rozhraní a jednoduchá menu – žádný kód netřeba.

Jak dlouho trvá blog spustit?

S tímto návodem zhruba 30 minut – včetně základního nastavení, vzhledu a prvních úprav. Klidně si mezitím dej pauzu na obdivování výsledku.

Kolik stojí rozjet blog?

Počítej kolem 2–3 $/měsíc za hosting a doménu (při roční platbě). Většina potřebných témat a pluginů je zdarma.

Najde vůbec někdo můj blog?

Ano – pokud tvoříš užitečný, čitelný obsah a držíš se základů SEO. Pluginy jako All in One SEO a Site Kit hodně pomůžou.

Můžu blog později přesunout k jinému hostingu?

Jasně. WordPress usnadňuje migraci k jinému poskytovateli i změnu domény. Tvůj obsah je přenositelný.

Za jak dlouho začne blog vydělávat?

Různé – ale většina blogů prvních pár měsíců nevydělává významně. Nejdřív obsah a důvěra; peníze přijdou potom.

Pořád nad něčím váháš? Napiš do komentářů – rádi poradíme 🧵

Závěr + jedno upřímné tajemství

Dočetl(a) jsi až sem, dobrá práce!

Teď máš vše potřebné k blogu, který vypadá dobře, běží rychle a má šanci oslovit reálné čtenáře (ne jen boty a mámu).

A tady je pravda – kterou bych býval rád slyšel dřív:

Největší rozdíl mezi úspěšným blogem a chcíplým? Není to technika. Není to ani spisovatelské umění. Dokonce ani štěstí. Je to tohle: nepřestávej.

Většina blogů skončí, protože jejich autoři prostě přestanou – často těsně předtím, než se to začne lámat!

Trpělivost a vytrvalost při blogování

Publikuj první článek.
Pak další.
A další.

Budeš lepší, rychlejší, přesnější.

A jednoho dne ti cizí člověk napíše upřímný komentář ve stylu: Hrozně mi to pomohlo, díky! V tu chvíli to docvakne.

Do té doby vytrvej: máš na to.

A kdykoliv se zasekneš nebo budeš mít dotaz – skoč dolů do komentářů a přidej se do debaty.

Díky za přečtení – a vítej na blogovací straně internetu 🖖

What Is a VPN, How Does It Work – and Do You Need One in 2025?

Imagine this:

you’re sipping a suspiciously overpriced cappuccino ☕ at an airport lounge, scrolling through your email… completely unaware that someone nearby could be watching your every online move.

Yeah, not great.

That’s just one of the reasons VPNs have gone from nerd-only tools to everyone-should-probably-have-one status.

VPN use case

But what exactly is a VPN? How does it work, and is it something you actually need – or just more digital snake oil?

In this beginner guide, we’ll break it all down to answer the following questions:

  • 🔍What a VPN does – and how it protects your data
  • 🎬VPNs for streaming – can they unlock blocked content?
  • 🚨VPN legality – where it’s fine, and where it’s… less fine
  • 🤔Picking a VPN – how to choose one that won’t screw you over

So whether you’re here for privacy, Netflix, or just curiosity – scroll on. Let’s demystify the VPN once and for all:

What Exactly Is a VPN?

Let’s start with the basics:

A VPN (short for Virtual Private Network) is an app or service that creates an encrypted tunnel between your device and the internet.

Think of it as a private, invisible corridor that hides your online traffic from snoopers 👀 whether it’s your internet provider, the government, or a sketchy guy at the coffee shop.

What is a VPN?

Once connected to a VPN, your data travels through this secure tunnel to a VPN server (which could be in another city, country, or continent), and from there to the wider internet.

To any outsider, it looks like you’re browsing from the VPN server’s location – not your actual one. That’s why people use VPNs to do things like:

  • Access websites and apps blocked in their region
  • Keep their IP address hidden from advertisers and trackers
  • Stay safe on public Wi-Fi networks

But here’s something important to remember: a VPN doesn’t make you “invisible” online — it just makes it much harder for anyone to trace your activity back to you.

And that alone makes it a pretty handy tool in 2025.

How VPNs Work

Okay, so now we know what a VPN is. But what’s actually going on behind the scenes when you press that big “Connect” button?

Here’s the simplified version:

When you turn on a VPN, it encrypts your internet traffic and sends it through a remote server before it reaches the websites or apps you’re using.

That process does three very important things:

  • Encrypts your data – so no one on the network can read what you’re doing (not even your internet provider).
  • Changes your IP address – websites and services will see the IP of the VPN server, not your real one.
  • Bypasses restrictions – by making it seem like you’re in a different location, it can unlock content that would otherwise be blocked.

The cool part? All of this happens in the background, usually with just a single tap or click.

You don’t need to be a hacker or know how to code. Most modern VPN apps are dead simple to use — even your grandma could probably unlock the Netflix catalog now 🇺🇸📺

Why Use a VPN? Real-World Benefits

Let’s face it: most people don’t get a VPN just because they love privacy.

They get one because they want to watch something, download something, hide something, or protect something.

Here are the most common (and actually useful) reasons why people use VPNs in 2025:

  • Streaming without borders: want to watch a Netflix show that’s only available in the US or UK? A VPN lets you switch your digital location and access content as if you were actually there.
  • Safe browsing on public Wi-Fi: cafés, hotels, and airports are hacker hotspots. A VPN encrypts your traffic so no one can sniff out your passwords or credit card details.
  • Private browsing (for real): even if you’re not doing anything sketchy, your ISP still tracks what you do online. A VPN blocks that — and helps avoid targeted ads that follow you around like a clingy ex.
  • Bypassing censorship and blocks: live somewhere where certain sites or apps are blocked? VPNs let you dodge firewalls and access the open internet (even in countries like China or Russia — more on that below).
  • Better deals on flights or services: some websites show different prices depending on your location. With a VPN, you can compare pricing from different countries — sometimes with surprising results.

Of course, not everyone needs all of these — but if even one of them applies to you, a VPN might be worth it.

And if you’re thinking “okay, but what’s the catch?” — good question. That’s what we’ll look at next:

Drawbacks and Limitations

Alright, time to lift the hood a little.

While VPNs are great for a lot of things, they’re not magic. Here’s what you should know before rushing off to install one:

  • They can slow you down: because your traffic takes a detour through a VPN server, you might notice slightly lower internet speeds — especially with free or overloaded services.
  • Some websites block them: certain banks, video platforms, and apps (like PayPal or BBC iPlayer) may detect VPN traffic and deny access until you disconnect. Annoying, but it happens.
  • Not all VPNs are trustworthy: some free VPNs make money by logging your activity and selling the data — the exact thing a VPN is supposed to protect you from. Irony level: 9000.
  • They don’t make you anonymous: a VPN hides your IP and encrypts your traffic, but it doesn’t erase cookies, browser fingerprints, or the fact that you’re logged into Facebook while doomscrolling.
  • Can be clunky on some devices: while most modern VPN apps are slick, certain smart TVs, game consoles, or routers might need extra setup to get it working properly.

So yeah — VPNs are useful, but they’re not a one-click privacy shield from the future. They’re just one tool in your digital toolbox.

Up next: how VPNs compare to other privacy tools like proxies and Tor.

VPN vs Other Privacy and Security Tools

So what makes a VPN different from all other software used for similar purposes?

Let’s break it down:

Tool What It Does Best For Limitations
VPN Encrypts all internet traffic and hides your IP address Privacy, streaming, public Wi-Fi, bypassing restrictions May slow down speed; not 100% anonymous
Proxy Routes your connection through another server (but no encryption) Simple IP switching, low-stakes unblocking Not secure, often unreliable or slow
Tor Encrypts traffic through multiple nodes for anonymity Maximum privacy, avoiding surveillance Very slow, blocks many websites, overkill for most users
Antivirus Scans files/apps for malware and viruses Protecting devices from local threats Doesn’t protect your data or hide your identity online

Bottom line: a VPN is the best all-rounder if you’re looking for privacy, streaming freedom, and safer public Wi-Fi.

For true anonymity, you’ll need something like Tor — but it comes with serious trade-offs.

Alright, time to address the 🐘 in the room:

In most countries? Yes.

In a few? Not so much.

Here’s the deal:

Using a VPN is completely legal in the vast majority of the world — including the US, UK, EU, Canada, Australia, and most of Asia and Latin America.

In fact, many companies use VPNs every day to protect remote workers and internal networks. So no, you won’t “get in trouble” just for using one.

But there are some exceptions:

  • 🇨🇳 China: VPNs not approved by the government are technically banned. Foreigners usually get away with it, but it’s a grey zone.
  • 🇷🇺 Russia: legal to use, but many VPN providers are blocked. Some have pulled out of the country altogether.
  • 🇮🇷 Iran and 🇹🇲 Turkmenistan: VPN use is heavily restricted or outright prohibited, especially if you are a local.
  • 🇦🇪 UAE, 🇴🇲 Oman, 🇪🇬 Egypt: VPNs aren’t banned outright, but using one to access VoIP or blocked sites can lead to fines.

So should you worry?

If you’re just trying to protect your privacy or access Netflix from another country, you’re not breaking any laws in most places.

Just don’t use a VPN for illegal stuff — the VPN doesn’t make crimes magically okay!

…And if you are traveling to a more restrictive country like China? Install and test your VPN before you go — many VPN websites are blocked once you’re inside.

SO how do you choose a VPN that’s actually worth your time (and money)?

How to Choose a VPN That Doesn’t Suck

Let’s be real: there are way too many VPNs out there.

They all claim to be fast, private, secure, and magical ✨ – but not all of them live up to the hype. Some are just reskinned clones, others are shady data-harvesting schemes in disguise.

Choosing VPN

So, how do you pick a good one? Here are the 5 key things to look for when choosing a VPN in 2025:

  • No-logs policy: this means the VPN doesn’t store any record of your online activity. No logs = nothing to leak, sell, or hand over to authorities.
  • Strong encryption: AES-256 is the gold standard. Bonus points if they support modern protocols like WireGuard or OpenVPN.
  • Good speeds: look for VPNs with a large server network and solid speed test results — otherwise, streaming and browsing will feel like 2004 dial-up.
  • Reliable unblocking: not every VPN can access Netflix, BBC iPlayer, or other geo-restricted services. If that’s important to you, make sure it works.
  • Transparent pricing + refund policy: avoid bait-and-switch offers. A decent VPN should have clear pricing and a no-questions-asked money-back guarantee.

Oh — and one more thing: avoid 100% free VPNs unless you really know what you’re doing –

Free services often come with speed caps, ads, or worse: they collect your data and sell it to ad networks (which sort of defeats the whole point).

If you want our take on the top choices, check out our top-3 VPN list for 2025.

Frequently Asked Questions

Before we wrap up, let’s look at some of the most popular questions the internet has about VPNs:

Do I really need a VPN?

If you care about privacy, online freedom, or use public Wi-Fi often, then yes — a VPN is a smart move. It’s not mandatory, but it’s one of the easiest ways to boost your digital safety.

Can a VPN make me completely anonymous online?

No. A VPN hides your IP and encrypts your traffic, but it doesn’t block cookies, browser fingerprints, or tracking scripts. For full anonymity, you’d need more tools — and a lot more effort.

Is it legal to stream Netflix with a VPN?

Yes, it’s legal — but it may violate Netflix’s terms of service. Worst case? They might block your connection (temporarily), but you won’t get banned or fined.

Can I use a VPN on my phone?

Absolutely. All top VPNs have mobile apps for both iOS and Android — and in some ways, using a VPN on your phone is even more important than on your laptop, since mobile traffic is more often exposed.

Do VPNs work on smart TVs or game consoles?

Yes, but not always natively. Some VPNs offer Smart DNS features or router support, which lets you protect every device on your network — even if it doesn’t have a VPN app.

Will a VPN slow down my internet?

Usually just a little. Since your traffic is rerouted and encrypted, there’s often a small speed hit. That said, with a fast VPN and nearby server, you might not even notice it.

Final Thoughts: Do You Actually Need a VPN?

Here’s the short version:

If you spend any meaningful time online – especially on public networks, streaming platforms, or outside your home country – yes, a VPN is definitely worth considering.

It’s not just for hackers, dissidents, or people trying to watch Japanese Netflix from a Berlin hostel 🦄

A good VPN helps you to:

  • Keep your browsing private — from ISPs, trackers, and advertisers
  • Stay safe on sketchy Wi-Fi — like airports and hotels
  • Access content that’s otherwise blocked or geo-restricted
  • Regain some digital control in an increasingly surveilled world

It’s not a silver bullet. But it’s a simple, affordable tool that solves a surprising number of digital problems – without requiring any technical skills.

Need help choosing one? Head over to our curated list of the best VPNs for 2025 to compare top options and find one that fits your needs:

See the Best VPNs for 2025 ›

Got questions? Or perhaps some experiences to share? Hit us up in the comments section below, we do read and reply!

Review 2025: Why Is It Popular Despite the Price? + Best Deal Inside

☑︎ This guide has been last updated in October 2025

If you’ve spent more than 5 minutes researching VPNs, you’ve probably come across ExpressVPN.

😎 Slick branding, bold promises, and a long list of celebrity endorsements — but does all the hype actually hold up in 2025?

Is ExpressVPN really the gold standard of online privacy and streaming access — or just an overpriced dinosaur riding on its early fame?

Glad you asked.

In this no-BS review, we’ll skip the generic fluff and dig deep into real test results, pricing tricks, and lesser-known features — to help you decide whether ExpressVPN is still worth your money today.

Before we dive in, here’s a quick summary of our findings:

Verdict summary: ExpressVPN remains one of the most polished VPN services on the market, with exceptional streaming access and above-average speeds. Its high price is justified for users who want premium reliability, especially for travel or censorship-heavy countries.

Privacy: does it truly keep no logs? Read more
9/10
Speed: how fast is it globally? See test data
8/10
Streaming: does it unblock well? Check results
10/10
Pricing: is it worth the cost? Evaluate plans
7/10

Before we dive into the nitty-gritties though: there are dozens of VPNs out there, is ExpressVPN any different? Let’s see:

How Is ExpressVPN Different from Other VPNs?

With hundreds of VPN services out there offering AES-256 encryption, kill switches, and flashy mobile apps, it’s getting harder to tell them apart.

But ExpressVPN does manage to stand out — not through gimmicks, but by consistently delivering on fundamentals with a few clever twists:

  • Independent no-logs audits: ExpressVPN doesn’t just say they don’t keep logs — they’ve hired firms like PwC and KPMG to prove it. The audit results are publicly available and updated regularly.
  • TrustedServer technology: their servers run only on RAM, not hard drives — which means all user data is wiped with every reboot. There’s literally nothing to seize or steal.
  • Own DNS on every server: ExpressVPN runs its own zero-knowledge DNS — so your traffic never touches third-party DNS providers, which reduces the chance of leaks or logging.
  • Lightway protocol: instead of relying solely on OpenVPN or WireGuard, ExpressVPN built its own next-gen protocol. Lightway is faster to connect, lighter on battery, and designed for high mobility (switching networks mid-use).
  • Jurisdiction: the company is based in the 🇻🇬 British Virgin Islands — a region with no data retention laws and a strong record of respecting user privacy.
  • Complimentary eSIM: each ExpressVPN plan includes a free eSIM to use in your travels. The available data roaming depends on the chosen plan.
  • Aircove routers: the only VPN provider that offers physical devices with built-in ExpressVPN features to protect your entire home or small business network at once.

To be fair, ExpressVPN isn’t the only VPN offering these kinds of features — but it was one of the *first* to implement many of them, and it still executes better than most competitors in 2025.

If privacy is your #1 concern (especially when traveling or living in restrictive regions), ExpressVPN’s setup makes it a very strong candidate. But how well does it protect you in practice?

Let’s dive deeper into the technical side next:

Security and Privacy Features

ExpressVPN advertises a strong focus on privacy and security — but how well does it hold up under closer inspection?

1. Independent audits back up the no-logs policy.
As mentioned earlier, instead of relying on marketing claims alone, ExpressVPN has been audited by third-party firms like PwC and KPMG. These audits confirm that the service does not store data such as browsing activity or connection timestamps.

2. RAM-only server infrastructure.
All ExpressVPN servers run on volatile memory (RAM), which erases all data on reboot. This reduces the risk of persistent logs or accidental data retention — a common concern with traditional hard drive-based setups.

3. Kill switch is available on all major platforms.
Known as “Network Lock,” this feature blocks all internet traffic if the VPN connection unexpectedly drops, helping prevent IP or DNS leaks.

4. Private, encrypted DNS on every server.
Unlike many VPNs that rely on external DNS providers, ExpressVPN runs its own encrypted DNS to avoid third-party data exposure and improve resistance to DNS leaks.

5. Offshore jurisdiction in the British Virgin Islands.
The BVI does not have data retention laws, and it operates independently of intelligence-sharing agreements like Five Eyes. While this doesn’t guarantee immunity from legal pressure, it offers more privacy than many Western jurisdictions.

In short, ExpressVPN combines solid technical measures with a favorable legal setup. It’s not the only VPN doing this, but its track record and infrastructure are above average.

With privacy policies and audits accounted for, the next question is whether these safeguards come at the cost of usability — starting with raw connection speeds:

Server Speed and Performance

Let’s get one thing straight: no VPN will make your internet faster. But the best ones keep the slowdown so small, you barely notice it.

ExpressVPN is pretty good at that.

According to their official numbers, ExpressVPN operates thousands of servers in 105 countries — all of them physical, with no dodgy virtual locations. But numbers are just numbers, so we did our own tests.

Here’s how we tested:

  • Used both Speedtest.net and Fast.com to double-check results.
  • Connected to 12 server locations across the US, Europe, and Asia.
  • Measured speed with 3 different ISPs from two physical locations (EU and SEA).
  • Ran tests 3–5 times per server and averaged the results.

Here’s what we found:

  • Local connections (within same continent): average speed loss was just 10–15%, often unnoticeable even during video calls or large downloads.
  • Long-distance connections: latency increases were expected, but streaming still worked smoothly (see next section). Speed drops ranged from 20–30%, which is acceptable for encrypted traffic.
  • Lightway protocol: gave faster connection times and better stability in flaky network conditions — like switching from Wi-Fi to mobile data on the go.

In practice, ExpressVPN is more than fast enough for HD streaming, torrenting, Zoom calls, and gaming (if you’re not trying to compete in CS:GO on Brazilian servers from Berlin).

Want to download a 2GB file or stream a 4K movie through a US server from Tokyo? ExpressVPN can handle that without breaking a sweat.

But let’s test its real specialty next — streaming.

Streaming and Unblocking Capabilities

This is where ExpressVPN earns its reputation.

Unlike most VPNs that trip over Netflix’s increasingly aggressive VPN blocks, ExpressVPN just… works.

In our tests, we were able to access:

  • Netflix US, UK, Canada, Japan, Germany: full access to local libraries with no proxy errors or buffering issues.
  • BBC iPlayer: smooth playback from EU and US servers. (Yes, even the BBC hasn’t caught them yet.)
  • Hulu, Disney+, Amazon Prime Video: all working with zero fuss from multiple test locations.

Unlike Surfshark or NordVPN, ExpressVPN doesn’t use “specialty servers” for streaming — it just unblocks content out of the box, no need to dig through menus or contact support.

Even better, their browser extension lets you spoof your geolocation *in sync* with your VPN server — so you can trick stubborn websites that check your location using both IP and browser data.

A couple quick notes:

  • To access some services (like HBO Max), you might need to clear your cookies or use incognito mode.
  • Streaming in 4K requires at least 25 Mbps. With ExpressVPN, we consistently got 30–40 Mbps even on US servers from Europe.

In short: if you’re paying for multiple streaming subscriptions and want full access anywhere in the world — ExpressVPN is one of the most reliable tools for the job.

Next up: what about file sharing, torrenting, and good old P2P?

P2P and Torrent Support

There’s one area where both speed and privacy really matter — and that’s torrenting.

Whether you’re downloading public domain documentaries, Linux ISOs, or indie films, you probably don’t want your ISP or government sniffing around your connection.

So how does ExpressVPN hold up when it comes to peer-to-peer use?

  • All servers support P2P: unlike some VPNs that restrict torrents to “specialized” locations, ExpressVPN allows torrenting on every server in its network.
  • Kill switch + DNS protection: their Network Lock feature ensures that your IP and DNS traffic stay hidden even if the connection drops mid-download.
  • No bandwidth limits or throttling: ExpressVPN won’t slow you down based on usage — and it often prevents throttling by your ISP in the first place.
  • Compatible with all major clients: uTorrent, qBittorrent, BitTorrent, Transmission, Deluge — they all work just fine.

During our testing, torrenting with ExpressVPN was fast and seamless — especially on servers close to our actual location. We were able to reach 8–10 MB/s on a 100 Mbps line without triggering any connection warnings or disconnections.

Just one thing to keep in mind: you’ll want to pick a nearby server to minimize latency and maximize throughput. ExpressVPN’s smart location picker usually gets it right — but you can always experiment for better results.

Oh, and in case it needs saying: always use legal torrents and support content creators when you can. We don’t condone piracy — we just want you to be safe while exploring the open seas of the internet 🏴‍☠️

Next up, let’s look at how ExpressVPN actually feels to use — from setup to everyday experience.

ExpressVPN Apps and Ease of Use

ExpressVPN has been around since 2009 — and it shows, in a good way.

The apps are polished, stable, and refreshingly free of bloat. Whether you’re new to VPNs or a settings nerd, you’ll probably feel right at home.

Let’s break it down by platform:

  • Windows & macOS: the desktop clients are fast, minimal, and easy to navigate. You get a big “on” button, a smart location suggestion, and a quick menu to switch servers. There’s a built-in kill switch and protocol selector (Auto/Lightway/OpenVPN).
  • iOS & Android: clean, one-tap interface with most of the features you’d want — Lightway protocol, split tunneling (Android only), and auto-connect on public Wi-Fi. Bonus: it doesn’t drain your battery like some other VPN apps do.
  • Linux: unlike many competitors that barely support Linux, ExpressVPN actually delivers a fully functional CLI app. It’s easy to install, stable, and supports all major distros.
  • Browser extensions: available for Chrome, Firefox, and Edge — these aren’t just proxies. They control the main VPN app, and also spoof your geolocation, DNS, and WebRTC settings for better privacy.
  • Routers & Smart TVs: ExpressVPN has custom firmware for select routers and detailed setup guides for the rest. Also works with Fire TV, Apple TV (via Smart DNS), and even gaming consoles via router sharing.

In short: ExpressVPN doesn’t just check the “multi-platform” box — it actually makes an effort to deliver a good experience on each.

We especially liked the speed of the Lightway protocol and the reliability of auto-reconnect on mobile. It’s the little things that make a VPN feel invisible — and ExpressVPN nails a lot of them.

If you ever do run into trouble though, is their support team actually helpful?

Let’s find out.

Customer Support Experience

VPNs are one of those tools that work great… until they don’t.

It’s hard to find a company which has not switched to some sort of AI assistant these days, and reaching an actual human being can often be a near-impossible task.

Thankfully, ExpressVPN doesn’t cheap out here.

  • Live chat support: available 24/7 on their website, and yes — it’s actually human if you ask to speak with one. You don’t have to be a paying user to ask questions, either.
  • Email support: good for more technical stuff or when you need to send logs. Replies usually land within a few hours.
  • Extensive help center: hundreds of well-written articles, setup guides, and troubleshooting walkthroughs — searchable and regularly updated.

We tested the live chat multiple times across several days and time zones. Average wait time? Around 3-5 minutes, which is fantastic in our AI-everywhere age. The agents were polite, fast, and knew what they were doing.

They were also refreshingly honest — for example, when asked about which streaming servers work best, the rep admitted some might rotate due to Netflix’s ongoing cat-and-mouse game, and pointed us to updated resources.

In short: if you’re stuck, you’ll probably get help fast — and without feeling like you’re yelling into a void.

Now that we’ve covered most of the core features, let’s talk about money. How much does ExpressVPN actually cost — and is it worth it?

Pricing and Refund Policy

Let’s address the elephant in the room: ExpressVPN is not cheap.

It’s consistently one of the most expensive VPNs on the market — and they almost never run wild “90% off” promos like some other services do.

Here’s what the current plans look like:

  • 1-month plan: expensive, basically there just for psychological framing purposes. With a 30-day money back guarantee this one is kind of moot compared to the yearly plan…
  • 1-year plan: you get 3 months extra as a bonus, so 15 months in total. Two times less than the previous plan, per month.
  • 2-year plan: you get 4 month on top, i.e. 28 months overall – another 15% cheaper on a monthly basis compared to the annual billing above.

Yep, you’re paying premium prices — but in return you’re getting premium reliability, top-tier privacy features, and arguably the smoothest user experience in the VPN world.

Still, if you’re on a tight budget, ExpressVPN might feel like overkill — especially when solid alternatives like NordVPN or Surfshark often come in at half the price (or less).

💡 **Pro tip:** check out the bonus section below to get the best ExpressVPN deal in your region.

All plans come with a 30-day money-back guarantee. No weird conditions, no sneaky “store credit” refund traps.

We tested the refund process ourselves:

  • Contacted live chat and asked to cancel (you don’t need to give a reason, but we just said we were testing it).
  • Agent confirmed the refund instantly — no hassle, no guilt trip.
  • Money was back in our PayPal account within 5 days.

So if you’re on the fence, you can give ExpressVPN a full month-long try with zero risk.

Still reading? You’re about to get rewarded with a little discount tip 👇

BONUS: ExpressVPN Coupon

Want to try ExpressVPN and save a bit while you’re at it?

While they don’t shout about it from the rooftops, ExpressVPN often runs exclusive deals through partner links — including ours. At the time of writing, the annual plan comes with 3 free bonus months, which lowers the monthly price significantly.

There’s no need to enter a coupon code — just follow the steps below:

  1. Click the button below to open the official ExpressVPN plan choice page in a new tab:

    Unlock ExpressVPN Deal ›

  2. You can choose the 12-month or the 24-month plan — the bonus pricing will be applied automatically at checkout.
  3. Download the app and try ExpressVPN across your devices. You’re covered by a 30-day money-back guarantee, so there’s zero risk.

Not seeing the deal? Try opening the link in a private window or clearing cookies first — ExpressVPN’s pricing page can behave oddly if you’ve visited before.

Our Verdict + User Reviews

So — is ExpressVPN still worth it in 2025?

If what you want is a VPN that “just works,” unblocks everything, and doesn’t mess around when it comes to privacy — then yes, ExpressVPN is still one of the top dogs in the game.

But it’s not perfect for everyone.

Here’s the final breakdown:

  • Excellent streaming access (Netflix, BBC iPlayer, Disney+, Prime Video — all tested and working)
  • Solid performance across continents with their proprietary Lightway protocol
  • Top-tier privacy stack: RAM-only servers, no-logs audits, own DNS, kill switch — all checked
  • Easy to use apps on everything from smartphones to routers
  • Proven customer support with 24/7 live chat that doesn’t suck
  • Above-average pricing: especially compared to newer providers offering more features for less
  • Fewer advanced configuration options: may not appeal to power users looking to tinker

Bottom line: ExpressVPN is a premium service at a premium price — ideal if you want reliability, simplicity, and strong privacy defaults. But if you’re looking for feature-packed extras or budget pricing, there are more flexible options out there.

Already using ExpressVPN? Thinking of switching from another service?
👇 Leave your thoughts, tips, or questions in the comments below — let’s compare notes!

Visme Review 2025: the Only Visual Content Creation Tool You’ll Ever Need?

Today’s internet doesn’t lack online design tools that promise awesome templates and seamless workflows for small and large design/marketing teams 🦄

Visme is one such tool, allowing its users to easily create, download, and share a wide range of professional designs –

But is it worth your time and money?

In this detailed review, we’re going to explore what Visme is and how it can be useful to you and your team. Let’s start with the basics:

What is Visme?

To put it simply, Visme is a template-based, all-in-one visual content creation tool that allows you to come up with a wide range of designs, ranging from purely online forms such as presentations, to physical documents such as posters, brochures, and business cards.

Started as a professional infographics creation tool, Visme now empowers designers and non-designers alike to create beautiful visual content for nearly any communication purpose.

Visme is a fully browser based toolkit, which means you don’t need to download anything to your computer; the interface is simple and user-friendly, adapting to the specific content type you’re creating –

For example, when making a presentation in Visme, you have the ability to add multiple slides to the editor.

Visme Interface: Presentation

whereas, when creating an infographic, you can easily add content blocks which extend the design rather than create separate pages:

Visme Interface: Infographic

Furthermore, the content blocks available when you’re adding new presentation slides are quite different from the content blocks you’d add to your infographic.

Everything you need is in the left hand sidebar, from new layout designs to photos, icons, animated illustrations, and data visualizations.

Speaking of content:

Content Types and Design Elements

The entire idea of Visme is to help create professional-looking designs based on pre-made templates. There are nearly 40 different types of templates for all conceivable business and personal purposes.

This abundance can be loosely categorized into 7 groups: presentations, infographics, charts and maps, documents, printables, website graphics, and social media graphics.

VIsme templates

You can add your own elements to the template you chose, such as stock photos, icons, animated graphics and illustrations, audio clips, stock videos and data visualization tools, just to name a few.

Each of the available design elements can be found in the various tabs of the left-hand sidebar we mentioned in the previous part of our review:

  • Layouts are handy in case you start customizing a template, then realize that another one you saw would have been a better option. You can easily browse through all of the other layouts similar to your content type in this tab: simply scroll through the options until you find the one that suits your needs.
  • Basics is a set of pre-made content options to help you easily create stunning graphics, documents, printables and more. Here, you can browse through the tabs for Header & Text, Stats & Figures, Graphics & Text, Diagrams and any content blocks you may have saved for future use.
  • Graphics are available in a huge variety in Visme: you can choose from shapes, arrows, lines, icons, animated icons, animated illustrations, animated characters, and animated gestures. Each of these types of graphics is completely customizable from color to size – and everything in-between.
  • Photos: there are over a million high-quality stock photos for you to choose from in Visme’s design dashboard.
  • Data: choose from 16 different types of charts and graphs or over 30 different data widgets to help visualize your numbers and statistics. From line charts and bar charts to flowcharts and progress bars, there’s a variety of different options to ensure your infographics and other visualizations are easy to understand.
  • Media: Visme provides a stock video library to help your designs stand out. There is even an audio library and the possibility to record audio on top of your slides. You can also embed external content like podcast episodes, sign up forms, quizzes, polls and more, right into your Visme projects.
  • Apps allow connecting third-party services to Visme, which opens up an entire new range of possibilities for your visual materials, from embedded YouTube and Vimeo videos to interactive Google Maps and forms from Jotform.

Visme Features

Visme offers a number of cool features that can help bring your designs to life and create stunning pieces of content. In this review, we will only look at the most important features that help Visme stand out among other similar services:

  • Paid Visme accounts unlock the Brand Kit, which allows you to easily organize your brand colors, fonts and logos for easy placement within your designs. You can also create branded slides, graphics or content blocks and save them in your templates for future use.
  • Visme offers tons of custom animations to bring your designs to life. You can also animate any element of your designs in order to grasp the attention of your audience! Animated graphics can be downloaded as a GIF or MP4 to share on social media.
  • With Visme, you can easily add interactive elements to your designs: this allows creating neat things like non-linear presentations, interlinked slides, or pop-ups that appear when users hover over a set element in your project.
  • One of Visme’s newest features centers around team collaboration. You can assign roles and work together on different projects, as well as add and resolve comments on designs. Users are able to share projects with team members or anyone else with a Visme account and give them access comments. Note that this feature is only available in the Team plan – more on that a bit later.
  • Visme’s dashboard provides analytics for published projects, allowing you to see how many people are viewing your designs. Choose your time frame to see how your projects have performed over time:

    Visme analytics

  • There is a lead-generation mechanism built in as well! You can choose to limit access to your content in Visme so that people have to sign up or provide their email address before being able to see your infographic, ebook, etc.

In order to use the latter feature, you will need to have any Business plan at Visme – just visit the advanced sharing settings and turn on “Requires Registration” under “Privacy” to start collecting data from your visitors. And yes, you can easily export your leads and add them to your CRM or email marketing platform.

Downloading and Sharing in Visme

Ready with your awesome design?

Now you can download your project in a variety of formats or seamlessly share it online. There are 4 formats from which you can choose:

  • Choose JPG or PNG formats to generate an image file – don’t forget to switch on the high-resolution option if you need maximum quality!
  • You’re also able to download your work as a PDF document, with or without margins for printing.
  • Some content types, like social media, are available as a animated download – you can choose between a video in MP4 format or an animated GIF image.
  • Or you could download your Visme presentation slides as an editable PPT document or an HTML5 file to present offline but still keep your animations and transitions.

Apart from file downloads, Visme also provides several options for sharing your content online, including direct sharing on social media, generating a (public or password-protected) live link, or embedding into a webpage.

If you’re sharing a slideshow, you will have access the presenter view so that you can see your private notes for each slide, while your audience only sees your presentation.

***

Overall, Visme has plenty of unique features to offer; before we give the final verdict, though, we need to look at another important aspect – how much does this cost?

Visme Pricing

Visme works under the so-called freemium (=”free+premium”) model, whereby it offers both free and paid options depending on how serious you want to get about your designs.

It’s fair to say that Visme’s pricing structure is not the simplest one in existence: there are 9 different plans (!) across 3 categories, each targeted to a specific type of user.

Let’s start with the Individual plans:

Visme plans - Individual

Here, we find the free-forever option (Basic) with limited storage, templates choice, and download options – but with access to any design element available on Visme.

The biggest drawback of the Basic plan is the obligatory Visme branding on every design you create – fine for personal use, but not very professional if you’re planning to show it to a large number of people.

The cheapest paid Standard plan ($14 per month) increases the available storage and number of projects, as well as unlocks all premium images and templates – but most importantly, it removed the Visme branding from your works.

The freelancer-targeted Complete plan ($25 per month) removes all limitations on the number of projects you can create, as well as adds several features that are useful for any professional designer, such as privacy controls and lead generation.

***

Things actually get a bit easier with the Business plans:

Visme Business plans

When you look closer, the Single and Team business plans are in fact just the Complete plan with the added Brand Kit – the former is meant for solo designers working for small or medium enterprises, while the latter is great for collaborating in teams. Both cost the same $25 per month.

Larger teams (10 people or more) can benefit from the Enterprise plan, which adds even more collaboration and security features; you’ll need to get in touch with Visme for a specific price quote.

***

Finally, there are the Education plans, which are essentially just cheaper versions of the personal plans (Student is the discounted version of Standard, and Educator is equivalent to the Complete plan).

Those are billed per semester, and in order to get one you will need to use an email address that ends with .edu; if your institution has a different domain extension, you’ll need to contact Visme support to get the discount.

You can compare all Visme plans on their official pricing page – there is a set of tabs above the pricing table that allows you to switch between the Individual, Business, and Education categories.

Now that we have a deeper understanding of what Visme is and how much it costs, we’re ready to answer the final question:

Verdict: Should You Use Visme?

Today, great visuals are an essential part of any solid marketing strategy… in fact, any marketing strategy – whether it’s for social media, your blog, or your email newsletter.

Visme is a design tool for those who are serious about marketing – its main advantages are versatility of available templates, advanced data visualization, as well as animations and interactivity.

So, if you are simply looking to create one or two Facebook post images, Visme will still do the job, but its real potential is fully realized through the more demanding formats such as presentations and infographics.

If you need a simple yet powerful design tool geared towards data visualization, Visme is the right choice:

Try Visme for free ›

There’s no need to purchase a paid subscription right away, thanks to the free plan, but if you regularly create visual content, you will quickly appreciate all the features a tool like Visme has to offer.

***

Have you already tried Visme? Or maybe you still have questions that weren’t answered in this review? Hit us in the comments section below, let’s discuss!

The Ultimate Review: Is Canva for Work Worth Your Money in 2025?

Wondering whether Canva Pro is really worth your money — or perhaps the free version already has everything you need?

You’re not alone.

With over 100 million users worldwide, Canva has become the go-to design tool for non-designers and professionals alike.

But here’s the kicker:

The free version is already pretty great.

So why do millions of people still upgrade to the Pro plan every year — and should you be one of them?

This guide will help you figure that out, fast. We’ll answer the most common questions about Canva Pro, including:

  • 🥇What is the biggest benefit of Pro?
  • 💵How much does Canva Pro cost?
  • 📊How does it compare to alternatives?
  • 🚀Should you upgrade to Canva Pro?

Before we dig into the differences between the free and the pro versions, it makes sense to take a bird’s eye view of the entire product:

What Is Canva? A Brief Overview

At its core, Canva is a web-based graphic design platform that lets you create everything from Instagram posts to business proposals — with zero design experience required.

The magic? Templates.

Lots of them.

Canva gives you professionally designed templates in almost every imaginable category:

  • Social media: Create stunning posts, banners, stories, and thumbnails for Facebook, Instagram, YouTube, Pinterest, and more. You can even animate them.
  • Branding & identity: Need a logo or a set of cohesive brand assets? Canva makes it surprisingly easy to whip up a decent-looking visual identity using its huge pre-made icon and font library.
  • Business materials: Presentations, invoices, proposals, certificates, resumes – all ready-to-edit in drag-and-drop templates that won’t make you look like a beginner.
  • Infographics & posters: Whether it’s for a pitch deck, classroom, or Pinterest board, Canva simplifies the process of turning data or ideas into good-looking visuals.
  • Printables: Need flyers, menus, brochures, or event invitations? Canva lets you design them and even order the printed versions right from the dashboard — delivered to your door in under a week.
  • Personal & everyday use: From custom calendars to postcards and photo collages, Canva can be your go-to tool for gifting or organizing your personal life in style.

The best part?

You can do all of this – yes, all of it – using Canva’s free version.

Why would anyone pay for Canva Pro then? That’s exactly what we’re about to explore next:

Canva Pro vs Canva Free

So, if Canva’s free version already lets you create beautiful designs… why do so many people still pay for Pro?

Let’s break it down.

When you’re browsing templates or building your design, you’ll quickly run into assets with diagonal lines — those are watermarked elements, and unlocking them either costs a few dollars per item… or you go Pro.

Here’s what that looks like:

Canva: the watermarks

If you’re using Canva frequently, paying per image gets old (and expensive) fast. That’s where the subscription starts to make sense.

  • Pro unlocks 140+ million premium assets — including high-quality photos, videos, graphics, icons, and audio files. Use them freely in your designs, no extra charges or surprises.

But that’s just one part of the story.

Let’s walk through what else you get — in three big buckets:

1. Premium Content & Templates

  • Unlimited access to Canva’s full collection of premium templates (2M+ and growing)
  • 1,000 Brand Kits to organize logos, fonts, and colors for your projects
  • Exclusive fonts and advanced text effects to level up your visuals

Canva Brand Kit

Whether you’re designing for yourself or managing a brand, this gives you way more flexibility and polish.

2. Design Tools That Save Hours

  • Magic Resize: instantly reformat any design for different platforms (e.g. Facebook → Instagram → YouTube)
  • 1TB cloud storage (Free plan has 5GB — that’s 200x less)
  • Background remover: click once, background gone. No fiddling with layers or clunky cutouts.
  • Transparent PNG export for logos, overlays, and clean web assets
  • Animation & video export: turn any design into a slick MP4 or GIF
  • One-click translation: resize and translate designs at scale, super useful for international teams or campaigns

Canva Pro animations

3. Workflow Boosters & Smart Features

  • Content Planner: schedule social posts right from Canva
  • Version history: go back in time and restore older versions of your design
  • Priority support: Pro users get faster responses and access to customer service
  • 25+ AI-powered tools to help generate, edit, and adapt content more efficiently (like Magic Write for text and design suggestions)

Canva Pro brings premium assets, time-saving tools, and automation features together into one very tidy (and surprisingly affordable) package.

Coming up next: what does it cost, and is it cheaper than buying stock assets and design tools separately?

Let’s run the numbers →

How Much Does Canva Pro Cost?

Canva Pro is currently priced at $10 per month (when billed annually), or you can pay monthly if you prefer a bit more flexibility.

And yes — there’s a 30-day free trial, no strings attached. You’ll need to enter a payment method, but you won’t be charged unless you decide to keep it after the trial ends:

Try Canva Pro – 30 days free ›

Compared to other design platforms in the same price range, Canva Pro offers an unusually generous toolkit.

Over the last years the prices have converged, but Canva still offers the most serious combination of features, flexibility, and polish.

Here’s how it stacks up:

Tool Pricing Templates Photos Brand kit Free trial
Canva $10 14000+ 60M yes 30 days
Alternatives
PicMonkey $10 2400+ 1M yes 7 days
Stencil $9 1300+ 5M no
Snappa $10.00 6000+ 5M no
Canva clones
VistaCreate $10 200K+ 170M+ yes 14 days
FotoJet $12 800+ 1M no 7 days

You might notice several brands at the bottom of the table priced well below Canva Pro – those are what we call “Canva clones” –

– an entire group of more recent tools that noticeably imitate Canva’s features, and even its interface 🐒

While added to the comparison table for the sake of a fuller picture, they can hardly be considered true substitutes to Canva Pro.

To be fair though, the first three competitors aren’t looking too awesome compared to Canva either, for a couple of reasons:

  • much smaller libraries, i.e. more limited choice of templates, images, videos, and other design components,
  • fewer features, most notably the absence of a well-defined brand kit and lack of productivity enhancing tools such as auto-animator,
  • narrower focus, typically on photo editing or social media posting rather than full-scale, multichannel, brand-centric design and collaboration.

In other words,

if you’re working on brand content, juggling multiple platforms, or just want an all-in-one design solution with no pay-per-download surprises, Canva Pro delivers excellent value for the price.

What about the practical things – is it easy to manage your Canva Pro account? Let’s have a closer look:

Managing Your Canva Pro Subscription

Starting a Canva Pro trial takes no more than a minute – all you need to do is visit the official page and add your payment method (card or PayPal). It will not be charged until the 30-day trial expires.

You can change your subscription settings and manage your team in the Billing part of the Settings area, which you can visit by clicking the circle in the bottom left corner of the Canva dashboard:

This is also where you’ll find your invoices if you have an active Canva Pro or Enterprise subscription.

If you’re part of a team, you’ll also see a People tab where you can invite, remove, or manage team members. Just keep in mind:

  • Canva charges per user on the Teams plan (currently $100/year per person, billed annually, with a 3-user minimum)
  • Team members only see what you explicitly share with them — it’s easy to keep personal designs private

But what if you don’t need the paid version anymore? Here’s how to do it in under a minute:

  1. In the SettingsBilling section click “Cancel subscription” at the bottom of your current plan
  2. Confirm cancellation (you won’t be charged again, but you’ll still have Pro access until the current billing period ends)

Note: Canva does not offer refunds for unused time, so if you’re thinking about cancelling — it’s best to do it near the end of your billing cycle.

Will your designs disappear after you cancel?

Nope! You’ll still have access to all your projects after downgrading — but any Pro-only elements (like premium images or fonts) will get watermarked again until you re-subscribe.

If you plan to cancel, it’s a good idea to download your key designs in high resolution beforehand — especially if they include premium content or transparent backgrounds.

Next up: can you use Canva designs commercially, and what happens with licensing if you cancel Pro?

Licensing and Copyright in Canva

Canva is incredibly user-friendly — but licensing can still trip people up.

So let’s make it simple:

You can use your Canva designs for both personal and commercial purposes, as long as you follow a few key rules.

We’ve combed through the fine print in Canva’s Content License Agreements and Terms of Use to break it down for you.

  • Yes, you can sell products (like T-shirts, eBooks, posters, presentations) that include designs made with Canva — as long as the design isn’t just a raw Canva element copied and resold as-is.
  • Premium content (Pro-only assets) is licensed on a “one design = one use” basis. If you reuse a Pro image across multiple projects, each variation technically needs its own license. But if you have an active Pro subscription, this is handled automatically — no extra charges.
  • Free content is covered by a more flexible license. You can use it across as many projects and platforms as you like, provided you’re not reselling the original asset (e.g. uploading a Canva image to a stock photo site = not okay).
  • Logo use: You can absolutely design a logo in Canva — just be aware that it may include non-exclusive elements (icons, fonts, etc). For legally protected logos or trademarks, it’s best to use fully original components or consult a designer.

If you cancel Canva Pro, you can still use your downloaded designs — even commercially — as long as the usage complies with the original license at the time of download.

In short: Canva’s licensing is generous, but not “do anything, anywhere, forever” — especially when it comes to Pro assets. If in doubt, check their official license guide or contact support directly.

Hopefully this clears things up! If you have more questions, don’t hesitate to share them in the discussion section below!

Now that we’ve covered the legal stuff, let’s sum everything up in one final verdict:

Should You Use Canva Pro?

After all the features, pricing, and legal fine print — here’s the bottom line:

Canva Pro is a serious upgrade over the free plan — not just in assets, but in workflow, polish, and time saved. If you design anything more than occasionally, it’s probably worth it.

That said, here’s how to decide based on how you actually use Canva:

  • If you need a quick one-off design (like a resume, flyer, or invitation), the free version is more than enough. Just watch out for watermarked elements — or activate the free trial to unlock everything temporarily.
  • If you design social posts regularly (especially for multiple platforms), Canva Pro will save you hours. Magic Resize alone justifies the price if you value your time.
  • If you’re building a brand — whether it’s your business, podcast, nonprofit, or YouTube channel — the Brand Kit, premium fonts, and design consistency tools make Pro a no-brainer.
  • If you work on a team (e.g. agency, startup, marketing department), you might want to consider Canva for Teams instead. It’s built for collaboration and comes with shared folders, permissions, and team billing.
  • If you’re on the fence, the 30-day free trial is your best friend. No rush, no risk — and you’ll know pretty quickly if the upgrade is worth it.

Design better, faster, and with fewer roadblocks. Canva Pro doesn’t just unlock assets — it unlocks momentum.

Try Canva Pro – first 30 days free ›

Still have questions? Already using Pro and want to share your experience? Drop into the comment section below — let’s help each other make smarter choices.

How to Use LinkedIn Sales Navigator for Content Marketing

What channels are you currently using for your content marketing efforts?

YouTube? SEO? Facebook? LinkedIn?

There is no shortage of options, these days. While this often means more opportunity to engage with a wider audience, zeroing in on what will work well for your brand and your industry is getting increasingly difficult 🎯

But one thing is clear: some channels work better for B2B than others. Which channel would you use for your B2B brand: TikTok or LinkedIn?

That’s right. If content is king in B2B marketing, LinkedIn is the castle.

LinkedIn and B2B Content

It’s no secret that LinkedIn offers plenty of ways to leverage your content for more engagement and better reach. They even have a whole playbook on the topic:

“Weigh in on active discussions and point fellow group members to additional information of value, whether that’s content published by your company or another organisation. The key is to position yourself as a trusted and helpful peer rather than as a marketer focused on reeling in the next customer.”

While this is referring specifically to leveraging LinkedIn groups for thought leadership, the sentiment can be applied across the platform. LinkedIn is for sharing and learning valuable information.

But distribution on LinkedIn as a social media platform is one thing. You can leverage LinkedIn’s most powerful offering — insight on its users — to extend your content marketing efforts off the platform as well.

How? With LinkedIn Sales Navigator.

Sales Navigator Isn’t Just For Sales

Some strategies take money, others take time. Using LinkedIn Sales Navigator for content marketing is definitely the latter — but it’s worth it.

As the name implies, LinkedIn Sales Navigator is typically used by sales teams for prospecting and account-based sales efforts. The three most attractive features of Sales Nav are:

  • Advanced Filters: Narrow in on a specific audience with the ability to filter by company, interest, position and more.
  • Saved Lead Lists: Keep track of specific people of interest by saving up to 1,500 leads at once.
  • Additional InMail Messages: Receive 30 InMail messages each month to send to high value contacts (though, with that limitation, you’ll also want a way to email contacts).

So how can you use Sales Nav (a tool your sales team is likely already using) for content marketing?

Just like sales, you can use it to connect to the right people.

“Sales Navigator features a powerful set of search capabilities, improved visibility into extended networks, and personalized algorithms to help you reach the right decision maker.”

Yes, it’s built for sales professionals. But that shouldn’t preclude other teams from using LinkedIn’s extensive data and powerful search to reach their audience.

Here are three ways to use Sales Nav for content marketing:

#1 Find Niche Thought Leaders for Influencer Marketing

Influencer marketing is now a proven method for both B2C and B2B marketing. In fact, it was #4 in the top 10 B2B tech marketing tactics from last year as ranked by MarketingCharts.

“The growth trajectory of influencer marketing is not limited to consumer brands. B2B companies are also realizing the value of collaborating with influential experts for marketing purposes.”
~ Lee Odden / Digital Marketing Institute

The most common approach for finding influencers for B2B marketing is fairly straightforward. First, use platforms like BuzzSumo to Ahrefs to identify shared content, then reach out to the authors of those posts. But this can be limiting: social shares don’t always equate with ‘industry leadership’ and tracking down authors can be difficult.

Why not start with the influencers themselves?

On LinkedIn Sales Navigator, you can use advanced filters to find leaders in your niche or for your specific topic quickly.

From marketing software to sales management, you can find the people you want to follow and engage with your own content. Some of the advanced filters that will work particularly well for influencer marketing are:

  • Group membership: Do you have a favorite, industry-specific LinkedIn group? Filter your search results by those groups to turn up people who participate in those conversations.
  • Leads mentioned in the news: This is where you’ll get into true influencer territory.
  • Leads with recent LinkedIn activity: You’ll want to filter down by people who are actually active on LinkedIn; they’ll be more likely to have more followers.
  • Posted content keyword: If you’re looking for influencers for a particular blog post or guide writeup, use your keyword to see who’s talking about it.
  • Years of experience: Make sure you focus on people who actually know what they’re talking about.

Once you have a list of interesting leaders saved, take time to go through their LinkedIn activity. Bookmark their most relevant article to use in your next post as a quote.

Once you actually use a quote in a piece, export their email (or connect directly on LinkedIn with InMail) to let them know and to ask if they’d be interested in continued collaboration.

Let’s be honest: one of the hardest (or at least time consuming) elements of content marketing is the backlink building.

You have to find relevant domains and blogs, figure out the best point of contact, and make a compelling pitch for a guest post or a reason for inclusion on a resource page. Again, BuzzSumo, Ahrefs and Moz all work great for kickstarting the backlink building process.

But instead of starting on one end — finding ‘guest post opportunity’ pages first — why not start from the other? The ‘other end’ would be to first find digital marketing managers and editors and contact them directly.

With Sales Nav, you can filter down to the people who will make decisions regarding the editorial calendar and guest posts. What are the filters that will work the best?

  • Position or Job Title: Look for digital marketing managers, online editors, and in some cases directors of marketing.
  • Posted content keyword: If your initial search turns up way too many opportunities, try narrowing it down by those who have mentioned a ‘guest post’ or ‘contribution’ in their shared content on LinkedIn.

Once you have your list, you can extract their emails to make a direct pitch. Take your time, and make sure you reference an article or post they recently shared on Linkedin. Better yet, add them on LinkedIn too, so when your submission comes through you’re already on their radar.

#3 Amplify the Reach of Your Most Compelling Content

Content marketing isn’t only about the inbound engine; you can also use content to create more compelling outbound emails.

Instead of limiting LinkedIn Sales Navigator to fuel your content and then distribute elsewhere, you can also find an audience that would be most interested in your content directly on the platform.

Yes, it means sending out cold emails. But outbound marketing can go a long way if you’re sending valuable content to a target audience.

  1. Make separate lead lists. Organize individual lists based on interest, title, company size, location and industry.
  2. Map your content to your lead lists. Or create new content to match the interest and niche of your lists. Either way, the idea is to send content in your initial email that your leads will find extremely educational or helpful. For a list in California, for example, you could send an article on recent changes to self-employment tax. Or for a group of social media managers, you could send a video on updates to social media ads. Make it relevant!
  3. Send out your outbound emails. Use an email marketing platform (or cold email platform) to send out all of your emails at once. Use personalization (i.e. company name and first name) to make the email feel as personal as possible.

When you send a cold email with a highly relevant resource, you’ll be much more likely to receive a positive response right away. It won’t beat out inbound traffic, but outbound should prove to be a valuable addition to your marketing efforts.

Remember to Keep it Organic

Going this route for content marketing doesn’t mean you can start sending cold emails at abandon.

You can leverage LinkedIn Sales Navigator to deepen and widen your reach, but getting the most out of the platform will still take a good amount of time (if you do it right). Here are a few ways to keep it organic.

  • Send Connection requests to promising leads. You may be limited to InMail messages to non-connections, but you can connect with people to your heart’s content. Connecting with promising people introduces multiple touch points and serves as an organic way of reaching people you’ll value a relationship with.
  • Narrow your lists as much as possible. Take the time to make your lists and searches as specific as possible so your message comes across as personal as possible. For content marketing, lists should be a few dozen to maybe a couple of hundred — not in the thousands.
  • Tailor your messages. At the very least, use variables to personalize your opening lines and subject lines. Better yet, take the time to actually go through your list one-by-one (I’ve seen the highest response rate with the latter).

Sales Nav doesn’t necessarily make content marketing easier, but it does extend what you’re able to do with what you have 📣 How do you plan to use this sales-oriented tool for marketing?

Best VPN Services in 2025: Our Top 3 Picks for an Easier Choice

☑︎ This top-3 guide has been last updated in October 2025

– “Ugh, choosing the best VPN for myself is impossible!”

We get it. On the surface, most VPNs look like clones: same privacy promises, same shiny apps, same discounts.

Choosing the best VPN?

But dig a little deeper – and there are some real differences that only show up after weeks (or months) of actual use 🤓

That’s why this guide doesn’t waste your time on basic stuff like “it uses encryption” or “it has an app for Android.” All top VPNs do.

Instead, we’ve handpicked just three VPNs — each with excellent performance, airtight privacy, and solid global coverage — but with a unique edge that makes it better for a specific type of user.

Here’s a quick overview before we dive into the details:

VPN provider brand Biggest strengths Base location Key feature Best deal
NordVPN securityspeedprice 🇵🇦 Panama 7000+ physical servers worldwide -70% (check)
Surfshark affordabilityno-logs∞ devices 🇳🇱 The Netherlands Super low 2-year pricing -81% (check)
ExpressVPN streamingspeedreliability 🇻🇬 British Virgin Islands Works with all major streaming sites -61% (check)

In the following sections we will discuss each usage scenario in more detail and explain why we’ve chosen that specific VPN provider as the winner.

Let’s begin:

🏆 Best All-Round VPN

The way we define “value for money” in this case is when a provider ticks all of the boxes for essentials like privacy and speed – while also offering the best bargains.

Finding the winner in this category was actually quite easy – out of our top VPN picks, there is only one that clearly competes the price:

Best VPN: NordVPN

While it’s not the cheapest VPN in existence, NordVPN is surely the most attractive option among VPNs with a good reputation and a long track record.

With over 7500 servers in every part of the world, Nord offers a fast, secure VPN connection for any purpose – be it online banking, watching movies, or protecting your privacy.

As we mentioned above, it’s also cheaper than most other large VPNs, and you get a 30-day full refund guarantee with any plan:

Get up to 70% off at NordVPN ›

By the way, in addition to a Virtual Private Network Nord also offers a password manager and a secure file storage solution – which can all be managed from the same account.

  • Consistently fast speeds thanks to the proprietory NordLynx protocol.
  • RAM-only server architecture lowers data retention risk.
  • Password manager, encrypted cloud storage, and other complementary services if you want an all-in-one bundle.
  • In highly restrictive regions, servers may need manual selection and performance can vary.

You can find out more about NordVPN, including in-depth analysis of its unique features, in our expert review.

💰 Best Value for Money VPN

Alright, what if instead of the “best of the best” you want a privacy and security solution that has the lowest impact on your budget?

While many Virtual Private Network services offer discounts on 1-year and 2-year plans, no-one is quite as aggressive with its pricing as Surfshark:

Surfshark

Surfshark offers 3200+ servers to provide great connection speed from any location, as well as advanced security protocols to bypass even the most sophisticated filters.

On top of that, it costs 2-3x less than most other large VPN services, especially if you choose the longest 2-year deal:

Get a 81% Discount at Surfshark ›

As usually, we recommend setting a reminder for 20-25 days to make sure your 1-month refund guarantee is still valid if you need it.

  • Unlimited simultaneous device connections on one account.
  • Strong value pricing on long-term plans, often with bonus months.
  • Nexus architecture with rotating IP and features like NoBorders and Everlink for stability under changeovers.
  • Some locations are virtual, which can affect site language/region detection.

If you’d like to find out more about Surfshark (as well as get the best possible deal on this VPN), check out our in-depth review.

📺 Best VPN for Streaming

If, like many of us, you watch TV shows and movies on a regular basis, you will especially like our next pick – the safest, fastest, and most convenient VPN for streaming and P2P (peer-to-peer).

Yes, you heard it right – we are also including torrents here, for a couple of reasons:

  • The torrent protocol (and its use) is not illegal in itself – it is just another technology for sharing data. That being said, the devil is of course in the details.
  • There are a few countries where personal torrent use — as long as you’re not distributing or profiting — falls into a legal grey zone and is generally tolerated. Examples include Spain, Switzerland, and (to some extent) Poland.

In any case, there’s one provider that has consistently shown outstanding results in our streaming and torrenting tests:

Best VPN for streaming: ExpressVPN

Whenever streaming services like Netflix introduce new regional filters and stricter blocking policies, ExpressVPN is among the first providers to come up with stable solutions.

Regardless of your location, you’ll be able to watch your favourite shows and use the P2P torrenting networks as much as you like.

Stream Better with ExpressVPN ›

So, if you’re a TV show fan or just want to relax and watch some good-old Friends episodes (remember that one where Ross ate all the maple candy?), this is our VPN of choice.

  • Consistently fast, low-latency connections on a broad global network.
  • Excellent streaming reliability, with MediaStreamer SmartDNS for devices that don’t support VPN apps.
  • Strong obfuscation options that tend to work in restrictive regions; auto protocol selection helps when blocks change.
  • Higher pricing than many competitors, especially on monthly plans.

For more tests and the best coupon deal, check out our review of ExpressVPN.

***

Alright, this concludes our top-3! Before we wrap up, here’s some advice on testing your chosen VPN, presented in a slightly inside-out manner:

Avoid These VPN Mistakes

We’ve all been there – signing up for a VPN that looks amazing on paper, only to realize it’s either slow, limited, or just plain annoying. Here are some of the most common VPN buying mistakes (and how to avoid them):

  • Testing on just one device: Most VPNs allow multiple simultaneous connections – meaning you can use the same account on your laptop, phone, tablet, even your smart TV. Don’t judge the VPN based on how it runs on just one device.
    → Pro tip: check if your provider supports routers too – it’s the easiest way to cover your entire household at once.
  • Choosing a “free” VPN: Yes, they exist. And yes, most of them suck. Free VPNs usually come with speed caps, data limits, and shady privacy practices.
    → If it’s free, you’re probably the product.
  • Ignoring refund policies: Even great VPNs aren’t perfect for everyone. Always double-check the provider’s money-back guarantee – and set a reminder a few days before it expires.
    → All 3 of our top picks offer risk-free trials or 30-day refund periods.
  • Skipping the fine print: Privacy isn’t just about encryption. It’s about jurisdiction and data collection policies. Make sure your VPN is based in a privacy-friendly country and has a clear no-logs policy.
    → We’ve done the homework in our comparison table above.
  • Judging speed by a single test: Speed can vary wildly depending on the server location, time of day, and even your ISP. Don’t just hit “connect” and measure once.
    → Try 4–5 different servers in your region, especially during peak hours (evenings and weekends). The good ones will stay fast and stable.

The two most trustworthy testing tools are Speedtest.net and Fast.com, make sure they produce similar results.

Still unsure how to test a VPN properly? here are some frequent questions and common misconceptions, explained:

VPN Buying FAQ

What’s the difference between a free VPN and a paid one?

Free VPNs usually come with speed caps, limited servers, and questionable privacy policies. In contrast, paid VPNs (like the ones on this list) offer better security, faster speeds, and a real no-logs guarantee. Bottom line: if it’s free, you’re probably the product.

Will a VPN make my internet slower?

Slightly, yes – but good VPNs minimize the difference. All VPNs add a bit of overhead due to encryption and routing, but the top providers use high-speed protocols and optimized servers to keep things smooth. In most real-world use cases, the drop is barely noticeable.

Can I use one VPN account on multiple devices?

Absolutely. All major VPNs support at least 5–6 devices at once – and Surfshark even allows unlimited connections. That means you can cover your laptop, phone, tablet, and smart TV with a single plan.

Is using a VPN legal?

In most of the world – yes. VPNs are legal in countries like the US, UK, Canada, the EU, and much of Asia. However, in countries with heavy internet censorship (like China, Russia, or Iran), usage may be restricted or monitored. Always check local laws before using a VPN abroad.

Do VPNs work with Netflix and other streaming services?

The good ones do. Services like ExpressVPN and NordVPN are consistently able to bypass geo-blocks for Netflix, Disney+, Hulu, BBC iPlayer, and more. Just make sure to choose a VPN with a proven track record for unblocking — we’ve highlighted our top picks above.

Final Words

That wasn’t so difficult, right? Choosing from 3 distinct VPNs is much better than sifting through 10 or 20 similar-looking options.

Let’s recap:

  • If you’re after the best of the best, check out NordVPN as the most advanced VPN provider on the market – verified by years of testing.
  • If you want the entire package (quality, security, speed) at the lowest price, Surfshark is the best VPN deal you can find.
  • If you want a reliable VPN that works with any streaming/torrenting service (including Netflix, Disney+, YouTube, Spotify, etc), we recommend ExpressVPN.

By now you should have all you need to make a smart, informed choice regarding a VPN provider.

Any questions left unanswered? Leave your comment in the discussion section below, let’s help each other choose the best VPN!

Disclosure: if you found this guide helpful, please consider using links on this page to purchase VPN subscriptions – this will not affect your price in any way, but we (Satori Webmaster Academy) might receive commissions that help us keep this project going.

Wie du 2025 einen Blog erstellst: In unter 30 Minuten zum Blogger (und vielleicht sogar etwas Geld verdienen)

Also, du hast etwas zu sagen. Oder vielleicht dein Chef 🤷

So oder so: Die Launen der Algorithmen und die künstlichen Beschränkungen sozialer Netzwerke nerven dich. Was du brauchst, ist ein richtiger eigener Platz im Netz

🎛️ ein Ort, an dem du volle Kontrolle über Inhalte und Design hast
📍 eine teilbare Adresse, die einzigartig dir gehört
😎 eine, die signalisiert: „Yep, diese Person weiß, was sie tut“

…Du kannst deine Google-Suchergebnisse jetzt getrost schließen – du bist am richtigen Ort gelandet.

Ja, mach ruhig zu. Gut.

Erstelle deinen Blog und werde plattformunabhängig

Scherz beiseite: Diese einfache Anleitung führt dich Schritt für Schritt durch alles, was du fürs Bloggen brauchst – vom Namensfinden bis zum ersten Klick auf „Veröffentlichen“.

Und das Beste? So einen Blog kannst du in weniger als einer halben Stunde bauen – selbst wenn du noch nie in deinem Leben Code angefasst hast.

Bereit, deinen Blog genau jetzt zu starten – und damit vielleicht sogar deine Kaffeeroutine zu finanzieren? 🤑

Los geht’s:

Hier starten: Was du aus diesem Guide mitnimmst

Ganz klar vorweg: Das hier ist nicht eine dieser vagen „Blog in 3 Klicks“-Geschichten – und auch kein 97-teiliger Kurs, für den du sechs Wochen brauchst.

Das ist deine Überholspur. Wir nutzen einfache, aber starke Tools, umgehen unnötige Details und konzentrieren uns nur auf das, was zählt:

  • Wähle einen großartigen Domainnamen, der nicht nach Scam oder Tippfehler klingt
  • Richte Hosting ein, das zuverlässig läuft und nicht dein Budget sprengt
  • Installiere WordPress auf die einfache Art – ganz ohne FTP-Drama
  • Passe deinen Blog an mit Themes und Plugins, die nicht nerven
  • Sichere ihn ab und erstelle Backups ohne einen Cent auszugeben
  • Starte mit dem Publizieren von Beiträgen, die gut klingen und gut aussehen
  • Und wenn du willst: verwandle deinen Blog in eine (Neben-)Einnahmequelle 💸

Du musst kein Developer sein;
du musst keine 399,99 € für einen Blogging-Kurs ausgeben;
du brauchst nur einen Browser, ein kleines Budget – und 30 Minuten Fokus.

Klingt gut? Dann klären wir zuerst eine brennende Frage:

Gratis vs. bezahlt: Wo ist der Haken?

Ja, du kannst einen Blog kostenlos starten. Und wenn du nur ein digitales Tagebuch willst, um Katzenfotos zu teilen oder Urlaube zu dokumentieren – go for it.

Aber wenn du auch nur ansatzweise ernsthaft für ein richtiges Publikum schreiben, deine Seite ausbauen oder (irgendwann) damit Geld verdienen möchtest, gilt Folgendes:

  • Kostenlose Blogs haben Haken. Vor allem in Form hässlicher Adressen (denk an deinname15.plattform.com) und erzwungener Anzeigen, an denen du nichts verdienst.
  • Anpassung ist begrenzt. Die meisten Gratis-Plattformen sperren dich in ihre Layout- und Designvorgaben ein. Plugin installieren, Farben ändern, Mailingliste hinzufügen? Nope.
  • Du hast nicht wirklich die Kontrolle. Plattformen können Regeln ändern, Features entfernen oder ganz dichtmachen – und dein hart erarbeitetes Publikum ist von einem Moment auf den anderen weg.

Es ist ein bisschen so, als würdest du ein Haus auf fremdem Grund bauen. Am Anfang bequem – aber wenn dort ein Parkplatz entstehen soll, wirst du eben rausgeworfen.

Blog erstellen und sich von Plattformen befreien

Wenn dein Blog wachsen, ernst genommen werden und deiner bleiben soll – lohnt sich ein kleiner Betrag am Anfang absolut.

Die gute Nachricht? Wir halten deine Einstiegskosten ultra-niedrig:

…mit echter Domain, echtem Hosting und echtem Besitz – alles zum Preis einer monatlichen Pizza 🍕 (na gut, einer fancy).

Als Nächstes braucht dein Blog ein Zuhause und eine Adresse. Kümmern wir uns darum:

Schritt 1: Hosting und Domain sichern (mit einem kleinen Twist)

Ein Domainname 🌐 ist die eindeutige Adresse deines Blogs im Netz (wie blog.com), während Webhosting 🖥️ der Service ist, der deine Seite speichert und sie 24/7 unter deiner Domain erreichbar macht.

Die gute Nachricht? Du musst beides nicht getrennt besorgen – die meisten modernen Anbieter bündeln Hosting und Domain. Genau das machen wir hier.

Wir suchen etwas, das:

  • Einfach zu bedienen ist – auch für absolute Anfänger
  • Schnell und zuverlässig läuft
  • Erschwinglich ist, ohne dubios zu wirken

Wir müssen das Rad nicht neu erfinden – wir bleiben bei WordPress, der weltweit beliebtesten kostenlosen Blog-Plattform – und bei einem von drei Hosts, die offiziell von WordPress.org empfohlen werden:

👌 Der günstigste Hosting-Plan bei Hostinger reicht völlig aus.

Natürlich kannst du auch einen anderen hochwertigen Hoster wie Kinsta oder SiteGround wählen – oder sogar einen Baukasten (hier ist unser Vergleich).

* * *

Wir nutzen einen kleinen Psychotrick, um nicht gleich am Anfang hängen zu bleiben:

…anstatt mit dem Domainnamen zu starten (und Stunden damit zu verbringen, den perfekten zu suchen!), legen wir direkt eine Entwicklungs-Version deines WordPress-Blogs an!

Du kannst im Hinterkopf schon über Domains nachdenken, aber lass dich nicht blockieren 🚧 – glaub uns, wir haben schon unzählige Fälle gesehen ;)

Jetzt brauchen wir erstmal einen Platz, an dem wir am Blog arbeiten können. Wir nutzen dazu einen Coupon, um den besten Preis bei Hostinger zu bekommen.

Hier die Schritt-für-Schritt-Anleitung:

  1. Geh zur Hosting-Angebotsseite von Hostinger und klicke auf „Deal sichern“ (oder scrolle einfach runter, um die Tarife zu sehen):

    Bestes Angebot bei Hostinger holen ›

    Wir nehmen die günstigste Option, die alles bietet, was wir brauchen (sie heißt Premium, ja :)

  2. Auf der nächsten Seite empfehlen wir 12 Monate als optimales Mittelmaß zwischen Preis und Bindung – aber du kannst natürlich jeden Abrechnungszeitraum wählen:

    Blog erstellen Schritt 1: Hosting

    Und jetzt kommt noch ein Extra: einen zusätzlichen 10%-Rabatt! Kopiere diesen Coupon und füge ihn ins entsprechende Feld unter der Preisübersicht ein:

    TRUS10CODE
  3. Klick auf „Apply“ und dein Endpreis reduziert sich um 10%. Falls der Coupon nicht klappt, probiere SPECIAL15 für 7% Rabatt – und sag uns gerne in den Kommentaren Bescheid!

    Blog erstellen Schritt 1: Hostinger-Coupon angewendet

  4. Nun wirst du aufgefordert, ein Konto zu erstellen und die Bestellung abzuschließen. Glückwunsch! Dein Blog hat jetzt ein Zuhause 🏠

Sobald die Zahlung durch ist, leitet dich Hostinger direkt zum Einrichtungsassistenten weiter, um deinen Blog einzurichten und WordPress zu installieren (das schauen wir uns gleich an).

* * *

WICHTIG: Denk parallel über Domains nach:

Du kannst unseren Blog Name Generator nutzen, um kreative Ideen für eine .com-Domain zu finden –

– oder wenn du lieber eine regionale Endung wie .de oder etwas Nischiges wie .org möchtest, nutze einfach die Domain-Suche bei Hostinger.

Ziel ist etwas Kurzes, Klartextiges und leicht zu merkendes – mehr Tipps findest du in unserem Domain-Guide.

Gib dir Zeit, einen Domainnamen zu finden, der sich richtig anfühlt – wir registrieren und richten ihn dann am Ende ein, wenn dein Blog live geht.

Für jetzt: arbeite einfach weiter an deinem Blog:

Schritt 2: WordPress oder eine andere Blog-Engine installieren

Gehen wir gemeinsam durch den Hostinger-Einrichtungsassistenten, um deinen WordPress-Blog in unter 5 Minuten aufzusetzen:

  1. Die erste Frage kannst du ignorieren (sie ändert nichts), bei der zweiten wählst du “Website erstellen“:

    Blog erstellen 2025: Hostinger Assistent 1

  2. Im nächsten Schritt bekommst du drei Optionen: WordPress installieren, den Hostinger-eigenen Website-Baukasten nutzen oder mit einer leeren PHP/HTML-Seite starten. Auch wenn ihr Baukasten in 2025 recht ordentlich geworden ist, nehmen wir WordPress für maximale Einfachheit:

    Blog erstellen 2025: WordPress installieren

  3. Im nächsten Schritt wirst du aufgefordert, ein Passwort für deinen WordPress-Adminbereich zu erstellen (manchmal wird es für dich vorgegeben – stelle sicher, dass du dein eigenes festlegst!). Auch E-Mail-Adresse und Sprache kannst du hier anpassen:

    Blog erstellen 2025: WordPress Admin-Passwort festlegen

  4. Nun hast du die Wahl zwischen einer vorgefertigten Website (mit Design, Demo-Inhalten usw.), einem der Partner-Themes von Hostinger (allesamt Freemium) oder einer komplett leeren Installation.

    Wir empfehlen die Option „leere Seite“, da es buchstäblich tausende großartige kostenlose Themes gibt, die deinem Blog ein viel individuelleres Aussehen geben, als eine von zehn Standard-Vorlagen, die Hostinger Millionen Nutzern anbietet:

    Blog erstellen 2025: leeres WordPress installieren

  5. Als Nächstes wirst du nach dem Domainnamen gefragt – wähle einfach “Temporäre Domain verwenden“, wenn du dir noch unsicher bist. Wir verbinden deine endgültige Domain direkt vor dem Start in Schritt 4.
  6. Im nächsten Schritt kannst du einstellen, in welchem von Hostingers 12 globalen Rechenzentren dein Blog gespeichert wird.

    Je näher der Server an deinem Hauptpublikum, desto schneller lädt deine Seite (also wähle nicht Singapur, wenn deine Leser hauptsächlich in Deutschland oder den USA sitzen!).

    Zum Schluss klickst du auf “WordPress installieren“.

  7. Nach ein paar Sekunden ist deine WordPress-Installation abgeschlossen 🪄 – und dein neuer Blog ist damit schon halb fertig!

Lass uns nun die wichtigsten Einstellungen vornehmen:

Schritt 3: Deinen Blog smart konfigurieren

Bevor wir ins Design oder Schreiben von Inhalten einsteigen, nehmen wir uns ein paar Minuten, um grundlegende Einstellungen zu optimieren. Glaub uns – ein paar schnelle Anpassungen jetzt ersparen dir Stunden an Verwirrung später.

Um dich in dein WordPress-Adminpanel einzuloggen, kannst du entweder in Hostingers Dashboard auf „Website bearbeiten“ klicken oder einfach deinblog.com/wp-admin besuchen und dich mit der E-Mail und dem Passwort anmelden, die du zuvor eingerichtet hast.

Das solltest du zuerst tun:

  • Gehe zu Einstellungen → Allgemein
    Aktualisiere hier unbedingt deinen Seitentitel und deine Tagline. Diese erscheinen im Browser-Tab und manchmal auch in den Suchergebnissen – also halte sie kurz und beschreibend. Überprüfe hier auch gleich deine Zeitzone und dein bevorzugtes Datumsformat.
  • Als Nächstes: Einstellungen → Permalinks
    Wähle die Option Beitragsname – so erhältst du saubere, lesbare URLs wie deinblog.com/mein-erster-post statt deinblog.com?p=123. Besser für Nutzer, besser für Google.
  • Noch dabei? Super – weiter geht’s mit Einstellungen → Diskussion
    Scrolle runter zu Bevor ein Kommentar erscheint und setze ein Häkchen bei „Kommentar muss manuell genehmigt werden“. So hältst du Spam-Bots und Trolle aus deinem Kommentarbereich fern.
  • Bonus: Gehe zu Benutzer → Profil
    Ändere deinen Anzeigenamen, sonst werden deine Beiträge als „admin“ unterschrieben – wähle etwas, das wie ein echter Name klingt.

Natürlich wirst du im Laufe der Zeit noch weitere Einstellungen finden und anpassen – dies ist das absolute Minimum, damit du sofort starten kannst, ohne einen ganzen Tag in Konfiguration zu verlieren.

Jetzt ist es Zeit, diesen Blog wirklich zu deinem zu machen – mit einem passenden Theme und ein paar unverzichtbaren Plugins:

Schritt 4: Design auswählen und wichtige Plugins hinzufügen

Dein Blog ist live. Er funktioniert. Aber mal ehrlich – im Moment sieht er wahrscheinlich noch wie eine generische Platzhalter-Seite aus 2008 aus 🔲

Zeit, das zu ändern.

In diesem Schritt 🎨 wählen wir ein Theme (das definiert, wie dein Blog aussieht) und installieren ein paar 🧩 wichtige Plugins (die deinem Blog zusätzliche Funktionen geben).

Keine Sorge – du kannst Themes später jederzeit wechseln, ohne deine Inhalte zu verlieren, und die meisten Plugins sind in unter 10 Sekunden installiert oder deinstalliert.

Schritt 4.1: Ein Theme auswählen

Gehe in deinem WordPress-Adminbereich zu Design → Themes und klicke auf „Hinzufügen

Blog erstellen: aus tausenden kostenlosen WordPress-Themes auswählen

Dort findest du tausende kostenlose Themes – filtere nach Beliebtheit oder nutze die Suchfunktion, um die Auswahl einzugrenzen.

  • Wenn du einen soliden Allrounder suchst, empfehlen wir schamlos unser eigenes kostenloses Template: Bento ;)
  • Du kannst auch beliebte Multipurpose-Themes wie Astra oder GeneratePress ausprobieren, wenn du mehr Optionen möchtest.
  • Für Power-User eignet sich vielleicht ein Premium-Theme wie Divi – es bringt viele Funktionen, professionelle Designs und Extras wie Formulare oder E-Mail-Marketing gleich mit.

Merke dir dabei:

Wähle etwas Sauberes und Leichtgewichtiges – Extras kannst du später jederzeit hinzufügen.

Schritt 4.2: Plugins installieren

Plugins erweitern die Funktionalität deines Blogs; denk an: SEO-Tools, Analytics, Kontaktformulare, Backups – alles modular, alles optional.

(Das heißt: Installieren/Deinstallieren hat keinen Einfluss auf deine Inhalte oder dein Design).

Hier sind die ersten, die wir direkt empfehlen:

  • All in One SEO – damit steuerst du, wie deine Beiträge in den Suchergebnissen erscheinen (Meta-Titel, Beschreibungen usw.).
  • UpdraftPlus – einfache, automatische Backups, die deinem Blog (und dir) den Hals retten, falls mal etwas schiefgeht.
  • Site Kit by Google – verbindet deinen Blog mit Google Analytics und der Search Console in wenigen Klicks.
  • Akismet Anti-Spam – hält deinen Kommentarbereich sauber und frei von Bots.
  • WPForms – ein super einfacher Drag-and-Drop-Formular-Builder (z. B. für eine Kontaktseite).

Um ein Plugin zu installieren, gehe zu Plugins → Installieren, suche nach dem Namen, und klicke auf „Installieren“ und dann „Aktivieren“.

Das war’s!

Normalerweise erscheint danach ein neuer Menüpunkt im Adminmenü links – falls nicht, schau im Bereich „Einstellungen“, dort könnte es ein Untermenü sein.

Dein Blog hat nun ein solides Design, die wichtigsten Funktionen – und Raum zum Wachsen 🌱

* * *

Kommen wir zurück zum Domainnamen, bevor wir live gehen:

Deinen Blog auf eine Domain setzen

Falls du in Schritt 1 noch keinen Domainnamen gewählt hast: jetzt ist dein Blog bereit zum Start, also wird es Zeit, diesen Schritt abzuschließen:

  1. Gehe zu deinem Hostinger-Dashboard und wähle im linken Menü „Websites“. Unter deinem neuen Blog klickst du auf „Domain ändern“:

    Blog erstellen 2025: Domain bei Hostinger hinzufügen

  2. Im neuen Fenster gibst du deinen gewünschten Domainnamen ein und es erscheint ein Pop-up: Wähle deine Anfangslaufzeit (danach verlängert sich die Domain automatisch); wir empfehlen 1 Jahr zum Testen deines Blogs.

    Blog erstellen 2025: Domain-Details bei Hostinger

  3. Im selben Fenster klickst du auf „Hinzufügen“ neben dem Gutscheinfeld und fügst folgenden Code ein, um einen zusätzlichen Rabatt zu erhalten:

    TRUS10DOMAIN
  4. Jetzt kannst du die Bestellung abschließen und die neue Domain registrieren. Dein WordPress wird automatisch auf diese Domain umgezogen!

Bevor wir fertig sind, folgen noch ein paar Empfehlungen, wie du deinen Blog schützt, optimierst – und vielleicht sogar dafür sorgst, dass er sich selbst bezahlt:

Bonus-Schritt: Schütze deinen Blog und mach ihn schnell

Du hast deinen Blog erstellt, das Design angepasst, Funktionen hinzugefügt – jetzt sorgen wir dafür, dass er sicher, stabil und schnell lädt.

Hier ein paar schnelle Tipps, die dich nichts extra kosten und dich nicht in ein Technik-Kaninchenloch ziehen:

Tipp #1: Automatische Backups

🔐 Du kennst das Sprichwort – es gibt zwei Arten von Bloggern: die, die Backups machen, und die, die irgendwann nachts um 2 Uhr heulend ins Kissen schauen.

Lass uns nicht zur zweiten Sorte gehören.

Hostinger (und die meisten anderen großen Hoster) bietet wöchentliche Backups in allen Tarifen, aber wenn du mehr Kontrolle möchtest, empfehlen wir das kostenlose Plugin UpdraftPlus

Es erstellt tägliche automatische Backups deines Blogs und erlaubt es dir, sie extern zu speichern (z. B. auf Google Drive oder Dropbox) – so ist dein Content selbst dann sicher, wenn der Server abstürzt oder deine WordPress-Installation zerschossen wird.

Tipp #2: Grundlegende Blog-Sicherheit

🛡️ Du brauchst keine Militär-Verschlüsselung – nur ein paar einfache Regeln:

  • Verwende starke Passwörter: bitte kein admin123. Nutze Tools wie NordPass oder 1Password, um sichere Passwörter aufzubewahren.
  • Halte alles aktuell: WordPress-Core, Themes und Plugins. Updates schließen oft Sicherheitslücken.
  • Füge 2-Faktor-Login hinzu, z. B. über dieses Plugin – damit wird bei jedem Login ein Einmalcode vom Handy verlangt, was es Cyberkriminellen extrem schwer macht, in deinen Blog einzubrechen.

Tipp #3: Speed-Boosts

🚀 Selbst der schönste und informativste Blog ist nutzlos, wenn er eine halbe Minute zum Laden braucht. Tatsächlich verlassen die meisten Nutzer eine Seite nach ~3 Sekunden Ladezeit!

Das solltest du tun:

  • Caching aktivieren: installiere ein kostenloses Plugin wie LiteSpeed Cache (ideal für Hostinger) oder WP Super Cache.
  • Bilder komprimieren: lade Bilder im .webp-Format hoch oder nutze ein Plugin wie ShortPixel, um sie automatisch zu komprimieren und zu optimieren.
  • Plugins schlank halten: vermeide 20+ Plugins in deinem WordPress – vor allem nicht „nur zum Ausprobieren“. Bleib bei dem, was du wirklich brauchst, und lösche alles, was du nicht aktiv verwendest.

Extra-Tipp: Hostinger (und andere moderne Hoster) nutzen bereits schnelle globale CDNs, SSD-Speicher und PHP 8+, also hast du in Sachen Performance einen guten Start.

Voila – du hast jetzt einen Blog, der schnell, sicher und zukunftsfähig ist. Natürlich kannst du in all diesen Bereichen noch viel tiefer einsteigen – aber das liegt weit außerhalb unseres Rahmens heute.

Bereit für den letzten Schritt?

Dann lass uns darüber reden, wie du deinen Blog in eine Geldmaschine verwandelst 💸

So verdienst du Geld mit deinem Blog

Klar, die meisten starten keinen Blog mit dem ausdrücklichen Ziel, reich zu werden.

Aber wenn du einmal großartige Inhalte veröffentlichst und eine echte Leserschaft aufbaust… warum sollte dein Blog nicht auch die Rechnungen bezahlen?

Blog erstellen 2025: Monetarisierung

Hier sind drei der beliebtesten und bewährtesten Wege, einen Blog zu monetarisieren – klein anfangen und mit dem Wachstum skalieren:

Option 1: Affiliate Marketing (ideal für Einsteiger)

💰 Du verlinkst Produkte oder Services, die du wirklich magst – und wenn jemand über deinen speziellen Tracking-Link kauft, verdienst du eine Provision.

Ein paar Beispiele:

  • Reviews: schreibe einen Beitrag über deine liebsten digitalen Tools und verlinke ihre Websites mit deinen Affiliate-Links
  • Guides: erstelle einen Vergleichsartikel (wie unser Website-Builder-Vergleich) und füge Affiliate-Links zu den einzelnen Produkten ein

Du brauchst dafür keine riesige Reichweite oder Massen an Besuchern – wichtig sind Vertrauen, Relevanz und Konsistenz.

Starte, indem du Affiliate-Programme wie Amazon Associates, Impact, PartnerStack, ShareASale beitrittst – sowie spezifische Programme deines Hosting-Anbieters, VPNs oder SaaS-Tools.

Pro-Tipp: Empfiehl nur Dinge, an die du wirklich glaubst. Sonst ist es nur Werbung – und Leser merken das sofort.

Option 2: Werbung (ideal für populäre Blogs)

📢 Sobald dein Blog regelmäßig Traffic hat, kannst du noch mehr passives Einkommen erzielen, indem du Werbeanzeigen schaltest.

Am einfachsten startest du mit Google AdSense – es platziert automatisch relevante Anzeigen auf deiner Seite und zahlt pro Klick oder Ansicht.

Weitere beliebte Plattformen sind Mediavine, Ezoic und BuySellAds.

Bedenke: Werbeeinnahmen sind meist winzig, solange du nicht hunderte Besucher pro Tag hast.

Wenn deine Nische jedoch hochpreisigen Traffic hat (z. B. Finanzen, Software, B2B) oder dein Blog wirklich große Besuchszahlen erreicht, kann dieser Weg sehr lukrativ sein – besonders in Kombination mit Affiliate Marketing!

Option 3: Eigene Produkte oder Services verkaufen

🛍️ Sobald dein Blog eine Leserschaft hat, kannst du ihn auch als Shop nutzen, um Dinge zu verkaufen:

  • Digitale Produkte: Nischen-E-Books, Online-Kurse, Checklisten, Templates usw.
  • Physische Produkte: eigene Kreationen oder über Dropshipping / Print-on-Demand
  • Dienstleistungen: Business-Coaching, professionelle Beratung, Freelance-Texte oder Design

Du kannst deinem Blog mit einem kostenlosen Plugin wie WooCommerce E-Commerce-Funktionalität hinzufügen – oder auf externe Plattformen wie Gumroad und Etsy verlinken.

Denk dran: Monetarisierung braucht Zeit. Konzentriere dich zuerst auf Inhalte, die Menschen wirklich lesen wollen – das Geld folgt, wenn Vertrauen aufgebaut ist.

Blogging FAQ

🧠 Noch Fragen? Hier sind einige der häufigsten, die uns neue Blogger stellen:

Muss ich programmieren können, um einen Blog zu starten?

Nein. Mit WordPress und modernen Hostern kannst du alles über visuelle Editoren und einfache Menüs erstellen – ganz ohne Code.

Wie lange dauert es, einen Blog zu starten?

Mit dieser Anleitung etwa 30 Minuten – inklusive Einrichtung, Design und ersten Anpassungen. Du kannst zwischendurch sogar Pausen machen, um dein Werk zu bewundern.

Wie viel kostet es, einen Blog zu starten?

Du musst mit etwa 2–3 €/Monat für Hosting und Domain rechnen (bei jährlicher Abrechnung). Die meisten Themes und Plugins, die du brauchst, sind kostenlos.

Wird überhaupt jemand meinen Blog finden?

Ja – wenn du hilfreiche, gut geschriebene Inhalte erstellst und grundlegende SEO-Prinzipien beachtest. Plugins wie All in One SEO und Site Kit helfen dabei enorm.

Kann ich meinen Blog später zu einem anderen Hoster umziehen?

Absolut. Mit WordPress ist es relativ einfach, zu einem anderen Hosting-Anbieter zu wechseln oder die Domain zu ändern. Deine Inhalte sind portabel.

Wie lange dauert es, mit Bloggen Geld zu verdienen?

Das variiert – aber die meisten Blogs verdienen in den ersten Monaten kein nennenswertes Einkommen. Fokus zuerst auf Inhalte und Vertrauen; das Geld kommt danach.

Immer noch unsicher? Stell deine Frage im Kommentarbereich – wir helfen dir gerne 🧵

Abschlussgedanken + Ein ehrliches Geheimnis

Du hast es bis hierhin geschafft – starke Leistung!

Du hast jetzt alles, was du brauchst, um einen Blog aufzubauen, der gut aussieht, schnell läuft und echte Leser anzieht (nicht nur Bots und deine Mama).

Und hier kommt die ehrliche Wahrheit – die, die ich mir damals selbst gewünscht hätte:

Der größte Unterschied zwischen einem erfolgreichen Blog und einem toten? Es ist nicht die Technik. Nicht die Schreibfähigkeiten. Nicht mal Glück. Es ist: dranbleiben.

Die meisten Blogs scheitern, weil ihre Autoren einfach aufhören – sehr oft genau dann, wenn es langsam anfängt zu funktionieren!

Blog erstellen 2025: Dranbleiben

Also veröffentliche deinen ersten Artikel.
Dann den nächsten.
Und noch einen.

Du wirst besser, schneller, präziser.

Und irgendwann schreibt dir jemand, den du noch nie getroffen hast, einen Kommentar wie: Das hat mir so sehr geholfen, danke! – und genau dann macht es Klick.

Bis dahin gilt: mach weiter – du schaffst das.

Und wenn du mal festhängst oder Fragen hast – scrolle runter zum Kommentarbereich und diskutiere mit.

Danke fürs Lesen – und willkommen auf der Blogger-Seite des Internets 🖖

Renderforest Review: a One-Stop-Shop Media Creator for Your Online Business in 2025

Are you in search of an easy tool that can help you create professional-looking logos, promo videos, animations, and slideshows? Didn’t even know such tools existed?

In any case, if you’re considering or already managing a website, there’s no way you can avoid the need of producing brand-related images and videos for your project.

So, today we’re going to review a popular online media editing platform called Renderforest. The tool is getting positive reviews on Trustpilot, as well as social networks – which means it’s high time we figured out:

  • 🎓Can you use Renderforest if you have no prior experience?
  • 💡Which RF tools offer the best value for online projects?
  • 🔧How does their site builder compare to established brands?
  • 💵Which pricing plan should you choose at Renderforest?
  • 👍What do the 10 million existing clients like about RF?

This review will examine the various features of Renderforest to arrive at the final verdict: whether it’s worth using RF for your next online project.

First things first though –

What Is Renderforest?

As you’re probably guessed by this point, RF is an all-in-one tool that lets you create videos, logos, intro videos, slideshows, infographics, and animations.

And it all happens on a single platform – fully browser-based and requiring no subscriptions to start.

The whole idea of Renderforest is empowering anyone to create quality media for their business quickly and rather effortlessly (or at least with a much shallower learning curve than Photoshop or Pinnacle).

The tool has a pretty simple user-interface, making even novices capable of using it without any prior training.

Another thing that makes this tool unique from its competitors is the sheer choice of templates, meaning you can start immediately, working up from the existing samples.

Renderforest in numbers

Moreover, as the platform is cloud-based, the entire editing process is performed online. Neat, but not too exciting in our day and age.

To understand what makes Renderforest stand out from alternative tools, let’s analyze the parts of its toolkit one by one:

The Logo Wizardry

A logo is not merely an image; beyond this, it is a unique identity of your brand that helps you get recognition. A well-crafted logo makes a strong first impression and draws the attention of your potential customers.

In other words, a good logo conveys a slew of messages: your brand is trustworthy, professional, and offers quality services.

And yes, nowadays there are plenty of tools available online to create an eye-pleasing logo. However, not all tools are equal in terms of quality and user-friendliness.

Renderforest Logo Maker

Speaking of Renderforest, the tool claims to help you create a professional looking logo within a few minutes. The company says they use Machine learning algorithms that help them deliver the best design options to users (to be frank, we didn’t see anything that a purely algorithmic tool like LogoDesign.net could not do).

Let’s see how it goes.

The few simple steps to create a logo with Renderforest are quite straightforward:

  1. Go to their Logo Maker, and write down the name of your brand and then hit the “Create My Logo” button.
  2. The next step will ask you for a few lines about your brand – this does not influence your results, but will help generate more lifelike imagery and mockups.
  3. Next, you can select among six general stylistic directions for your logo, like “minimalist”, “flat”, or “watercolor”.
  4. Now you can edit the different elements of your logo, including the font, the icon, and the layout. If you don’t like what you see, you may click on “Create from blank” option to do it yourself.
  5. The last step will let you choose the download option – the free version is low-quality, but still works perfectly fine for a pitch or team discussion. For production logos, a plan with high-definition rendering is of course recommended.

Voila! It’s so smooth it almost looks like wizardry (and technically it is, because it’s a logo-making wizard, get it?).

Does it use machine learning? Unlikely, since we’ve gotten the same suggestions from using very different.

Does it mean it’s no good? Au contraire, the tool is definitely a great help for those who don’t own an expensive Adobe subscription or want to pay hefty sums to graphic designers.

Is their video maker up to the standard?

Creating Videos with Renderforest

Yes, at RF you can easily create a high-quality video without knowing a thing about (or paying for) professional editing software.

To start with, there are free video templates that help you create intro videos and product explainer videos.

If you want to give your video marketing a unique touch, you may use their 3D explainer video toolkit that has over a thousand of animated scenes. You may sort these scenes by options like “Most Popular”, “Trending,” or “Newest.”

Similar to logo creation, the steps to video creation are quite simple. You need to choose a template, edit your project online, download it, and hit the publish button. Your video is now ready to use!

Renderforest has a stock gallery of commercial videos that you can easily remix and edit without going through any complicated interfaces.

Renderforest video templates

Apart from this, they have more 195.000 high definition royalty-free stock footage that you can use to make your video more professional and appealing.

And of course don’t forget a sound library for those finishing touches to your new video – btw this option allows you to upload your own music as well.

Renderforest as a Site Builder

Alright, you’ve got your cool new logos and videos, now for something to use then on…

Along with the media, Renderforest enables you to design a full-fledged website with the help of their page builder.

The tool is mostly geared towards landing pages, but you can also use it to construct an entire website if you wish – directly in your browser without any coding skills:

  • Renderforest has more than 100 ready-to-use templates for every conceivable purpose, from business and marketing to beauty and photography.
  • The visual editor is simple and minimalist, letting you focus on the essentials. You can make your site live within a few hours without any professional assistance.
  • Not sure this needs to be mentioned nowadays, but the templates are of course fully responsive, that means your website will function properly on all mobile devices, laptops, and desktops.
  • You can create multiple pages and bind them into a navigation menu for a full-blown website. The CMS/structure features are quite basic at Renderforest, so if you really need different content types and all such, WordPress is the preferred option.

Once you’re done, you can publish the website onto an RF subdomain for free or choose the paid plan for a custom domain name, branded email, more storage, and no ads (which is the only option you should consider for live websites that wish to look anything close to professional).

Sounds easy? Because it is! Nothing terribly advanced, so if you’re a professional web developer/designer, you shouldn’t be reading this :)

For everyone else, Renderforest offers a refreshingly simple and stripped-down (in a good sense) version of a visual site builder that lets you get online fast – and finally have somewhere to put that new fancy logo we generated earlier!

Plans and Pricing

Since RenderForest offers several different products, you are able to choose between a bundled option and individual tools. The respective toggle can be found on top of their official pricing page.

The former is suitable for those who intend to use the service on a regular basis: the Free plan offers unlimited low-quality videos and logos, while the progressively more pricey Amateur, Pro, and Popular plans unlock access to HQ media as well as the website builder.

Renderforest plans

The per-product plans are made for those who wish to use RF only once or twice – otherwise it becomes more lucrative to use the abovementioned subscription option.

The logo and video creation tools each has 4 plans, with the free version leaving a watermark on your video or rendering a low-fidelity PNG logo. The paid options allow you to remove the watermark and increase the quality of the render per your desired parameters.

The Website Maker is also a freemium model, with the paid plan giving you more storage and allowing to publish your site on a custom domain instead of the Renderforest subdomain.

User Satisfaction and Support

What about support, though? After all, regardless of the number of neat features, users will be looking for software that fulfils their needs, and that includes getting help and solving issues when they arise.

Support is available via the phone, by email, or using the contact form on the official RF website. There’s no live chat at the moment, but all the mentioned options are typically more than enough for most of your support needs.

Response time is short, and the team does their best to be as helpful and friendly as possible. In any case, with the tools that are that simple, you are unlikely to encounter too many questions or issues while using the product.

Having helped create over 10 million videos and logos, Renderforest can now boast being a part of G2’s list of the World’s top 100 software companies.

G2 is a global ranking platform that uses proprietary algorithms to assign scores to tech companies based on various customer satisfaction metrics from user reviews, social networks, and other online sources.

Being present on their top-100 list is an indicator of persistently high user opinions about the company and their products.

Should You Use Renderforest?

Time for the final verdict: who should use Renderforest, and is it worth opening your wallet for the paid features?

To recap, RF is a freemium online tool that lets users create videos for YouTube audiences, music visualizations, presentations, corporate slideshows, and other branded media.

The main advantages of Renderforest are definitely simplicity and cost savings: it gives you the freedom to create without asking for hours of training or subscription fees.

Big-budget online projects and advanced webmasters who know how to use tools like Figma and Resolve are unlikely to find anything they haven’t seen before.

For the rest of us bootstrappers and daredevils, Renderforest is a convenient all-in-one platform for fast, easy, and inexpensive media prototyping that definitely deserves a try.

***

Have you already used Renderforest? Any thoughts or questions? Hit us in the comments section below, let’s discuss!