Search results for

"column"

La reseña definitiva – ¿Deberías usar este hosting en 2024?

Hay proveedores de hosting, antiguos y de eficacia comprobada; hay proveedores populares , que tienen millones de clientes; hay proveedores que constantemente están evolucionando y reinventándose…

Y luego, hay un pequeño grupo de empresas de hosting que están en la intersección comprendida entre las tres categorías.

SiteGround se encuentra definitivamente en ese último grupo.

En esta revisión detallada, examinaremos con lupa a este hosting, para descubrir las respuestas a las preguntas más frecuentes:

  • 🦄¿Qué tiene de especial SiteGround?
  • 💳¿Cómo elegir un plan de hosting adecuado?
  • 👎¿Existen desventajas de usar SiteGround?
  • 🎯¿Quién debería usar SiteGround y por qué?

Empecemos por abordar las cosas que probablemente no encontrarás en ningún otro sitio, aquellas que hacen que SiteGround sea único:

Qué tiene de especial SiteGround

Hablando en serio…

SiteGround se centra en WordPress, así como en otros sistemas de gestión de contenidos y creadores de sitios, hay varios planes de precios dependiendo de tus necesidades, atención al cliente 24/7…

Eso suena familiar.

Lo que realmente diferencia a SiteGround son sus soluciones tecnológicas, creadas a medida por su equipo técnico; más específicamente:

  • Un conjunto de medidas para maximizar ⚡ la velocidad de tu sitio web, que trataremos por separado en la siguiente sección,
  • Funciones de seguridad de última generación 🔐 para prevenir y mitigar cualquier posible ataque, analizadas en detalle en esta sección,
  • Algunos de los mejores 💵 precios entre los proveedores de hosting de su calibre, especialmente si tenemos en cuenta los grandes descuentos que ofrece,
  • Avanzadas 🛠️ herramientas para el cliente que permite la colaboración, las realización de pruebas y migraciones, creadas por el equipo de SiteGround (¡hablaremos de esto aquí!).

Como acabamos de mencionar, los usuarios de SiteGround obtienen algo más que un servidor: hay toda una serie de herramientas administrativas que te harán la vida más fácil:

  • Su flexible sistema de usuario le da acceso a otros miembros de equipo, clientes o expertos de terceras partes, para ayudarte a ejecutar tus proyectos web,
  • Puedes crear copias de prueba de tu sitio web en vivo con un solo clic, y transferir cualquier cambio al original – de nuevo, con un solo clic,
  • A los autónomos y a las agencias les gustará la función de etiqueta blanca (white label) que te permite ofrecer servicios de hosting a tus clientes con tu propia marca.

Todas las herramientas anteriores funcionan sobre una sólida infraestructura de hardware y software para obtener el máximo rendimiento y estabilidad:

Infraestructura y velocidad

He aquí un dato sorprendente: SiteGround, uno de los mayores proveedores de hosting web del mundo, ¡no posee ningún servidor físico!

En su lugar, utiliza Google Cloud para su infraestructura principal…

Sí, has entendido bien: cuando alojas tu sitio web con SiteGround, éste se almacena en los servidores de Google.

Esto no es algo inusual en nuestros días,

– de hecho, la mayoría de los proveedores modernos de hosting, tanto grandes como pequeños, se centran en los servicios de valor añadido 🚀 y subcontratan el hardware real a las pocas empresas como Google y Amazon que tienen enormes ventajas de escala, pero no proporcionan interfaces fáciles de usar.

Los clientes de SiteGround pueden elegir entre varias regiones al crear un nuevo sitio web, incluyendo Europa, Estados Unidos, Asia y Australia:

Los puntos azules del mapa representan las más de 150 ubicaciones de la red Cloudflare CDN , incluidas en todos los planes de SiteGround.

Tu sitio web se carga automáticamente desde el nodo CDN más cercano a cada visitante, lo que supone una importante mejora de la velocidad.

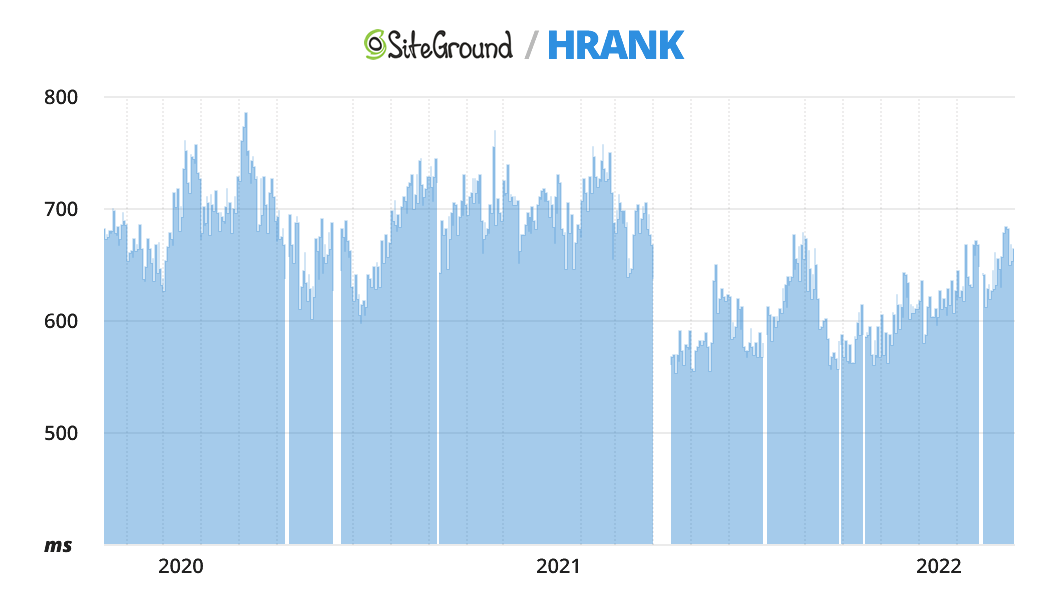
Para mejorar aún más el tiempo de carga de las páginas, los sitios web de SiteGround funcionan con un software optimizado de forma exclusiva (PHP, MySQL, compresión Brotli, etc.), lo que da lugar a unos de los tiempos de respuesta más rápidos del sector:

– esta es la razón principal por la que SiteGround ha ocupado los primeros puestos en las clasificaciones de HRank durante años ⚡

Por último, cada sitio web viene con un único plugin de WordPress preinstalado, que permite controlar fácilmente la configuración del servidor y ajustar los parámetros del caché.

Hablando de plugins para WP…

Seguridad en SiteGround

Hay otro plugin de WordPress hecho por el equipo de SiteGround, para trabajar específicamente en los sitios de los clientes:

El SiteGround Security ayuda a prevenir las amenazas y ataques más comunes en tu sitio web, así como a reaccionar rápidamente en caso de un ataque, por ejemplo, cerrando la sesión de todos los usuarios y restableciendo las contraseñas.

No es el único plugin de seguridad de WP que existe, por supuesto, pero sigue siendo agradable tener todas las diferentes características en un solo lugar, totalmente integrado con tu proveedor de hosting.

A nivel de servidor, tres medidas clave ayudan a garantizar la máxima seguridad para cada cliente de SiteGround:

  • Un firewall y un filtro basado en inteligencia artificial para proteger tu sitio web automáticamente contra ataques y hackeos 🦺
  • Copias de seguridad diarias alojadas en varios centros de servidores independientes en diferentes ubicaciones geográficas garantizan que tu sitio web pueda ser restaurado después de cualquier desastre 💽
  • Sistemas de monitoreo que comprueban el estado y el rendimiento de cada servidor cada 0,5 segundos, 24/7🔍

Llegados a este punto, podrías argumentar que todos los hosting web premium tienen estas características, y tendrías razón.

Sólo que hay una diferencia:

SiteGround se las arregla para ofrecer todos esos beneficios por un precio que se acerca más a los proveedores de hosting “convencionales”:

Planes y precios de SiteGround

A primera vista, parece un poco confuso: cuatro tipos diferentes de hosting, cada uno con varios planes de precios…

¡Pero mira más de cerca, y te darás cuenta de que los planes en los tipos de hosting Web, Compartido, y WooCommerce son idénticos!

Esto es porque todos son esencialmente el mismo tipo de hosting compartido , con tres niveles de precios que van acorde a las diferentes necesidades de los clientes.

Teniendo esto en cuenta, vamos a olvidarnos por un momento de los tipos de hosting y a centrarnos en hablar de cada plan de precios con más detalle:

  • El plan StartUp es bastante sencillo: obtienes un sitio web y suficientes recursos de servidor para manejar un tráfico decente. A menos que estés migrando tu sitio web de un proyecto grande, siempre vale la pena comenzar con este plan y luego decidir si necesitas cambiar de plan.
  • El plan GrowBig permite crear un número ilimitado de sitios web, lo que significa que es adecuado para quienes dirigen varios proyectos o tienen un elevado tráfico de visitantes (más de 20.000 al mes).
  • Por último, con el plan que descaradamente se llama GoGeek, obtendrás aún más recursos informáticos, así como la función “white label” que te permite ofrecer alojamiento web a tus propios clientes, lo que es ideal para agencias y autónomos.

Tal como lo mencionamos anteriormente, lo mejor de la oferta de SiteGround es el hecho de que todas las características de nivel profesional están disponibles a precios muy razonables.

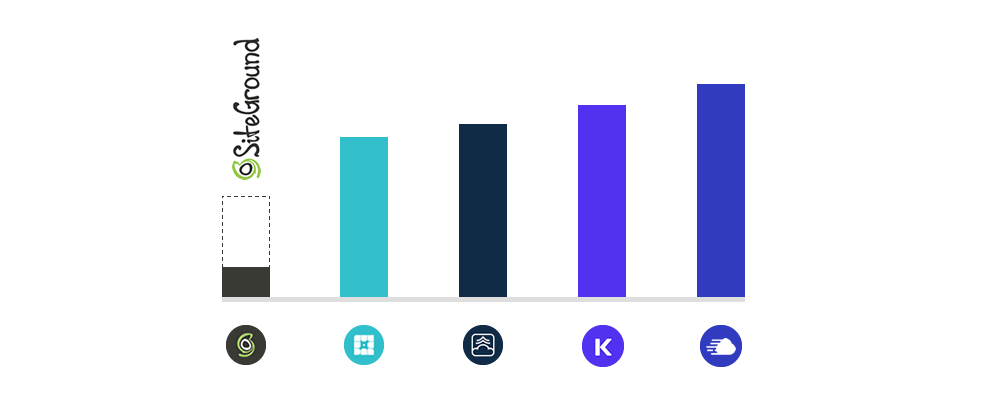
Por ejemplo, he aquí una comparación de precios de los proveedores de alojamiento premium que utilizan Google Cloud como plataforma de infraestructura:

La línea discontinua indica el precio completo que se aplica después del primer período de facturación en SiteGround, lo que está muy por debajo de las alternativas, y ni siquiera estamos considerando los precios de entrada que tienen grandes descuentos (es decir, la columna color negro).

Hay cuatro ciclos de facturación disponibles en SiteGround, siendo el mensual el más caro y por lo tanto el menos útil.

Siempre puedes optar por un ciclo de facturación más largo (con descuento) y utilizar la garantía de devolución de 30 días, si es necesario.

Aunque acabarás pagando menos al mes con la opción de 3 años, el mayor descuento del primer periodo 🤑 está disponible para el ciclo de facturación de 1 año, donde el monto pagado ahora mismo es mucho menor:

Consigue un 69% de descuento en SiteGround

Una cosa más que vale la pena mencionar es la cancelación: con SiteGround, es tan fácil como hacer clic en un botón en el panel de administrador del hosting, sin necesidad de contactar con el soporte al cliente.

Cuando se cancela, se puede optar por seguir utilizando los sitios web hasta el final del período de facturación actual o eliminar todo de inmediato.

Pros y contras de SiteGround

Antes de pasar al veredicto final sobre SiteGround, resumamos los puntos fuertes y débiles de este proveedor de hosting:

  • Obtienes funciones y herramientas prémium a un precio mucho menor al de la mayoría de los alojamientos gestionados de WordPress
  • El conjunto de software optimizado construido sobre la infraestructura de Google Cloud garantiza un funcionamiento fluido y rápido de tus sitios web
  • Todas las cuentas disponen de una serie de funciones de seguridad para la prevención y mitigación de amenazas, como cortafuegos, supervisión en directo y copias de seguridad automáticas
  • Cloudflare CDN está incluida sin costo adicional en todas las cuentas de SiteGround, mejorando tanto la velocidad como la seguridad
  • No hay límites de visitantes en ninguno de los planes, a diferencia de la mayoría de los proveedores de alojamiento prémium
  • Avanzadas herramientas de colaboración y gestión de clientes, que le hacen la vida más fácil a los autónomos y agencias
  • Plugins para WordPress (de seguridad, optimización y migración) creados por el equipo de SiteGround para que funcionen a la perfección con el alojamiento
  • Atención al cliente 24 horas al día, 7 días a la semana mediante chat en vivo, tanto para clientes potenciales como para los ya existentes
  • La oferta de alojamiento en la nube de SiteGround es menos atractiva que sus soluciones gestionadas para WordPress, siendo hasta 2 veces más cara que, por ejemplo, las máquinas comparables Digital Ocean
  • La disponibilidad de recursos puede estar limitada para los sitios web o las cuentas que utilizan regularmente demasiada capacidad de cómputo de un servidor
  • La herramienta para crear una copia de prueba/desarrollo de tu sitio web, no está disponible en el plan StartUp

Y ahora, lo más importante:

Veredicto: ¿Vale la pena SiteGround?

20 años en el negocio y millones de clientes: ¿puede un proveedor de hosting ser más confiable que eso? 👓 Veamos:

A lo largo de su existencia, SiteGround ha intentado claramente mantener su estatus de hosting “prémium asequible”, combinando calidad profesional con precios competitivos.

De hecho, es algo más fácil determinar quién NO debería usar SiteGround en contraste a todos los demás (que sí deberían).

  • Si tu presupuesto es considerable y buscas el alojamiento más avanzado basado en Google Cloud para un proyecto grande, echa un vistazo a Kinsta en su lugar,
  • Si formas parte de un equipo de desarrolladores que necesita un alojamiento en la nube escalable con control total sobre todos los ajustes del servidor, una solución de autoservicio como Digital Ocean es probablemente la mejor para ti.

Aparte de eso…

Tanto si sólo necesitas un sitio web para tu organización como si haces sitios web para tus propios clientes, SiteGround tiene todo lo que necesitas y más, funcionando sobre una base técnica tan sólida como una roca 💎 así como años de experiencia 🏆 y reputación.

Obtén un 69% de descuento en SiteGround

¿Tienes una opinión sobre SiteGround o una experiencia personal que quieras compartir? Dirígete a la sección de comentarios: ¡ayudémonos mutuamente a tomar mejores decisiones!

The Definitive Review – Should You Use This Hosting in 2024?

There are old, time-tested hosting providers; there are popular ones, with millions of clients; there are those which constantly evolve and reinvent themselves…

And then there’s a small group of hosting companies at the intersection of all three categories –

SiteGround is firmly in that cohort.

In this detailed review, we will examine this host under a magnifying glass to uncover answers to the most popular questions:

  • 🦄What’s special about SiteGround?
  • 💳How to choose a suitable hosting plan?
  • 👎Are there any drawbacks to using SiteGround?
  • 🎯Who should use SiteGround and Why?

Let’s start by looking at the things that you probably won’t find anywhere else – things that make SiteGround unique:

What’s Special About SiteGround

Seriously, though?

SiteGround focuses on WordPress as well as other popular content management systems and site builders, there are several pricing plans depending on your needs, 24/7 support…

Sounds familiar.

What really sets SiteGround apart are its technological solutions, custom-built by its technical team; more specifically:

  • A set of measures to maximize your website’s ⚡ speed, which we will discuss separately in the next chapter,
  • State-of-the-art 🔐 security features to prevent and mitigate any potential attacks, analyzed in detail in this section,
  • Some of the best 💵 prices among hosting providers of its caliber, especially when we factor in the large first-period discounts,
  • Powerful 🛠️ client tools for convenient collaboration, testing, and migrations, built in-house by the SiteGround team (we’ll talk about this one right here!).

As we just mentioned, SiteGround users get more than just a server – there’s an entire array of administrative tools to make your life easier:

  • The flexible user system allows access to other team members, clients, or third-party experts to help you run your web projects,
  • You can create test copies of your live website in one click, and transfer any changes back to the original – again, in a single click,
  • Freelancers and agencies will like the white label feature, which allows you to provide hosting services to clients under your own brand.

All the tools above function on top of a solid hardware and software infrastructure for maximum performance and stability:

Infrastructure and Speed

Here’s a surprising fact: SiteGround, one of the largest hosts in the world, doesn’t own any actual physical servers!

Instead, it uses Google Cloud for its key infrastructure…

Yes, you understood correctly – when you’re hosting with SiteGround, your website is stored on Google’s servers.

This is not something unusual in our day and age –

– in fact, most modern hosting providers, both big and small, focus on the value-adding services 🚀 and outsource the actual hardware to the few companies like Google and Amazon that have huge scale advantages but don’t provide user-friendly interfaces.

SiteGround clients can choose between several regions when creating a new website, including Europe, United States, Asia, and Australia:

The blue dots on the map represent the 150+ locations of the Cloudflare CDN network, included on every SiteGround plan –

Your website automatically loads from the CDN node that is the closest to each particular visitor, bringing serious improvements in speed.

To further improve page loading, SiteGround websites run on uniquely optimized software (PHP, MySQL, Brotli compression, etc.), which results in some of the fastest response times in the industry:

– this is the main reason why SiteGround has held top positions in HRank ratings for years ⚡

Finally, each website comes with a unique, pre-installed WordPress plugin, that allows you to easily control the server settings and adjust the caching parameters.

Speaking of WP plugins…

Security at SiteGround

There is another WordPress plugin made by the SiteGround team to work specifically with client sites:

SiteGround Security helps prevent the most common threats and attacks on your website, as well as react quickly in case of an attack, e.g. by logging out all users and resetting passwords.

It’s not the only WP security plugin in existence, of course – but it’s still nice to have all the various features in a single place, fully integrated with your hosting provider.

On the server level, three key measures help ensure maximum security for every SiteGround client:

  • Firewall and an AI-based filter for automatically protecting against attacks and hacks 🦺
  • Daily backups in several independent server centers in different geographical locations ensure that your website can be restored after any disaster 💽
  • Monitoring systems that check each server’s status and performance every 0.5 seconds, 24/7 🔍

At this point, you might argue that every premium web host has these features – and you’d be right.

There’s just one nuance:

SiteGround manages to offer all that goodness for a price that is closer to “mainstream” hosting providers:

SiteGround Plans and Pricing

At first glance, it looks a bit confusing: four different types of hosting, each having several pricing plans…

But take a closer look, and you’ll notice that the plans in the Web, Shared, and WooCommerce hosting types are actually identical!

That’s because all of them are essentially the same kind of shared hosting, with three pricing tiers for different client needs.

With that in mind, let’s forget about hosting types and focus on discussing each pricing plan in more detail:

  • StartUp is quite straightforward – you get one website and enough server resources to handle decent traffic. Unless you are migrating with a large project, it’s always worth starting with this plan and then deciding if you need to upgrade.
  • The GrowBig plan allows you to create unlimited websites, which means it’s suitable for those who run several projects or have high visitor traffic (over 20,000 per month).
  • Finally, on the cheekily named GoGeek plan you get even more computing resources, as well as the white label solution that allows you to offer web hosting to your own clients – great for agencies and freelancers.

As we mentioned earlier, the best part of SiteGround’s offer is the fact that all the professional-grade features are available at very reasonable prices –

For example, here’s a price comparison for premium hosting providers which use Google Cloud as their infrastructure platform:

The dashed line indicates the full price that applies after the first billing period at SiteGround – even that is way below the alternatives, and we’re not even considering the heavily discounted introductory pricing (i.e. the solid dark column).

There are four billing cycles available at SiteGround, with monthly being the most expensive and hence the least useful –

You can always opt for a (discounted) longer billing cycle and use the 30-day money-back guarantee if needed.

While you will end up paying less per month on average with the 3-year option, the largest first-period discount 🤑 is available for the 1-year billing cycle, where the amount spent right now is much lower:

Get a 69% discount on SiteGround

One more thing worth mentioning is cancellation: with SiteGround, it’s as easy as clicking on a button in your hosting admin panel, no need to contact support.

When you cancel, you can choose to continue using your websites until the end of the current billing period or to remove everything right away.

Pros and Cons of SiteGround

Before we move on to the final verdict on SiteGround, let’s summarize this hosting provider’s stronger and weaker sides:

  • You get premium-grade features and tools at a much lower price than most other managed WordPress hosts
  • Optimized software stack built on top of the Google Cloud infrastructure ensures consistently smooth and speedy functioning of your websites
  • Every account gets a slew of security features for threat prevention and mitigation, including firewall, live monitoring, and automatic backups
  • Cloudflare CDN is included at no additional cost with every SiteGround account, improving both speed and security
  • There are no visitor limits on any of the plans, as opposed to most other premium hosting providers
  • Powerful tools for collaboration and client management, making life easier for freelancers and agencies
  • Security, optimization, and migration plugins for WordPress built by the SiteGround team to work seamlessly with the hosting
  • 24/7 customer support via live chat, both for potential and existing clients
  • The cloud hosting offer at SiteGround is less attractive than its managed WordPress solutions, being up to 2x more expensive than e.g. comparable Digital Ocean machines
  • Resource availability may be limited for websites or accounts that regularly use up too much of a server’s computing power
  • The tool for creating a test/development copy of your website is not available on the StartUp plan

And now for the bottom line:

Verdict: Is SiteGround Worth It?

20 years in business and millions of clients – can a hosting provider get any more credible than that? 👓 Let’s see:

Throughout its existence SiteGround has clearly tried to maintain its status as the “affordable premium” host, combining professional quality with competitive prices.

As a matter of fact, it’s somewhat easier to define who should NOT use SiteGround as opposed to everyone else (who should) –

  • If your budget is substantial and you’re looking for the most advanced Google Cloud based hosting for a large project, take a look at Kinsta instead,
  • If you are part of a developer team that needs scalable cloud hosting with full control over all server settings, a self-service solution like Digital Ocean is probably best for you.

Apart from that –

Whether you just need a website for your organization or you make websites for your own clients, SiteGround has everything you need and more, built on a rock-solid technical foundation 💎 as well as years of expertise 🏆 and reputation.

Get a 69% discount on SiteGround

Have an opinion on SiteGround or a personal experience you’d like to share? Head over to the comments section – let’s help each other make better decisions!

Reseña Completa de Crello 2024: ¿El Sueño de Todo Diseñador Gráfico o Simplemente Otra Herramienta de Ilustración?

Les guste o no a los escritores y otros amantes de la palabra, ¡Internet es todo imágenes y videos en estos días!

Si estás manejando la identidad visual de una marca (aunque sea una pequeña), la cantidad de gráficos que necesitas producir diariamente puede convertirse rápidamente en abrumadora.

Entra a Crello

Este servicio en línea quiere revolucionar la forma en que miramos al diseño gráfico, y ahorrarle a todo el mundo toneladas de tiempo en el proceso. ¿Cumple sus promesas? ¡Averigüémoslo!

En esta reseña detallada, responderemos a las preguntas más importantes sobre Crello con el fin de ayudarte a tomar una decisión informada:

  • 🎨¿Qué es Crello y cómo funciona?
  • 🦄¿En qué se diferencia Crello de otras herramientas similares?
  • 🤼¿Es Crello mejor que Canva, y en qué casos?
  • 👍¿Deberías usar Crello en tus proyectos de diseño?

Antes de que hablemos sobre las características únicas de Crello y compararlo con las alternativas más cercanas, no estaría de más asegurarse de que entendemos lo básico:

¿Qué es Crello y Cómo Funciona?

Lo primero y más importante, Crello es una herramienta de diseño en línea. Si estás leyendo este artículo, probablemente ya lo sepas, así que intentemos ser más específicos:

Crello es una plataforma de automatización de diseño para la creación de todo tipo de material de marketing visual, tanto digital (social, web, anuncios) como físico (folletos, etiquetas, carteles, etc.)

Bueno, eso está mejor, pero también menos entendible 🤔 – ¡¿qué demonios es una “plataforma de automatización de diseño”?!

– Significa que Crello es mucho más inteligente y práctico que el engorroso software para diseño del pasado. Todo el flujo de trabajo se trata de ahorrar tiempo:

  1. No hay necesidad de empezar desde cero nunca más: Crello ofrece más de 10.000 plantillas totalmente personalizables para cualquier propósito concebible (siempre puedes volver a un lienzo en blanco si lo prefieres, por supuesto).
  2. Olvídate de lo manual estableciendo las dimensiones correctas para una imagen de Facebook o una portada de video de YouTube – Crello tiene todos los ajustes preestablecidos que necesitas, siempre al día con los últimos requisitos para cada red social.
  3. Escoge entre millones de recursos visuales – fotos, videos e ilustraciones de alta calidad – para personalizar tus diseños.
  4. Rápidamente escala tus campañas en redes sociales a partir de un único diseño creando copias ilimitadas de tu trabajo en cualquier formato o dimensión.
  5. Comparte tus diseños directamente desde tu panel de control de Crello: publica en redes sociales, genera un enlace o descarga tu diseño como un archivo en uno de los 7 formatos disponibles.

Por cierto, el tercer paso es posible por el hecho de que Crello es una creación de los fundadores de Depositphotos, uno de los mayores mercados de medios de comunicación en el mundo – lo que significa que…

Crello está totalmente integrado con la biblioteca de Depositphotos, dándote acceso instantáneo a más de 150 millones de imágenes en stock, videos y otros archivos gráficos.

Estos vienen en 3 variedades: archivos gratuitos (obviamente cuestan cero), archivos en stock (que se pueden comprar por separado) – y archivos premium, que sólo están disponibles en Crello Pro.

Hablando de eso, veamos qué otras características puedes desbloquear con la versión Pro:

¿Crello Gratis o Crello Pro?

En primer lugar, vale la pena explicar que cualquiera puede usar la versión básica de Crello sin costo alguno, indefinidamente – no hay necesidad de añadir los datos de tu tarjeta ni nada.

La versión de pago (Crello Pro) está destinado a aquellos que usan Crello regularmente y les gustaría maximizar su productividad:

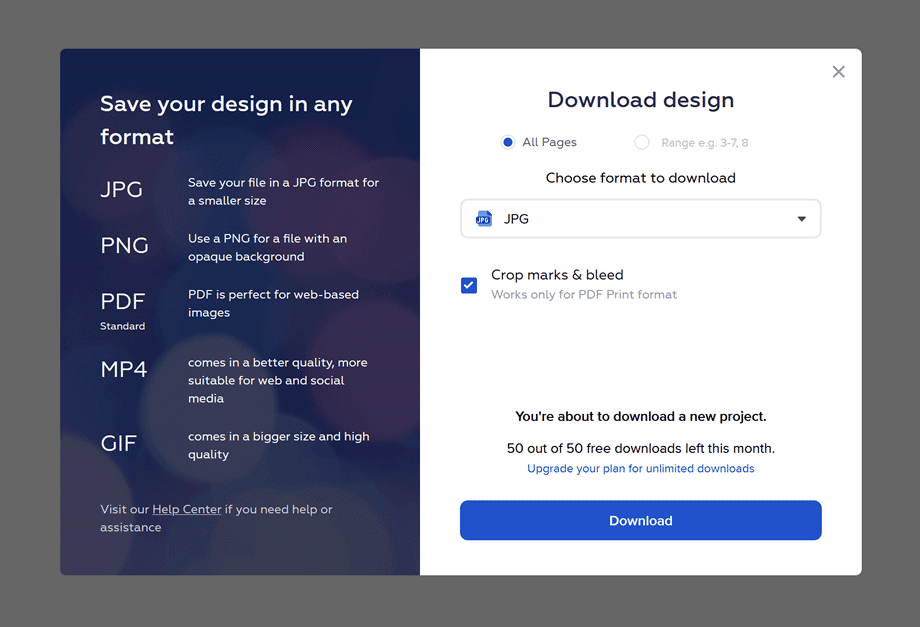
  • Además del acceso completo a la biblioteca premium, Crello Pro elimina el límite de descarga mensual para tus diseños – si creas varios diseños por día en promedio, esto puede ser útil.

    Crello: download

  • La versión Pro también desbloquea la herramienta de eliminación automática de fondo, la cual funciona casi como magia:

    Crello: background remover

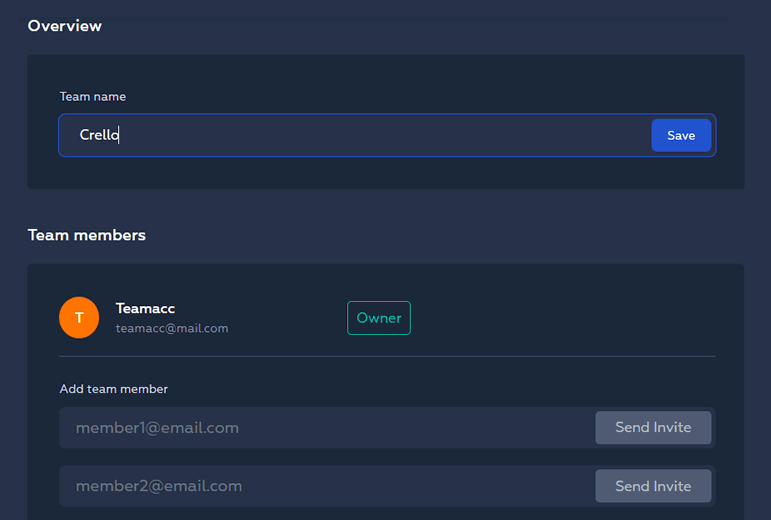
  • Pero lo más importante es que Crello Pro te permite crear un equipo e invitar a otros 10 usuarios a colaborar en los diseños:

    Crello: team collaboration

También está el servicio de soporte técnico prioritario , lo que significa que siempre serás el primero en la fila para hablar con el equipo de soporte técnico de Crello – pero no consideraríamos esto como una razón importante para cambiar a Pro:

La interfaz de Crello es bastante intuitiva y fácil de aprender, sobre todo teniendo en cuenta las guías detalladas y los video-tutoriales a los que se puede acceder desde el menú inferior de la página de inicio oficial.

Además, puedes obtener soporte técnico en la versión gratuita también… sólo que un poco más lento 🐌

Para aquellos que les gustan las cosas organizadas en filas y columnas, aquí hay una pequeña tabla resumen que hicimos para dar una idea de las principales ventajas de Crello Pro:

Plan Crello Gratis Crello Pro
Elección de imágenes Limitada Todas las imágenes
Eliminación del fondo de la imagen
Descargas al mes Limitadas
Soporte técnico prioritario
Colaborar con los miembros del equipo

Hay dos opciones de facturación en la versión Pro: mensual y anual, siendo esta última un 20% más barata (como es típico en las suscripciones online).

Aquí hay algunas buenas noticias, por cierto –

¿Sabías que hay una forma de ahorrar un 25% adicional en una compra de Crello Pro? Echa un vistazo a la siguiente sección para averiguar cómo.

Usando el código de promoción de -25% de Crello

Si decides hacerte profesional, aquí tienes una guía paso a paso para obtener un importante descuento en tu suscripción a Crello.

Funciona tanto para la opción de facturación mensual como para la anual, pero el ahorro total es obviamente 12 veces mayor con esta última, ya que el código sólo se aplica al primer período:

  1. Visita la página oficial de Crello siguiendo el enlace de abajo; si aún no tienes una cuenta, créala – si la tienes, entra en tu panel de control.

    Consigue un 25% de descuento en Crello Pro

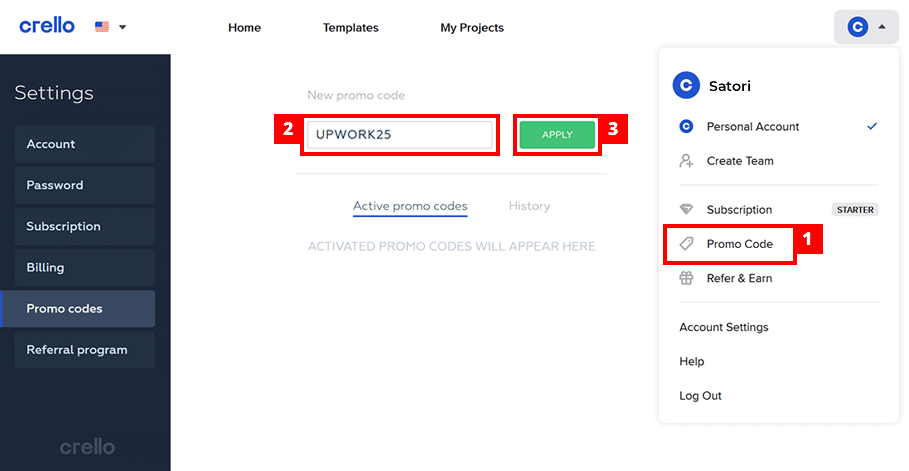
  2. Mientras estés en tu cuenta de Crello, haz clic en el icono redondo de la esquina superior derecha para mostrar el menú desplegable; en el menú, haz clic en “código de promoción”.

    Crello coupon

  3. En la página de gestión de códigos de promoción, introduce la siguiente combinación en el formulario y haz clic en el botón verde “Aplicar”.

    UPWORK25
  4. ¿Hecho? Debajo del formulario debe aparecer un recuadro azul con los detalles del cupón, indicando que el cupón se ha aplicado con éxito.
  5. Ahora puedes cambiar a Pro usando el proceso normal (es decir, haciendo clic en “Suscripción” en el menú de la cuenta en la esquina superior derecha de la pantalla). ¡Disfruta!

… O, alternativamente, puedes simplemente hacer clic en este enlace directo que aplica el cupón automáticamente ✨

¡Bien! Antes de pasar al veredicto final, hay una pregunta frecuente más que tenemos que abordar – en concreto, ¿cómo se compara Crello con su alternativa más cercana?

Crello vs Canva

Si estás en el negocio del diseño y consideras a Crello como tu principal herramienta, probablemente también has oído hablar de Canva también.

Es una plataforma online que es muy (quiero decir, ¡muy!) similar a Crello, pero todavía hay algunas diferencias significativas que debes tener en cuenta:

  • La elección de elementos es un poco más amplia en Canva, la cual ofrece elementos más interactivos como gráficos, botones o formularios editables. Las bibliotecas de gráficos son muy similares en tamaño, sin embargo (~200 millones desde Getty para Canva y ~150 millones desde Depositphotos para Crello).
  • Canva tiene un tipo más de suscripción además de la versión Pro comparable: la opción Enterprise en Canva añade más características enfocadas al equipo y ofrece soporte técnico prioritario. Ambas están más o menos incluidas en la suscripción a Crello Pro, por un precio mucho más bajo.
  • Crello es 20% más barato en sus planes anuales y mensuales, si comparamos las versiones Pro. Una vez más, hay que mencionar que las características premium que se obtienen con Canva Pro y Crello Pro son casi idénticas.

En resumen, en la mayoría de los casos Crello funcionará muy bien como sustituto del Canva, a un precio significativamente menor 💰

Recomendamos que consideres Canva sobre Crello si necesitas muchos elementos interactivos en tus diseños, y/o si tienes un gran equipo de diseño (>10 personas).

Aparte de eso, la elección más o menos se reduce a tus preferencias personales – ambas herramientas son excelentes para aumentar tu productividad y facilitar la colaboración.

… Ahora que eso ha sido aclarado, resumamos lo que sabemos sobre Crello:

Pros y Contras de Crello

  • No hay necesidad de descargar ningún software: Crello funciona desde cualquier navegador moderno, sin requisitos especiales
  • Comienza con una hoja en blanco o uno de los tamaños preestablecidos para redes sociales, tu propio sitio web o materiales impresos
  • Miles de plantillas, fotos, videos, fondos y animaciones gratuitas están disponibles para todos los usuarios
  • Totalmente integrado con la biblioteca de Depositphotos con más de 150 millones de imágenes, videos e ilustraciones
  • Publica directamente en redes sociales – o descarga tus diseños en formato de imágenes, documentos pdf, o videos
  • Puedes organizar tu trabajo en carpetas, así como subir tus propios elementos visuales y fuentes
  • El removedor de fondo de imagen automatizado en Crello Pro puede ahorrar mucho tiempo
  • Invita a un máximo de 10 miembros del equipo a colaborar contigo en los diseños (disponible en Crello Pro)
  • La suscripción a Crello Pro cuesta mucho menos que otras herramientas online similares como Canva
  • Más elementos interactivos como formularios, gráficos y mapas serían una gran adición a la caja de herramientas de Crello
  • El redimensionamiento automático de diseño necesita algo más de trabajo en términos de ajustar imágenes y fondos a nuevas dimensiones
  • Aunque la mayoría de las características de un kit para gestionar marcas están presentes en Crello, un paquete de gestión de marca más completo sería un desarrollo útil

Bien, ahora que examinamos a Crello desde diferentes ángulos, ya es hora de que respondamos a la pregunta principal planteada al principio de nuestra reseña:

¿Deberías usar Crello?

Crello ha encontrado un buen equilibrio entre la simplicidad y las características poderosas – puedes empezar a crear diseños de calidad profesional en minutos, sin necesidad de una curva de aprendizaje pronunciada.

¿Significa que todo el mundo debería usar esta herramienta?

Bueno, sí y no:

  • Si sólo necesitas un par de imágenes para redes sociales por mes, la versión starter (gratuita) de Crello ofrece todo lo que necesitas.
  • Si el diseño es lo que haces para ganarte la vida (o si tu negocio/proyecto depende en gran medida de lo visual), considera la posibilidad de suscribirte a Crello Pro para obtener imágenes premium, herramientas avanzadas, descargas ilimitadas y opciones de trabajo en equipo. Échale un vistazo a la guía para el cupón del -25% de arriba si decides suscribirte.
  • Si necesitas utilizar muchos elementos interactivos tales como formas, gráficos y mapas en sus diseños, échale un vistazo a Canva Pro (ten en cuenta que cuesta un 20% más que Crello Pro).
  • Si eres parte de un equipo de diseño grande (>10 personas), Canva Enterprise podría ser la elección adecuada, con sus características avanzadas de colaboración.

En cualquier caso, si todavía no tiene seguridad de que Crello sea la herramienta adecuada para ti, la mejor manera de averiguarlo podría ser simplemente probándolo 🤷 no necesitas dejar los datos de tu tarjeta de crédito para eso:

Prueba Crello gratis ›

… ¿O tal vez tengas algunas preguntas adicionales sobre Crello? Desplázate hacia abajo hasta la sección de discusión abajo y deja tu comentario – ¡vamos a ayudarnos a tomar decisiones informadas!

Full Crello Review 2024: Graphic Designer’s Dream or Just Another Drawing Tool?

Whether writers and other word-lovers like it or not, the Internet is all about images and videos these days!

If you are managing the visual identity of a brand (even a tiny one), the amount of graphics you need to produce on a daily basis can quickly become overwhelming.

Enter Crello

This online service wants to revolutionize the way we approach graphic design, and save everyone tons of time in the process. Does it deliver on its promises? Let’s find out!

In this detailed review, we will answer the most important questions about Crello to help you make an informed decision:

  • 🎨What is Crello and how does it work?
  • 🦄How is Crello different from other similar tools?
  • 🤼Is Crello better than Canva, and in which cases?
  • 👍Should You Use Crello in your design projects?

Before we discuss the unique features of Crello and compare it with the closest alternatives, it wouldn’t hurt to make sure we understand the basics:

What Is Crello and How Does It Work?

First and foremost, Crello is an online design tool. If you’re reading this article, you probably already know that, so let’s try to be more specific:

Crello is a design automation platform for creating all kinds of visual marketing materials, both digital (social, web, ads) and physical (brochures, labels, posters, etc).

Alright, that’s better, but also less comprehensible 🤔 – what on earth is a “design automation platform”?!

– It means that Crello is much smarter and more practical than the cumbersome design software of the past. The entire workflow is all about saving time:

  1. No need to start from scratch anymore: Crello offers over 10,000 fully customizable templates for every conceivable purpose (you can always switch back to a blank canvas if you prefer, of course).
  2. Forget about manually setting the right dimensions for a Facebook image post or an YouTube video cover – Crello has all the presets you’ll ever need, always up to date with the latest requirements of each social media.
  3. Choose from millions of visual assets – high-quality photos, videos, and illustrations – to customize your designs.
  4. Quickly scale your media campaigns from a single design by creating unlimited copies of your work in any format or dimensions.
  5. Share your designs directly from your Crello dashboard: post to social media, generate a link, or download your design as a file in one of 7 available formats.

By the way, the third step is made possible by the fact that Crello is a brainchild of the founders of Depositphotos, one of the largest media marketplaces in the world – which means that…

Crello is fully integrated with the Depositphotos library, giving you instant access to 150+ million stock images, videos, and other graphics files.

These come in 3 varieties: free files (obviously costing zero), stock files (which you can buy separately) – and premium files, which are only available in Crello Pro.

Speaking of which, let’s see what other features you can unlock with the Pro version:

Crello Free or Crello Pro?

First of all, it’s worth spelling out that anyone can use the basic version of Crello free of charge, indefinitely – no need to add your card details or anything.

The paid version (Crello Pro) is meant for those who use Crello regularly and would like to maximize their productivity:

  • Apart from full access to the premium library, Crello Pro removes the monthly download limit for your designs – if you create several designs per day on average, this might be useful.

    Crello: download

  • The Pro version also unlocks the automatic background removal tool, which works almost like magic:

    Crello: background remover

  • Most importantly, though, Crello Pro allows you to create a team and invite up to 10 other users to collaborate on designs:

    Crello: team collaboration

There’s also the priority support offer, which means you’ll always be the first in line to talk to Crello’s support team – but we wouldn’t consider this as a major reason to switch to Pro:

Crello’s interface is quite intuitive and easy to learn, especially given the detailed guides and video tutorials that can be accessed from the bottom menu on the official home page.

Besides, you can get support in the free version as well… just somewhat slower 🐌

For those among you who like things organized into rows and columns, here’s a little summary table we made to give an idea of the main perks of Crello Pro:

Plan Crello Free Crello Pro
Choice of images Limited All images
Image background removal Yes
Downloads per month Limited
Priority support Yes
Collaborate with team members Yes

There are two billing options in the Pro version: monthly and yearly, the latter being 20% cheaper (as is typical for online subscriptions).

Here’s some good news, by the by –

Did you know there’s a way to save an additional 25% on a Crello Pro purchase? Check out the next section to find out how.

Using the -25% Crello Promo Code

If you do decide to go Pro, here’s a step-by-step guide on getting a significant discount on your Crello subscription.

It works both for the monthly and the yearly billing option, but the total savings are obviously 12x bigger with the latter, as the code only applies to the first period:

  1. Visit the official Crello homepage following the link below; if you don’t have an account yet, create one – if you do, log in to your control panel.

    Get 25% Off Crello Pro ›

  2. While in your Crello account, click on the round icon in the top right corner to show the drop-down menu; in the menu, click on “promo code”:

    Crello coupon

  3. On the promo codes management page, enter the following combination into the form and click on the green “Apply” button:

    UPWORK25
  4. Done? A blue box with coupon details should appear below the form, indicating that the coupon has been successfully applied.
  5. You can now switch to Pro using the standard process (i.e. by clicking on “Subscription” in the account menu in the top right corner of the screen). Enjoy!

…Or, alternatively, you can simply click on this direct link that applies the coupon automatically ✨

Nice! Before we move on to the final verdict, there’s one more popular question we need to cover – namely, how does Crello compare to its closest alternative?

Crello vs Canva

If you’re in the design business and considering Crello as your main tool, you’ve probably also heard of Canva by now.

It’s an online platform that is very (I mean, very!) similar to Crello, but there are still some significant differences you should take into account:

  • The choice of elements is somewhat wider in Canva, which offers more interactive elements like editable charts, buttons, or forms. The graphic libraries are very similar in size, though (~200 million from Getty for Canva and ~150 million from Depositphotos for Crello).
  • Canva has one more type of subscription in addition to the comparable Pro version: the Enterprise option at Canva adds more team-focused features and offers priority support. Both are more or less included in the Crello Pro subscription, for a much lower price.
  • Crello is 20% cheaper for both its yearly and monthly plans, if we compare the Pro versions. Again, it should be mentioned that the premium features you get with Canva Pro and Crello Pro are nearly identical.

To sum up, in most cases Crello will work just fine as a substitute for Canva, at a significantly lower price 💰

We recommend considering Canva over Crello if you need a lot of interactive elements in your designs, and/or if you have a large design team (>10 people).

Apart from that, the choice more or less boils down to your personal preferences – both tools are great at increasing your productivity and facilitating collaboration.

…Now that that’s been clarified, let’s summarize what we know about Crello:

Pros and Cons of Crello

  • No need to download any software: Crello works from any modern browser, without any special requirements
  • Start with a blank sheet or one of the pre-set sizes for social media, your own website, or printed materials
  • Thousands of free templates, photos, videos, backgrounds, and animations are available to all users
  • Fully integrated with the Depositphotos library of 150+ million images, videos, and illustrations
  • Publish directly to social media – or download your designs as images, pdf documents, or videos
  • You can organize your work into folders as well as upload your own visual elements and fonts
  • The automated image background remover in Crello Pro can save a lot of time
  • Invite up to 10 team members to collaborate with you on designs (available in Crello Pro)
  • The Crello Pro subscription costs much less than similar online tools like Canva
  • More interactive elements like forms, charts, and maps would be a great addition to Crello’s toolkit
  • The automatic design resizer needs some more work in terms of fitting images and backgrounds into new dimensions
  • While most features of a brand kit are present in Crello, a more complete brand-management package will be a useful development

Alright, now that we examined Crello from different angles, it’s about time we answered the main question posed in the beginning of our review:

Should You Use Crello?

Crello has found a good balance between simplicity and powerful features – you can start creating professional-quality designs in minutes, no steep learning curve involved.

Does it mean everyone should be using this tool?

Well, yes and no:

  • If you just need a couple of social media images per month, the basic (free) version of Crello offers everything you need.
  • If design is what you do for a living (or if your business/project relies heavily on visuals), consider subscribing to Crello Pro for premium images, advanced tools, unlimited downloads, and teamwork options. Check out the -25% coupon guide above if you do decide to subscribe.
  • If you need to use a lot of interactive elements such as forms, charts, and maps in your designs, take a look at Canva Pro (do keep in mind that it costs 20% more than Crello Pro).
  • If you are a part of a large design team (>10 people), Canva Enterprise might be the suitable choice, with its advanced collaboration features.

In any case, if you’re still unsure whether Crello is the right tool for you, the best way to find out might be to simply give it a try 🤷 you don’t need to leave credit card details for that:

Try Crello for free ›

…Or maybe you have some additional questions about Crello? Scroll down to the discussion section below and leave your comment – let’s help each other make informed decisions!

Reseña de 000Webhost 2024: ¿Este alojamiento web / hosting es realmente gratuito?

Ese es un título intrigante, ¿no? Bueno, no solo está para captar tu atención: hay algunos hechos importantes sobre 000Webhost (y alojamiento gratuito en general) que cualquier webmaster necesita tener en cuenta.

En esta reseña ahondaremos un poco más a fondo que solo decir “000Webhost es gratis, ¡¿y qué precio puede ser mejor que 0?!” reformularemos nuestra pregunta de la siguiente manera:

Si 000Webhost es gratis, y la mayoría de los otros proveedores de hosting no lo son, ¿dónde está el truco? En otras palabras, ¿a qué tienes que renunciar en comparación con los servicios de hosting de pago?

Con la finalidad de encontrar una respuesta, examinaremos lo que ofrece 000Webhost así como su historia y modelo de negocios.

🔍 Al final de esta detallada reseña, descubrirás si vale la pena usar 000Webhost para tu nuevo sitio web – y en qué situaciones.

… Por cierto, como sucede con muchos otros nombres de marcas, Internet ha sido creativa con todo tipo de errores ortográficos para 000Webhost – así que si estás aquí como resultado de usar consultas de búsqueda como 00Webhost (dos ceros en lugar de tres) o ooowebhost (letra “o” en lugar de ceros) – ¡ten la seguridad de que estás en el lugar correcto!

Para aquellos que buscan un breve resumen de este articulo: 000Webhost puede actuar como un conveniente campo de pruebas para proyectos personales y otros proyectos web de pequeña escala, pero sus limitaciones y problemas de seguridad hacen que sea casi impensable alojar cualquier sitio web serio. Para esto último, recomendamos usar proveedores de alojamiento de bajo costo como Hostinger:

La alternativa más seria a 000Webhost ›

Antes de pasar a hurgar sin piedad en el tema de nuestra revisión, primero tratemos de entender cómo funciona el alojamiento o hosting – y ver si algún alojamiento web puede ser verdaderamente gratuito:

Cómo Funciona el Hosting (Gratis)

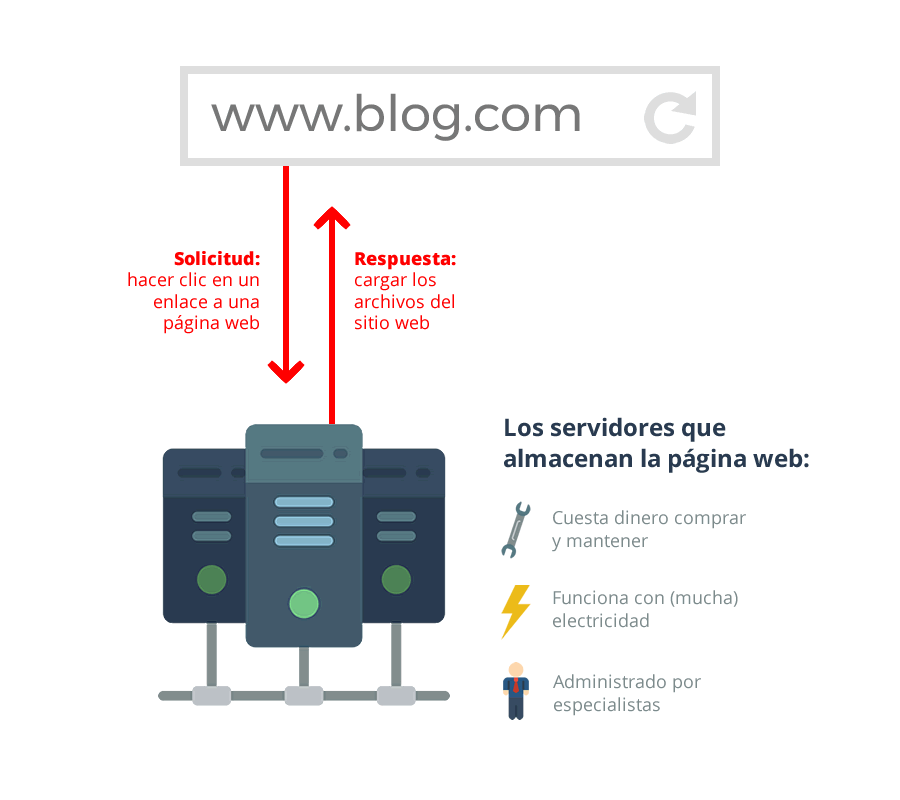
Cada vez que visitas un sitio web en Internet o utilizas una aplicación en tu dispositivo móvil, estás efectivamente enviando una solicitud (por ejemplo, tus clics) y obteniendo alguna respuesta (por ejemplo, una nueva página que se está cargando).

Y tú esperas que el sitio web o la aplicación te dé una respuesta sin importar la hora del día o la estación del año – en otras palabras, todos nos hemos acostumbrado al hecho de que la Web simplemente funcione en todo momento.

Esto significa que para ser accesible las 24 horas del día, los 7 días de la semana y los 365 días del año, un sitio web (que es básicamente una colección de archivos) debe funcionar en una computadora que esté constantemente encendida y que tenga una conexión ininterrumpida a Internet.

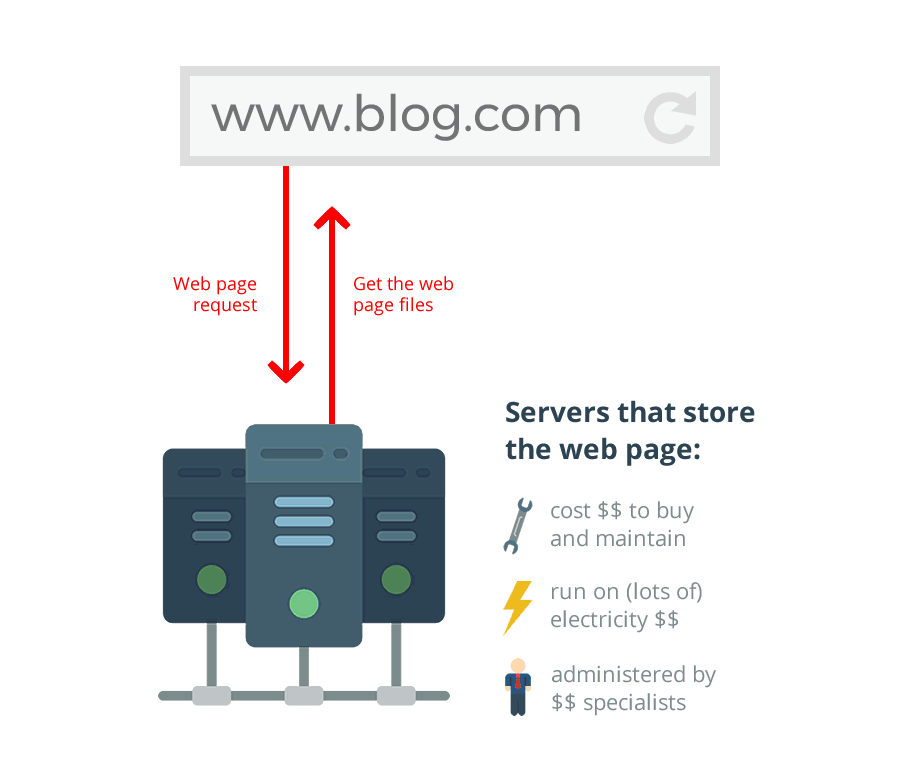
Esta es una tarea difícil para un portátil típico, por lo que los sitios web utilizan computadoras especializadas y poderosas llamadas servidores en su lugar.

Los servidores no son baratos – los precios pueden variar entre 500 y 5.000 dólares o más. Además, ya que están trabajando sin parar, los servidores consumen una cantidad decente de electricidad, sin mencionar el hecho de que requieren un mantenimiento regular por parte de especialistas cualificados:

000Webhost: costos de alojamiento web

¿Ves hacia dónde va esto?

Si un servidor cuesta dinero, y su operación cuesta dinero, y su mantenimiento cuesta dinero – cualquiera que se ofrezca a alojar su sitio web de forma gratuita es o bien una organización benéfica con bolsillos muy profundos o tiene otras fuentes de ingresos para cubrir sus gastos…

Hay dos formas conocidas de hacerlo:

  • Colocar anuncios en los sitios web alojados: pueden ser promociones para la propia empresa de hosting o banners de terceros que recuperan los costos de funcionamiento de los servidores
  • Ofrecer actualizaciones pagadas y servicios extras, mientras se restringe severamente la gama de funciones disponibles para los usuarios gratuitos.

Si lo pensamos bien, la empresa de alojamiento está realmente interesada en aplicar las máximas limitaciones posibles en ambos escenarios 🚧 – en el primer caso, esto reduce sus gastos de funcionamiento – y en el segundo sirve como motivador para que más gente se cambie de plan.

¿De qué limitaciones estamos hablando aquí?

  • Para empezar, está el límite de ancho de banda mensual, lo que significa que hay una cantidad máxima de tráfico de datos que tu sitio web puede utilizar. Esto rápidamente pone un límite al crecimiento de tu audiencia así como al tipo de contenido que puedes usar – es decir, puedes olvidarte de los videos e imágenes de alta calidad.
  • Lo que sigue, hay una baja disponibilidad, lo que significa que el proveedor de alojamiento no garantiza que sus servidores funcionen 24/7/365, sino más bien 23/7/365. En otras palabras, hasta un 5% del tiempo tu sitio web estará caído. En el caso de 000Webhost, puedes comprobarlo desplazándote hacia la parte inferior de su página de estado y mirando la figura de los “últimos 30 días”.
  • Tu sitio web no será rápido; de acuerdo con nuestras mediciones, en realidad será bastante lento para cualquier estándar, a veces frustrantemente lento. Esto tiene sentido porque no hay ningún incentivo para que el proveedor de hosting asigne demasiados recursos de un servidor (memoria y potencia de computación) a cuentas gratuitas.
  • Por último, el alojamiento gratuito no permite utilizar ninguna dirección personalizada para tu sitio web (como sitioweb.com) – sólo una subdirección con un nombre de dominio específico fijado por tu proveedor de alojamiento (por ejemplo sitioweb.000webhostapp.com).

Eso es exactamente lo que 000Webhost hace – su modelo de negocios se basa en todo lo que hemos mencionado anteriormente.

Así que, si estás planeando empezar un sitio web gratuito en 000Webhost, tiene sentido ser consciente de estas limitaciones.

¿Qué hay de las mejoras pagadas que mencionamos antes?

Aquí es donde las cosas se ponen interesantes, porque eso es lo que permite a 000Webhost pagar todos esos caros servidores web. Veamos si vale la pena considerar sus planes de pago:

Planes Gratuitos y de Pago en 000Webhost

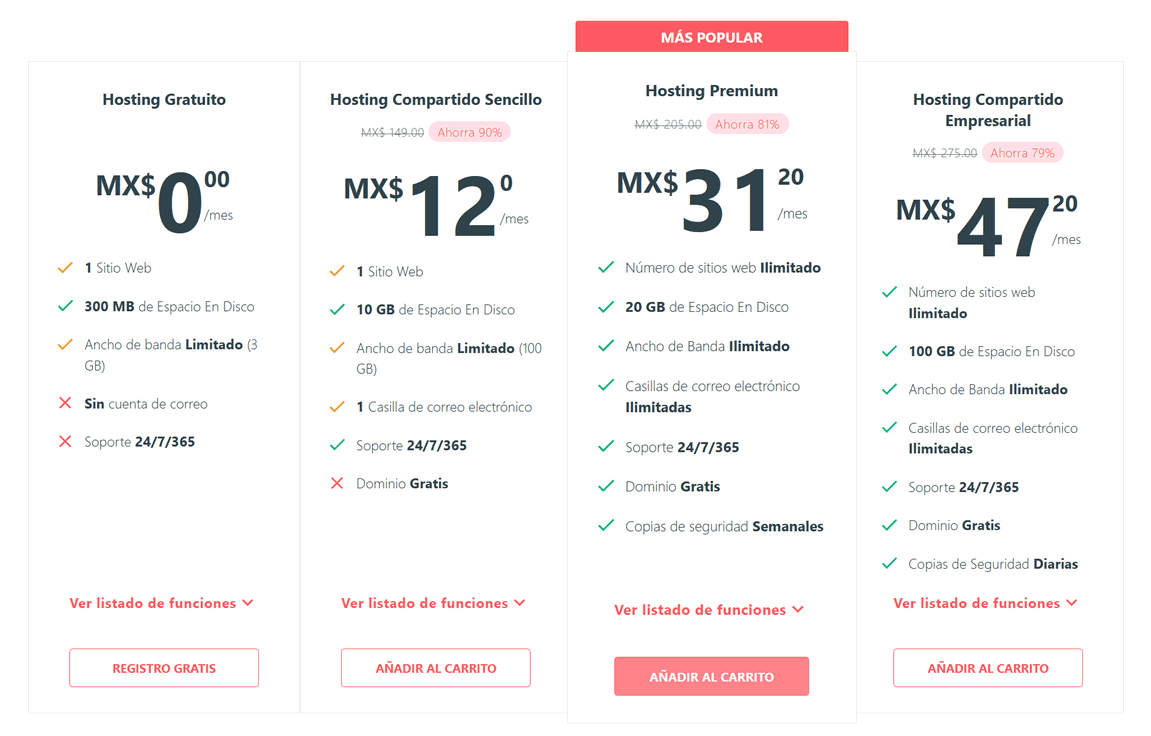
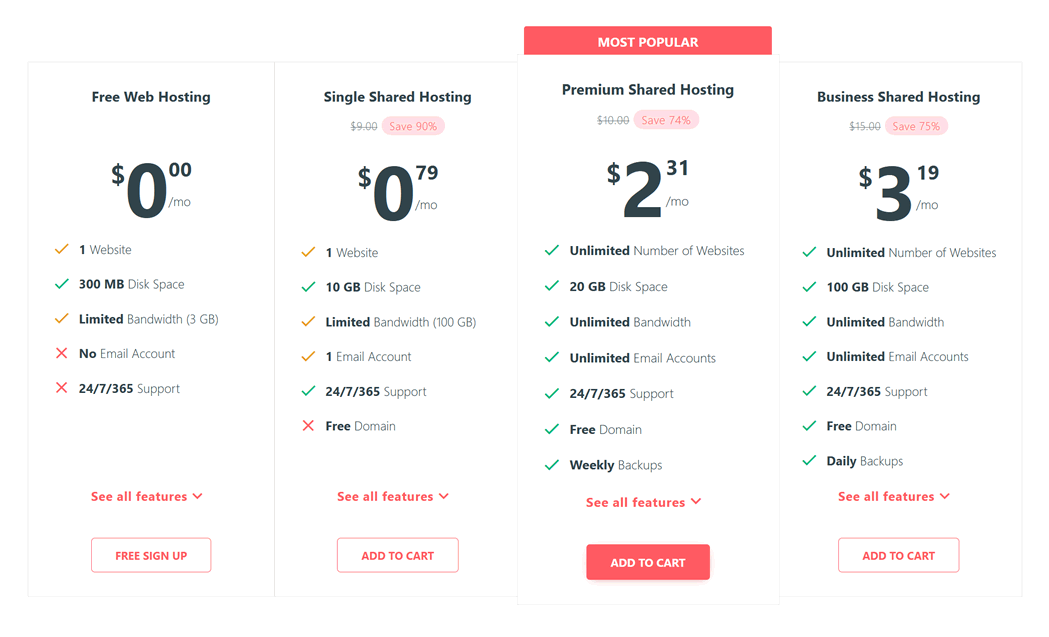
Desde su sitio web oficial se puede ver que en realidad hay tres planes de alojamiento en 000Webhost, sólo uno de los cuales es completamente gratuito. Los otros dos ofrecen más características y eliminan algunas de las restricciones de la versión gratuita:

000Webhost: precios

Como puedes ver en la columna de la izquierda, aparte de las limitaciones que señalamos antes, hay varias otras advertencias importantes para el Plan Gratuito –

  • No tienes acceso al Auto-Instalador el cual te permite configurar un sistema de gestión de sitios web en un par de clics. El único software que puedes instalar automáticamente en el plan gratuito es WordPress, pero eso suele ser suficiente para la mayoría de los principiantes.
  • No obtienes ninguna asistencia dedicada aparte de un foro público en el que los usuarios confundidos de las cuentas gratuitas publican preguntas y otros usuarios confundidos tratan de responderlas.
  • No hay cuentas de correo electrónico, así que olvídate de comunicarte con los visitantes de tu sitio web o con tus potenciales socios comerciales usando una dirección de correo electrónico de aspecto profesional. Gmail está bien, ¿no?

También está la ausencia de copias de seguridad automáticas y el hecho de que el espacio en el disco está limitado a 1 gigabyte, pero no son tan graves como los mencionados anteriormente más los otros cuatro (ancho de banda, velocidad, disponibilidad y dominios) que discutimos en el capítulo anterior.

Los planes de alojamiento pagados levantan algunas o todas estas limitaciones, mientras que también introducen una garantía de devolución de dinero de 30 días. El Plan Individual ofrece más recursos del servidor, una cuenta de correo electrónico personal, asistencia en vivo, así como una garantía de tiempo de actividad del 99,9%, para evitar que situaciones como estas afecten tu sitio web:

En el Plan Premium , se asignan aún más recursos a tu cuenta, haciendo que tu sitio web se cargue más rápido. Además, puedes registrar tu propio nombre de dominio personalizado de forma gratuita, así que en lugar de sitioweb.000webhostapp.com tus visitantes podrán escribir sitioweb.com en la barra de direcciones del navegador y visitar tu sitio web.

Hay algo importante que hay que saber sobre los planes de pago de 000Webhost: que en realidad son proporcionados por otra entidad. Hostinger, un proveedor de hosting profesional que pertenece al mismo grupo empresarial, es donde obtienes una cuenta una vez que te actualizas a un plan de pago en 000Webhost. ¿Por qué es importante saber esto? Porque –

La Brecha de Seguridad en 2015

Los registros personales de casi 13,5 millones de clientes de 000Webshot han quedado expuestos en marzo de 2015, ya que los piratas informáticos obtuvieron acceso a las bases de datos del proveedor de alojamiento a través de una vulnerabilidad de código. Nombres, detalles de cuentas, direcciones IP, así como contraseñas han sido comprometidos, y se han vuelto disponibles a través de foros del mercado negro.

Hay un pequeño e ingenioso recurso en la web llamado “Have I Been Pwned?” que recoge datos sobre las violaciones de seguridad en la web. Puedes introducir tu propio correo electrónico en la casilla y comprobar si algún servicio online para el que lo estés usando ha sido comprometido.

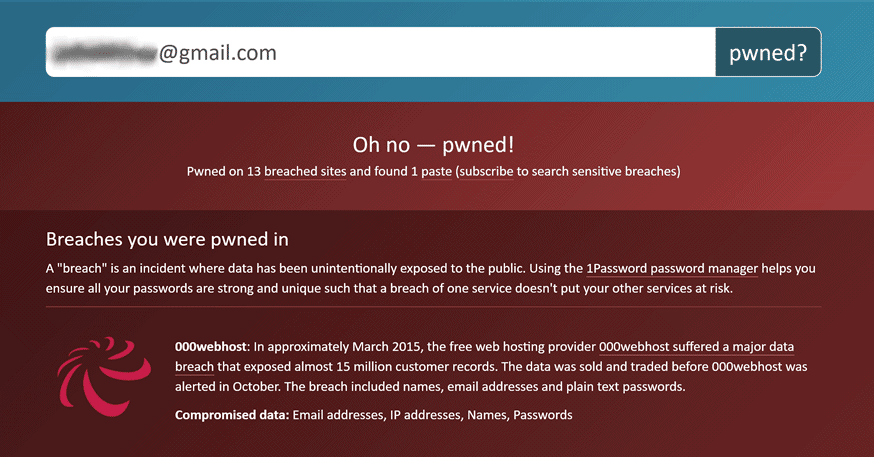
Irónicamente, “Have I Been Pwned?” me mostró que mi principal dirección de correo electrónico personal ha sido expuesta en la violación de 000Webhost, junto con millones de otros propietarios de sitios web:

Las investigaciones y análisis posteriores realizados por especialistas en seguridad después del suceso han revelado múltiples casos de prácticas potencialmente inseguras por parte de 000Webhost, entre ellas:

  • Usando una conexión no encriptada para la página de acceso del cliente, lo que significaba que cualquiera con suficientes habilidades podía interceptar datos vitales del usuario.
  • Ejecutando sus foros de soporte técnico en una versión antigua del software vBulletin (3.8.2), que tenía !Seis años de antigüedad para el 2015! La versión estable en ese momento era la 5.1.9.
  • Sin usar la validación del correo electrónico, lo que significa que cualquiera puede registrar una cuenta con cualquier correo electrónico, incluso uno que no les pertenezca.

Por supuesto, 000Webhost se disculpó y tomó medidas al respecto. De hecho, ha solucionado todos los problemas mencionados con bastante rapidez, por lo que podríamos argumentar que 000Webhost es en realidad mucho más seguro ahora que hace varios años, específicamente debido a esa brecha.

Sin embargo, vale la pena tener en cuenta que todavía no hay mucha motivación para que un proveedor de hosting gratuito sea lo más seguro posible – después de todo, si recibes algo gratis, no puedes quejarte realmente si no funciona o hace algo malo. Para decirlo sin rodeos, nadie te debe nada si no has pagado nada :)

¿Implica también automáticamente que los proveedores de hosting pagados son más seguros?

Normalmente sí: por la misma lógica de arriba, si tomas el dinero de alguien por un servicio, necesitas asegurar la suficiente calidad – de otra manera tus clientes actuales se irán, y tu deteriorada reputación no te permitirá conseguir nuevos. 🤷

Así que no hay una “ley de la naturaleza” que impida a los proveedores de hosting gratuito ofrecer servicios seguros y de alta calidad, pero también hay un razonamiento económico racional que los motiva a no hacerlo. En esta incierta situación, la única forma segura de averiguar si un host gratis es bueno es probarte a ti mismo.

Lo que hicimos aquí en la Academia de Webmasters de Satori.

Bastante extenso, de hecho.

En la siguiente parte de esta guía le contaremos nuestras impresiones personales sobre el uso de 000Webhost; esto proporcionará una base para el veredicto final: si debes elegirlo o no 000Webhost para tu proyecto en línea.

000Webhost: Nuestras Impresiones

Con el fin de obtener la imagen más completa de la oferta para clientes de 000webhost, hemos registrado una cuenta con el nombre de usuario “satoristudio”, lo que significa que la dirección que el sistema ha asignado para nuestro sitio web de prueba es satoristudio.000webhostapp.com – desafortunadamente el sitio web en sí ya no está disponible, ya que 000Webhost lo quitó el año pasado, por razones desconocidas.

Lo primero que hay que decir sobre 000Webhost es que este es muy fácil de usar. Todo el proceso de creación de una cuenta e instalación de WordPress nos llevó sólo un par de clics y 2 minutos como máximo. También se sintió mucho más fluido que un procedimiento similar en, digamos, GoDaddy.

Recibes un montón de banners y mensajes que te incitan a actualizar a un plan de hosting más potente, pero hasta ahora nada sugiere realmente que deberías hacerlo (aparte del hecho de que la dirección web de tu sitio se ve bastante fea).

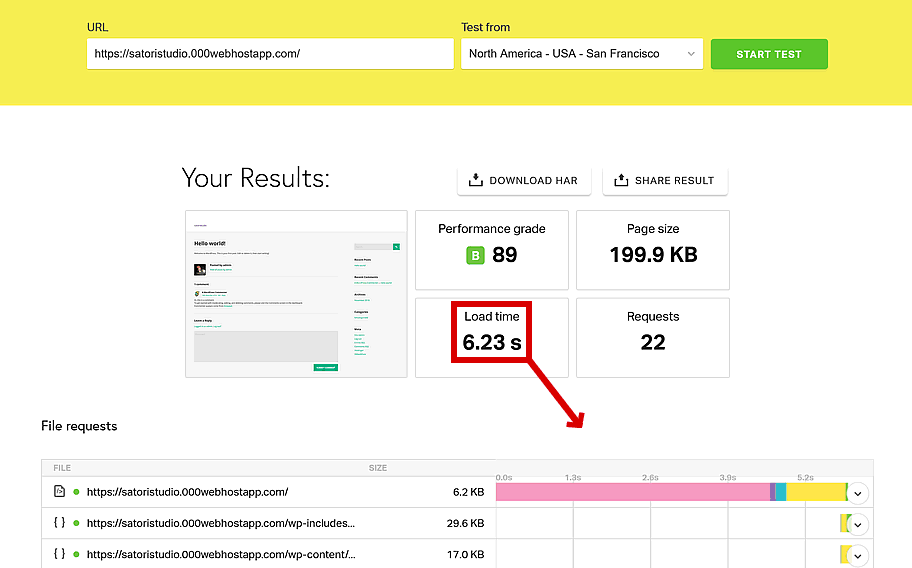
La velocidad de un sitio web en 000Webhost es por lejos espectacular: para una nueva instalación de WordPress con nuestro ligero tema Bento, la prueba de velocidad mostró un tiempo de carga de más de 6 segundos, que es el doble de alto que El valor recomendado por Google – pero oye, ¡no te olvides de que recibes esto gratis!

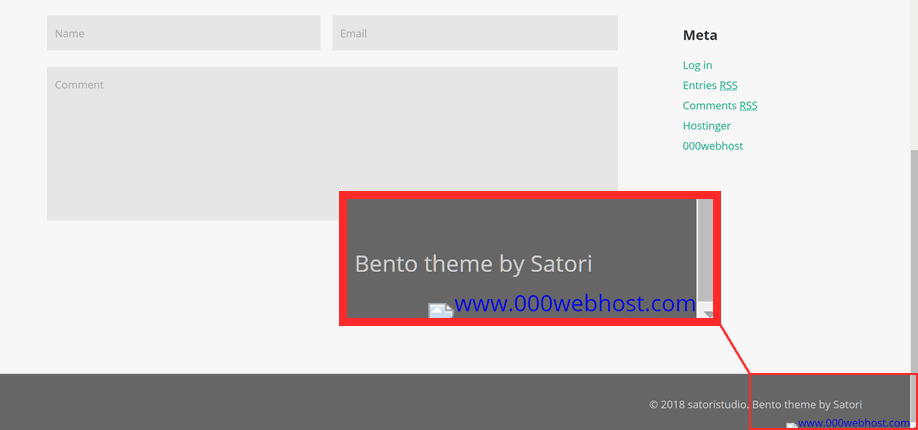
Otro recordatorio de ese hecho es un anuncio de 000Webhost en la parte inferior de tu sitio web. No sólo se superpone a una parte de tu pie de página, sino que a veces no se carga la imagen del banner, mostrando así un enlace de texto de aspecto más bien sucio acompañado de “no se puede cargar ninguna imagen”:

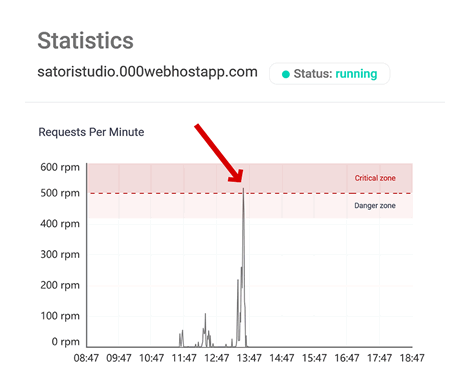
Donde realmente empiezas a sentir que estás en un hosting gratuito, sin embargo, es en la restricción del tráfico de la página web. Cada cuenta tiene un límite de 500 peticiones por minuto, que no deben confundirse con los visitantes por minuto: una petición es sólo una única interacción (como acceder a un archivo) en el proceso de carga de una página web, por lo que una sola página normalmente necesita entre 30 y 100 peticiones.

Esto significa que cuando un visitante llega a tu sitio web y mira tres páginas, se harán alrededor de 150 solicitudes – por lo que el límite que mencionamos anteriormente es en realidad sólo 5-10 páginas vistas por minuto.

Pudimos sobrecargar la restricción de solicitudes por minuto muy fácilmente con sólo abrir el sitio web en varios dispositivos al mismo tiempo. Una vez que te acercas y superas la “zona de peligro”, el sitio web comienza a cargar más y más lentamente, hasta el punto de que se vuelve demasiado molesto para seguir usándolo.

Ya que estamos en el tema de las limitaciones, hay un parámetro más que debe ser anotado aquí: el número máximo permitido de inodos. Esto corresponde aproximadamente al número de archivos y directorios en un disco.

En 000Webhost, cada nuevo plugin de WordPress que instales y cada nueva imagen que subas contará para tu límite de inodos.

Esto puede sonar como a un sinsentido, pero vale la pena considerar el hecho de que incluso el núcleo de WordPress (es decir, una instalación nueva sin ningún tipo de plugin) ocupa alrededor del 20% de tus inodos asignados en 000Webhost.

Necesitarás instalar más de un plugin WP para agotar el límite de inodos de 20,000 , aunque esto es bastante factible; para comparar, considera que incluso los planes de hosting más baratos en proveedores pagados permiten hasta 250,000 inodos.

Por último, está el asunto de que tu sitio web se desconecta de vez en cuando: 000Webhost está abierto sobre el hecho de que sus servicios no tienen las cifras típicas de tiempo de actividad que se esperaría de un proveedor de alojamiento (es decir, el 99,9% o más).

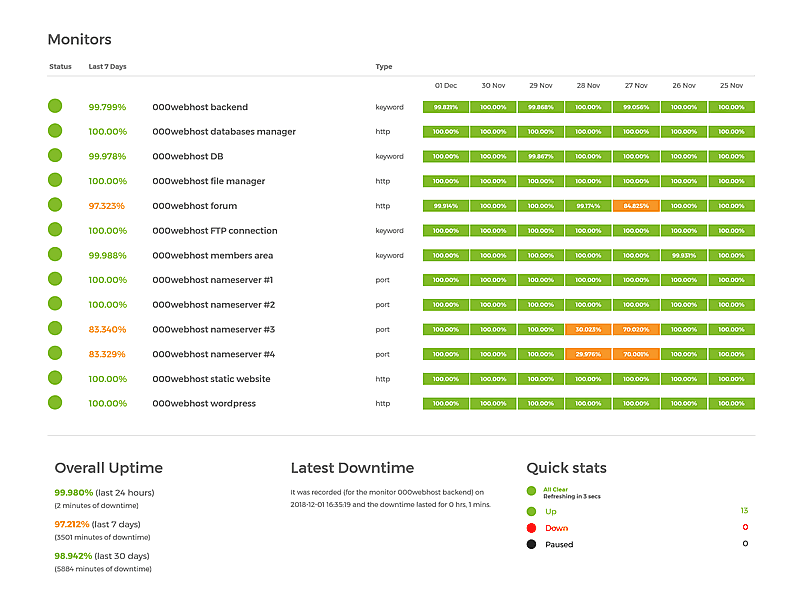
Según la página del estado de servicio de 000Webhost, el promedio de las estadísticas de 30 días es de alrededor del 99%:

Mientras que una diferencia de 0,9% podría no parecer mucho, sobre una base mensual esto significa un aumento en el tiempo fuera de línea de 40 minutos – a ¡7 horas!

Esto no es un gran problema si todavía estás trabajando en tu sitio web (parte de esos apagones ocurrirán por la noche de todos modos), las averías repetidas no son algo que haga que a tus visitantes les guste (o confíen) en tu sitio web.

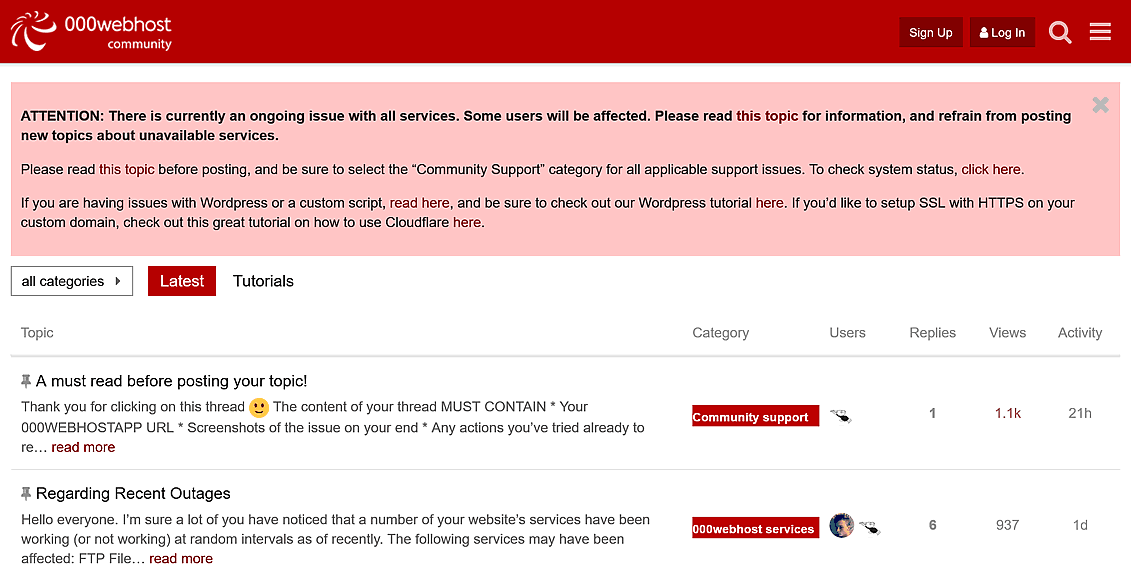
Si experimentas un fallo, no hay un servicio de atención al cliente dedicado disponible en 000Webhost – lo cual es comprensible, porque el personal de apoyo requiere salarios, algo que un producto gratuito no puede realmente cubrir.

Aun así, hay un foro donde los usuarios pueden hacer preguntas y obtener ayuda, sobre todo de otros usuarios de 000Webhost. Los tiempos de respuesta pueden variar, pero en promedio no esperes que tu problema se resuelva en menos de una semana ⏳

La buena noticia es que todos los foros anteriores son de libre acceso al público, así que si necesitas una solución más rápida y sospechas que tu problema puede ser un problema estándar, es posible que desees navegar por los debates más antiguos.

Pros y Contras de 000Webhost

Ahora que hemos visto a 000Webhost desde todos los ángulos, resumamos sus puntos fuertes y débiles para llegar a la evaluación final:

  • Es gratis para cualquiera; incluso puedes crear más de una cuenta si tienes varias direcciones de correo electrónico (no te sorprendas si algunos años después empiezas a recibir más spam en esos buzones).
  • El proceso de registro es muy fácil y rápido, puedes crear tu primer sitio web de WordPress en sólo un par de minutos gracias al instalador automático incorporado.
  • Hay un panel de control de hosting muy decente, y aunque no es muy profesional, la mayoría de las cosas que necesitas están ahí, incluyendo administradores de archivos y bases de datos, así como otros ajustes como redireccionamientos, buzones de correo electrónico y características básicas de seguridad.
  • La velocidad de carga de la página no es algo de lo que enorgullecerse, pero de hecho está bien, especialmente para un hosting que no cuesta dinero. Mientras no tengas más de 50-100 visitantes por día, no deberías preocuparte por sobrecargar tu capacidad de tráfico.
  • Oh, y ¡¿mencionamos que es gratis?!
  • Tu única opción en cuanto a la dirección de tu sitio web es un subdominio que se parece a https://sitio.000webhostapp.com – difícilmente fiable o fácil de memorizar para tus visitantes. Por supuesto, puedes comprar un dominio en otro lugar y adjuntarlo a tu cuenta de 000Webhost, pero eso te traería lo “peor de los dos mundos”: ni un sitio web completamente gratis ni un dominio gratis. Revisa la siguiente sección para una solución más sensata en su lugar ;)
  • Habrá anuncios de 000Webhost en la parte inferior de tu sitio web, que ocasionalmente funcionarán mal y mostrarán un icono de “imagen rota”.
  • El límite de 500 solicitudes por minuto limita efectivamente la audiencia simultánea de tu sitio web a sólo 2-3 personas. Cuando se excede, la velocidad de carga de la página se deteriora, y el sitio web puede incluso llegar a ser inaccesible por un tiempo.
  • De acuerdo con las cifras del promedio de tiempo de funcionamiento, se espera que tu sitio web esté fuera de línea durante varias horas cada semana; si tienes suerte, algunas de ellas lo serán por la noche.
  • Es bastante fácil agotar el máximo número de archivos permitidos en tu almacenamiento, incluso sólo con un sitio web de WordPress y un par de plugins populares de WP como Jetpack.
  • La única opción de servicio al cliente es un foro donde puedes publicar tu pregunta y esperar a que otros usuarios de 000Webhost te ayuden. El soporte al cliente por correo electrónico, teléfono o chat en vivo no está disponible en el plan gratuito.

¿Nuestro Veredicto: ¿Merece la Pena Usar 000Webhost?

Probablemente notarás que el número de ventajas y desventajas es aproximadamente el mismo en la sección anterior. Lo que significa que no hay una respuesta directa a nuestra pregunta, ¿es eso lo que estamos tratando de decirte?

Bueno, no, en realidad creemos que claramente hay un caso en el que usar 000Webhost podría ser una buena idea – y es cuando estás empezando a trabajar en tu primer sitio web. Es difícil negar que pagar una gran suma de dinero por adelantado, sólo para probar tu idea, no tiene mucho sentido.

Así que en vez de comprar un hosting de pago, podrías empezar con un plan gratuito en 000Webhost, tomarte tu tiempo para construir tu sitio web y mostrarlo a tus primeros visitantes, ver cómo va:

Sin embargo, cuando finalmente hayas validado tu idea y te hayas tomado en serio tu proyecto en línea – actualiza a un plan de pago y consigue un nombre de dominio único y de aspecto profesional. Tus visitantes no te tomarán en serio con una dirección como algo.000webhostapp.com y los anuncios que aparecen en el pie de página de tu sitio web.

La buena noticia es que el hosting de alta calidad no es necesariamente caro. Si eliges la actualización más básica en 000Webhost (que corresponde al Plan Individual en Hostinger, su socio de hosting de pago), obtendrás todos los beneficios de un proveedor de hosting profesional sin ninguna de las desventajas del plan gratuito de 000Webhost.

Incluso puedes elegir que te facturen cada tres meses en lugar de anualmente, lo que hará que tus costos iniciales sean bastante insignificantes.

Si alguna vez decides cambiar de plan o te interesa probar Hostinger de inmediato, asegúrate de revisar nuestra guía para obtener un 15% de descuento adicional en sus (ya económicos) paquetes de hosting:

Obtén un 15% de descuento en Hostinger

¿Ya has probado 000Webhost? ¿O tal vez todavía te cuesta decidir si debes elegirlo para tu idea de sitio web? Puedes hablar de esto con otros usuarios de 000Webhost y pedir consejo en la sección de comentarios de abajo – ¡Vamos a debatir!

Finding Email Addresses Like a Pro: a Guide to Voila Norbert

If you’re running a digital business, you’ll almost certainly have an email list. There’s a good chance you also send emails to cold prospects as part of your lead generation efforts, to land guest posts, or generally promote your business initiatives 📣

Simply put, email is important to your business.

Whether you are managing a list or sending emails to cold prospects, it’s important you send these messages to the correct email address (yes, this sounds obvious, but bear with us on this one).

There are two reasons: for a start, you want to make sure the person receives your email (simple as that) – and secondly, and just as importantly, sending emails to an incorrect addresses will impact your sender score, which can in turn result in the rest of your emails getting spam-filtered more often.

An email prospecting and verification toolkit can help avoid both problems.

In our guide, you’ll learn how to use this quirkily named online tool to automate the process of finding and verifying email contacts for your cold outreach needs. Let’s start with the basics:

What Is Voila Norbert, Exactly?

Voila Norbert was designed to be used by agencies and business owners that need to identify hundreds or even thousands of email addresses. It’s also a handy tool for solopreneurs and small businesses who want to verify a dozen or more emails a month.

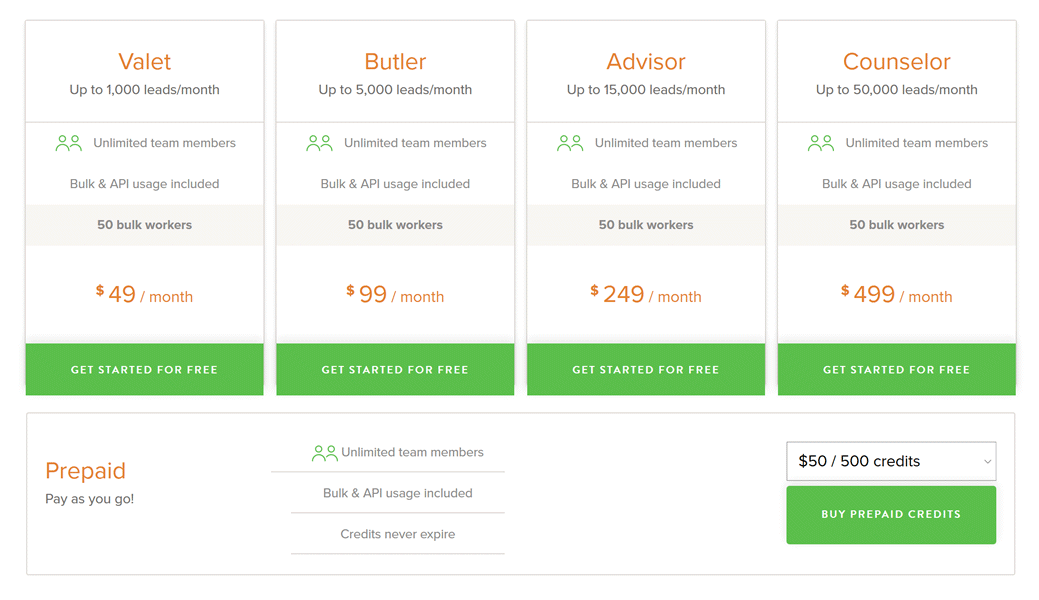
If, as in the second case, you don’t need to verify many emails you can purchase one of pay-as-you-go packages. The lowest package is $50 for 500 credits (validating a single email takes one credit). Businesses that need to regularly validate a lot of emails can sign up for the monthly package, which starts at $49 for 1,000 credits.

The names of the pricing plans are a treat all by themselves:

Voila Norbert pricing

You can notice that there are also specialized pay-as-you-go plans for bulk email verification and adding more “meat” on your contacts – in other words, augmenting your email contacts with rich data, allowing for even more personalized communication with your prospects.

The platform itself has a minimalist user interface: there’s a menu on the left hand side with a couple of tabs, and the email finder input fields across the top (we’ll show some screenshots in the next sections of our guide).

Yes, and there’s an API at your service! Using Voila Norbert’s API you can automatically validate email addresses through a third party platform like Mailchimp, CRMs like Hubspot, and blogger outreach tools like Mailshake.

Alright, enough with the introductions – let us see how the process of email prospecting looks like with Mr. Norbert:

How to Find Emails One at a Time

Let’s say you’re looking for a guest post opportunity, and you come across the name of the writer on a site you want to pitch. You want to find their email address. To do this on Voila Norbert, go to “Manual” in the “Prospecting” section:

Voila Norbert search

Let’s say we’re looking for the email address of Ahrefs’ Tim Suolo; type his name and the domain URL in the corresponding fields (1) and (2).

Note that this works better with the full name of the person! As for the domain, Voila Norbert will attempt to guess the relevant URL while you’re typing.

Finding the relevant email address usually takes a couple of seconds; if you hover your cursor over the name, you’ll see a confidence rate – in my case, Voila Norbert says it is 80 percent sure the address is correct.

You can get additional details about your prospect if you click on the email address. There are also two hotkey buttons: one lets you send an email message, and the other allows you to add the email address to a list.

Easy peasy!

Let’s now look at how this works at scale:

How to Bulk Find Email Addresses

This is the option you’ll want to use if you’re looking to find the email address of a couple of dozen or a couple of hundred prospects at a time. The relevant functionality is located in the “Bulk” subheading of the same part of the Voila Norbert dashboard:

Voila Norbert: Bulk Search

You will need to prepare and upload a CSV file – which is basically a text file that is formatted as a table, with lines of comma-separated data. To create a list in this format, you can use Microsoft Excel or Notepad.

Here’s how you can create a .csv document in each of those programs:

Microsoft Excel:

  1. Add data to a new spreadsheet. For example, type “Prospects” and “Company” in cells “A1” and “A2,” respectively.
  2. Click the “File” tab and then choose “Save As.” Click the arrow next to “Save as Type.” Choose “CSV (Comma Delimited)” from the drop-down list.
  3. Change the file name to the one you want. Select the location to save the file, and save. Make sure you click “OK” to save only the active sheet, and “Yes” to save the file in CSV format.

Notepad:

  1. Type in the data, like names and company website addresses, separating the data points with commas.
  2. Open the “File” menu and select “Save As.” In the File Name box, type a file name but make sure that it ends with the .csv extension.
  3. Click the “Save as Type” drop-down list; select “All Files” and click “Save”

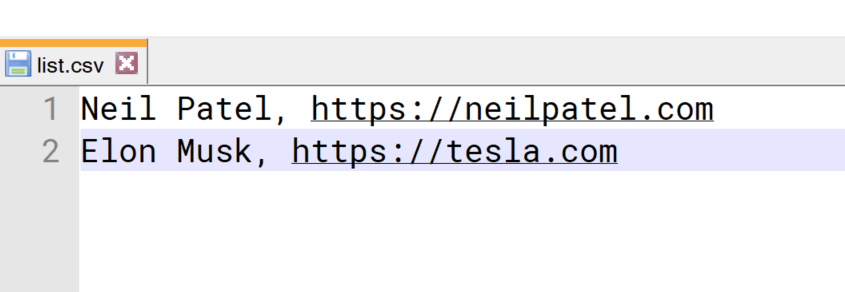
Here’s what the list will look like in a text editor – just a full name and a web page on each line, separated by commas:

Voila Norbert list

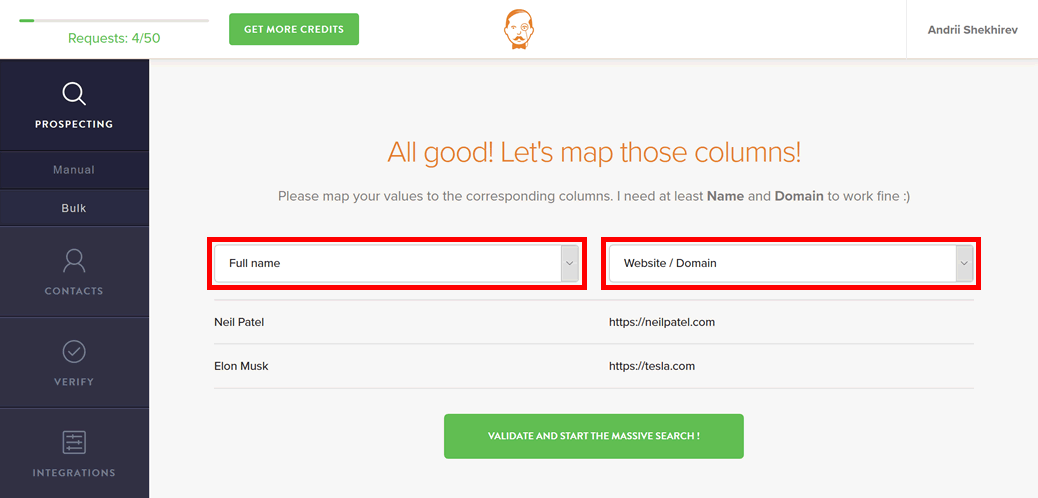
When your list is ready, upload it to Voila Norbert; the system will now ask you to specify the kind of information you just gave in each column. You can select the column types from the list provided on the dropdown menu:

Voila Norbert columns

Now, click on the big green button to allow Voila Norbert to conduct its search. If you have a large list, it may take a while – but as soon as Voila Norbert is done, it will send you an email.

Get back to the VN admin panel to see that you’ve been provided with the option to either download the list as a CSV file or open it in your browser with Google Sheets.

In the resulting table, you’ll have two additional columns: the email address found by Voila Norbert, and the confidence level we’ve already seen in the previous chapter.

Filter the results to weed out anything below 50-60% confidence (or use Voila Norbert’s email validation tool) – and your file is ready for loading into a mail sender app!

Our Verdict: Is Voila Norbert Worth It?

Voila Norbert is an affordable email verification tool designed for digital marketers. The tool is meant to help you quickly find the correct email address of a person you want to email or verify the details of an email address you already have.

Bulk search and verification, flexible pricing, integrations with most of the largest email marketing providers, CRMs, and blogger outreach tools – what else could you ask for in an automation tool?

You can test Voila Norbert for free, no credit card required – just signing up on their official homepage will get you 50 free credits (=50 emails, remember?)

Any questions left unanswered? Had an experience with Voila Norbert you’d like to share? Hit the comment section below, let’s discuss!

Blog Name Generator

How does the Blog Name Generator work?

Nice, you’ve scrolled all the way down to here! Well then, here’s a quick overview of what this nifty little tool does 🤖

In short, this particular Name Generator helps you brainstorm a domain name for your blog or website.

Why do we focus on the domain name, you might ask?

While it is important to come up with a nice and catchy blog title, it’s even more important to have a memorable domain name.

— Otherwise your readers – both existing and potential – might simply not be able to find and memorize your blog’s online address!

— Plus, a well-picked domain name is like a smart and stylish outfit – it makes your blog look more professional and trustworthy.

So how does our Blog Name Generator …um… generate names?

Mostly white magic, and a pinch of fairy dust 🔮 Okay, not really – just plain ol’ algorithms and a semantic association engine.

Our tool uses both a pre-defined set of popular words, prefixes, and endings, as well as a vast linguistic database to come up with various combinations – and then it checks which ones correspond to domain names that are available for registration.

For best results, try inputting either your most important keyword, or 2-3 words that best describe your blog’s intended content.

How Do I Choose a Good Blog Name?

Alright, so the Name Generator has produced a bunch of suggestions – how do you go about picking the best one?

Firstly, make sure it’s as short and readable as possible – you do want people to tell their friends about your blog, right?

Secondly, don’t get fixated on a specific word too much – the .com domain space is quite crowded (actually, really really crowded), so limiting yourself to very generic words might add a lot of time to your search.

In the 3rd column of its output, the Generator will give you a bunch of suggestions with synonyms of your original query – be sure to check on those.

Thirdly, it might be a good idea to take your time and brainstorm in several iterations, but setting yourself a deadline can help avoid overextending your search. After all, the contents of your website is still what matters the most.

Hope our Blog Name Generator will help you come up with something really cool!

In Search of the Cheapest WordPress Hosting – The No-Nonsense Guide for 2024

☑︎ this guide has been last updated in May 2024

If you’re reading this, congratulations! – you’re one of the (few) reasonable people interested in minimizing their hosting bills.

As with most things, there is a catch, though.

Three of them, to be more specific.

While finding the cheapest WordPress hosting sounds like a simple comparison task with a simple mathematical solution, we need to be mindful of the following pitfalls when evaluating our options:

💸 What does “cheapest” even mean? Do we want to pay the least amount of money up-front (and for what period), or look for a hosting that doesn’t quietly inflate prices after your initial period is over – or for the lowest price given a set of essential features? While we’re at it:

💎 Is there something we absolutely can’t do without? In other words, what is the minimum feature set that’s even worth calling “value for money”? Some hosts might be so cheap it’s almost free, but will you get all the necessary things to run a stable WP website?

🚫 Any irrelevant criteria that don’t matter? Articles that “rank” the most inexpensive hosting providers tend to use loads of different parameters to justify their opinions. Do all of them really matter? Do ANY of them matter?!

For those who don’t wish to go into details, here’s our top picks, with in-text links to the respective descriptions in the second part of this guide:

As you can see from the table above, there’s no single, all-encompassing figure to characterize a web hosting’s pricing. Let’s untangle the details and run the numbers!

Defining “Cheapest” (or Look Out for Asterisks)

The biggest difficulty in comparing web host value is the industry-wide obsession with promo pricing – a strategy whereby the first year or years of your subscription cost less than the normal price.

When you visit a hosting provider’s official website next time, look for asterisks, superscripts, or other indicators of disclaimers next to presented prices, for example:

      Starting at $2.75/mo *

Then try finding the actual disclaimers. This usually requires scrolling all the way down to the bottom of the page, or even browsing the terms and conditions. When you finally locate the disclaimer, it will look something like this:

      * Prices reflect discount on first term

While already not conveying user-friendliness, this is still a standard practice (not only in hosting), and in itself isn’t something to frown upon. Or it would be, if not for some less transparent additional tricks used by most hosting providers:

  • Promo prices are presented as discounts, with the strikethroughs and percentage points leading you to believe that this is what you’ll be paying for the rest of your subscription, not just the first year.
  • Real prices are often hidden in terms and conditions or presented in the smallest and faintest font possible. Sometimes the checkout page will not contain ANY mention of the price you’ll be paying at the end of your promo period.
  • Worse still, essential features like domain names are often marketed as “free”, while in reality only the first year of usage will actually be costless.

With competition in the hosting industry being high as it is, your hosting bill can quietly inflate 2-, 3-, or even 4-fold after the promo period is over! As a “cherry” on top, in order to understand that in advance you’ll really need to scour the provider’s website for clues and small-font disclaimers.

These concealed price hikes can become absurdly large:

For example, if you choose annual billing for the most basic plan at Bluehost, which is often praised as one of the “cheapest” WordPress hosts, your bill will grow by 73% in the second year – and stay that way!

For this guide, we’ve set a goal that sounds very logical, but sadly looks almost ambitious when you look at other reviews:

– not only do we consider ALL possible promo effects in our comparisons, but also try to focus on hosts where those effects are as small as possible.

Another thing we should take into account is that different people have different goals when searching for the cheapest WordPress hosting:
– some would like to pay as little as possible up-front,
– some prefer annual billing,
– and some want their aggregated costs for the lifetime of the website to be as low as possible.

And yes, this is why our top-picks table has so many columns :)

In order to account for the promo effects, two of our figures look at aggregate costs over a 5-year period, which can be viewed as an average lifetime of a small/medium website.

This approach allows us to level off the initial promo pricing and look at a bigger picture – making the results much more comparable.

Just in case, here are the more detailed explanations of each measure:

  • Lowest upfront indicates the smallest amount you can expect to pay if your goal is to minimize the immediate payment as you’re registering a hosting account. Quite expectedly, this always implies going for a monthly billing option if available.
  • 5 years, annual billing is our primary gauge, which assumes that you purchase a yearly subscription and continue with this option for the rest of the 5-year period. This one is used to see how heavily the hosts discount their longest subscription offers relative to the more standard ones.
  • 5 years, cheapest is similar, but sums up your hosting expenses over the representative 5-year period while using all promo offers, if any, to the max. This generally leads to higher up-front payments, but reduces the overall cost.

It is also worth noting that all of the above figures are calculated for a bundle of hosting, domain name, and an SSL certificate – the minimum “essential kit” which allows creating a fully functional, modern website.

Why are we including SSL into the mix?

Because from a nice-to-have extra it has evolved into an essential security and trustworthiness feature for any self-respecting website (that wants to rank in search results).

How do we know that?

Because the big G said so, repeatedly. Most hosts have already made SSL certificates either completely free or heavily discounted, and in many cases even mandatory for your hosting subscription.

Discussions of each of our top picks, complete with detailed expense breakdowns by years and separate items, can be found in the second part of this guide – but before reading those it makes sense to gather a little more knowledge about other important features any good hosting provider should have.

…and some tricks that are commonly used to distort the picture.

Let’s start with the must-haves:

What Else to Look for in a Host

Besides pricing, there’s a ton of other features that can be evaluated for any hosting provider – after all the machinery involved is quite complex and has many moving parts.

However, a large part of those features is either very good in most modern hosts, or simply cannot be measured that easily – or both.

Take page load speed, for example:

While it’s very easy to measure a website’s speed at a particular moment in time, the part of it that depends on the hosting provider is so small as to almost be insignificant!

Consider this: the number you got is valid only for a specific page, not the entire website, for a specific time of the day, and for a specific location of your test server (yes, signals take time to travel across continents, even at the speed of light).

If that wasn’t enough, the absolute majority of the actual load time will be eaten up by your active WordPress plugins and the images on your page.

So, if anyone uses a single load speed figure for evaluating or ranking hosting providers, it must be one of the two:

either a single measurement that is not representative of anything, or a meaningless average which doesn’t tell you a thing about the actual performance your pages will exhibit on the same host.

Keeping this in mind, here are the most essential hosting parameters that you CAN evaluate in advance and that tend to make a difference, based on personal and collective experience:

  • Support quality, which includes everything from how easy it is to contact support (I’m looking at you, 1&1 Ionos!), to how quickly your tickets get answered, to the actual willingness of the support team to resolve your issues. The most straightforward way to test support quality is to just try asking a couple of questions – you will see the good from the no-so-good in no time.
  • Ease of use – yes, as simple as that! If a hosting provider really cares about its clients, it goes the extra mile to make life easier for them. This encompasses everything from the sign-up process (twelve steps and 30 minutes of your life wasted? no, thanks!), to the hosting control panel (200 features, of which you actually use maybe 2?), to the cancellation procedure (let’s hope you don’t need that any time soon, but it’s comforting to know that it need be, the process is clear, quick, and hassle-free).
  • Transparency, as in – is the host being clear about its policies, especially promos? How consistent is its pricing? How do refunds work? How willing is the support team to reveal any of those that you still don’t quite understand?

The list is surprisingly short, isn’t it? :)

We didn’t include any technical parameters such as available disk space, type of hosting admin panel, or php version – because virtually all hosting providers offer decent technical setups.

While you’ll of course find some differences here and there, any self-respecting host (and definitely all we’ve considered for our top picks) will have more than enough for a beginner website. After all…

If you’re looking for advanced features or above-average specs, you’re probably not reading the right guide right now – the cheapest hosting is definitely not what you need :)

As you also might have noticed, most of the items we’ve mentioned above are “soft measures”, i.e. something that is quite difficult to put into clear numbers. And that’s not a coincidence –

– because so many things about your final website just happen to depend on dozens of factors, including your specific WP setup, a specific page on your website that is being measured, your visitors’ device profiles, conditions for a specific server on which your website is hosted, etc, etc.

This also means that many criteria commonly used in hosting comparisons simply don’t stand the test of rationality. Here are some common superficial or misleading practices:

What NOT to Look for in a Host

Yes, one of the reasons for preparing this guide was actually the existing guides on the topic. While for someone who is not a hosting geek all those graphs and ratings might give off an impression that serious work has been done in preparation for an article, the following truism is always worth keeping in mind:

– complicated-looking doesn’t automatically imply reasonable or trustworthy.

After spending some time (preferably at least 10 years) using and analyzing various hosting services, as well as setting up your own hosting servers from scratch, one starts distilling things that tend to matter from things that only look relevant.

So, regardless of how much I sympathize with the authors of similar guides (I really do, knowing first-hand how hard it is to try to produce quality content), there are several rants that just can’t be avoided if we want to arrive at a sensible result:

Ratings, stars, and other arbitrary quantitative evaluations given by reviewers. While we can surely understand why those are being used (after all, things look more serious and stable with ratings on them), it doesn’t negate the fact that actually interpreting them as something useful for the reader is near-impossible.

To illustrate the point, here’s a typical example from a comparative analysis of hosting providers:

Hosting ratings?

Each host in the list is given an overall score on a scale of 0 to 5, and several feature-based scores on the same scale, this time expressed as stars.

And yes, summing up and visualizing are powerful techniques to improve readability of any data – but could somebody explain to me what “★★★★☆ for pricing” or “★★★★★ for features” really means? Does it make sense at all to measure, say, uptime in stars?!

This is an example of how ratings and stars are used to purely nudge the reader towards choosing a specific hosting provider, which is probably beneficial for the authors of the post, but not necessarily for the readers.

Even the aggregate rating itself is not all that clear: the example above gives 4.4 to the host that ranks second in their list.

At the same time, the first host has a rating of 4.8 and not 5.0, which should mean that there is no perfection? Or that even that great host doesn’t fully meet all expectations by the authors of the evaluation…

Even more interestingly, the third host in that list has a rating of 4.5 – which seems to mean that, strictly speaking, the hosts are NOT even being ranked by this mega-score.

So, at the end of the day, how much useful information have we extracted from these ratings? Almost none: their scales seem to be relative, not absolute, and the endpoints of those scales are not even remotely explained. They don’t even seem to be used consistently throughout the containing text!

How much additional confusion have we got after trying to figure them out? Quite some, as can be seen from the above example.

Conclusion?

Not only do arbitrary, unexplained ratings add close to zero value to an analysis of hosts, they can actually obstruct our view with unnecessary details that only serve the goals of the authors, not the readers.

Now, for another thing that’s been grinding my gears for quite some time now:

Small-sample tests or even single graphs measuring things like load speed and uptime, which are implied to serve as objective measures of a host’s performance.

When I see a speed test graph in an evaluation of a hosting provider, a slew of questions instantly appears in my mind:

Tested how exactly?

For example, was this graph compiled by tracking a single domain from a single observation point, on a provider which hosts millions of domains on thousands of servers in dozen locations? If not, how many domains and observation points were used?

Finally, am I missing something or is this graph actually spans 5 minutes? Even if it was 5 hours, that’s grossly insufficient for any statistical inference about a host’s reliability.

Another example from a different post openly states that this graph (the only one in the evaluation of a host) has been constructed from a single website of unknown configuration:

Hosting downtime?

In this case the author doesn’t disclose the parameters of the speed test, though e.g. the locations of the test server and the observing server.

Now, it’s true that a site’s loading speed matters greatly when it comes to visitor engagement and satisfaction. However, the lion’s share of your final result will be dependent on the way you configure WordPress (including the number of plugins you install), the theme you use, and, most importantly (and trivially), the content of your pages, like images and videos!

Moreover, your visitors will access your website from a huge variety of devices on very different connections, from old smartphones on 3G networks to gaming laptops on optical cable.

And even if we discount all of the above, running a test on a single website from a single observation point can’t reasonably be extrapolated to an entire server park running countless websites on many servers in different locations.

What else?

“Exclusive” offers which are valid “only” for the visitors of a particular review: this has become a less frequent phenomenon these days, but it doesn’t mean it’s completely gone.

Let’s make it clear once and for all:

No self-respecting hosting provider offers special prices JUST for the visitors of a specific website.

Why would they? If they do that with one website, others will quickly want the same deal, which kind of defeats the purpose. Besides, promo prices for most hosting packages are already heavily discounted, which leaves little to no wiggle room for extra price cuts.

Simply put, in most cases the “exclusive” offers are just the plain old promo prices which can be found just as easily on the official websites of the respective hosting providers.

Finally, my “favorite”:

Comparing apples with oranges, as in – directly comparing promo prices of one host with regular prices of another, or comparing shared hosting prices with managed WP hosting (more on this topic a bit later).

This one wouldn’t be included here if it wasn’t for the fact that you can actually see it even in hosting comparisons from large, popular websites!

Are those comparable?

Not only does this example mix together promotional and full prices – one host is even quoted for its managed plan despite the title of the list clearly stating that this is a shared hosting matchup.

Seriously, WBE, I love your work, but in this case, I’m forced to exclaim, “get your act together!”

The only rational explanation for the above table that I can come up with is the size of affiliate commissions paid to the author of the review by each of the hosting providers – which is of course not something that the users should care about.

***

Now that that’s out of my system, let’s briefly take a look at one final important distinction before we discuss our top picks in more detail:

Shared vs Managed WordPress

The entire “find the cheapest WP host” quest gets an additional twist once you realize that many hosting providers offer more than one service that lets you create a WordPress website!

For example, in addition to standard hosting (which is often called “shared” since you’re sharing a server’s resources with several other websites), there’s oftentimes a “Managed WP” or a “WordPress hosting” solution. As a rule, it’s considerably more expensive – but apart from that, what’s the actual difference?

Actually, when you look under the hood, the perks aren’t necessarily tasty enough to justify the hefty price premium. The most useful ones can be summarized as follows:

  • Pre-installed WordPress – i.e. you get an up-and-running WP starter website out of the box. Note that on most shared hosting accounts you get automated apps that let you install WordPress in 3 or 4 clicks.
  • Automatic updates and backups – this one’s more useful, but can still be done either by hand (the updates) or by using free plugins (backups) just as well.
  • Optimized performance – which is supposed to mean that the servers running your website will be specifically configured for WordPress. I’ve yet to see a hosting provider which actually lists those optimizations though…
  • Pre-installed plugins – which are intended to provide advanced features like malware scans or search engine optimization. Note that you can install those same plugins yourself, if you actually need them. This one really looks less like a benefit and more like bloatware, if you ask me.

Does all of this combined warrant a price tag that is twice as high as shared hosting? For some hands-off users, maybe.

Managed WP

A typical example of managed WordPress (by GoDaddy). Note the same-old promo strategy with links to disclaimers about your next bill becoming much larger.

Can managed WP compete for the title of the cheapest WordPress hosting solution if the same host also offers a less expensive shared plan? Not really.

Unless the pricing is really, really appealing, most of the additional features of managed WP hosting either can be replicated with relative ease or look outright superfluous.

Not surprisingly, in this guide we focus mostly on shared hosting plans, with the rare exceptions of hosts that have some features of managed WP but offer much more competitive prices.

Speaking of such exceptions, let’s meet the first of our top picks for the cheapest WordPress hosting:

The Winner: Warpgate

Taking into account everything that has been said earlier about prices, features, and comparison methods, it was actually surprisingly easy to compile our list of top picks for the “cheapest WP hosting” category.

And among those, in turn, one hosting provider easily stands out if you start looking at the numbers, and that’s the geekish-ly named Warpgate.

Warpgate

The name is an allusion to the sci-fi devices which can materialize objects seemingly out of nowhere, by instantly moving objects between very distant points in space.

Warpgate allows creating WordPress installs in a matter of seconds – all without requiring your credit card details for the first 30 days! The process is so smooth compared to oldschool hosts that it actually does feel like using a little WP teleport.

Get 1 Free Month on Warpgate ›

The WordPress install you get lives on a temporary subdomain, and for a full month you’re free to build and prepare your website without paying a dime.

You can switch to the full plan at any time during the initial 30-day period, which entails adding a permanent domain name (right from your WordPress admin, by the way) and choosing between monthly ($3) or yearly ($30) plans.

The domain name itself, as well as SSL certificates and all other hosting features like email, come at no additional cost for the entire duration of your subscription – i.e. there’s no promo pricing. At all. Which makes the breakdown of your expenses look as minimalist as a Scandinavian coffeeshop:

Year 1 Year 2 Year 3 Year 4 Year 5 Total
hosting $30 $30 $30 $30 $30 $150
domain $0 $0 $0 $0 $0 $0
SSL $0 $0 $0 $0 $0 $0
total $30 $30 $30 $30 $30 $150

As we’ve mentioned above, the makers of Warpgate have decided that hosting panels create more confusion than benefit, so the dashboard has been stripped down to the absolute essentials and put right inside the WP admin:

Warpgate hosting panel

Overall, on a more visceral level there’s just something subtly pleasing about using Warpgate.

Whether this feeling comes from the refreshingly simple and friction-less interactions, from the down-to-earth and frank but still very friendly support, or from the peace of mind knowing there are no catches, hidden fees or price hikes – this unconventional hosting provider is on top of our value-for-money WordPress hosting shortlist right now.

Close Second: Namecheap

Yes, its name literally suggests that it should be on our frugal radars. Having started as a no-frills domain name registrar, Namecheap has grown into other niches over the years, including web hosting.

Namecheap

The Stellar shared hosting plan is the least expensive of its offers, with monthly and yearly billing options. The latter contains a 50% discount for the first year of use, which is clearly communicated on their pricing page.

Domains are cheap, naturally. SSL also comes at a discount for the first and second years, but after that costs almost as much as the domain name.

Get 50% Off 1st Year at Namecheap ›

In total, you should expect your hosting bill to almost double starting from the second year – but even that price is still very low compared to industry averages:

Year 1 Year 2 Year 3 Year 4 Year 5 Total
hosting $15.44 $30.88 $30.88 $30.88 $30.88 $138.96
domain $8.88 $10.98 $10.98 $10.98 $10.98 $52.80
SSL $0 $4.44 $8.88 $8.88 $8.88 $31.08
total $24.32 $46.30 $50.74 $50.74 $50.74 $222.84

While not the absolute cheapest WordPress hosting option, Namecheap does entice with below-market pricing, high-quality infrastructure, and fast support.

Overall, it’s a solid addition to our top picks, and a formidable challenger to Warpgate when it comes to value-for-money hosting.

Runner Up: Hostinger

Our third and final favourite is a hosting discounter famous for its aggressively cheap special offers, especially year-end campaigns.

Based in the small European country of Lithuania, this globally active host offers its services in more than 40 languages and has clients in virtually every country in the world.

Hostinger

Hostinger’s Single Shared plan is its by far cheapest option, with prices dropping as low as $0.80 per year if you are ready to pay for 4 years in advance.

Standard prices (at which your account will renew after the promo period) are several times higher, though; here’s the breakdown for the annual billing cycle:

Year 1 Year 2 Year 3 Year 4 Year 5 Total
hosting $23.40 $95.88 $95.88 $95.88 $95.88 $406.92
domain $8.99 $10.99 $10.99 $10.99 $10.99 $52.95
SSL $0 $0 $0 $0 $0 $0
total $32.39 $106.87 $106.87 $106.87 $106.87 $459.87

In addition to inexpensive hosting, domains, and SSL, you can enhance your future website with a slew of useful add-ons like backups, SEO tools, and priority support – all at an additional cost, of course.

Get term discounts at Hostinger ›

Overall, despite its somewhat flashy selling tactics and significant post-promo price hikes, Hostinger continues to be one of the most inexpensive hosting solutions out there, keeping server and support quality on a level that fully justifies it being a part of our cheapest WP host list.

How Do I Choose?

While we’d be glad to trim down our final results to a single host, it just doesn’t make sense to leave you with no choice, right?

It does?

Well then, here are some tips on how to differentiate between this guide’s three shortlisted hosts, if you so insist:

  • If you’re planning to create 2-3 websites, go for Namecheap’s Stellar shared hosting plan – a balanced combination of low immediate payments and very reasonable long-term pricing.
  • For those ready to lock in for a period of 4 years, Hostinger’s Single Shared plan provides absolutely unbeatable long-term pricing – just keep in mind that subsequent bills will get significantly (like, 800%) higher.
  • In all other cases Warpgate is a satisfyingly simple solution that doesn’t require any upfront payments (or even your payment details) and offers clear, transparent prices for its all-inclusive WordPress warp-ins.

Don’t take our word for it – trying out a web host has never been easier, especially with Warpgate’s free 30-day no-strings-attached full-featured trial.

Get 30 Days Free on Warpgate ›

What do you think of our top picks? Know of any other value-for-money web hosts we didn’t mention in this guide? Share your thoughts, suggestions, and experiences in the comment section below!

The Ultimate 000Webhost Review 2024: The Real Cost of Free Web Hosting

That’s one intriguing title, isn’t it.. Well, it’s not only for capturing your attention: there are indeed some important facts about 000Webhost (and free hosting in general) that any webmaster needs to keep in mind.

In this review we will dig a bit deeper than just saying that “000Webhost is free, and what price can be better than 0?!” by rephrasing our question as follows:

If 000Webhost is free, and most other hosting providers are not, where is the catch? In other words, what do you have to give up compared to paid hosting services?

In order to find the answer, we will examine 000Webhost’s offer as well as its history and business model.

🔍 By the end of this detailed review you will find out whether it is worth using 000Webhost for your new website – and in which situations.

…By the way, as with many other brand names, the Internet has been creative with all kinds of misspellings for 000Webhost – so if you’re here as a result of using search queries such as 00Webhost (two zeroes instead of three) or ooowebhost (letter o’s instead of zeros) – rest assured you’re in the right place!

For those seeking a TL;DR summary of this article: 000Webhost can act as a convenient testing ground for personal and other small-scale web projects, yet its limitations and safety issues make it almost unthinkable for hosting any serious website. For the latter, we recommend using value-for-money hosting providers such as Hostinger:

The more serious alternative to 000Webhost ›

Before we go on to poke mercilessly at the subject of our review, let’s first try to understand how hosting works – and see if any hosting can ever be truly for free:

How (Free) Hosting Works

Whenever you visit a website on the Internet or use an app on your mobile device, you are effectively sending a request (for example, your clicks) and getting some response (for example, a new page being loaded).

And you expect the website or app to give you a response regardless of the time of day or season of the year – in other words, we’ve all grown accustomed to the fact that the Web just works at all times.

This means that in order to be accessible 24/7/365, a website (which is basically just a collection of files) needs to run on a computer that is constantly turned on, and has an uninterrupted Internet connection.

This is a tough task for your typical laptop, so websites use specialized, powerful computers called servers instead.

Servers are not cheap – prices can range anywhere between $500 – $5000 and upwards. Moreover, since they are working non-stop, servers consume a decent amount of electricity, not to mention the fact that they require regular maintenance by qualified specialists:

See where this is going?

If a server costs money, and its operation costs money, and its maintenance costs money – anyone offering to host your website for free is either a charity with very deep pockets or has other sources of income to cover its expenses…

There are two popular ways to do that:

  • Placing ads on the hosted websites: those can be either promotions for the hosting company itself or third-party banners that recoup the costs of running the servers
  • Offering paid upgrades and extra services, while severely restricting the range of features available to the free users.

If we think about it, the hosting company is actually interested in applying maximum possible limitations in both scenarios 🚧 – in the first case, this reduces their operating expenses – and in the second it serves as a motivator for more people to upgrade.

Which limitations are we talking here?

  • For starters, there’s the monthly bandwidth cap, which means there is a maximum amount of data traffic your website can use. This quickly puts a ceiling on your audience growth as well as the type of content you can use – i.e. you can forget about videos and high-quality images.
  • Next, there’s the lower availability, which means the hosting provider does not guarantee that its servers will work 24/7/365, but more like 23/7/365. In other words, up to 5% of the time your website will be down. In the case of 000Webhost, you can check this by scrolling all the way down to the bottom of their status page and looking at the “last 30 days” figure.
  • Your website will not be fast; according to our measurements, it will actually be quite slow by any standard, sometimes frustratingly slow. This makes sense because there’s no incentive for the hosting provider to allocate too much of a server’s resources (memory and computing power) to free accounts.
  • Finally, free hosting does not allow using any custom address for your website (like website.com) – only a sub-address of a specific domain name fixed by your hosting provider (for example website.000webhostapp.com).

That’s exactly what 000Webhost does – its business model relies on everything we’ve mentioned above.

So, if you’re planning to start a free website on 000Webhost, it makes sense to be aware of these limitations.

What about the paid upgrades we mentioned earlier?

This is where things get interesting, because that’s what allows 000Webhost to pay for all those expensive web servers. Let’s see if their paid plans are worth considering:

Free and Paid Plans at 000Webhost

From their official website you can see that there are actually four hosting plans at 000Webhost, only one of which is completely free to use. The other three offer more features and lift some of the restrictions of the free version:

000Webhost plans

As you can see from the left column, apart from the limitations we pointed out earlier there are several other significant caveats to the Free plan –

  • You don’t get any dedicated support apart from a public forum where confused users of free accounts post questions and other confused users try to answer them.
  • There are no email accounts, so forget about communicating with your website’s visitors or your potential business partners using a professional-looking email address. Gmail if fine, right?
  • You don’t get access to the Auto-Installer which lets you set up a website management system in a couple of clicks. The only piece of software you can install automatically on the free plan is WordPress, but that’s usually enough for most beginners.

There’s also the absence of automatic backups and the fact that your disk space is limited to 1 gigabyte, but these are not as serious as the ones listed above plus the other four (bandwidth, speed, availability, and domains) we discussed in the previous chapter.

The paid hosting plans lift some or all of these limitations, while also introducing a 30-day money back guarantee. The Single plan offers more server resources, a personal email account, live support, as well as a 99.9% uptime guarantee, so as to prevent situations like these from affecting your website:

On the Premium plan, even more resources are allocated to your account, making your website load faster. Plus, you can register your own custom domain name for free – so instead of website.000webhostapp.com your visitors will be able to type website.com into the browser’s address bar and visit your website.

There’s one important thing to know about 000Webhost’s paid plans: they are actually provided by another entity. Hostinger, a professional hosting provider that belongs to the same business group, is where you get an account once you upgrade to a paid plan at 000Webhost. Why is it important to known this? Because of –

The 2015 Security Breach

Personal records of nearly 13.5 million 000Webhost clients have been exposed in March 2015, as hackers gained access to the hosting provider’s databases via a code vulnerability. Names, account details, IP addresses, as well as passwords have been compromised, and became available via black-market forums.

There’s a nifty little web resource called “Have I Been Pwned?” which collects data about security breaches around the web. You can input your own email into the box and check if any online service you’re using it for has ever been compromised.

Ironically, “Have I Been Pwned?” showed me that my primary personal email address has actually been exposed in the 000Webhost breach, along with millions other website owners:

Further research and analysis by security specialists after the event have revealed multiple instances of potentially unsafe practices by 000Webhost, including:

  • Using a non-encrypted connection for the client login page, which meant anyone with sufficient skills could intercept vital user data.
  • Running its support forums on an old version of vBulletin software (3.8.2), which was 6 years out of date by 2015! The stable version at that time was 5.1.9.
  • Not using email validation, which meant that anyone could register an account with any email, even one that does not belong to them.

Of course, 000Webhost apologized and took measures. In fact, it has fixed all of the above issues quite quickly, so we could argue that 000Webhost is actually much safer now than they were several years ago, specifically because of that breach.

However, it’s worth keeping in mind that there’s still not much motivation for a free hosting provider to be as secure as possible – after all, if you’re getting something for free, you can’t really complain if it doesn’t work or does something bad. To put it bluntly, no-one owes you anything if you haven’t paid anything :)

Does it also automatically imply that paid hosting providers are more secure?

Usually yes: by the same logic as above, if you take someone’s money for a service, you need to ensure sufficient quality – otherwise your existing clients will leave, and your deteriorating reputation won’t let you get new ones 🤷

So, there’s no “law of nature” that prevents free hosting providers from offering secure, high-quality services, but there’s also rational economic reasoning that strongly motivates them not to do that. In this uncertain situation, the only sure way of finding out whether a free host is any good is to test yourself.

Which we did here at Satori Webmaster Academy.

Quite extensively, in fact.

In the next part of this guide we will tell you about our personal impressions from using 000Webhost; this will provide a foundation for the final verdict: whether or not you should choose 000Webhost for your online project.

000Webhost: Our Impressions

In order to get the fullest picture of 000Webhost’s client offer, we’ve registered an account with the username “satoristudio”, which means the address the system has allocated for our test website is satoristudio.000webhostapp.com – unfortunately the website itself isn’t available anymore, since 000Webhost took it down last year, for unknown reasons.

The first thing that must be said about 000Webhost is that it’s very easy to use. The entire process of creating an account and installing WordPress took us just a couple of clicks and 2 minutes at most. It also felt so much smoother than a similar procedure in, say, GoDaddy.

You do get a lot of banners and messages prompting to upgrade to a more powerful hosting plan, but so far nothing is really suggesting that you should be doing it (apart from the fact that your site’s web address looks quite ugly).

The speed of a 000Webhost website is far from awesome: for a fresh WordPress install with our lightweight Bento theme, the speed test showed a load time of over 6 seconds, which is twice a high as Google’s recommended value – but hey, don’t forget you’re getting this for free!

Another reminder of that fact is a 000Webhost ad in the bottom part of your website. Not only does it overlay a part of your footer – it also sometimes fails to load the banner image, thus displaying a rather dingy-looking text link accompanied by a “no image can be loaded” placeholder:

Where you really start feeling you’re on a free hosting, though, is the web traffic restriction. Each account has a limit of 500 requests per minute, which shouldn’t be confused with visitors per minute: a request is just a single interaction (like accessing a file) in the process of loading a web page, so a single page typically needs between 30 and 100 requests.

This means that when a visitor comes to your website and looks at three pages, around 150 requests will be made – so the limit we mentioned above is really only 5-10 page views per minute.

We were able to overload the requests-per-minute restriction quite easily by just opening the website on several devices at the same time. Once you approach and surpass the “danger zone”, the website starts loading slower and slower, to the point when it becomes too annoying to continue using.

While we’re on the topic of limitations, there is one more parameter that should be noted here: the maximum allowed number of inodes. This roughly corresponds to the number of files and directories on a disk.

On 000Webhost, each new WordPress plugin you install and each new image you upload will count towards your inode limit.

This might sound like gibberish, but it’s worth considering the fact that even WordPress core (i.e. a fresh installation with no plugins at all) takes up around 20% of your allotted inodes at 000Webhost.

You will need to install more than one WP plugin to exhaust the 20,000 inode limit, but it’s quite doable; for the sake of comparison, consider that even the cheapest hosting plans at paid providers allow up to 250,000 inodes.

Finally, there’s the matter of your website switching off from time to time: 000Webhost is open about the fact that their services do not have the typical uptime figures you would expect from a hosting provider (i.e. 99.9% or higher).

According to 000Webhost’s service status page, the average 30-day statistic is around 99%:

While a difference of 0.9% might not sound like much, on a monthly basis this means an increase in offline time from 40 minutes – to 7 hours!

This is not a big deal if you’re still just working on your website (part of those outages will happen at night anyway), but repeated breakdowns are not something that makes your visitors like (or trust) your website.

If you do experience a glitch, there’s no dedicated customer support available at 000Webhost – which is understandable, because support staff requires salaries, something that a free product can’t really cover.

Still, there is a forum where users can ask questions and get help, mostly from other 000Webhost users. Reply times can vary, but on average don’t expect your problem to be resolved within less than a week ⏳

The good news is that all previous forum threads are freely available to the public, so if you need a solution quicker and you suspect your problem might be a standard one, you might want to browse older discussions.

Pros and Cons of 000Webhost

Now that we’ve looked at 000Webhost from all angles, let’s summarize its strong points and weaknesses in order to arrive at the final assessment:

  • It’s free to use for anyone; you can even create more than one account if you have several email addresses (just don’t be too surprised if some years later you start getting more spam in those mailboxes).
  • The sign-up process is really easy and fast, you can set up your first WordPress website in just a couple of minutes thanks to the built-in automatic installer.
  • There is a very decent hosting control panel, and although it’s hardly a professional one, most of the things you need are there, including file and database managers, as well as other settings such as redirects, email boxes, and basic security features.
  • Page load speed is not something to be proud of, but in fact it’s quite alright, especially for a hosting which does not cost money. As long as you don’t have more than 50-100 visitors per day, you shouldn’t worry about overloading your traffic capacity.
  • Oh, and did we mention it’s free?!
  • Your only option in terms of your website’s address is a sub-domain which looks like https://site.000webhostapp.com – hardly trustworthy or easy to memorise for your visitors. You can of course buy a domain elsewhere and attach it to your 000Webhost account, but that would get you the “worst of both worlds”: neither a completely free website nor a free domain. Check the next section for a more sensible solution instead ;)
  • There will be 000Webhost ads at the bottom of your website, which will occasionally malfunction and display a “broken image” icon.
  • The ceiling of 500 requests per minute effectively limits your website’s simultaneous audience to just 2-3 people. When it is exceeded the page load speed will deteriorate, and the website might even become inaccessible for a while.
  • According to the average uptime figures, your website is expected to be offline for several hours every week; if you’re lucky some of them will be at night.
  • It’s quite easy to exhaust the maximum allowed number of files in your storage, even just with a WordPress website and a couple of popular WP plugins such as Jetpack.
  • The only customer support option is a forum where you can post your question and wait for other 000Webhost users to help you. Email, phone, or live chat support is not available on the free plan.

Our Verdict: Is 000Webhost Worth Using?

You’re probably noticed that the number of pluses and minuses is roughly the same in the previous section. Which means there’s no straightforward answer to our question, is that what we’re trying to tell you?

Well, no, actually we think there clearly is a case when using 000Webhost might be a good idea – and that’s when you are just starting to work on your first website. It’s hard to deny that paying a large sum of money upfront, to just test your idea, doesn’t make much sense.

So instead of buying a paid hosting you might just as well start with a free plan at 000Webhost, take your time to build your website and show it to your first visitors, see how it goes:

When you’ve finally validated your idea and gotten serious about your online project, though – upgrade to a paid plan and get yourself a unique, professional-looking domain name. Your visitors won’t take you seriously with an address like something.000webhostapp.com and ads displaying in your website’s footer.

The good news is, high-quality web hosting isn’t necessarily expensive. If you choose the most basic upgrade at 000Webhost (which corresponds to the Single plan at Hostinger, its paid hosting partner), you will get all the benefits of a professional hosting provider with none of the disadvantages of the free 000Webhost plan.

You can even choose to get billed every three months instead of annually, which will make your upfront costs quite negligible.

If you ever decide to upgrade or are interested in trying Hostinger right away, be sure to check out our guide on getting an additional 15% discount on its (already inexpensive) hosting packages:

Get a 15% Discount at Hostinger

Have you already tried 000Webhost? Or maybe you’re still having a hard time deciding whether you should choose it for your web idea? You can talk this over with other 000Webhost users and ask for advice in the comments section below – let’s discuss!

Affiliate disclosure: we think it is only fair to let our visitors know that some of the links we use on this page (and throughout our website) are affiliate links, which means we receive a small commission for purchases made through those links. This does not affect the price you pay as a client, so if you found this guide useful, please support our project by using our partner links. Thank you!

Bento Theme Manual

About the Theme

Bento is a free multi-purpose WordPress theme packed with features and possibilities. With a variety of templates and settings, it can be used to create anything from personal blogs or landing pages to complex showcases and online shops. Bento is a result of years of theme-building expertise accumulated here at Satori Studio, making it a stable and reliable, yet at the same time remarkably flexible theme. With over 80 theme options as well as dozens of settings for individual pages and posts, Bento offers unprecedented customization possibilities for both beginners and experienced WordPress users.

Bento is responsive, retina-ready, and translation-compatible. The theme is also bundled with the Content Builder plugin by SiteOrigin, which offers an easy drag-and-drop interface for creating both simple and complex pages, with a choice from dozens of building blocks such as text, images, sliders, carousels, buttons, widgets, and many more.

Thank you for choosing Bento! We hope you will enjoy using it as much as we have enjoyed building it.

Version: 2.2 (changelog)
Theme demo: satoristudio.net/bento
Free download: wordpress.org/themes/bento

Support and Feature Requests

You can ask us a question or report a bug on the official support forum. We generally aim to respond to all requests and messages within 5 business days, yet would appreciate your patience taking into account the fact that the theme is a free and open-source item.

Moreover, if you have suggestions or ideas on how Bento or our support could become better, please do not hesitate to get in touch – we appreciate your feedback!

Installation

Please follow these steps to install Bento:

  1. In the admin area of your WordPress website, visit the Appearance -> Themes admin menu section.
  2. Click on the “Add New” button on top of the page.
  3. Input “bento” into the search form on the right hand side of the page.
  4. When results appear, locate the “Bento” theme and place the cursor over it.
  5. Several controls will appear; click on the blue “Install” button in the bottom right corner.
  6. Wait for the theme to upload and install; after the process completes, click “Activate” on the next screen.
  7. After a successful installation of the theme you will be prompted to install the bundled Content Builder plugins – please see the respective section of the current manual for more information.

Alternatively, you can install Bento manually:

  1. Download the theme archive from the official theme page.
  2. In the admin area of your WordPress website, visit the Appearance -> Themes admin menu section.
  3. Click on the “Add New” button on top of the page.
  4. On the next screen, click on the “Upload Theme” button on top of the page.
  5. Click on the “Choose File” button that appears.
  6. In the pop-up window, navigate to the archive you’ve downloaded on step 1. and press “Open”.
  7. Click on the “Install Now” button to the right, which has now become active.
  8. Wait for the theme to upload and install; after the process completes, click “Activate” on the next screen.
  9. After a successful installation of the theme you will be prompted to install the bundled Content Builder plugins – please see the respective section of the current manual for more information.

That’s it, you’re all set!

Updating Bento

You can update the theme from the Apperance -> Themes section of your website’s admin panel: when an update is available, you will see a “New version available” ribbon on top of the Bento theme box; click on the “Update now” link in the ribbon – everything else will be handled automatically.

Alternatively, you can update the theme manually:

You can always download the latest version of Bento from the official repository. After obtaining the “bento.zip” archive, unzip it and upload the resulting “bento” folder into the following folder inside your WordPress installation: /wp-content/themes/ using an FTP client or your hosting provider’s file manager. Agree to replace all existing files if prompted. Updating the theme will not erase any theme settings, pages, posts or other content.

Theme Options

Bento comes with a powerful set of options that allow full customization of the theme according to your wants and needs. All theme options can be set through the native WP Customizer interface in your admin area, by visiting the Appearance -> Customize section. After any modifications to the theme options please do not forget to click on the blue “Save & Publish” button in the top right corner of the customizer area.

The theme adds or affects 16 sections of the Customizer panel:

  1. Help & Expansion Pack – here you can find useful links as well as information on the Expansion Pack
  2. Site Identity – this section allows you to set the custom logo, favicon, and other site-wide branding.
  3. Site Elements – in this section you can set up various elements of the website such as displaying next posts in blog without reloading the page, fixing the header on top of the window when scrolling through the website, etc.
  4. Site Layout – here you can set the width of the content area, choose between a wide and a boxed layout for the website, as well as set up the backgrounds for the website and the content area.
  5. Site Colors – allows you to define the background color for the website (please note that for this to have effect, the “boxed” mode should be set in the “Site layout” section).
  6. Site Background Image – allows you to define the background image for the website (for this to have effect, the “boxed” mode should also be set in the “Site layout” section).
  7. Fonts and Typography – in this section you can input the fonts to be used for the headings, the menu, and the rest of the texts of your website. Just go to the Google Fonts repository, pick any fonts you like, and write their names into the respective fields. Note that all fonts used in this section can also be identical if you wish.
  8. Header Colors – this section allows you to choose the colors of each separate element in the header section of the website, including foremost the main menu.
  9. Content Colors – here you can change the colors of each element in the body of the website, i.e. the content and the sidebar areas.
  10. Footer Colors – the third styling section lets you choose the color of every element in the footer, the lowermost part of the website.
  11. Homepage Settings – apart from the standard options of choosing which page to display as the front of the website, Bento allows you to choose the header image and call-to-action elements for that page.
  12. Additional CSS – here you can add your own CSS code to the website, without the need to edit the style.css file. This code will stop having effect if you switch to another theme, but will be restored if you then switch back to Bento.
  13. SEO Settings – here you can define the meta information for search engines. Please note that this feature is only available with the Bento Expansion Pack.
  14. Analytics Code – allows you to add Google Analytics code to track your website’s traffic and other visitor data. Please note that this feature is only available with the Bento Expansion Pack.
  15. Call to Action Popup – the settings in this section enable you to activate and customize the call-to-action popup for converting your visitors. Please note that this feature is only available with the Bento Expansion Pack.
  16. Preloader – here you can activate and customize the loading animation for your website’s pages in order to improve user experience and only display fully rendered pages to your visitors. Please note that this feature is only available with the Bento Expansion Pack.

There are two menu locations in Bento: in the primary header area where the logo is situated (primary menu), as well as in the footer, below the footer widget area and next to the copyright statement. The primary menu can have sub-menus up to two levels deep (i.e. a sub-menu item can have its own sub-menu); the footer menu does not display submenus and is intended for a flat navigation section, such as terms and conditions, contact information, etc.

The menus are sourced from the native WordPress menu constructor, found in the Appearance -> Menus admin section. You can create and assign your own menus to each of the menu locations: first, create a new menu by clicking on the respective link just below the “Edit Menus” tab, entering a unique name in the “Menu Name” box, and clicking on the blue “Create Menu” button on the right; once you’ve created a menu, the checkboxes in the “Theme Locations” option under the “Menu Settings” section will provide an opportunity to assign the menu to one of the locations mentioned above (you can also change it later by visiting the “Manage Locations” tab on the same admin page).

To add new items to a menu, tick the respective page, post, or term in the panels on the left hand side of the menus admin page; you can rearrange added items by means of drag-and-drop, and create sub-menus by dragging an item under its intended parent item and then slightly more to the right, until it sticks.

Grids And Other Page Layouts

Bento comes with a flexible page layout system, consisting of three parts, each of which can be configured while in the editor mode for a particular page, post or product:

  1. Page templates, of which there are two: the default template (i.e. classical page) and the grid template, which, in turn comes in three varieties (see details below). Any page can be assigned any of the two templates by using the “Template” drop-down in the “Page Attributes” settings block on the right hand side of the page edit screen.
  2. Grid modes, of which there are three: masonry – a tightly packed layout using various tile sizes which fills all available gaps (demo); columns grid – a layout which uses “cards” with images and text and aligns them by columns (demo); and rows grid – a layout which organizes the blocks by rows, independently of their heights (demo). Grid modes can be switched using the “Grid mode” drop-down in the “Grid settings” box which appears at the bottom of the page when the “Grid” template has been chosen in the “Template” drop-down in the “Page Attributes” settings block on the right hand side of the page edit screen
  3. Sidebar configurations, which exist in three varieties: right-sidebar (default), left-sidebar, and full-width. Each of these can be mixed with any of the page templates or grid modes described above. To switch between sidebar configurations in Bento, use the “Sidebar layout” drop-down in the “General settings” box underneath the text area editor, in the edit mode of the particular page. Since Bento version 2.0 it is now also possible to set site-wide sidebar defaults, the respective option is located in the “Site Layout” tab of the Customizer panel

The pages with “grid” templates (see point 1 above) act as containers for displaying collections (grids) of individual items, which can be posts, products (in the presence of WooCommerce) and projects (in case you have the Bento Expansion Pack installed and activated). You can set which content types to display on a grid page by using the “Content Types” checklist found in the “Grid Settings” box which appears underneath the content area when switching to the “Grid” template in the page editor mode.

Since Bento version 2.0 grids are filterable by taxonomies (tags or categories) and can be ordered by date, title, or comment count, the respective settings can be found in the “Grid settings” box mentioned above.

It should also be noted that individual posts (Posts admin menu section), products (Products admin menu section) as well as projects (Portfolio admin menu section) have a separate settings box called “Masonry Tile Settings” which allows customizing the look of the particular item on a grid page with the “masonry” grid mode (see points 1 and 2 above for details).

The images for the tiles and grid items in other grid modes are sourced from the thumbnails (featured images) of the respective posts/projects/products. The overlay text of masonry items is generated from the titles, while the body text of the columns and rows grid mode tiles comes from the main content of the respective post or the post’s excerpt, if it is not empty.

Apart from that, you can add even more diversity to your pages by using the bundled Content Builder, which enables constructing column grids with 2-6 columns of various relative widths, as well as mini-grids and other layouts elements right inside the content area of any page or post.

One-Page Mode

Bento is capable of creating one-page websites, which implies having all information on the same page, with the navigation menu scrolling to the respective section of that page without the need to reload the page every time the visitor clicks a link. This layout has become quite popular in the recent years, especially for smaller websites with a simple structure which does not require multi-layered navigation. One-page mode can increase the impact of your website by keeping the visitors engaged.

It should be noted that using one-page mode in Bento implies the presence of the bundled Content Builder plugin (see installation details in the respective section of this manual). The following steps outline the process of creating a single-page website using Bento:

  1. Create a page (Pages -> Add New) using the Builder – while in the page edit mode, click on the “Page Builder” tab in the top right corner of the content area. This will be your canvas for the one-page layout.
  2. Use rows (the “Add Row” button in the top left corner of the content area) to organize the contens of the page into sections, corresponding to how you want your one-page layout to be structured.
  3. For each such row, hover over the small wrench/spanner icon in the top right corner, and click on “Edit row” in the hover-menu. In the pop-up window that opens, click on the “Attributes” section under the “Row Styles” on the right. Input an identifier for the row into the “Row Class” field; the identifier should consist of lowercase latters, underscored, and dashes – e.g. “contact-us”. Click on the blue “Done” button to save the changes.
  4. Save/update the page by clicking on the blue “Publish” (“Update”) button in the top right corner of the page editor view.
  5. Visit the Appearance -> Menus admin section and create a menu, if you haven’t yet done so (please see this chapter for more details on menus). In the accordeon on the left click on “Custom Links”, and into the URL field input the URL of your website’s home page, plus the “Row Class” identifier you’ve specified earlier, preceded by a hash, i.e. “http://yourwebsite.com/#contact-us”. The “Link Text” field should contain the name of the menu item as seen by the user. After filling out the fields click on the “Add to Menu” button below and then on the blue “Save Menu” button on the right in order to save the changes.
  6. Voila! The menu items you add in this fashion will link to specific sections of your page, and the window will scroll smoothly to the required location thanks to the theme’s built-in scripts.

Header Layouts

The theme offers four distinct header configurations to personalize the look and feel of your website, which can be set by using the “Menu Layout” drop-down in the “Site Layout” section of the Customizer panel:

  1. Top, right-aligned: this is the classic configuration with the header on top, the logo on the left and the menu on the right.
  2. Top, centered: the header is on top of the page, with both the logo and the menu centered (see demo).
  3. Top, hamburger button + overlay: the header is on top of the page, with the logo on the left and the menu represented by a hamburger icon on the right; clicking on the hamburger opens a full-page overlay with the menu (see demo). This option is most suitable for websites with flat navigation structure, since the overlay menu does not support submenus.
  4. Left side: the header is on the left side of the page, pushing the content area to the right. The logo and the menu are left-aligned inside the header (see demo).

Widget Areas

There are three widget areas in Bento: the Sidebar, which is situated on the right or left side of the content (see the Page Layouts section for more details on content alignment); the Footer, which is situated below the content and above the copyright area; and the WooCommerce sidebar, which is identical to the first widget area in its position but is displayed only on WooCommerce-related pages, such as the shop, individual product pages, checkout, etc.

By default all widget areas are empty, you can add widgets to them by visiting the Appearance -> Widgets admin menu section – simply drag the needed widget from the left side of the view and drop it onto one of the widget areas on the right. It must be noted that when a widget area is empty, it will not display on the front-end – in other words, if there are no widgets in the Sidebar widget area, all pages and posts with sidebar layouts will still appear as full-width (same logic is applied to other widget areas); this is done automatically to avoid unnecessary swathes of empty space on the website.

Color Customization

You can change the color of any group of elements in Bento using the visual colorpickers in the Customizer panel; the respective tabs are “Header Colors”, “Content Colors”, and “Footer Colors”. To change a color setting, click on the rectangle to the right of the “Select Colour”, which will open a hover control; there are three ways of interacting with the control: by clicking into any part of the square gradient area, by using the colored squares on the bottom (which will change the hue of the gradient area), and by using the draggable caret on the right, which will change the level of saturation. Apart from using the hover control, you can simply input the color in the hex notation into the field which appears next to the colorpicker once you click on it. To clear the value of the colorpicker, use the “Clear” button on the right of the active hover control. Do not forget to click on the blue “Save & Publish” button on top of each section to preserve your colors!

Visual Content Builder

Bento comes bundled with a powerful free content builder by SiteOrigin which allows easily creating awesome professional layouts from a set of “building blocks”, including text, images, buttons, grids, widgets, and many more. Its use is not required for Bento to work, yet your webmaster experience will be much more pleasant with the content builder installed. Upon activating the Bento theme you will see a prompt on top of each admin page recommending to install the Content Builder, which is as easy as clicking the link in the prompt. It is also recommended to install the second offered bundled plugin, the Extra Elements package, which will enhance your Content Builder with cool additional blocks such as galleries, sliders, post grids, etc. Alternatively, you can also install both plugins manually from the Plugins -> Add New admin section. After having installed both plugins you will need to activate them by clicking on the “Activate” link underneath the title of the respective plugin. You can also install the bundled plugins by visiting the Appearance -> Install Required Plugins admin menu section.

After activating both plugins it is advisable to visit the Plugins -> SiteOrigin Widgets and click the “Activate” button on every available widget since some of them might be disabled by default. Moreover, it is recommended to visit the Settings -> Page Builder admin section and tick the checkboxes of the content types you wish to use the Builder with, in the “Post Types” option inside the “General” tab.

Please note that due to the way the theme generates grid pages, the Post Loop element of the Content Builder will not create a grid if you choose the “content-grid.php” in the “Template” drop-down. If you need a post grid, you’re better off using either the theme’s built in template or the “Simple Masonry” widget supplied by the SiteOrigin Builder.

For a detailed guide on using the Content Builder, including high-quality tutorial videos, as well as widget-related support, please refer to the official manual.

Post Formats

There are six post formats in Bento, which can be switched between using the “Format” settings box on the right side of the post editor mode view:

  1. Standard – the default format, used for displaying the text, images, and other content in a normal way.
  2. Aside – intended for shorter remarks, thoughts, announcements, etc. This format does not display a title.
  3. Gallery – used for gallery-type posts, such as photo collages.
  4. Quote – pre-formatted for displaying quotes; the content of the post becomes the text of the quote, and the title of the post is used as the author of the quote. It is recommended to use plain-text mode for quote-format posts instead of the Content Builder mode.
  5. Link – useful for recommending specific links; the title of the post is used as the text (anchor) of the link, while the URL of the first link within the content of the post will be used as the link destination.
  6. Image – intended for displaying single images.

Advanced Page Headers

Pages, posts and other content types in Bento can display full-width headers with text and button overlays like seen on the theme demo homepage or this page. To enable this feature, tick the “Activate Extended Header” checkbox in the “Page Header Settings” section underneath the content area in page editor mode. Doing so will expand a set of additional options which such as defining the height of the header by setting the padding above and below the title, customizing the coloured semi-transparent overlay to increase readability of the title, as well as adding primary and secondary action buttons to the header. The header image itself is sourced from the post/page featured image, which can be added via the native Featured Image box on the right side of the page edit mode view.

In addition to the page/post title, it is also possible to add subtitles in Bento, which are sourced from the excerpt of the respective page. In case you do not see the “Excerpt” field while in the edit mode, please click on the “Screen Options” tab in the top right corner of the screen in edit mode and tick the respective checkbox.

The front page’s header image and call to action buttons can be added via the “Homepage settings” section of the Customizer. Since Bento version 2.0, it is also possible to assign a separate header image to the blog posts page – the controls can be found in the same section of the Customizer.

Please note that due to particularities of the WordPress templating system extended headers do not currently affect the WooCommerce shop page, as well as other archive pages, such as category, tab, or custom taxonomy archives.

Vector Icons

Bento comes with 500+ vector icons from FontAwesome, which you can use on any page or post by inserting a simple piece of markup: an <i></i> tag with a class which specifies which icon to use. For detailed usage instructions please refer to the official FontAwesome guide.

Translating Bento

The theme uses proper WordPress functions to wrap all localizable strings, which means it can be both manually translated and used with third-party translation plugins such as the free Polylang or the paid WPML. The files needed for a manual translation are located in the “languages” folder inside Bento’s main directory; for detailed instructions on translating themes manually please see this guide. In case a plugin requires inputting the theme’s text domain, please use “bento”.

WooCommerce + Bento

The theme is fully compatible with the world’s most popular free e-commerce WordPress plugin, WooCommerce. The plugin is free software and is not included within the theme, i.e. it must be installed separately to activate Bento’s WooCommerce features. No additional steps are required from the theme’s side after the installation of WooCommerce – however, you can adjust certain additional parameters in the “Website Elements” tab of the Customizer panel For a demonstration of how Bento works with WooCommerce, please see the “E-commerce” section of the official theme demo.

The grid page template in Bento works just as well with WooCommerce products – you can tick the “product” option in the “Content Types” setting found in the “Grid Settings” box which appears underneath the content area when switching to the “Grid” template in the page editor mode in order to create project grids or even mixed post+project grids. The “Masonry Tile Settings” box also works for individual products (enter the editor mode for the product and scroll to the bottom of the view) for customizing how a particular item will look as a tile in a masonry grid.

Please note that the extended header feature does not currently affect the default WooCommerce shop page due to the limitations of the WP templating system. In case you need a shop with a header image, you can create a new static page, set it to Grid template, and choose “products” as the source of grid items in the “Grid Settings” box underneath the main content edit area. DO NOT set this new page as the WooCommerce shop page, since doing so will prevent the header image from being displayed.

Importing Demo Content

There is a sample data file available for Bento which includes all data from the official theme demo, it can be downloaded here (please right-click on the link and choose “Save As” in the popup dialogue). In WordPress, you can import data by going to Tools -> Import, clicking on the WordPress installer and installing it in the pop-up window, then clicking “Activate Plugin & Run Importer”, and choosing the xml content file to upload. After you press “Upload file and import”, do not forget to check the “Download and import file attachments” box (you can also set the author for the imported posts in the same screen, but that is not mandatory), then press “Submit”. In case you do not have the WooCommerce plugin installed, the “product” and “product tag” items will return errors when imported – you can ignore the error messages in this case. In case you install WooCommerce after importing demo content, the demo products will not be visible and will need to be imported anew – you can use this separate source file to do it. Moreover, in case you install the Bento Expansion Pack after importing demo content, the demo projects for the portfolio will not be visible and will need to be imported anew – you can use this separate source file to do it.

Please note that the sample data does not contain any settings in the “Settings” admin section or any Customizer panel settings; you will also need to assign the menus to their respective locations – make sure that the theme location checkbox is checked in the “Menu Settings” section right under the menu constructor in the Appearance -> Menus admin section.

Child Themes

It is highly recommended to use a child theme for any modifications to Bento code – this way your changes won’t get overridden when a theme update occurs. A minimal sample setup for a child theme can be downloaded here; more information on using child themes can be found in this part of the official WordPress knowledgebase.

Frequently Asked Questions

The website went blank after updating the theme to a newer version; what gives?
Please completely remove the existing version of the Expansion Pack plugin and install it anew using this source; after that, refresh you web page – in case the issue is not fixed at that point, please let me know and I will investigate further.

I have uploaded the theme manually but upon pressing “activate” the system returns a white screen and the website stops working. What the hell is wrong?!
Don’t panic :) It is most probably due to your hosting server running out of php memory, breaking the website when you tried to install an additional item. What needs to be done is to add the following line to wp-config.php file in the root folder of the WordPress website:

define('WP_MEMORY_LIMIT', '2048M');

If this does not work, try doubling the figure in the brackets; if still broken, please contact us.

I have uploaded the theme manually and it shows the message “Are you sure you want to do this? Please try again.” What went wrong?
Please upload the unzipped theme folder (it should have the name “bento”) into the “wp-content/themes/” directory of your WordPress installation using an FTP client – some hosting providers have small file upload limits for user convenience which limits the usage of WordPress’ internal theme uploader. After that, visit the Appearance -> Themes admin page, locate the newly uploaded theme from the list, and click “Activate”.

All portfolio projects I create with the Expansion Pack display a 404 error (“page not found”).
Please try visiting the “Settings -> Permalinks” admin section and clicking on the blue “Save Changes” button without adjusting anything. After that, refresh the portfolio page in your browser and try to access the project pages.

License

Like WordPress itself, Bento is licensed under the GPL (GNU General Public License) and is free for personal and commercial application – use it to make something cool, have fun, and share what you’ve learned with others.

Changelog

2.2 / 29 August 2019
Improved main menu behaviour on sertain mixed one-page setups.
Fixed header background color on scroll for centered header configurations.
Fixed menu text color setting as applied to second-level submenu items.
Fixed the bug that prevented the SiteOrigin widget block from displaying properly.

2.1.3 / 10 July 2019
Fixed page excerpts for pages with Grid template.

2.1.2 / 8 July 2019
Improved compatibility for admin scripts.

2.1.1 / 20 June 2019
Improved thumbnail support for custom post types registered by third-party plugins.
Fixed scroll position for same-page menu links with active full-height page header.
Fixed the Grid settings animation for classic editor mode.

2.1 / 26 March 2019
Fixed compatibility issues with the Gutenberg editor.
Added extra styling for the admin metaboxes.

2.0.6 / 6 February 2019
Improved side menu scrolling for very long menu cases.

2.0.5 / 26 November 2018
Updated theme screenshot to comply with the latest requirements.

2.0.4 / 22 October 2018
Fixed mobile logo sizing for side-menu layout.

2.0.3 / 27 September 18
Standardized button appearance across all browsers.
Fixed copyright displaying in the theme footer.
Updated theme translations.

2.0.2 / 20 July 2018
Added more blog page controls to the “Homepage Settings” tab of the Customizer.
Fixed the behaviour of the extended header elements on blog posts pages.

2.0.1 / 11 July 2018
Fixed the CMB2 admin notice bug.
Added extra functions for the Expansion Pack.
Fixed the text float issue on aligned images inside content.
Fixed submenu chevron positioning for larger menu font sizes.

2.0 / 29 June 2018
Replaced all Isotope layouts in the theme with modern CSS grids, removed Isotope dependency.
Added a category filter for grid pages.
Added item ordering options for grid pages.
Added site-wide options for page/post sidebars layouts.
Blog posts page can now have an image header.
Completely rewrote the Customizer scripts using Customizer JS API.
Replaced Font Awesome internal dependency with a CDN.
Improved primary menu CSS for higher robustness and customizability.
Fixed side-menu layout styling issues.
Replaced submenu menu chevrons with analogous Dashicons.

1.8.1 / 27 February 2018
Updated the bundled CMB2 library.
Updated the bundled FontAwesome set to v5.
Improved the behaviour of the “Hide thumbnail” post option.

Version 1.8 / 29 December 2017
Improved WooCommerce single product page styling.
Removed animations from footer widget nav menus.
Included backward-compatibility for the custom logo function.
Fixed scroll position for the same-page links from the CTA buttons in the presence of fixed header.

Version 1.7.9 / 8 December 2017
Added a Spanish translation.
Fixed sidebar behavior on blog index-template pages.

Version 1.7.8 / 9 November 2017
Submenus in side-menu layout now stay open on pages corresponding to active submenu items.
Masonry grid now behaves better on page resize with side-menu layout.
Added the “target” attribute to allowed html for the footer copyright.

Version 1.7.7 / 25 October 2017
Fixed the full-width grid behaviour in the presence of side-menu.
Fixed the bug which prevented the new breakpoint for fixed header on scroll.
Fixed thumbnail display with active extended header on static pages.

Version 1.7.6 / 2 October 2017
Fixed scroll positions for same-page links in the absence of fixed header.
Posts with excerpts now display the excerpt on the native blog page.
Added more robustness to the one-page links js function.
Fixed margins for the first stretched Content Builder element.

Version 1.7.5 / 8 August 2017
Fixed thumbnail visibility for posts with active Extended Header
“Hide featured image” option now also hides thumbs on native blog page.

Version 1.7.4 / 17 July 2017
Improved the presentation of item content in column and row grids.
Fixed html tag rendering in grid items of quote format.
Fixed duplicate featured images on grid pages with active extended headers.
Removed unneeded arrows from grid page excerpts.

Version 1.7.3 / 11 July 2017
Fixed thumbnail behaviour on pages with active extended header.

Version 1.7.2 / 10 July 2017
Fixed content width for the SiteOrigin Features widget.
Fixed side menu width for boxed site layout.
Fixed grid image for posts and projects with active extended headers.

Version 1.7.1 / 19 June 2017
Fixed call to action button alignment settings with extended header being switched on.
Fixed the default logo line height for long site titles.
Fixed mobile menu scroll behaviour for one-page setups.
Adjusted the fixed header position with active admin bar.

Version 1.7 / 11 May 2017
Moved the mobile styles breakpoint to a smaller width (1024px).
Added a control to change the logo padding.
Fixed mobile menu z-index order for cases with transparent header.

Version 1.6.7 / 25 April 2017
Updated the included CMB2 library.
Fixed header overlay and tile overlay opacity setting saving.
Removed hyphenation from the stylesheet.

Version 1.6.6 / 12 April 2017
Fixed submenu behaviour with active sticky header given that a page is loaded in the middle.
Added a more universal fix for the same-page menu item highlight on scroll.
Added product gallery features support for WooCommerce 3.0+.

Version 1.6.5 / 7 April 2017
Added full pingback support in the theme using native WP functions.
Improved the function that determines the number of WooCommerce shop columns.
Fixed the appearance of the WooCommerce Star Rating filter widget.
Fixed same-page menu item highlight on scroll.
Fixed the sticky header positioning when loading the page in the middle.

Version 1.6.4 / 3 March 2017
Fixed the featured images control visibility issue for the project content type.
In case of empty logo the theme now displays site title in its place.
Replaced the theme screenshot with a more accurate one.
Replaced the front-end welcome header with an admin page.
Removed Expansion-Pack-specific metaboxes from the front-end.
Moved the option to edit the credit link in the footer into the Expansion Pack.
Corrected the name and description of the colors section of the Customizer.
Fixed the output of the “link” and “quote” format posts and linked to single post view.

Version 1.6.3 / 13 February 2017
Added the header image upload field for the Expansion Pack.
The bottom footer does not display at all now if the footer menu and the copyright statement are blank.
Fixed the featured image behaviour in the presence of extended header on Grid pages.

Version 1.6.2 / 5 February 2017
Fixed the “Hite title” option on WooCommerce product pages.
Removed the unnecessary “Hide thumbnail” setting from pages.
Removed Facebook and Twitter links and fixed the rating link in the Customizer
Added notes on site title and tagline into the readme file.
Moved the “Tile image” field into the Expansion Pack.
Corrected handles for third-party scripts and styles.
Updated the included CMB2 library.

Version 1.6.1 / 1 February 2017
Corrected the text domain in the translation function which sets sidebar names.
Added unminified versions for all minified js files included in the theme.
Replaced custom comment function arguments with hooks.
Added the pagination link mechanism to page template.
Removed the “create-function” call from the WooCommerce “loop_shop_per_page” hook.
Removed theme prefixes from third-party script-enqueue handles.
Escaped all input for the wp_localize_script(), image URLs in the logo function, and category lists in post meta.
Replaced the json_encode() with the native wp_json_encode() function.
Moved the register_nav_menus() function inside the after_setup_theme() call.
Removed the excessive function_exists() check for the register_nav_menus() call.
Wrapped admin strings for plugin activation module into proper localization functions.
Added a reset to the custom grid query.
Switched to home_url() in the custom WooCommerce search function.
Removed the unnecessary “page-” prefix from the grid template.
Removed excessive escaping for the get_search_query() function.
The search form now fills with existing search query using the get_search_query() function.
Removed the excessive post date from the bento_entry_meta() template function.
Wrapped the year in the theme footer into a localization tag.
Fixed the unordered multiple placeholders issues included libraries
Removed the error control operators from the included CMB2 library.

Version 1.6 / 25 January 2017
Moved all theme-related support and upsell links into a single native Customizer section.
Removed all premium sections and fields from the Customizer for non-upgraded users.
Got rid of the ‘add_option’ call on theme activation.
Displaying the novice header only to users with admin capabilities.
Got rid of any separately stored additional options.
Added the user-defined website title with home link to the copyright notice in the footer.
Moved some of the page/post meta settings to Customizer or the Expansion Pack.
Replaced the global $post calls with get_queried_object_id().
Replaced the deprecated woocommerce_get_page_id().
Moved the custom site background option to the native Customizer functions.
Replaced the logo-related calls with native WP functions.
Replaced site_url() with home_url().
Added has_nav_menu checks for all theme-defined menu locations.
Replaced the custom excerpt-generating function with the native WP function and filters.
Defined the content width variable using a global.
Moved the custom CSS theme option to the WordPress native setting.
Escaped all user-inputted data on output for improved security.
Switched to the native WP imagesLoaded script.
Enqueuing admin scripts only on necessary screens.
Removed the redundant register_script() function calls.
Made menu and sidebar names translation-ready.
Removed the upload_mimes filter from the theme.
Corrected license version inconsistensies across theme files.
Added a readme file with theme information and credits.
Improved WooCommerce cart styling on smaller screens.
Fixed search form icon when used as a SiteOrigin widget.
Fixed Content Builder elements overlaying the mobile menu.
The fixed header now fits inside the boxed website layout.

Version 1.5.5 / 25 October 2016
Fixed bug in masonry grid image urls.
Fixed “post types” multicheck for “grid” pages.

Version 1.5.4 / 22 October 2016
Updated the CMB2 included library.
Sanitized all output instances.

Version 1.5.3 / 21 October 2016
Adjusted the way the CMB2 library is included into the theme.

Version 1.5.2 / 18 October 2016
Prefixed all hooks in the included php libraries.
Reverted to non-prefixed names for JS library enqueues.
Included favicon using native WordPress functionality.

Version 1.5.1 / 9 October 2016
Improved the way Google Fonts are added to the theme.
Added theme prefixes to all external libraries and custom classes.

Version 1.5 / 7 October 2016
The “hide title” setting now also works if the extended header has been activated.
Added an option to hide the featured image on posts and projects.
Mobile menu now closes also on touching outside the menu.
Fixed scroll position on page load with hashed URLs and fixed header.
Fixed oversize logo fit on side-header configuration in IE11.
Fixed the duplicate subheading issue for extended header.
Added sanitization to all output fields.
Corrected HTML validation errors.

Version 1.4.1 / 16 September 2016
Fixed content width bug in the Customizer.
Fixed individual page/post setting effect scope.
Added defaults to all get_theme_mod calls.

Version 1.4 / 12 September 2016
Migrated theme options into the native Customizer.
Moved non-theme functionality into the Expansion Pack.
Optimized and streamlined the functions.php theme file.
Fixed pagination links for Grid page template on static front page.
Updated JS breakpoints from pixels to em units to sync with CSS breakpoints.

Version 1.3 / 23 August 2016
Added highlight for the current position in the footer menu.
Fixed mobile menu animation on iOS.
Fixed sidebar logic in the absence of sidebar widgets.
Fixed Google maps header behaviour for maps without custom styles.
Fixed post meta for posts in Uncategorized category.
Fixed header menu submenu styling on transparent headers with large logos.
Fixed theme welcome screen on side-header configuration.
Added full translation into Ukrainian (special thanks to Vadim Chernobublik).
Improved footer widget area compatibility with Polylang plugin.
Fixed Theme Options tab navigation beaviour in Firefox in cyrillic languages.
Fixed Google Fonts appearance in Safari for latin-ext and cyrillic characters.
Fixed sidebar on WooCommerce shop category pages.

Version 1.2 / 23 June 2016
Added a possibility to upload a separate logo for mobile devices.
Site header custom color now also applies to fixed header.
Fixed Theme Options framework bug in php 7.
Fixed the bug with the “Hide title” setting for Grid pages.
Header background color setting now also affects side header layout.
Added full translation into French (special thanks to ThemeCloud.io)

Version 1.1 / 16 May 2016
Added a possibility to upload a separate tile image apart from thumbnails.
The heading font setting in Theme Options now affects extended header headings.
Added full translation into Russian.
Fixed compatibility of link colors with user-defined styles in Content Builder.
Fixed sidebar layouts for pages that were created using other themes.

Version 1.0.2 / 20 February 2016
Fixed the submenu animations and styling for “side” menu layout.
Added extra padding to the mobile menu in the absence of logo.
Hiding mobile menu elements if no menu has been created.

Version 1.0.1 / 4 February 2016
Updated theme screenshot.

Version 1.0 / 3 February 2016
Initial release.

Bento Expansion Pack

About the Expansion Pack

Bento Expansion Pack is a plugin that has been developed by the authors of Bento in order to add more capabilities to the theme. It’s easy to install and offers a host of cool additional features such as portfolio functionality, pre-built layouts, video and maps headers, preloaders, and many more. The Expansion Pack also allows to fully customize the copyright statement in the footer, removing all our branding. The Pack can be downloaded here for $25 (one-time payment), which includes support and lifetime updates; this is about 2-3 times less than what you’d need to pay for a premium theme elsewhere.

Version: 2.0 (changelog)
Expansion Pack demo: satoristudio.net/bento, “Expansion Pack” menu section.

License

The Bento Expansion Pack is licensed under the GPL (GNU General Public License); one purchase of the Expansion Pack offers one activation key, which is in turn valid for two activations – i.e. it can be used to activate the Expansion Pack on two separate instances of WordPress, be it on individual domains, subdomains, or localhost setups. The second activation has been primarily included for the sake of giving an opportunity to configure the Expansion Pack on a test environment (e.g. Localhost or separate dev URL) before using it on a live website.

Installation

Please follow these steps to install and activate the Expansion Pack:

Step one: install the Expansion Pack.

  1. Purchase the Pack at the bottom of the official page and download the archive using the link in the purchase confirmation email which is sent automatically to the email address you’ve indicated during the checkout.
  2. After downloading, please visit the Plugins -> Add New section in your website’s WordPress admin panel and click on the “Upload plugin” button on top of the page, next to the heading.
  3. After that, click on “Choose File” and navigate to the archive you’ve downloaded from the link in your confirmation email, then press “Open”.
  4. When the pop-up window closes, click on the “Install now” button that appears in the center of the screen and wait for the magical fairies to do their thing.
  5. After the installation has completed, click on the “Activate plugin” link.

Step two: activate the Expansion Pack

  1. After installing the Pack, visit the Plugins -> Bento Expansion Pack Activation section in your website’s WordPress admin panel.
  2. Input your licence key – the long string of letters and numbers seen above in this email – into the field, and click on the “Activate license” button.
  3. A green success message should appear. Great success! The new features and options will be available from the Appearance -> Customize admin section.

Updating Bento Expansion Pack

Since version 2.0, Expansion Pack has received an auto-update routine which periodically checks for available updates and displays a notification if a newer version of the plugin is available. If you see such message next to the Expansion Pack in the Plugins – Installed Plugins section of the admin panel, simply click on the “update now” link to bring your version up to date.

Alternatively, you can also manually download the latest version of the Expansion Pack at any time using the download link from the automatic email you received after your purchase. After obtaining the “bento-expansion-pack.zip” archive, unzip it and upload the resulting “bento-expansion-pack” folder into the following directory inside your WordPress installation: /wp-content/plugins/ using an FTP client or your hosting provider’s file manager. Agree to replace all existing files if prompted.

Included Features

The current version of the Bento Expansion Pack augments the theme with the following features, and more are being added all the time:

  • Fully customizable or removable footer copyright message.
  • Portfolio with various layouts and a new specialized content type called “project” (demo).
  • Beautiful prebuilt layouts for the Content Builder allowing you to create professional-looking pages in seconds (demo).
  • Fully customizable pop-ups for engaging and converting more visitors (demo).
  • A new element above the header in the form of a customizable full-width bar that can display any HTML, e.g. contact details or promo offers (demo).
  • “Under construction” mode which automatically redirects all non-logged-in visitors to the from page of the website, displaying a custom “coming soon” template (demo).
  • Customizable preloading animations for better user experience (demo).
  • Video headers which help your pages to stand out and leave an impression (demo).
  • Google Maps headers with customization and styling possibilities (demo).
  • “Twitter Feed” custom widget for displaying your latest tweets in your website’s sidebar or footer.
  • “Advanced Recent Posts” custom widget with additional options compared to the standard one.
  • Possibility to upload own fonts for displaying the website’s body, headings, and menu text.
  • Possibility to add a Google Analytics tracking snippet without touching the theme’s code.
  • SEO settings such as meta data for search engines.

The Expansion Pack adds 6 new sections to the Customizer panel:

  • SEO Settings – allows you to set the meta information for search engines.
  • Analytics Code – here you can insert the Google Analytics code to track your website’s traffic and other visitor data.
  • Call to Action Popup – enables you to activate and customize the call-to-action popup for converting your visitors.
  • Preloader – in this section you can activate and customize the loading animation for your website’s pages in order to improve user experience and only display fully rendered pages to your visitors.
  • Coming Soon Page (since 2.0) – allows activating and configuring the “under construction” mode.
  • Top Bar (since 2.0) – provides control over a new full-width section above the header.

After installing and activating the Bento Expansion Pack you will be able to customize or fully remove the copyright message in the theme footer – just input your own text or HTML into the “Copyright message in the footer” field in the “Site Identity” tab of the Customizer panel.

Portfolio and Projects

The Expansion Pack adds a new custom content type to the Bento theme: the so-called “projects”, which are pre-styled for showcasing work by creative agencies, service providers, freelancers, photographers, etc. The projects function similarly to the classical WordPress posts and be can created by visiting the Portfolio -> Add New admin menu section. There is a separate specialized taxonomy for projects which is called “types” (Portfolio -> Types admin menu section) which works just like categories do for classical WP posts, and which can be used to differentiate between the projects and construct filters used on portfolio pages; you can specify one or more types for any particular project by using the “Types” settings box in the right part of the editor mode view.

In order to display your projects, you can use the existing layouts and features found in Bento, namely the “Grid” page template. After successfully activating the Expansion Pack, the “project” content type becomes available in the “Content Types” checklist found in the “Grid Settings” box which appears underneath the content area when switching to the “Grid” template in the page editor mode. You can use this setting to create grids of projects or even combined grids displaying both projects and posts or projects and products, or all three content types. In case only “project” is chosen as the content type to display on a particular grid page, that page will automatically display a portfolio filter based on which “types” you assign to each of the projects (see portfolio filter demo here).

In case the project pages you create display a 404 error (“page not found”), please try visiting the “Settings -> Permalinks” admin section and clicking on the blue “Save Changes” button without adjusting anything. After that, refresh the portfolio page in your browser and try to access the project pages.

Prebuilt Layouts

The Expansion Pack includes a continuously expanding set of pre-formatted page layouts for the Content Builder, designed to fit specific needs, such as product homepages or corporate landing pages (see live demos here). These pre-packaged layouts have been built with the aim of saving your time by offering a fast and easy way of setting up professional-looking pages.

Currently the Expansion Pack offers the following pre-built-layouts:

  • Product Homepage With Slider
  • Corporate Homepage
  • Creavite/Agency Homepage
  • Coming Soon Page

In order to make use of the pre-built layouts, you will need to have the Content Builder and the Extra Elements plugins installed (see this section of the current manual for more details). The layouts are accessible for all users of the Bento Expansion Pack by switching to the “page builder” mode (click on the respective tab in the top right corner of the content area while editing a page) and clicking on the “Prebuilt Layout” button in the content area – in case the page is new you haven’t added any content yet – or clicking the “Prebuilt” button in the top left corner above the content area. The available layouts are found under the “Theme Defined”. Each layout contains placeholder text and icons, so after applying a layout you will only need to replace those with your own text and icons by editing each respective section; you can, of course, modify any of the layouts in any way you require, using them as a basis for creating more custom pages.

Popups For Converting Visitors

Visitor engagement is one of the most important success metrics for almost any website, which is why the Expansion Pack features a tool to help you transform more visits into actions using specialized pop-ups (see a demo here). It is a popular method of motivating website visitors to perform a specific task, such as signing up for a newsletter or clicking a button, or even purchasing a product / service. In order to set up a converting pop-up with the help of Bento Expansion Pack, please follow these steps:

  1. Create a page that will serve as the content of the pop-up (Pages -> Add New admin menu section); it can include any text, images, Content Builder elements or layouts, as well as third-party shortcodes such as contact forms, social widgets, etc.
  2. Visit the “Call to Action Popup” tab of the Customizer panel and choose the page you’ve created in step 1 from the “Source of content for the popup” drop-down.
  3. In the same tab, choose where to display the pop-up using the “Display call to action popup” setting and set the trigger using the “Popup trigger” setting.

The “Call to Action Popup” tab of the Theme Options panel mentioned in the steps above also contains auxiliary settings to fine-tune your pop-up, such as the width of the pop-up window, its border thickness and color, as well as overlay color and opacity.

Please note that pop-ups use cookies to only display once per session to each user; in other words, once the pop-up is shown to a particular visitor, it will not appear again to that particular visitor until they close their browser window. This is done in order to minimize the chances of the pop-ups becoming annoying to your website’s visitors.

Preloader

Bento Expansion Pack allows displaying a loading animation to the visitors while a page is loading in the background in order to only display the fully loaded page to the viewers and at the same time to let them know that the process of loading the page is underway (see the preloader in action here). The preloader can be activated and configured in the “Preloader” tab of the Customizer panel.

Top Bar

Since version 2.0, you can activate and configure a new site element with Bento Expansion Pack – a full-width bar above the header. It can contain any text or even HTML and can be customized in terms of color palette and content alignment. All settings for the top bar can be found in the respective tab of the Customizer panel.

Coming Soon Mode

Since version 2.0, the Expansion Pack offers the possibility to switch to an “under construction” mode for your website, which means all non-logged-in visitors will be automatically redirected to the front page, which, in turn, will utilize a custom template with no navigation and other details. You can pick any existing page as the basis for the content of the “coming soon” page, all related settings can be found in the “Coming Soon Page” tab of the Customizer panel. When the “coming soon” mode is active, only the site admins are able to see the full website, which allows for hassle-free launch preparations.

Video Headers

One of the new types of headers available in the Bento Expansion Pack is full-width video – an additional setting in the extended header which allows uploading a video file to display as a background of the page title (see demo here). The .mp4 file format is recommended for the video files, yet you can also use .ogg and .webm files. The smaller the size of the file you’re using, the better for user experience and SEO, it’s recommended that the size of the video file does not exceed 2-3 Mb; using a Content Delivery Network is highly encouraged to increase loading speed and reduce server load.

Please note that it is still recommended to upload a static header image using the “Header Image” field in the same settings section in order to have a fallback for the cases when the video fails to load or play. Moreover, the image will display as the header on smaller devices since the video will automatically be hidden in order to save on data service bandwidth. When defining a video background, you can use all other extended header settings and features in a normal fashion; if you wish to revert to displaying a static image header, click on “Remove” under the video you’ve uploaded and save changes to the page.

Google Maps Headers

In addition to video headers, the Expansion Pack allows creating headers with functional maps using the Google Maps API v3 (see live demo here). In order to set up such a header you need to check the “Activate Google Maps header” checkbox in the “Map Header” settings section underneath the content area in the page editor mode. After that you will be able to set the parameters for the map, such as its centering point, zoom level, and height, as well as define a custom style for the map using your own code or the ready-made snippets from Snazzy Maps; to achieve the latter, navigate to the page of the style you like and click on the “Copy” button or simply select and copy the code under the “Javascript Style Array” heading.

It should be noted that the Google Maps header has precedence over the image/video header – in other words, in case you activate the map your header will display a map regardless of which settings you have in the “Page Header Settings” box.

Extra Widgets

Bento Expansion Pack adds the following widgets to the standard WordPress selection in the Appearance -> Widgets admin section:

  • Twitter Feed – a configurable stream of tweets from a specific Twitter account. Since Twitter requires creating an application in order to display its data on third-party websites, please follow the instructions in the widget settings area to set up the required data.
  • Advanced Recent Posts – a take on the standard WordPress “Recent Posts” widget offering more display elements such as thumbnails and more links as well as more customization options.

All widgets above are pre-styled to work seamlessly with Bento’s Customizer panel color settings.

SEO settings

After activating the Expansion Pack you will notice a new section in the page/post edit mode view, beneath the main content area: the “SEO Settings” box allows defining the meta title and description for each individual page without having to introduce additional strain on your WordPress website by installing a separate SEO plugin.

In addition to that, the new “SEO Settings” tab added by the Expansion Pack to the Customizer panel allows you to set the front page meta title and description (used by search engines such as Google and Bing), as well as customize the suffix added to all page meta titles.

Since version 2.0 of the Expansion Pack, there is also a possibility to turn off all SEO settings, preventing the plugin from generating any custom meta tags. This can be useful if you are willing to activate a third-party SEO plugin on your WordPress install. The checkbox for deactivating the SEO settings can be found in the respective tab of the Customizer panel.

Changelog

Version 2.0 / 11 July 2018
Added a top bar for contact details or other additional information.
Added a full-height header image option.
Added a pre-built layout for a coming soon page.
Content Builder tags are now stripped from meta descriptions.
Added a “coming soon” page option.
Added an option to disable all SEO settings.
Fixed the portfolio filter.
Set up automatic Expansion Pack updates from our server.
Fixed image import in pre-built layouts for the Content Builder.

Version 1.1.1 / 11 May 2017
Header video now switches to image at a smaller width.

Version 1.1 / 24 April 2017
Fixed a compatibility issue between EP maps and the Content Builder maps widget.
Made the Expansion Pack translatable.
Fixed the issue which prevented the EP widgets from being available in the backend.
Fixed file upload issue introduced by changes in WP core from 4.7.1.

Version 1.0
Initial release