☑︎ This top-3 ranking has been last updated in May 2026
You’ve finally made a decision: “I need a website”. Great start!
Now comes the daunting but crucial part: picking a web host.
⛈️ Choose poorly and you’ll be stuck with slow pages, downtime, and support replies that feel like they were written by a toaster.
But here’s the good news:

Over the last 10+ years, we’ve tested, prodded (and even intentionally broken) websites on all popular hosting providers. Below are the three that actually stand out – each with its own strengths and ideal audience:
| Web host | Strengths | Clients | Best for | Best deal |
|---|---|---|---|---|
| Hostinger | cheapfasteasy to use | 4,000,000+ | Personal, small businesses | -79% (check) |
| SiteGround | supportsecurityuptime | 3,000,000+ | Small businesses, freelancers | -81% (check) |
| Kinsta | performancemanaged | 140,000+ | Medium businesses, agencies | -17% (check) |
Before we dive into our top-3 hosting picks for 2026, let’s briefly talk about our methodology – in other words:
Best All-Round Hosting
Best Support and Reliability
Best Managed WordPress Hosting
Common Pitfalls When Choosing Hosting
Web Hosting FAQ
Which Hosting Is Best for You?
User Reviews and Comments
How We Rank the Hosts
There are literally hundreds of hosting providers out there – and our goal is to help you make the best choice. So we don’t just copy sales messages from the provider’s marketing page.
Instead, we analyze 30+ parameters and thousands of data points, loosely grouped into the following five categories:
- Speed tests ⏩ We measure real-world load times across multiple locations using tools like GTmetrix and WebPageTest. No cherry-picked results, just raw numbers.
- Uptime monitoring 🟩 We keep sites running on each host for months (sometimes years) and track how often they become unavailable. Hint: some “99.9% uptime” claims don’t hold up.
- Support chats 🆘 We deliberately break things (plugins, databases, SSL setups) and see how quickly – and how competently – support helps us fix them.
- Pricing analysis 🆚 We don’t just look at the flashy first-year promo price. We check renewal rates, hidden add-ons (like backups and email), and refund policies.
- Extra features ☑️ Things like free domains, staging sites, backups, security tools, and WordPress optimizations all get taken into account.
In addition to that, we perform detailed comparisons of technical characteristics to determine where each host stands relative to the broader market.
Bottom line: if a host can’t keep your site fast, secure, and online without emptying your wallet, it doesn’t make our list.
Let’s take a closer look at each of out top-3 picks below:
🏆 Best All-Round Hosting
By “value for money” in hosting, we mean outstanding performance, ease of use, and powerful features – for the best possible price.
Finding the winner in this category wasn’t hard: out of all the providers we tested, Hostinger consistently delivers the most bang for your buck.

It’s not just “cheap hosting”. Hostinger pairs its ultra-low prices with an impressive product offering: generous server resource allocations, a surprisingly polished control panel, fast LiteSpeed-powered servers in 12 regions, and the most comprehensive set of AI tools – most notably, the next-gen AI builder Horizons.
For beginners, that means you can get your first website live in under an hour. For more advanced users, there’s WordPress optimization, staging tools, and VPS options if you ever need to scale up.
Get up to 79% off at Hostinger ›
And yes, even at these prices Hostinger offers a 30-day money-back guarantee, so you can test-drive it without risk.
- Some of the lowest hosting prices on the market (starting under $3/month with our coupon).
- Beginner-friendly control panel (hPanel) that’s simpler than cPanel.
- Up to 25 sites on even the cheapest
Premuimplan. - 12 global data centers (Americas, Europe, Asia) to keep your site closer to your visitors.
- Comprehensive product offering – shared, VPS, Horizons AI builder
- Weekly backups on the cheapest plan (daily backups available starting with
Businessplan) - No phone support – live chat only.
For a deeper dive into Hostinger’s products, performance, and pricing, check out our full Hostinger review.
🛡️ Best Support and Reliability
If Hostinger is the king of affordability, then SiteGround is the go-to choice when you want absolute peace of mind.
Their superpower? Customer support. SiteGround’s chat, ticket, and phone responses are consistently among the fastest and most helpful we’ve seen in 10+ years of testing hosting companies.

But as they say, the best support is the one you need as seldom as possible! Among industry-leading preventive measures, SiteGround also delivers rock-solid uptime (99.97% in our monitoring), automatic daily backups, 0.5-second monitoring, and proactive security patches.
Get up to 81% off at SiteGround ›
It’s not the cheapest option out there, especially if we factor in the price jumps after the initial promo period. But it’s still solidly in the affordable category – so if your website is critical to your business, the extra investment is worth every penny.
- Outstanding 24/7 customer support (including by phone): fast, knowledgeable, friendly, and genuinely helpful.
- High reliability with uptime consistently near 100% in our tests.
- Daily backups on separate servers, included in all plans.
- Value for money: attractive pricing with generous first-period discounts.
- WordPress-focused: Website Builder and AI assistant are not as advanced as with Hostinger
- Server storage limits are tighter than with some competitors.
If you’re a freelancer, small business owner, or simply someone who wants everything to just work without endless tinkering, SiteGround is an easy recommendation.
Our detailed review contains everything you need to know before starting with this hosting provider.
💺 Best Managed WordPress Hosting
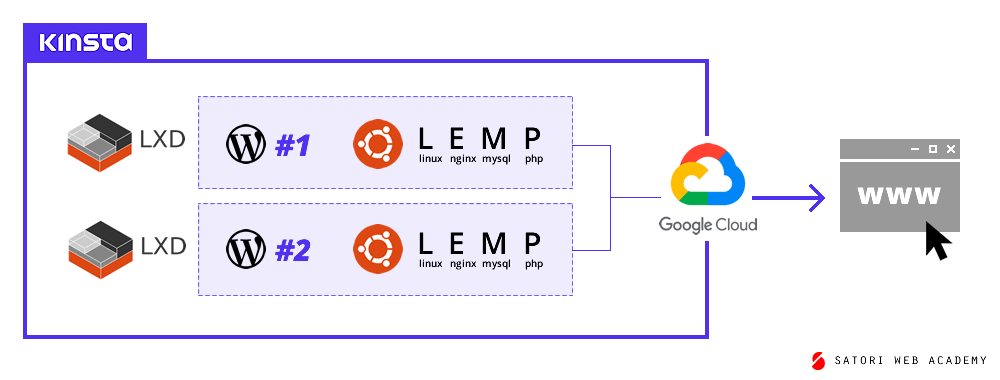
If you want your WP site to run on the same host as TripAdvisor and NASA – meet Kinsta.
Kinsta is built entirely on Google Cloud’s premium tier network, offering blazing-fast performance, containerized site management, and a slick dashboard that makes cPanel look like Windows 95.

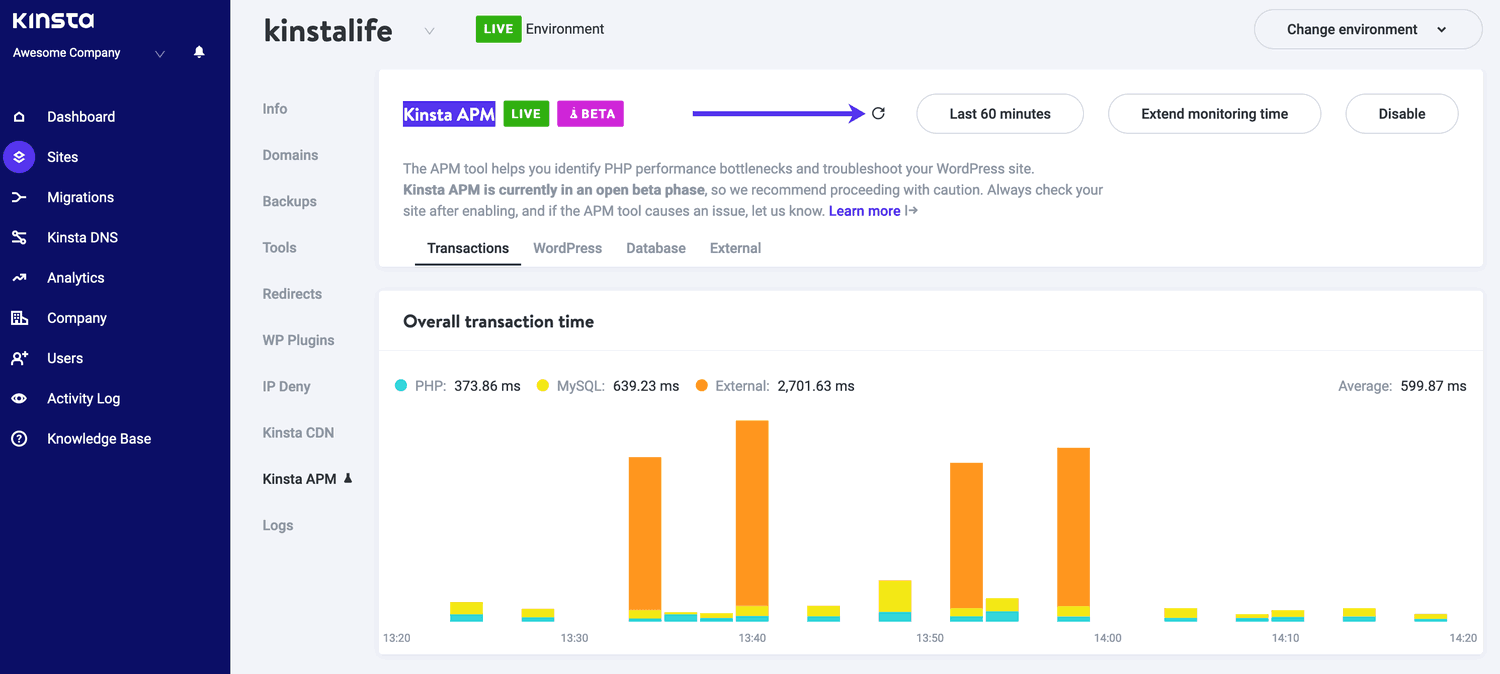
Kinsta is a managed host, which means it handles all the heavy lifting for you: server management, automatic scaling, daily backups, staging environments, and a built-in performance monitoring tools (APM).
In other words, you can focus entirely on your website and business – not on babysitting your hosting.
Kinsta is one of rare hosts that offer a free 30-day trial in addition to a 30-day money-back guarantee:
Of course, premium comes at a price: Kinsta plans start at $30/month, which is well above entry-level hosting. But for agencies, online stores, or businesses running mission-critical sites, the peace of mind and performance gains are well worth it.
- Google Cloud premium tier infrastructure with 35+ global data centers.
- Beautiful, intuitive MyKinsta dashboard with advanced site management tools.
- Automatic daily backups, one-click staging and easy restores.
- Built-in CDN, caching, and application performance monitoring (APM).
- Specialized support team made up of WordPress experts.
- Premium pricing: starts at $30/month, no cheap entry-level plans.
- WordPress-only hosting – not for other CMS or custom stacks.
If you’re an agency, e-commerce store, or a business that needs zero compromises on WordPress hosting, Kinsta is the clear choice. For everyone else, it might feel like overkill – but that’s exactly the point.
You can find out more about Kinsta in our detailed review.
Common Pitfalls When Choosing Hosting
If you’re not planning to go with any of the above top-3 picks, this section will be especially useful. Picking a host is a bit like picking a roommate:
Choose well and you’ll barely notice they’re there. Choose poorly and you’ll be living with broken dishes and mysterious noises at 3AM.
Here are the most common traps we see beginners (and sometimes even pros) encounter all the time:
- Falling for “unlimited everything” promises. Spoiler alert: nothing is truly unlimited. CPU, memory, and inode limits lurk in the fine print, and once you hit them, your “unlimited” plan suddenly isn’t.
- Only looking at promo prices. That $2/month deal looks sweet, until renewal comes around, and the price quadruples. Always check the regular (renewal) rates before committing!
- Ignoring support quality. Pretty dashboards mean little if you can’t get help when your site goes down. Fast, helpful, human support is something you don’t think about – until you need it yesterday. Run a test ticket before committing!
- Forgetting about backups. Some hosts include daily or weekly backups, others make you pay extra. Don’t wait until your site goes belly up to realize you don’t have a restore point.
- Over-buying resources. Most new sites don’t need high-tier hosting plans, let alone VPS or dedicated servers. Shared hosting (from a decent provider) is more than enough to get started.
- Getting locked into free domains. “Free for the first year” is fine, but watch out for expensive renewal rates and tricky transfer rules!
Bottom line for choosing on your own?
Read the fine print, test support early, and think about what you’ll need 12 months from now – not just today.
Web Hosting FAQ
Before we wrap up, here are answers to the questions we get most often about web hosting – especially from beginners setting up their first site:
What’s the difference between shared, VPS, and cloud hosting?
Shared hosting means your site lives on the same server as dozens – sometimes hundreds – of other sites. It’s the cheapest and easiest option; VPS (Virtual Private Server) gives you your own slice of a server with more resources and flexibility; Cloud hosting spreads your site across multiple servers, giving you better scalability and uptime. Great for projects expecting to grow fast.
Can I change hosts later?
Yes. Almost every host offers free or paid migration services, and moving your site is usually easier than you think. The main pain point is email accounts – make sure you back them up, or plan ahead.
Is a free domain really free?
Most hosts throw in a domain name for no additional cost. After the first year, you’ll need to pay renewal fees, typically $10–20/year depending on the domain extension. Still a nice perk – but not a lifelong freebie.
Do I really need SSL, backups, and email hosting?
Yes. SSL is a must in 2026 – Google ranks you lower without it, and browsers flag your site as “Not Secure”. Backups are your insurance policy against hacks or mistakes. Email hosting isn’t critical if you prefer Gmail/Outlook, but having a @yourdomain.com email does look more professional!
What’s an “uptime guarantee” worth?
Most hosts promise 99.9% uptime – which still allows for about 8 hours of downtime per year. The guarantee usually means they’ll credit your account if they fall short, but it won’t magically prevent outages. Best to look at real-world uptime data, not just promises.
How much traffic can shared hosting handle?
A good entry-level shared hosting plan can handle around 10–20k visits/month without issues. After that, you may want to upgrade to a higher tier – or move to a VPS. But keep in mind: performance also depends heavily on your theme, plugins, and caching setup.
Which Hosting Is Best for You?
So – which host should you actually pick?
It depends entirely on your needs and budget:
- Best all-round choice: Hostinger if you want maximum features and performance for the lowest price.
- Best for peace of mind: SiteGround if you value world-class support and rock-solid reliability.
- Best for serious WordPress projects: Kinsta if you run a business, agency, or store where premium managed hosting is worth the investment.
❓ And when you’re choosing between different plans from a specific hosting provider:
don’t overpay for resources you don’t yet need – but also don’t cut corners if your site is critical for your business. Start with the tier that fits your current situation and upgrade/downgrade if your situation changes.
Still not sure?
Leave a comment below with your situation and goals – we’ll help you figure out the best fit.
Good hosting won’t automatically make your site a success… but bad hosting can make it fail. Choose wisely 😉
Affiliate disclosure: some links in this post are affiliate links, which means we may earn a small commission if you sign up. No extra cost to you, but it helps us keep this guide updated and coffee-fueled. Thanks for the support!