Search results for

"saas"

Arvustus 2025: Kõik, Mida Peaksid Teadma + Parim Sooduskood

☑︎ Seda ülevaadet uuendati viimati July 2025

Hostinger on praegu üks soodsamaid variante tuntud veebimajutuse pakkujate seas. Aga “suur ja odav” ei tähenda iseenesest veel midagi –

Ka Titanic oli suur… ja mõned piletid olid üsna taskukohased.

Selle asemel, et uskuda reklaamjuttu või masside arvamust, sukeldusime päris andmetesse ja isiklikku kasutajakogemusse, et välja selgitada, kas Hostinger tõesti tasub ära.

Kokkuvõte: Hostinger on tugev kandidaat hinna ja kvaliteedi suhte kategoorias – tänu taskukohastele hindadele, kaasaegsetele tööriistadele ja kasutajasõbralikkusele. Kas ehitad väikest ärilehte või isiklikku blogi – tõenäoliselt leidub sobiv plaan.

Hind: kas tasub ära? Loe lähemalt
10/10
Serverid: kui kiire ja töökindel see on? Vaata andmeid
7/10
Funktsioonid: mida klient tegelikult saab? Detailid
9/10
Tugi: kas abiline on olemas ja kasulik? Uuri järgi
8/10

Kui sattusid siia trükkides hostenger, hosinger või isegi hostiger, siis – jah, oled ikka õigel lehel 😄

Räägime nüüd põhjalikult lahti kõik, mida pead sellest majutusteenusest teadma – millal see on superdiil… ja millal mitte:

Kui Suur on Hostinger Tegelikult?

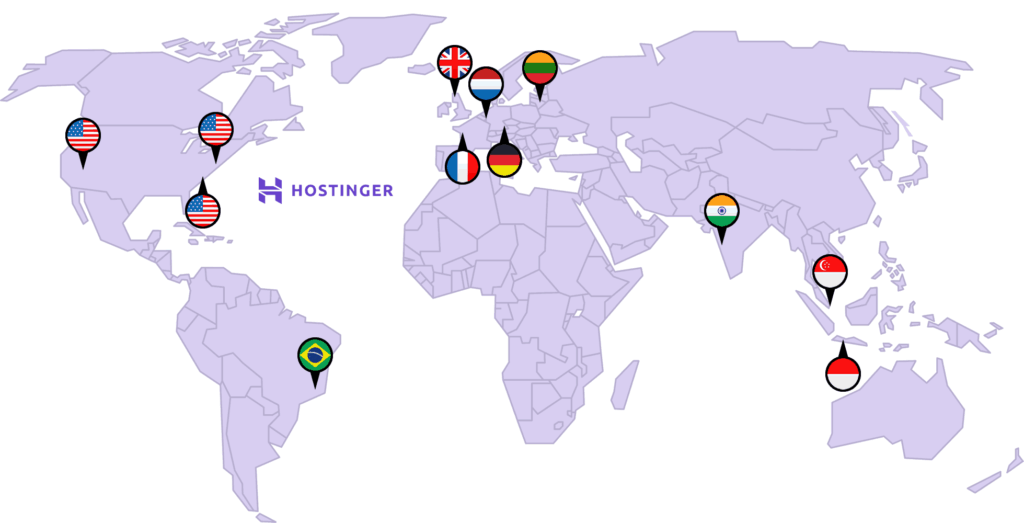
Hostinger tänapäeval on, siin on mõned numbrid: ettevõttel on hetkel üle 3,5 miljoni kliendi rohkem kui 150 riigis.

Ja hoog ei näi raugevat – nende andmetel liitub Hostingeriga endiselt üks uus klient iga 5 sekundi järel.

Hostingeri faktid

Kuid nagu arvata võib, ei ole Hostinger alati olnud rahvusvaheline hiiglane. Kõik sai alguse juba 2004. aastal ühe lihtsa ideega:

Inimesed ei taha maksta meie turunduse eest – nad tahavad lihtsalt majutust: lihtsat, töökindlat ja võimalikult odavat.

Aastate möödudes on see põhimõte püsinud Hostingeri südames: pakkuda kvaliteetset teenust võimalikult soodsa hinnaga.

Vaatame nüüd täpsemalt, mida nende paketid endast kujutavad:

Milline Hostingeri Pakett Sobib Sulle?

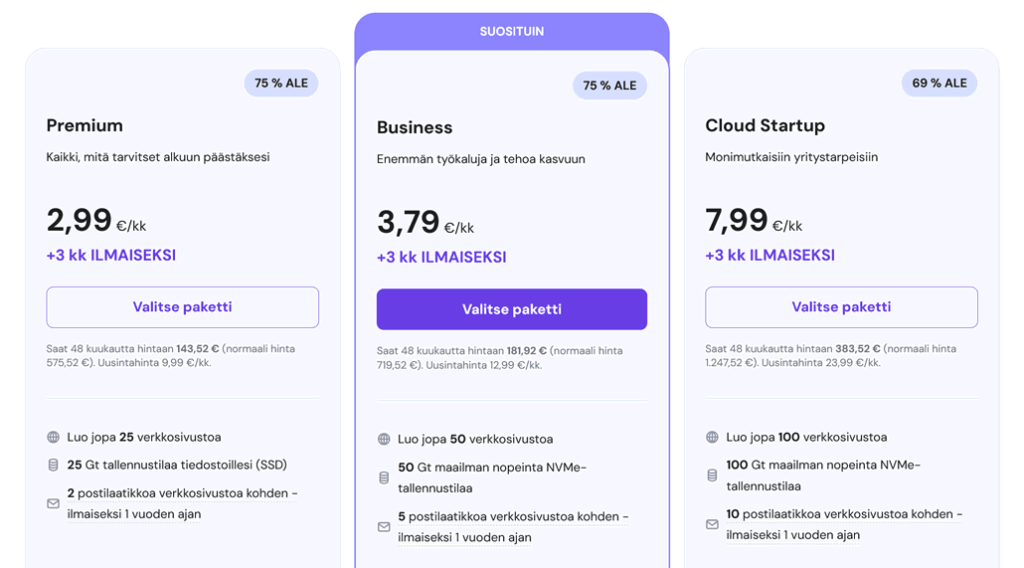
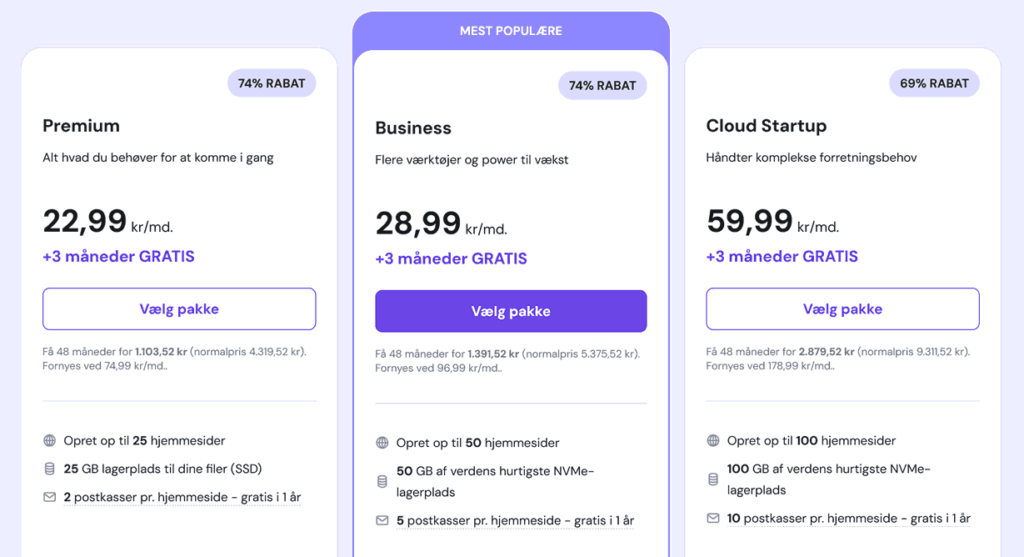
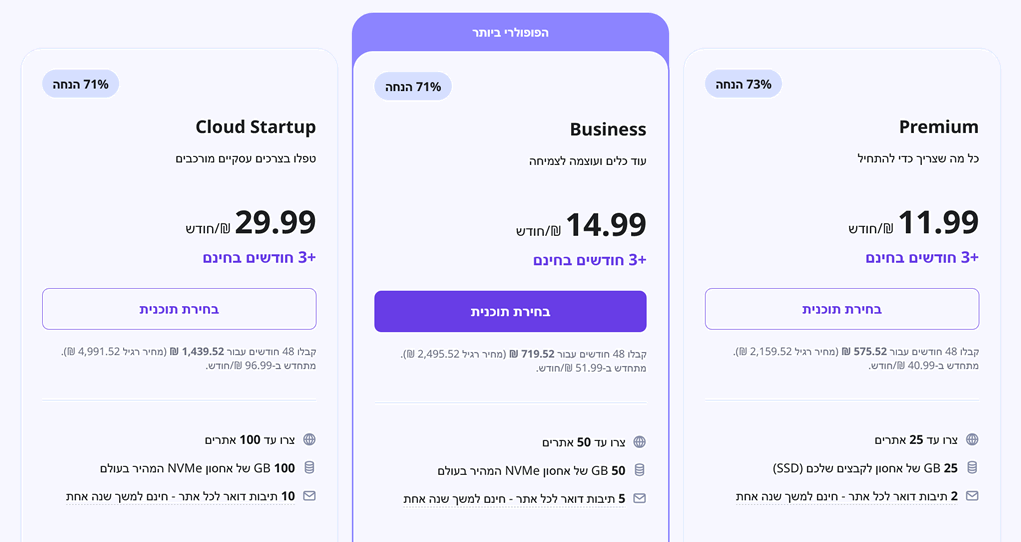
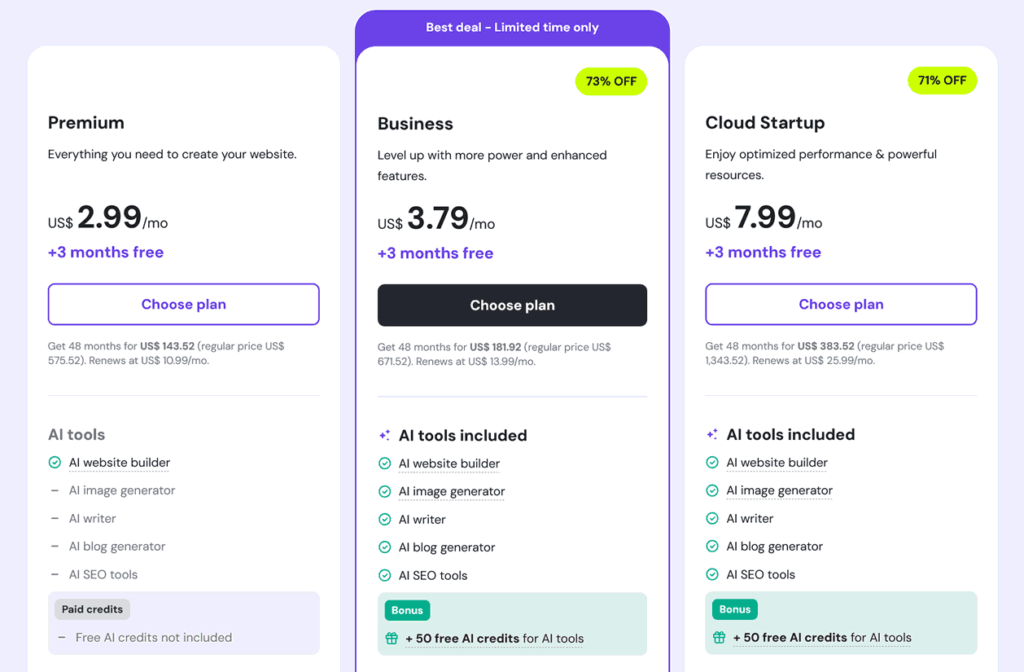
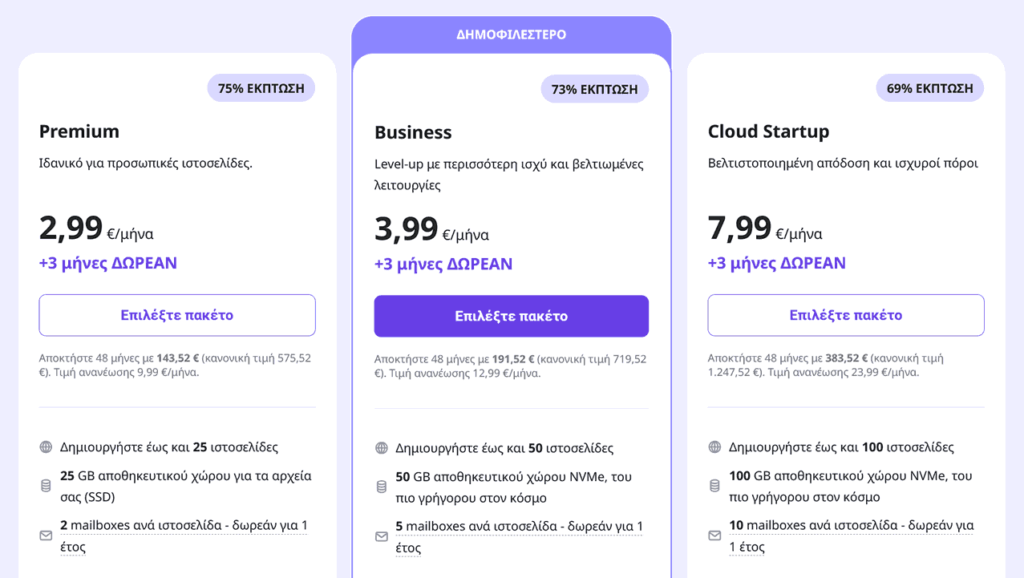
Seisuga 2025 pakub Hostinger kahte peamist jagatud veebimajutuse paketti: Premium ja Business.

Mõlemad sisaldavad WordPressi ühe-klikiga paigaldust, tasuta e-posti ja domeeni – kuid on mõeldud erinevatele vajadustele.

Siin on kiire ülevaade, mis aitab sul valida:

  1. Kas käivitad isikliku kodulehe või väiksema äri projekti? Siis on Premium plaan just sulle. See võimaldab kuni 100 veebilehte, sisaldab 100 GB SSD salvestusruumi ja pakub väga head hinna ja funktsionaalsuse suhet.
  2. Kas pead veebipoodi või ootad suuremat liiklust? Sel juhul on Business mõistlikum valik – rohkem RAMi ja protsessoriressurssi, WooCommerce’i tugi ning igapäevased varukoopiad annavad lisakindluse.
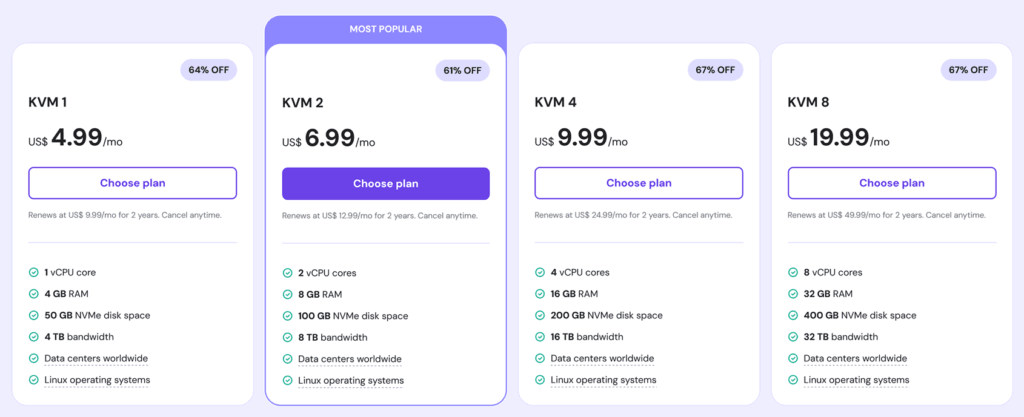
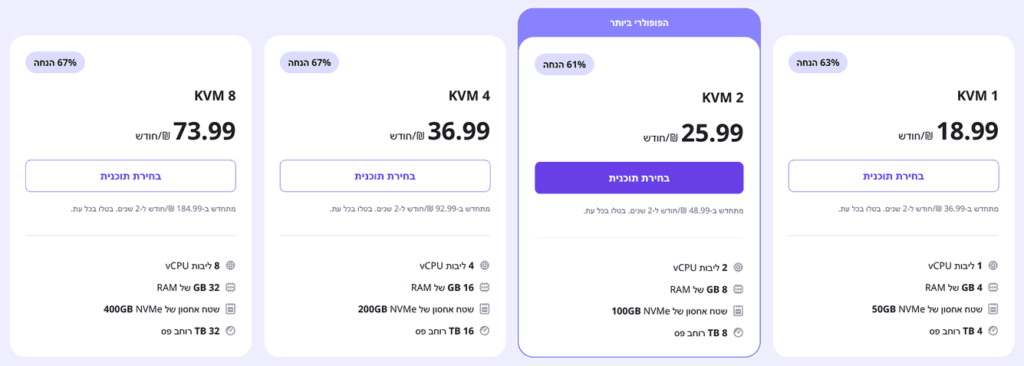
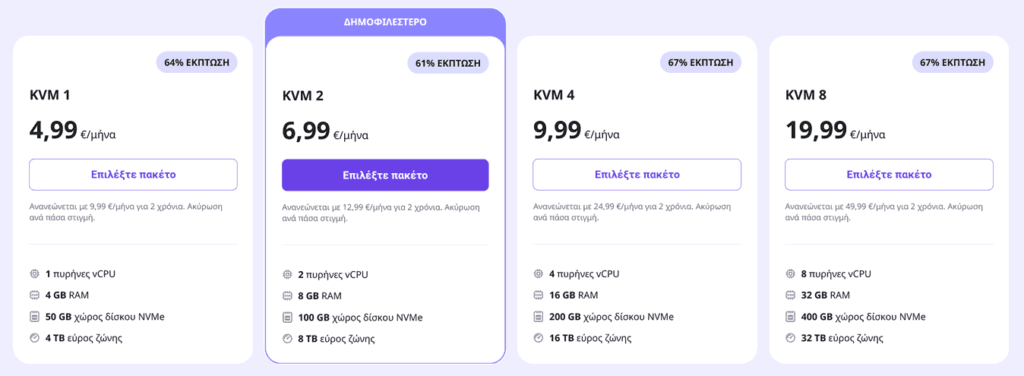
  3. Kas vajad täit kontrolli ja kohandatud serveriseadeid? Sel juhul võiksid vaadata VPS-majutuse poole – see pakub spetsiaalseid ressursse ja root-juurdepääsu arendajatele ning edasijõudnutele.
  4. Ehitat midagi suuremat ja vajad sujuvat skaleeritavust? Siis soovitame pilvemajutust – see on nende võimsaim variant, ühendades kindlad ressursid, kõrge töökindluse ja koormuse tasakaalustamise.

TL;DR: vali Premium tavaveebide ja blogide jaoks. Business sobib paremini e-poele ja tihedama liiklusega lehtedele. VPS ja Cloud on parimad, kui vajad täiesti kohandatavat ja võimsat lahendust.

…Aga kas üldse tasub valida Hostingerit? Tore, et veel loed! Sellele vastamiseks on meil vaja rohkem andmeid:

Järgmistes peatükkides sukeldume Hostingeri tehnilistesse omadustesse 🤓 ja jagame ka isiklikke muljeid sellest teenusest.

Lähme edasi!

Hostingeri Töökindlus ja Kiirus: Kui Usaldusväärne See Tegelikult On?

Lisaks funktsioonidele ja hinnale on veebimajutuse valikul ülioluline veel üks asi – stabiilsus. Teisisõnu: serveri uptime ehk tööaeg ja kiirus.

Uptime’i ehk serveri töökindlust saab hinnata nii Hostingeri enda kui ka kolmandate osapoolte andmete põhjal.

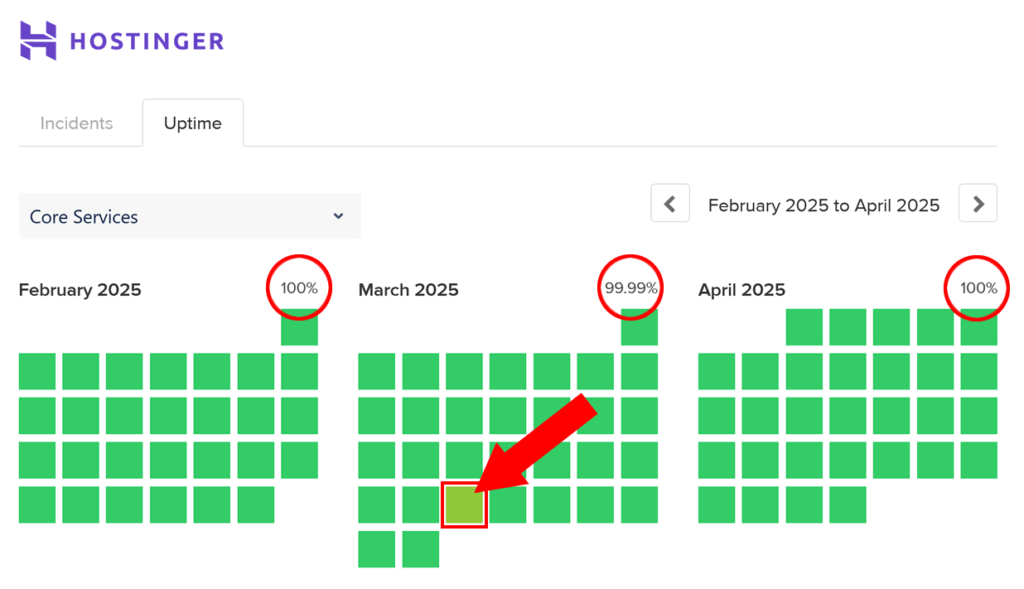
Esimesed on kõigile kättesaadavad nende serverimonitori lehel. Seal näeb statistikat päevade, nädalate ja kuude lõikes kõigi 150+ serveri kohta – umbes selline näeb see välja:

Hostinger uptime

Meid huvitab eelkõige tabeli all olev üldnumber, mis näitab keskmist kõigi serverite lõikes.

Vaata 30 päeva keskmist – see annab aimu, kui palju võib su veebileht maksimaalselt kuu jooksul maas olla.

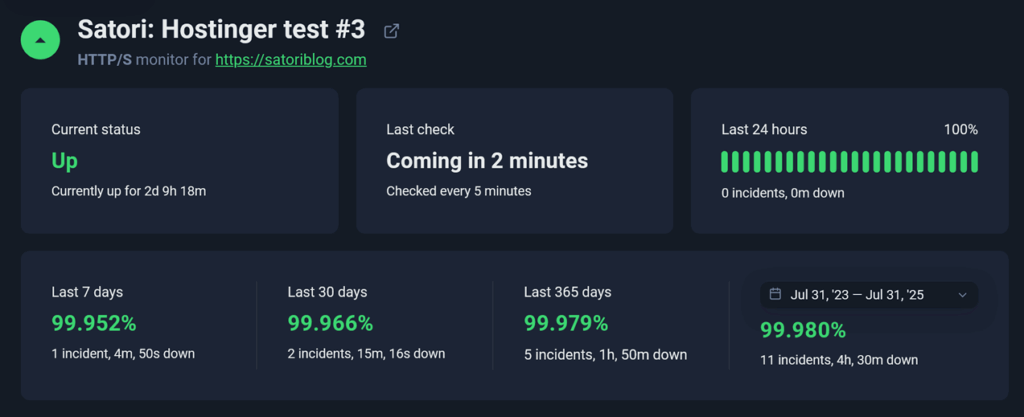
Seisuga July 2025 on see näitaja ligi 99.9% – mis tähendab, et veebileht võib olla maas umbes 42 minutit kuus. Enamikule kasutusjuhtudele täiesti normaalne tulemus.

See langeb kokku ka Hranki mõõdetud keskmisega 99.908% ja jääb Hostingeri ametliku garantii piiridesse – nende teenusetingimustes on garantii samuti täpselt 99.9% (punkt 7).

***

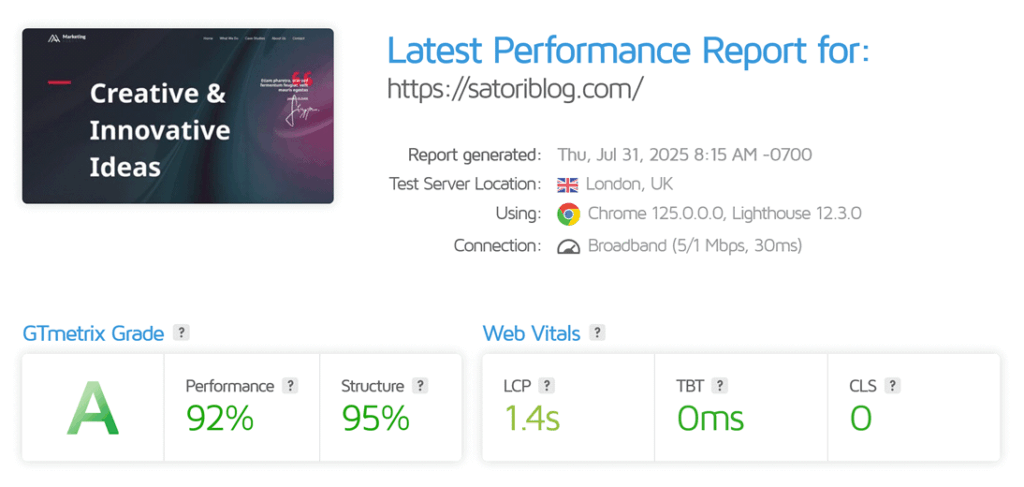
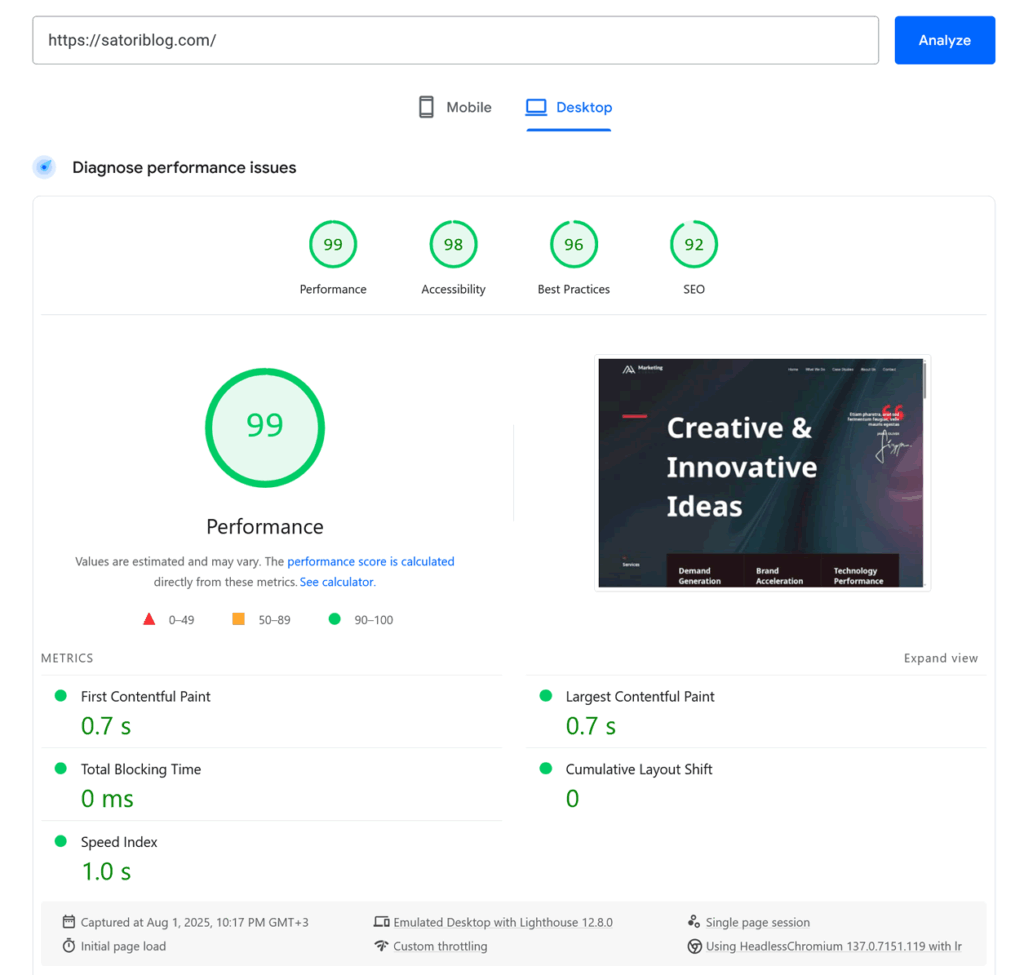
Aga kuidas on lood kiirusega? See on veidi keerulisem teema, sest lehe laadimisaeg sõltub paljuski muudest teguritest peale serveri enda.

Veebilehe kiirust mõjutavad muuhulgas piltide kogumaht, aktiivsete WordPressi plugin’ite arv ja muu selline – seega ei ole kõik seotud majutusega.

Seepärast on mõistlik vaadata just serveri vastamisaega – st kui kaua kulub keskmiselt (millisekundites), et server vastaks ühenduse päringule (ehk keegi üritab avada su lehte).

Kolmandate osapoolte (nt Hrank) andmetel on Hostingeri keskmine vastamisaeg ca 800 ms:

Hostinger response time

Hostingeri keskmine vastamisaeg Hranki mõõtmiste järgi (mida väiksem, seda parem)

Hea uudis: Hostingeri keskmine on viimastel aastatel langenud (= lehed laevad kiiremini), osaliselt tänu infrastruktuuri uuendustele.

Alla 1000 ms vastamisaeg on jagatud veebimajutuse puhul täiesti okei – ja Hostinger edestab siin paljusid rahvusvahelisi konkurente.

Okei, nüüd kui andmed on laual, liigume edasi meie isiklike muljete juurde:

Meie Muljed Hostingerit Kasutades

Nagu eelnevalt mainisime, pakub Hostinger midagi igale tasemele – aga enamik inimesi alustab just jagatud majutusega, seega keskendume siin sellele.

Pärast plaani ostmist (vt altpoolt, kuidas parim hind saada) viiakse sind kohe Hostingeri enda halduspaneelile.

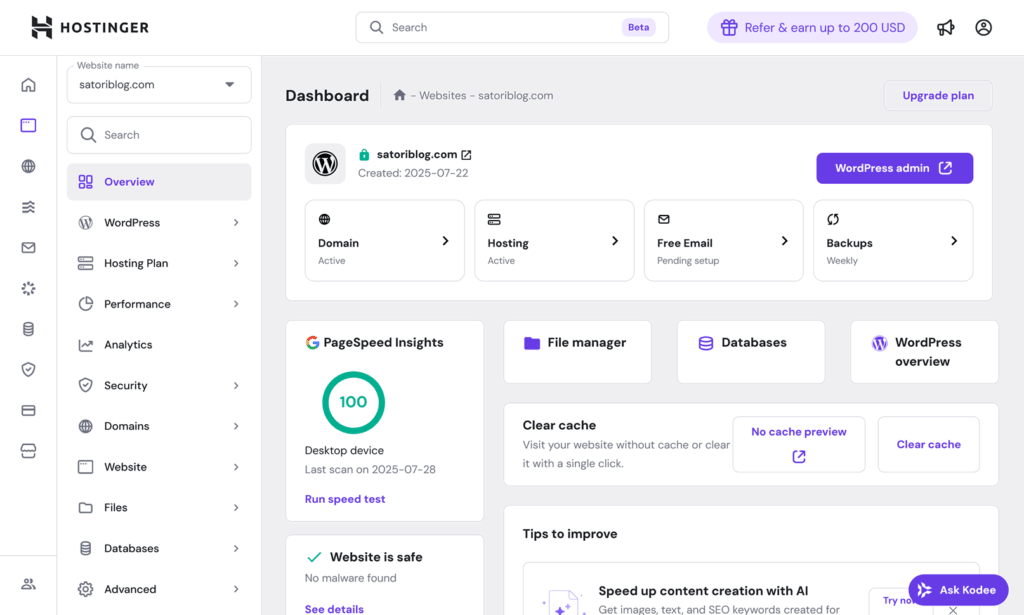
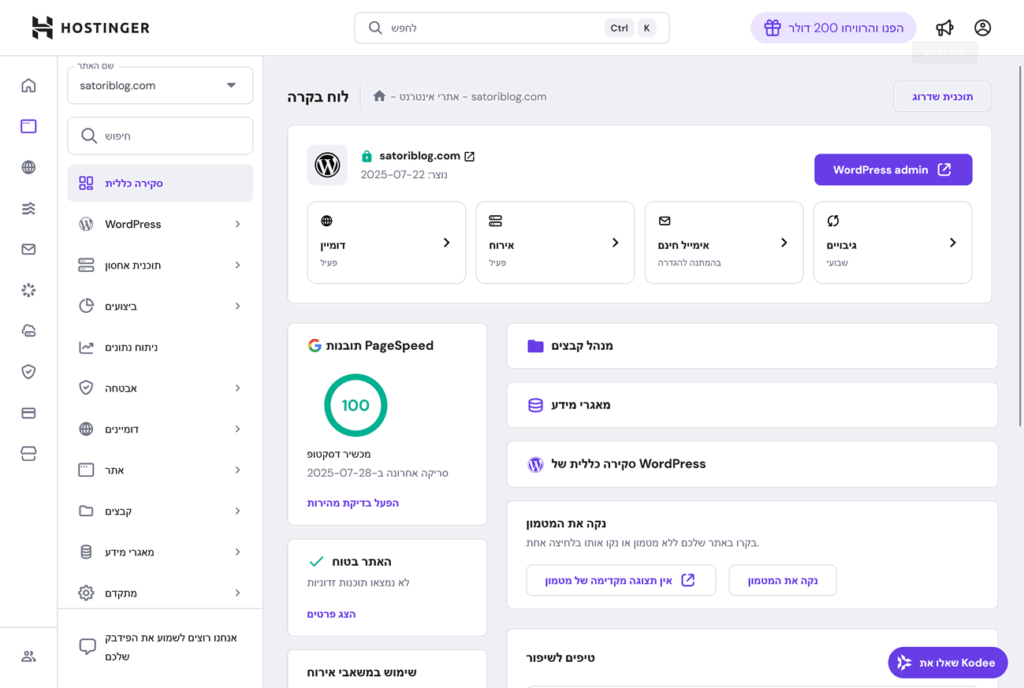
Seal saad hallata oma majutust, domeene, veebilehti ja seadeid:

Hostingeri juhtpaneel

Erinevalt cPanelist või Pleskist on Hostingeri juhtpaneel nende enda loodud – ja ausalt öeldes: see on hea asi.

Liides on puhas, loogiline ja kasutajasõbralik ilma liigselt lihtsustamata. Kõik on kenasti plaaditud ikoonidega, lisaks on ülal otsinguriba, millega leiad kiiresti vajaliku seadistuse.

Saad seal:

🖱️ luua WordPressi lehe ühe klikiga (päriselt),
⚙️ hallata faile ja andmebaase otse paneelist lahkumata,
📧 seadistada e-posti, cron-töid, SSL’i ja vahemälu vaid paari klikiga.

Enamiku kasutajate jaoks töötab kõik juba esimesest hetkest – ja tegelikult just seda me veebimajutuselt ootamegi aastal 2025.

Ka tehisintellekti ajastul ei jää Hostinger rongist maha: neil on mitu AI-põhist tööriista otse halduspaneelis:

  • AI Website Builder: uus AI-ga integreeritud WordPressi teema, mis loob automaatselt lehestruktuuri ja avalehe sisu. Väga ajasäästlik – eriti algajatele.
  • AI Content Assistant: WordPressis saad kasutada Hostingeri pluginat, mis aitab kirjutada blogipostitusi ja maandumislehti – SEO-sõbralikud ja teemakohased. Ideaalne, kui inspiratsioon on kadunud.
  • AI Image Picker: tööriist, mis valib automaatselt sisuga haakuvaid pilte. Mitte täiuslik, aga kiirete projektide puhul abiks küll.

Kui alustad nullist, võivad need tööriistad ehitusaja sisuliselt poole võrra lühendada

Kui oled juba kogenud kasutaja, saad neid kasutada näiteks prototüübi tegemiseks või sisuloome algpunktiks.

Kokkuvõttes:

Hostingeri haldusliides ja tööriistad pakuvad tasakaalu lihtsuse ja professionaalsuse vahel – nüüd veel ka AI-lisanditega.

Kui juba AI’st juttu tuli, siis räägime järgmiseks Horizonsist:

Hostinger Horizons: Uue Põlvkonna Veebilehe ja Rakenduse Looja

Enamik suuremaid majutusteenuseid pakub tänapäeval mingit AI-põhist leheloome tööriista – aga Hostinger astub sammu kaugemale:

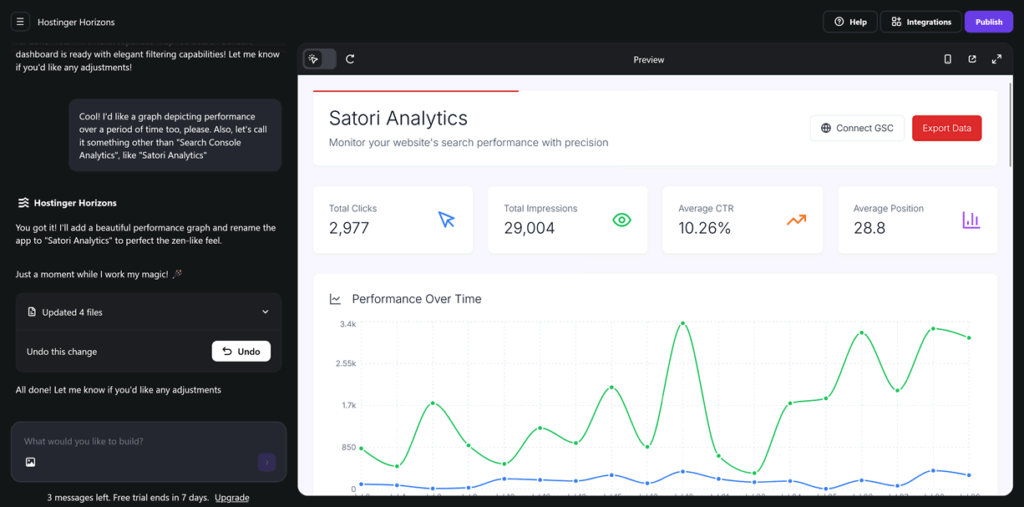
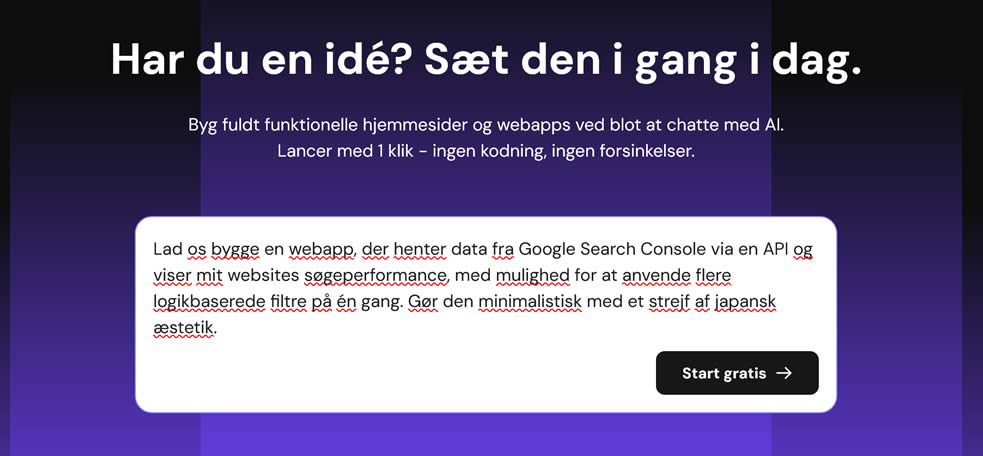
Hostinger Horizons on uus teenus, mis võimaldab sul luua veebilehti või lausa rakendusi ainult ühe kirjelduse põhjal – mõtle stiilis ChatGPT veebimajutuse jaoks.

Me arvasime, et Hostingeril polegi võimalik kasutamist veelgi lihtsamaks teha… aga eksisime:

  1. Kirjelda oma ideed: ütle lihtsalt AI-le, mida soovid luua – olgu see veebileht, ülesannete haldur, treeningpäevik või midagi muud.
  2. Kohanda reaalajas: tee muudatusi vesteldes AI-ga – saad muuta tekste, kujundust või funktsioone jooksvalt.
  3. Käivita kohe: avalda oma leht või äpp ühe klikiga – Hostinger hoolitseb nii majutuse kui domeeni eest.

“Kas pole juba mitmeid start-up’e, mis pakuvad midagi sarnast?” – võiks küsida keegi hästi informeeritud…

Tõsi. Aga ükski neist ei paku Hostingeri infrastruktuuri, tuge ega (mis veelgi olulisem) 20-aastast kogemust veebimajutuses.

Horizons on 7 päeva tasuta proovimiseks saadaval, kuni 5 AI-käsuga päevas. Seejärel saab valida sobiva paketi – näiteks:

Pakett Käske Sobib kellele Hind
Explorer 50/kuu Katsetajatele ja ideede testijatele $9.99/kuu
Starter 100/kuu Õpilastele ja alustajatele $19.99/kuu
Hobbyist 250/kuu Freelancer’itele ja nädalavahetuse projektidele $49.99/kuu
Hustler 500/kuu Startup’idele ja skaleeruvatele äriideedele $99.99/kuu

Nagu iga AI-toega teenuse puhul – tulemus sõltub suuresti sellest, kui täpselt oskad küsida :)

Aga kiirus ja mugavus on tõesti muljetavaldavad –

Sa saad nüüd käivitada praktiliselt igasuguse veebilehe või teenuse tundide, vahel isegi minutitega ⚡ ilma arendajate või koodioskusteta.

Proovi Horizonsit Tasuta ›

See tööriist areneb kindlasti veelgi koos tehnoloogia arenguga – ja me hoiame sellel silma peal, et värskendada oma arvustust vajadusel.

Aga nüüd liigume inimliku toe poole:

Hostingeri Klienditugi

Üks olulisemaid asju veebimajutuse juures on see, mida tehakse siis, kui midagi läheb viltu. Kuidas Hostinger selles osas hakkama saab?

Lühike vastus: üllatavalt hästi – eriti arvestades, kui taskukohane teenus on.

Hostinger pakub 24/7 live-chati tuge, mis on kättesaadav otse halduspaneelist (nimetatakse hPanel). Pole vaja saata e-kirju ega avada pileteid – kõik toimub reaalajas, samas kohas kus haldad oma saiti.

Fun fact: Hostinger loobus e-posti teel tugiteenusest täielikult, et keskenduda live-chat’ile – ja tänu sellele on vastamisajad märgatavalt lühenenud.

Meie hiljutise testimise põhjal:

  • Esimesed vastused tulid reeglina mõne sekundi kuni 2–3 minuti jooksul – sõltuvalt kellaajast.
  • Tugimeeskond oli sõbralik, kannatlik ja tehniliselt kompetentne – isegi keerulisemate küsimuste puhul.
  • Vahel jagavad nad ootamise ajal ka rõõmsaid pilte (jah, isegi kasse 🐈) – kena žest.

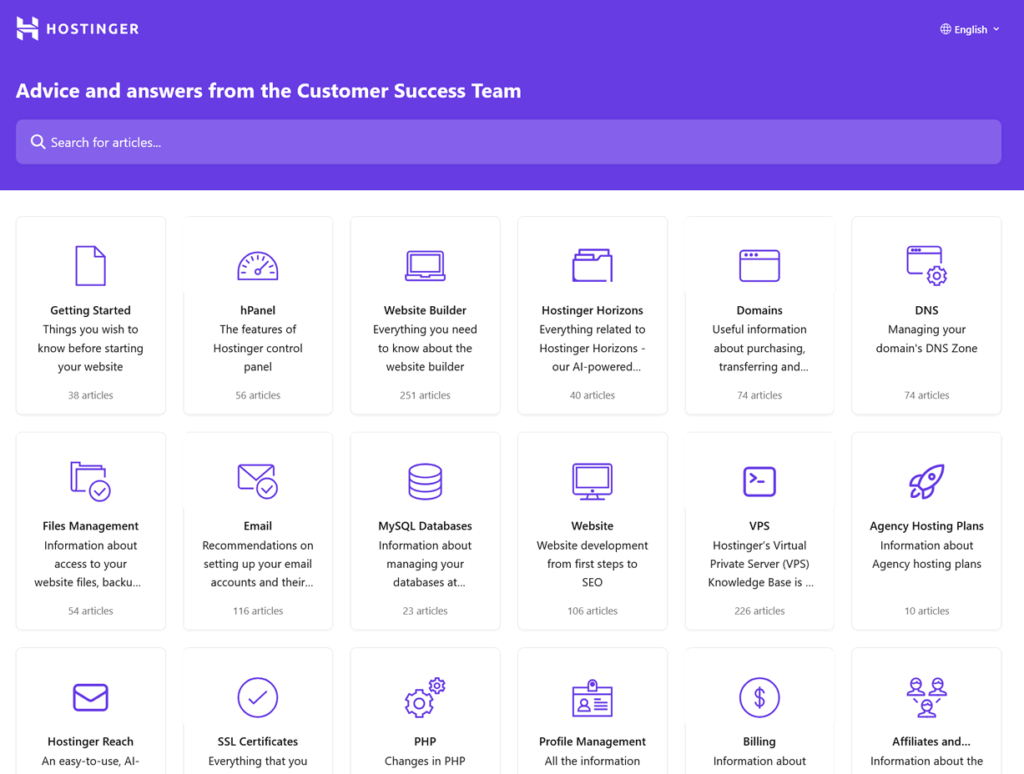
Lisaks on Hostingeril hästi struktureeritud teadmistebaas, millele pääseb ligi nii hPanelist kui ka otse veebilehelt. Seal leidub:

  • Juhendid lehe seadistamiseks ja konto haldamiseks
  • Abitekstid WordPressi, e-posti, domeenide, jõudluse jms kohta
  • Teenuste selgitused, olekuinfo ja funktsioonide ülevaated

Ei ole veel Hostingeri klient?

Saad nendega ühendust võtta ka kontaktivormi kaudu Hostingeri kodulehel – lihtsalt arvesta, et aktiivsetel klientidel on eelisjärjekord.

Kokkuvõte:

✅ 24/7 live-chat otse hPanelis
✅ Selge ja otsitav teadmistebaas
❌ Telefonituge pole
❌ Tavaline e-posti tugi puudub

Üldiselt ületab Hostingeri klienditugi ootusi – eriti sellise hinnaklassi teenuse puhul.

Raha Tagasi ja Tellimuse Tühistamine

Hostinger pakub 30-päevast raha tagasi garantiid enamiku teenuste puhul – sealhulgas jagatud majutus, VPS ja domeeni ülekanded.

Aga mõned olulised erandid tasub meeles pidada:

  • Uued domeeniregistreeringud on tagastatavad ainult esimese 96 tunni jooksul (ja teatud tippdomeenide puhul üldse mitte).
  • Teatud lisad, nagu domeeni pikendused, privaatsuskaitse või SEO tööriistad, on tagastusevälistatud.
  • Krüptoga tehtud maksed pole tagastatavad (mis on üsna tavapärane).

Kui soovid mõne teenuse tühistada, mine oma juhtpaneelile, otsi üles Deactivate Account ja järgi juhiseid. Protsess on kiire ega nõua klienditoega suhtlemist.

⚠️ Tahad täielikult kustutada kogu konto? Siis pead pöörduma tugitiimi poole – ja kui oled EL-i elanik, tasub mainida GDPRi, mis võib kiirendada asjaajamist.

Hostingeri KKK

Enne kui liigume edasi Hostingeri plusside ja miinuste juurde, siin on vastused kõige sagedamini esitatud küsimustele, mida oleme veebis ja kommentaarides kohanud:

Kas Hostinger on tõesti tasuta?

Ei ole – Hostinger kunagi pakkus tasuta majutust, aga 2025 aastal on kõik nende paketid tasulised. Hea uudis: hinnad on endiselt üks madalamaid kogu turul.

Kas Hostinger sobib WordPressi jaoks?

Jah. Hostingeril on ühe-klikiga WordPressi paigaldus, sisseehitatud LiteSpeed vahemälu ja valikuline AI-tööriist sisuloomeks ja struktuuri seadistamiseks. Väga hea valik nii algajatele kui edasijõudnutele.

Kas Hostinger pakub telefonituge?

Ei – Hostinger ei paku tuge telefoni teel. Kogu tugi käib live-chati kaudu, otse juhtpaneelist, 24/7.

Kas Hostinger on töökindel?

Jah – meie monitooringu ja sõltumatute testide põhjal on Hostingeril 99.9% uptime koos korralike vastamiskiirustega. Pole küll kõige kiirem, aga väga usaldusväärne oma hinnaklassis.

Kas ma saan oma Hostingeri plaani hiljem muuta?

Muidugi. Saad vahetada Premiumilt Businessile või minna üle Cloud/VPS-ile ükskõik millal oma juhtpaneelis. Kasutamata aeg vanalt plaanilt kantakse automaatselt uue arvele.

Kas Hostinger pakub e-posti teenust?

Jah – kõik veebimajutuse paketid sisaldavad tasuta e-posti majutust. Saad luua aadresse stiilis sinunimi@sinudomeen.ee ja kasutada neid nii veebipõhiselt kui Gmaili/Outlookiga ühendatuna.

Kas ma saan Hostingerit riskivabalt proovida?

Jah – neil on 30-päevane raha tagasi garantii enamikule teenustele. Kui teenus ei sobi, saad selle tühistada juhtpaneelist ja taotleda tagasimakset – ilma piinlike kirjadeta.

Hostingeri Plussid ja Miinused

Oleme nüüd läbi vaadanud Hostingeri teenused ja klienditoe – aeg teha kiire kokkuvõte heast ja mitte nii heast. Püüame olla võimalikult objektiivsed:

  • Suurepärane hinna ja kvaliteedi suhe: taskukohased hinnad igas paketis – nagu Hostinger ise ütleb: “sa maksad ainult majutuse, mitte turunduse eest”
  • Paindlikud paketid igasugustele kasutajatele – alates üksikisikutest ja väikestest ettevõtetest (jagatud majutus) kuni arendajate ja suurettevõteteni (VPS ja pilv)
  • 99.9% uptime garantii – sisuliselt tähendab see, et su veebileht on peaaegu alati kättesaadav. Tõlgendatuna: maksimaalselt 44 minutit seisakut kuus, aga praktikas meie testides väga lähedal nullile
  • Tasuta domeen vähemalt 12-kuulise paketiga
  • Hulk kasulikke AI tööriistu nagu veebiehitaja, sisugeneraator ja automaatne piltide soovitaja
  • Kiire ja abivalmis tugi – sõbralik meeskond, kättesaadav ööpäevaringselt
  • Telefonituge ei ole – ainus suhtluskanal on live-chat
  • Ei sobi süsteemihalduritele – kui vajad root-õigusi, kohandatud serveri stack’i või täit SSH ligipääsu, siis DigitalOcean on rohkem sinu teetass. Hostinger on teadlikult algajasõbralik ja piirab seetõttu mõningaid edasijõudnute funktsioone jagatud plaanides.

Boonus: Hostingeri Sooduskood

Me ei väida, et sa peaksid kindlasti Hostingeri valima – aga kui otsustad seda teha, siis miks mitte säästa veelgi?

Järgi neid lihtsaid samme:

  1. Mine Hostingeri ametlikule lehele, kasutades allolevat nuppu (link avaneb uues aknas):

    Saa Hostingeris Parim Hind ›

  2. Vali endale sobiv majutuspakett (vaata kiirülevaadet ülal) ja liigu kassasse.
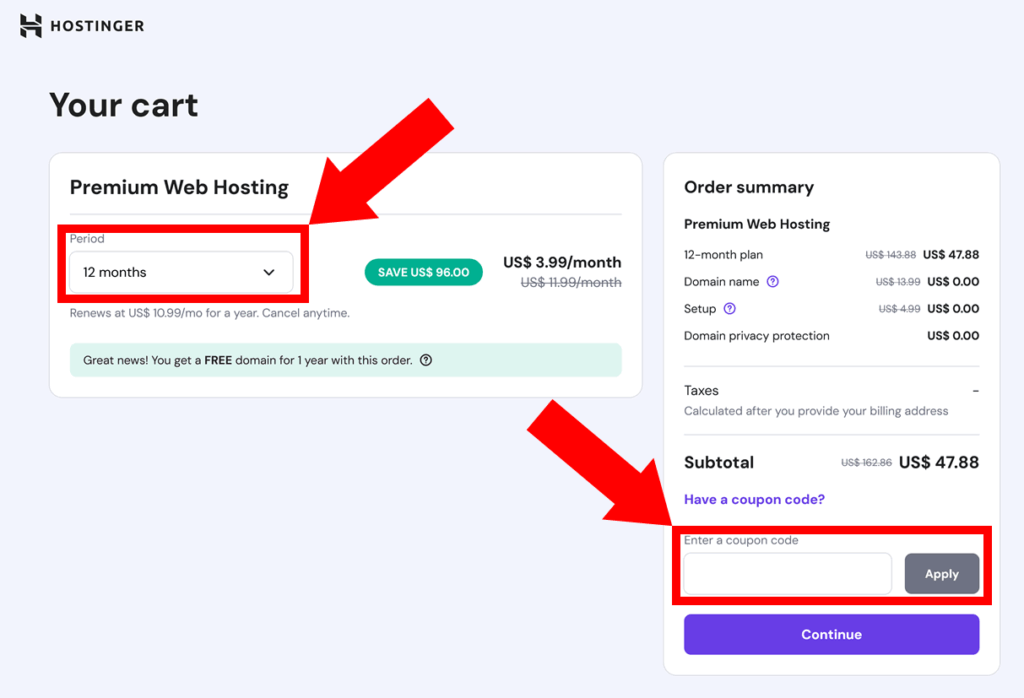
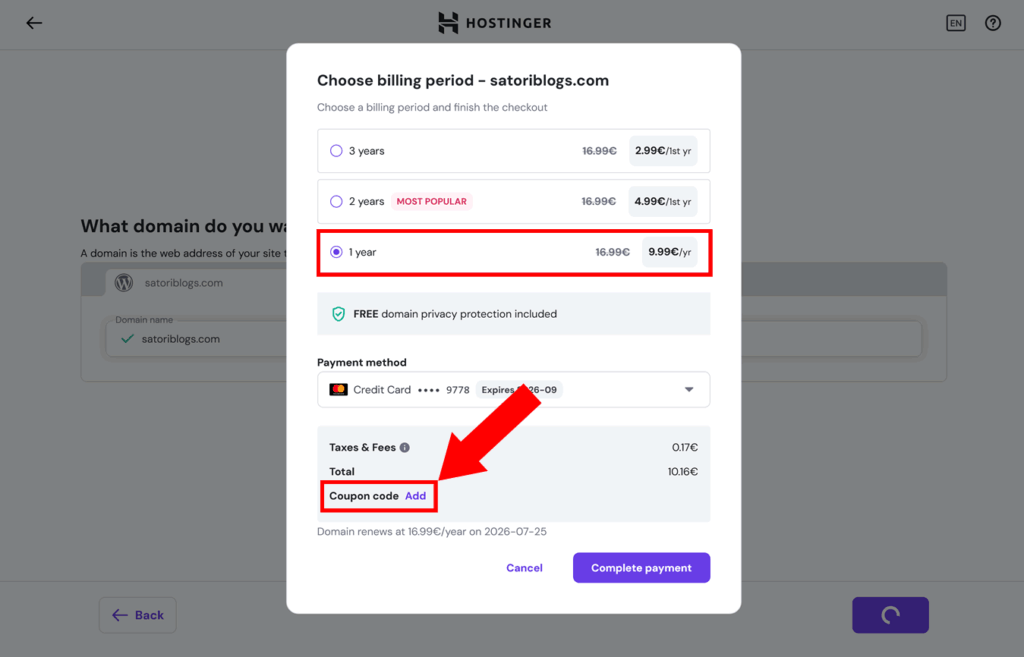
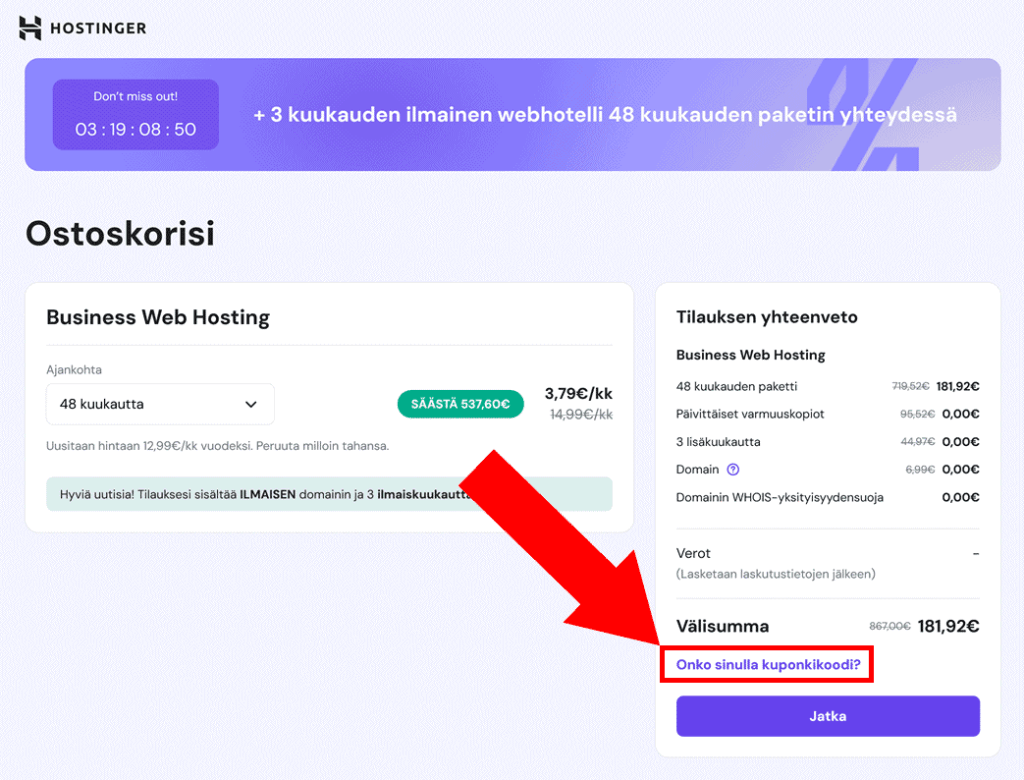
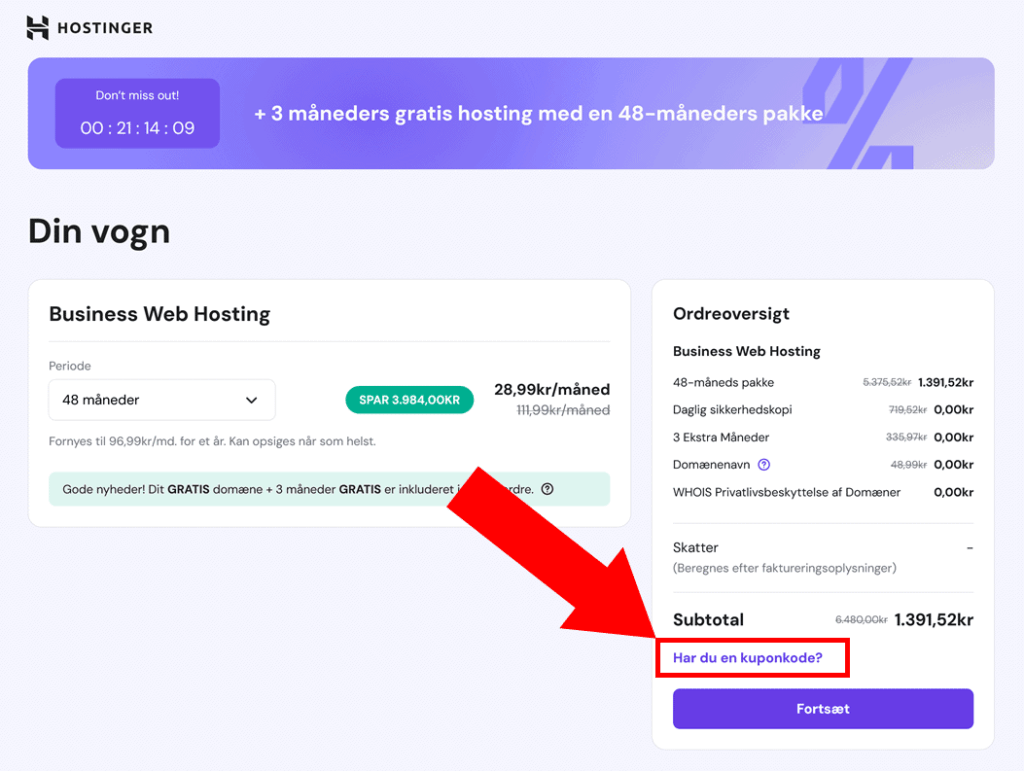
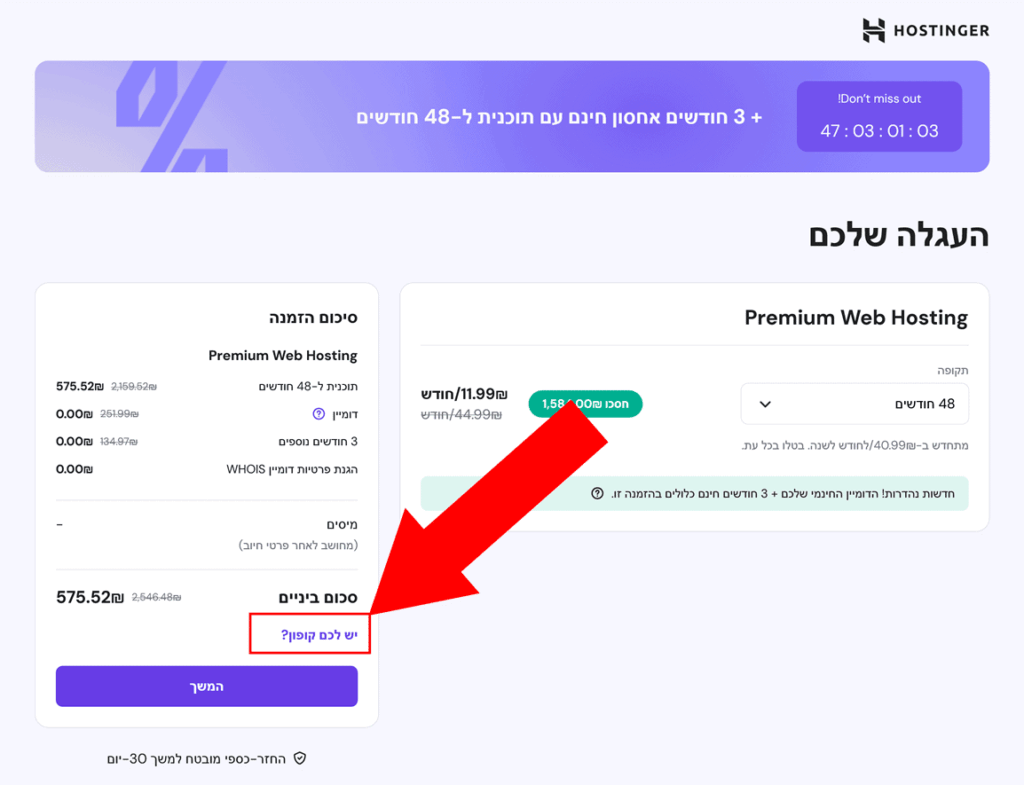
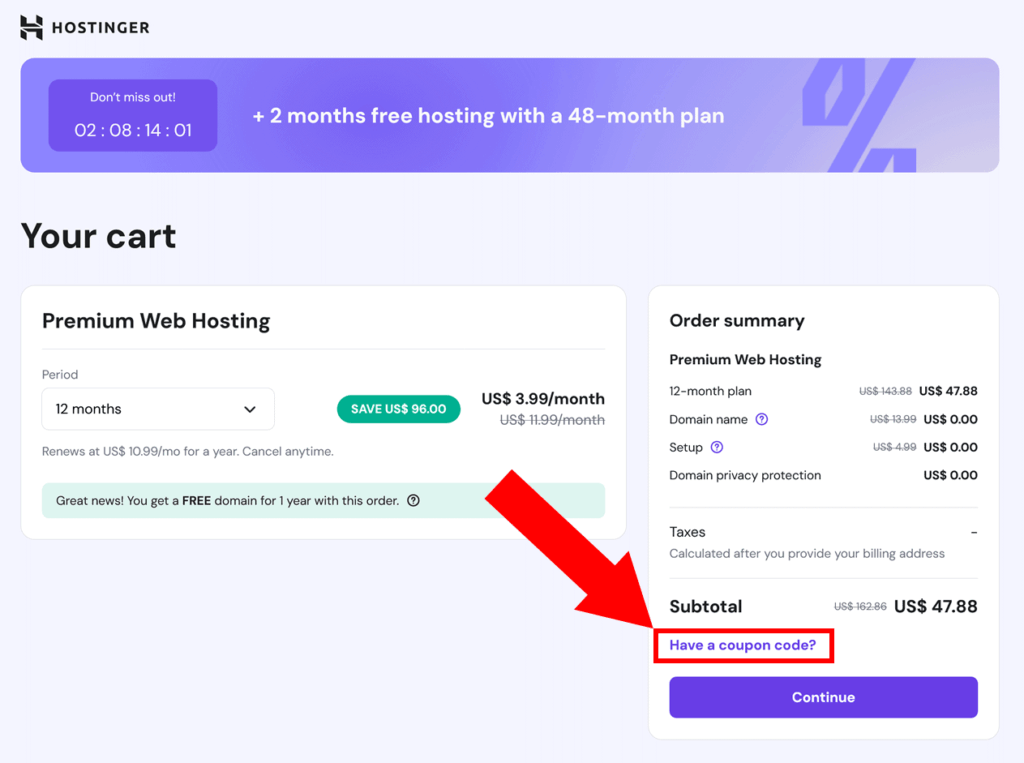
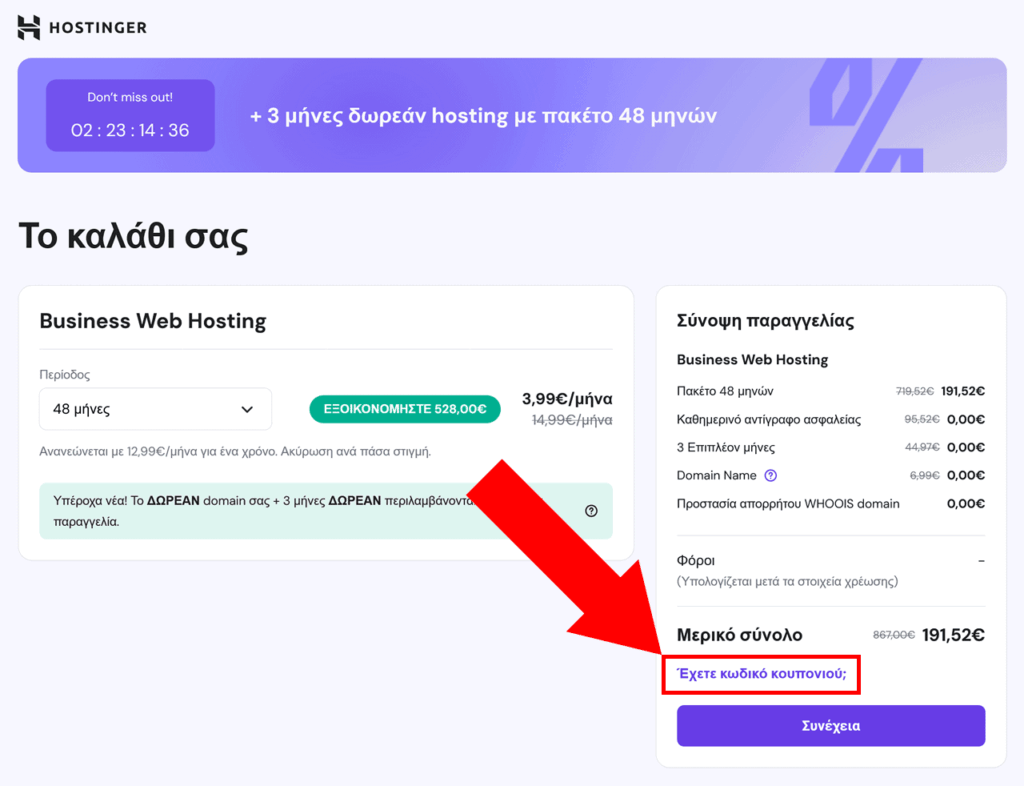
  3. Otsinguvälja paremas servas näed halli teksti “Kas sul on sooduskood?” – klõpsa selle kõrval oleval lingil, et avada kupongi sisestusväli.

    Hostinger sooduskoodi näide

  4. Kopeeri ja kleebi allolev kood sinna lahtrisse:

    special15
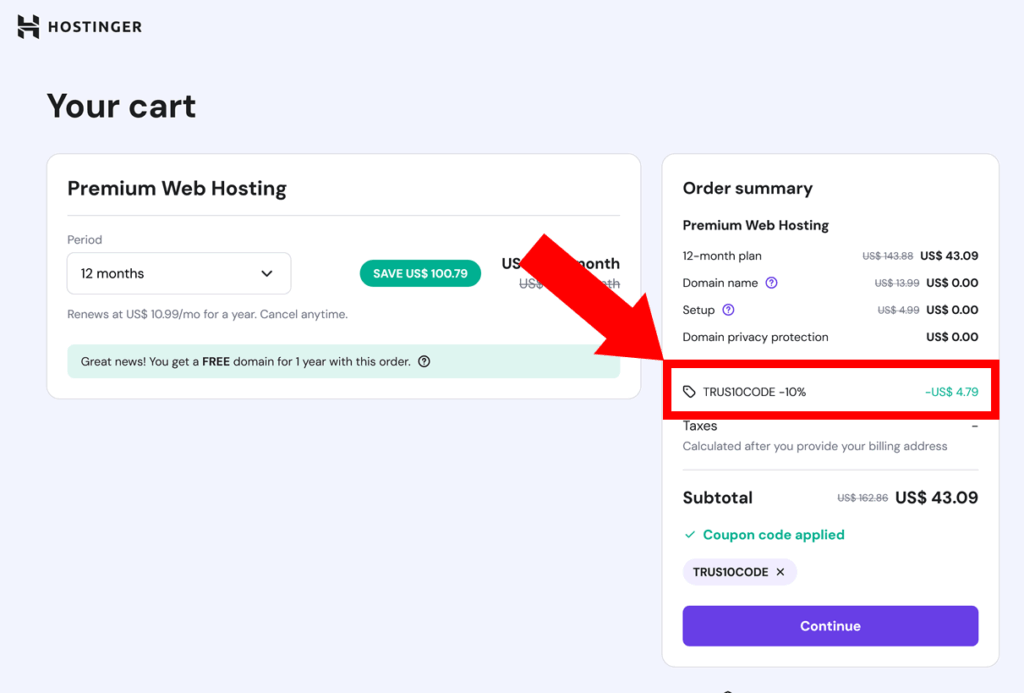
  5. Klõpsa “+” nupul, et rakendada. Kui kõik läks õigesti, näed kinnitusmärget ja hind langeb.
  6. Palju õnne! Sa said just veelgi parema hinna – nüüd mine ja loo midagi ägedat.

Kui peaks juhtuma, et kood ei tööta, anna meile kommentaarides märku – uurime asja ja aitame sul toimiva koodi leida.

Kokkuvõte: Kas Hostinger On Seda Väärt?

Võttes arvesse kõike eelnevat – kas Hostinger sobib su järgmise veebiprojekti jaoks?

Pärast enam kui 10 aastat Hostingeri kasutamist võime öelda, et see bränd on sisuliselt hinna ja kvaliteedi definitsioon: maksad väga mõistliku hinna ja saad vastu stabiilselt toimiva teenuse. Hostinger lihtsalt… töötab 🧘

Ja nad ei seisa paigal – iga kuu lisandub uusi funktsioone ja kasutajakogemus paraneb.

Kokkuvõte: Hostinger on 2025 aastal üks parimaid valikuid, kui soovid ühendada lihtsust, kiirust, töökindlust ja head hinda.

Kui otsustad Hostingerit proovida, ära unusta vaadata meie samm-sammulist juhist, kuidas saada lisasoodustust esimese tellimuse puhul.

***

On sul veel küsimusi serverite, pakettide või toe kohta? Või oled juba Hostingeri kasutanud ja tahaksid kogemust jagada?

👇 Tule ja liitu aruteluga kommentaaride sektsioonis – aitame üksteisel teha targemaid otsuseid!

Affiliate-teavitus: kui leidsid selle ülevaate kasulikuks, siis saad toetada meie blogi, kasutades tekstis olevaid linke Hostingeri tellimiseks. See ei mõjuta sinu hinda, kuid aitab meil jätkata kvaliteetsete juhendite loomist. Aitäh!

Cómo Crear un Sitio Web con WordPress en 2025: Guía para Principiantes paso a paso

Vamos al grano: aunque WordPress es famoso por ser amigable para novatos, los primeros pasos pueden sentirse como armar muebles de IKEA sin las instrucciones.

Nombres de dominio, hosting, temas, plugins, paneles de administración, certificados SSL, enlaces permanentes… ¿qué demonios es un enlace permanente?

Esta guía está aquí para desmitificar todo eso.

Aprenderás a montar tu primer sitio en WordPress como se debe — desde elegir las herramientas correctas hasta hacer clic en ese brillante botón de “Publicar”. Sin paja, sin sopa de tecnicismos. Solo una guía paso a paso, cortesía de alguien que ha montado decenas (si no cientos) de webs con WordPress desde 2009.

Vamos allá 👇

¿Qué es exactamente WordPress?

Impulsa una cuarta parte de todo Internet. Es, con diferencia, la forma más popular de crear y mantener sitios web. Es gratuito para todo el mundo y puedes modificarlo como quieras. Pero… ¿qué es exactamente WordPress?

Vamos a despejar la niebla: WordPress no es un creador de sitios como Wix o Squarespace. Tampoco es un servicio de hosting. Y no trae un botón neón que diga “Lánzame”.

Entonces… ¿qué es?

WordPress es una herramienta gratuita y de código abierto que te permite construir y gestionar sitios web. Más concretamente, es lo que se llama un Sistema de Gestión de Contenidos (CMS) — lo que en cristiano significa que maneja todo el contenido del sitio (textos, imágenes, menús, páginas, usuarios, ajustes) para que tú te concentres en que se vea y funcione como quieres.

Sin necesidad de programar. Lo juro por Snoopy.

Está compuesto por tres ingredientes principales:

  • WordPress Core – el software principal que hace que todo funcione
  • Temas – controlan la apariencia del sitio (estructura, fuentes, colores, ese “look” general)
  • Plugins – extensiones que permiten hacer más cosas (formularios, tiendas, SEO, etc.)

Piensa en ello así: el Core de WordPress es la estructura de la casa, los temas son la decoración interior, y los plugins son los electrodomésticos y gadgets.

¿Qué se puede hacer con WordPress?

  • Crear y gestionar páginas y entradas de blog
  • Personalizar la apariencia del sitio (sin romper nada)
  • Añadir funciones como formularios, sliders, tiendas online, foros… lo que sea
  • Colaborar con otros usuarios (admin, editores, autores, etc. — cada uno con sus superpoderes)

Pero ojo: esto es lo que WordPress no hace por defecto:

  • No te da un dominio como misitiochido.com — eso hay que comprarlo aparte (aquí una guía)
  • No aloja tu web — necesitas un sitio donde “colgarla” (aquí explicamos cómo elegir hosting)
  • No escribe ni diseña tu contenido de forma mágica (al menos todavía 😏)

No te preocupes — esta guía cubre todo eso con enlaces a nuestros mejores tutoriales. Pero primero, respondamos una pregunta clave: ¿sigue siendo WordPress una buena idea en 2025?

¿Deberías usar WordPress en 2025?

Antes de meternos con herramientas, ajustes y temas bonitos, hagamos una pregunta más básica:

¿Realmente es WordPress la mejor opción para tu proyecto?

Porque aunque WordPress es potente, flexible y está en todas partes — no siempre es la mejor elección. Pero…

  • Si quieres tener control total sobre tu sitio (sin pagar cuotas mensuales)
  • Si estás dispuesto a aprender un par de cosas nuevas
  • Si quieres escalar, personalizar y ser dueño de tu web

…entonces WordPress sigue siendo una de las mejores opciones en 2025.

Pero echemos un vistazo a la competencia por un momento.

Cuándo no deberías usar WordPress

Si solo estás probando una idea, necesitas una landing page en el mismo día, o no quieres ni oír hablar de hosting, dominios o plugins — probablemente te convenga más un constructor de sitios como Wix, Squarespace o Webflow.

Estas herramientas lo traen todo incluido (hasta el hosting), y puedes arrastrar y soltar cosas sin preocuparte por nada técnico.

¿La desventaja?

Pagas mes a mes, tienes menos opciones de personalización, y una vez dentro… es difícil salir. Es como una secta con tipografías elegantes.

Por qué WordPress sigue ganando (para la mayoría)

Aquí va la razón por la que más del 40% de las webs siguen usando WordPress:

  • Puedes empezar gratis — el software es de código abierto y la mayoría de los plugins y temas también lo son
  • Es increíblemente flexible — puedes montar blogs, portfolios, tiendas, foros, newsletters, hasta apps tipo SaaS
  • No estás solo — si tienes un problema, alguien ya lo tuvo y lo resolvió (y lo bloggeó)
  • Conservas el control — sin bloqueos propietarios, ni cierres sorpresa, ni limitaciones raras

Sitios importantes como TechCrunch, BBC America e incluso partes de whitehouse.gov funcionan con WordPress. Si les va bien a ellos, probablemente también te sirva a ti.

Salvo que tengas un caso de uso ultra específico o odies aprender cosas nuevas, WP sigue siendo una apuesta segura en 2025.

Qué necesitas antes de empezar

Antes de instalar WordPress y empezar a toquetear ajustes como si fueras un pro, hay dos cosas esenciales que tienes que resolver:

1. Nombre de dominio

Es tu dirección en Internet — el famoso tunombre.com.

Puedes registrarlo en servicios como Namecheap, GoDaddy o incluso a través de tu proveedor de hosting.

Pero no te lances sin pensarlo — el dominio importa más de lo que parece. Si tienes dudas, aquí tienes una guía para elegir bien.

2. Proveedor de hosting

Aquí es donde tu sitio “vivirá” — en un servidor que almacena tus archivos y se los muestra a los visitantes.

Hay miles de hostings por ahí, pero no todos se llevan bien con WordPress. Busca uno que ofrezca:

  • Instalación de WordPress en 1 clic (ahorra mucho tiempo)
  • Certificado SSL gratis (para ese bonito https://)
  • Soporte decente (mejor aún si tienen chat en vivo)

¿No tienes tiempo para comparar? Ve directo con Hostinger.
¿Quieres explorar opciones con lupa? Te dejamos nuestra mega guía de hosting.

Opcional: entorno local o de pruebas (staging)

Si quieres trastear sin arriesgarte a romper nada en vivo, puedes instalar WordPress en tu propio ordenador (sitio “local”) o usar el entorno de pruebas que ofrecen algunos hostings.

Esto es súper útil para experimentar sin miedo.

Herramientas como Local by Flywheel hacen que todo sea ridículamente fácil.

* * *

Una vez tengas dominio y hosting listos, es hora de instalar WordPress.

Hay dos formas — y te enseñamos ambas a continuación.

Instalar WordPress (2 métodos fáciles)

Perfecto — ya tienes dominio, hosting, y esa chispa de ambición en los ojos.

Hora de poner WordPress en marcha.

Hay dos formas principales de instalar WordPress:

  • Modo fácil: instalación en 1 clic desde el panel de tu hosting
  • Modo manual: hacerlo a mano (sigue siendo sencillo, lo prometo)

Elige el que te dé más confianza. Ambos te llevarán al mismo destino: un sitio en blanco pero funcional listo para personalizar.

Método 1: instalación en un clic (recomendado)

La mayoría de hostings decentes incluyen un instalador de WordPress en su panel de control — normalmente bajo nombres raros como “Softaculous”, “Installatron” o simplemente el logo de WordPress.

Te pedirá que rellenes un formulario breve:

  • Nombre del sitio y eslogan – se pueden cambiar más tarde
  • Usuario administrador – por favor no uses “admin” 🙏
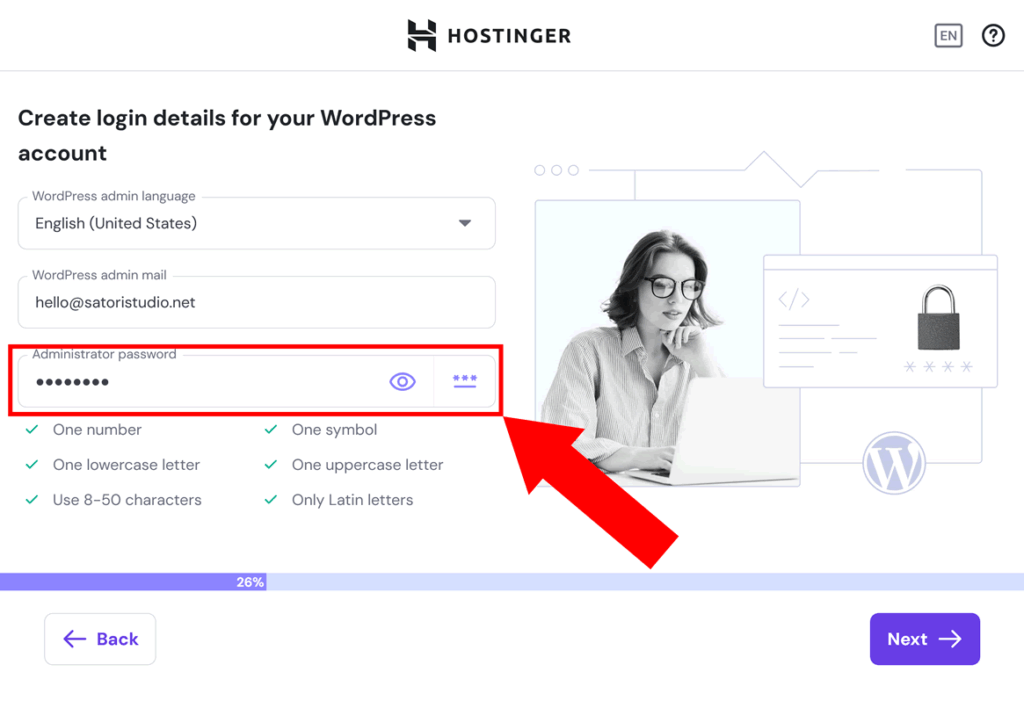
  • Contraseña – fuerte y única (un gestor de contraseñas ayuda)
  • Email – usa uno que revises de verdad
  • Ruta de instalación – déjala en blanco si es tu sitio principal (más abajo explicamos)

Haz clic en “Instalar”, espera 30 segundos, y boom — ya tienes web.

¿Y eso de “ruta de instalación”?
Si lo dejas en blanco, WordPress se instala en tu dominio principal.
Si escribes algo como blog, tu sitio quedará en tusitio.com/blog.
Útil si más adelante quieres tener varias secciones o micrositios.

Método 2: instalación manual (el modo friki útil)

Si tu hosting no ofrece instalación en 1 clic, o si quieres ejercitar tus músculos nerd, aquí va la versión manual. Tiempo estimado: ~10 minutos.

  1. Descarga la última versión de WordPress desde wordpress.org
  2. Crea una nueva base de datos MySQL + usuario desde el panel de tu hosting (normalmente en la sección “Bases de datos”)
  3. Descomprime WordPress y renombra la carpeta como quieras (ej: misitiochulo)
  4. Sube esa carpeta a tu servidor vía FTP usando FileZilla o el gestor de archivos del hosting
  5. Abre tu navegador y ve a tudominio.com — sigue el asistente de instalación: introduce datos de la base de datos, crea usuario admin, etc.

¡Listo! Ya puedes entrar en el panel de WordPress desde:

tudominio.com/wp-admin

Guarda ese enlace — lo vas a visitar bastante.

Ahora pasemos a los ajustes esenciales que conviene cambiar cuanto antes (antes de ponerte a publicar o instalar temas).

Ajustes clave tras instalar WordPress

¡Ya tienes WordPress instalado — felicidades! 🎉
Antes de ponerte a diseñar o escribir posts, vamos a dedicar cinco minutos a afinar algunos ajustes importantes.

¿Y por qué ahora? Porque algunos valores por defecto son… mejorables. Y arreglarlos más tarde puede ser un lío.

Aquí tienes lo que deberías hacer justo después de instalar WP:

Ajustes generales

Ve a Ajustes → Generales en tu panel de WordPress. Completa:

  • Título del sitio – aparece en las pestañas del navegador y en los resultados de búsqueda
  • Eslogan – opcional, pero útil para el SEO si describe bien tu web

Y revisa también:

  • Zona horaria – ajusta a tu ubicación real para que los posts y copias de seguridad tengan la hora correcta
  • Formato de fecha y hora – va a gustos, pero afecta cómo se ve todo para los visitantes

Ajustes de comentarios

Ve a Ajustes → Comentarios.
Si planeas permitir comentarios (blog o comunidad), deja activada la opción “Permitir que se publiquen comentarios”.

Si no… desactívala y disfruta del silencio.

Otras recomendaciones útiles:

✅ Activa “El comentario debe aprobarse manualmente” (créeme)
❌ Desactiva pings y trackbacks (ya casi nadie los usa y suelen ser spam)
✅ Activa comentarios anidados (se ve mucho más ordenado si hay conversaciones)

Estructura de enlaces permanentes

Esto es clave tanto para humanos como para Google.
Ve a Ajustes → Enlaces permanentes y elige:

✔️ Nombre de la entrada

Este ajuste convierte URLs feas como tusitio.com/?p=123 en direcciones limpias y entendibles como tusitio.com/guia-wordpress. Mucho mejor.

Eliminar contenido de ejemplo

Las instalaciones nuevas de WordPress suelen venir con cosas de prueba como el post “Hola mundo” o una “Página de ejemplo”.

Bórralos desde Entradas y Páginas para evitar que aparezcan en el menú o en tu sitemap.

* * *

Una vez hecho esto, tu sitio estará más limpio, seguro y preparado tanto para Google como para tus visitantes humanos.

¿Seguimos? Es hora de ponerle estilo y funciones con temas y plugins.

Tus Primeros Temas y Plugins en WordPress

Ahora que tu sitio está limpio y recién instalado, es momento de darle un poco de personalidad — y potencia.

Aquí entran en juego los temas y plugins.

Plugins: lo que tu sitio puede hacer

Los plugins son donde ocurre la magia. Añaden nuevas funciones a tu web WordPress — como formularios de contacto, herramientas SEO, tiendas online, mejoras de velocidad, lo que quieras.

Solo en el repositorio oficial hay más de 59.000 plugins, pero no te emociones demasiado.
Unos pocos bien elegidos hacen más por tu sitio que 30 al azar.

Aquí tienes algunos esenciales (y gratuitos) para empezar:

  • Rank Math – plugin SEO para optimizar títulos, meta tags y fragmentos en buscadores
  • Akismet – filtra automáticamente los comentarios spam (imprescindible si tienes comentarios activos)
  • WPForms Lite – permite que los visitantes te contacten mediante formularios simples
  • LiteSpeed Cache (o WP Super Cache) – acelera la carga de tu sitio
  • Wordfence Security – protege contra hackeos, malware y cosas chungas en general

¿Quieres ver quién visita tu web?
Añade Google Site Kit — conecta Analytics, Search Console y más, todo desde el panel.

Una nota sobre la “inflación de plugins”

No todos los plugins son buenos. Algunos son lentos, obsoletos o chocan entre sí. Por eso:

  • Usa solo plugins bien valorados y con actualizaciones frecuentes
  • Instala solo lo que realmente necesites
  • Elimina (no solo desactives) los que no uses

Temas: cómo se ve tu sitio

Los temas controlan el diseño del sitio — estructura, tipografías, colores, estilo del encabezado, formato del blog… todo.

Puedes verlos como la ropa de tu web. Y sí, puedes cambiar de look más adelante sin perder el contenido.

Hay miles de temas por ahí, pero no elijas el primero que brille. Algunos son lentos, otros tienen bugs, y algunos están rotos de fábrica.

Para mantenerlo simple:

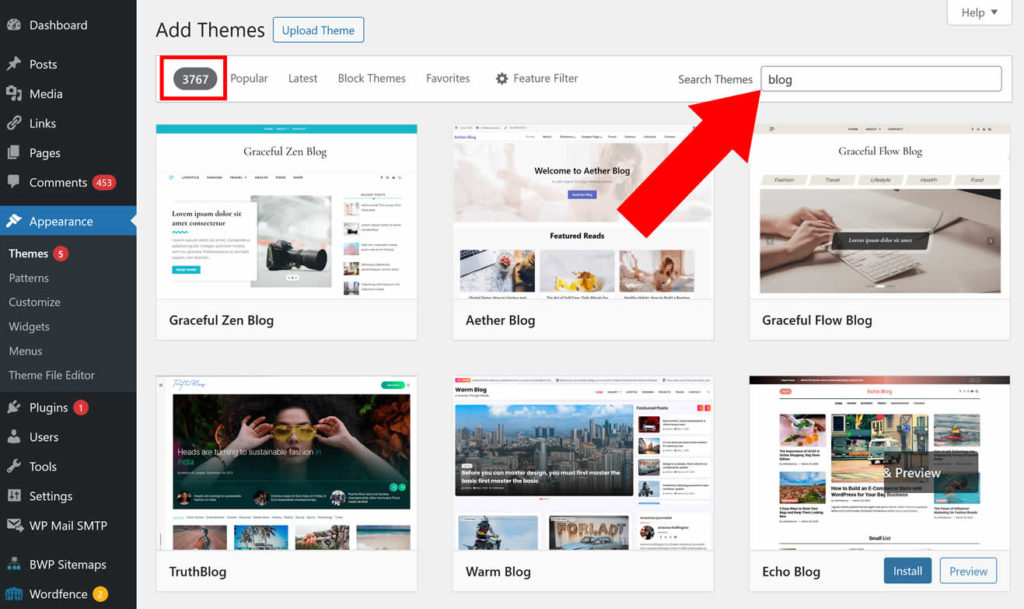
Si piensas usar el nuevo editor de bloques de WordPress (full-site editing), busca un tema basado en bloques como Astra o GeneratePress. Funcionan de maravilla con el editor nativo y no sobrecargan tu web.

¿El próximo paso? Encontrar un tema que no sea una decepción.
Tenemos una guía completa sobre eso → cómo elegir el tema ideal en WordPress.

Próximos Pasos: Qué Hacer Después de la Instalación

A estas alturas ya tienes:

✔️ Un sitio WordPress funcionando
✔️ Ajustes clave configurados
✔️ Un tema que no da vergüenza
✔️ Plugins haciendo su magia en segundo plano

¿Y ahora qué?

Aquí va una hoja de ruta rápida para continuar:

  • Crea tus primeras páginas: normalmente una página de inicio, una de “Sobre mí/nosotros” y otra de contacto
  • Publica tu primer post: aunque sea un breve “Hola mundo”, sirve para probar que todo va bien
  • Personaliza tu menú de navegación: asegúrate de que los visitantes pueden encontrar lo importante
  • Configura las copias de seguridad: tu hosting puede ofrecer esta opción, o puedes instalar algo como UpdraftPlus

Opcional pero recomendable:

  • Explora nuevos temas si quieres una estética más personalizada
  • Empieza a pensar en velocidad, caché y seguridad — lo cubriremos en próximas guías

Preguntas frecuentes sobre WordPress

¿Necesito saber programar para usar WordPress?

¡Para nada! Puedes crear y gestionar un sitio completo en WordPress sin escribir una sola línea de código. Eso sí, saber un poco de HTML/CSS o usar un constructor visual como Elementor (o el editor de bloques integrado) te dará más flexibilidad.

¿Cuál es la diferencia entre WordPress.org y WordPress.com?

WordPress.org es la versión gratuita y de código abierto que instalas en tu propio hosting. WordPress.com es un servicio con hosting incluido — más fácil para empezar, pero con muchas limitaciones a menos que pagues. Si quieres control total, usa WordPress.org (que es el que explicamos aquí).

¿Puedo cambiar el tema más adelante?

Sí, puedes cambiar de tema cuando quieras sin perder tu contenido. Solo ten en cuenta que puede que tengas que reajustar menús o widgets, especialmente si usabas un constructor o un tema muy personalizado.

¿WordPress es seguro?

WordPress es seguro si lo mantienes actualizado, usas contraseñas fuertes y eliges plugins confiables. Instalar un plugin de seguridad como Wordfence o Solid Security también es buena idea. Y siempre haz copias de seguridad, por si acaso.

¿Puedo crear una tienda o portfolio con WordPress?

Absolutamente. WordPress puede con todo: tiendas online (con WooCommerce), portfolios de fotografía, membresías, foros o incluso aplicaciones tipo SaaS. Con los plugins adecuados, no hay casi límites.

* * *

WordPress puede parecer abrumador al principio — pero una vez que completas estos pasos, todo empieza a encajar.

Ya tienes la estructura.
Ahora toca enfocarte en el contenido, el diseño y hacer que tu web sea realmente útil para quien la visita.

Si tienes preguntas sobre la instalación o configuración inicial de WordPress, no dudes en dejar un comentario más abajo — ¡hablemos!

NordVPN arvustus: parim VPN 2025 või pelgalt nutikas turundustrikk?

☑︎ Seda arvustust värskendati viimati: July 2025

Alates selle asutamisest 2012. aastal on NordVPN kasvanud vaieldamatult suurimaks VPN-teenuseks kogu maailmas – see on lausa kaks korda populaarsem kui suuruselt teine bränd, nagu näitab meile Google’i globaalne otsinguhuvi mõõdik:

NordVPN interest

See muljetavaldav kasv on teinud NordVPN-ist turuliidri. Kas see kasv on tõesti tingitud kvaliteedist ja usaldusväärsusest või on selle taga lihtsalt suur turunduseelarve?

Teisisõnu: kas ka sina peaksid veebiturvalisuse ja privaatsuse suurendamiseks valima NordVPNi?

Uurime selle välja!

Selles detailses arvustuses analüüsime põhjendatud arvamuse kujundamiseks NordVPN-i iga võimaliku nurga alt. Muuhulgas käime läbi ka järgmised populaarsed küsimused:

  • 🗻Kuidas erineb Nord teistest VPN teenustest?
  • 🔒Kas sinu andmed on ikka NordVPN-iga turvatud?
  • 🐌Kas see võib sinu internetiühendust aeglasemaks muuta?
  • 💸30-päevane tagasimaksmise garantii – kuidas see töötab?
  • 🏆Kas peaksid eelistama NordVPN-i teistele pakkujatele?

(juhul, kui otsustad, et soovid samuti NordVPN-i proovida, oleme selle artikli lõppu lisanud sooduskoodi mille abil säästad kolmeaastase tellimuse pealt lisaks 5%)

…Aga uurime kõigepealt, kas NordVPN ikka on teistest VPN teenustest nii erinev:

NordVPN-i unikaalsed omadused

VPN (= Virtual Private Netwrok ehk virtuaalne privaatvõrk) on süsteem, mis suunab sissetuleva ja väljamineva internetiliikluse krüptitud ühenduse kaudu, mida kutsutakse „tunneliks”.

See muudab sinu ühenduse palju turvalisemaks ründajate vastu, kes soovivad varastada sinu delikaatset informatsiooni, ning samuti suurendab sinu privaatsust kõigi nende suhtes, kes võivad tahta sinu järel nuhkida – alates valitsusest ja sõbralikest suurkorporatsioonidest kuni sinu internetiteenuse pakkujani.

Kuna protsessis varjatakse sinu Interneti-aadress, saad „boonusena” juurdepääsu ka kogu maailmas olevale sisule, isegi kui sellele on sinu riigis autoriõiguse või riikliku tsensuuri tõttu ligipääs piiratud 🚧

Peaaegu iga turul leiduv korralik VPN pakub hetkel kõike eelnimetatut, kõigil mõeldavatel seadmetel alates sülearvutitest nutitelefonide, telerite ja ruuteriteni – kas NordVPN-is on üldse midagi erilist?

On, ja tegelikult isegi palju:

  • NordVPN-il on olemasolevate VPN teenusepakkujate seas vaieldamatult suurim arv servereid (üle 5000 serveri 59 riigis) – see on 1,5 korda rohkem kui suuruselt teine VPN!

See tähendab peaaegu piiramatut asukohtade valikut ja tagab, et ükski server ei ole samaaegsete ühendustega liigselt koormatud.

Siin on nimekiri kõikidest riikidest, kus asuvad NordVPN-i serverid (iga punkt tähistab piirkonda, mitte ühte serverit):

NordVPN: countries

Ilmselt panid tähele, et NordVPN-i riikide valik on üsna tagasihoidklik võrreldes mõne teise VPN-iga, kus asukohti on üle 150 – see on tingitud asjaolust, et Nord kasutab ainult füüsilisi servereid, mitte virtuaalservereid, mis ainult matkivad asukohti.

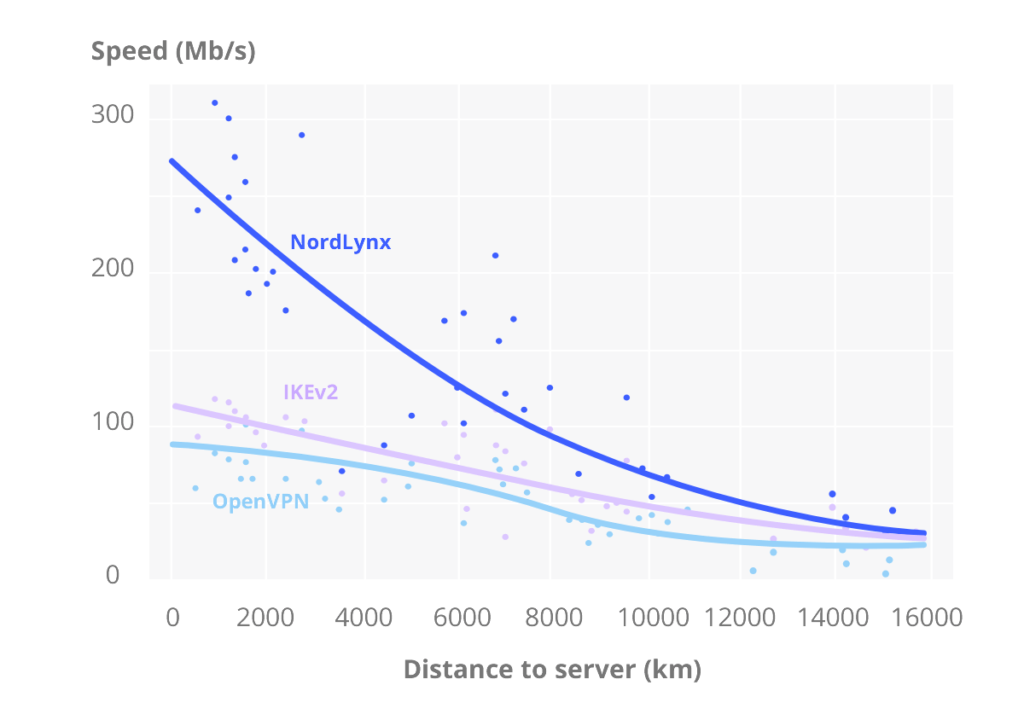
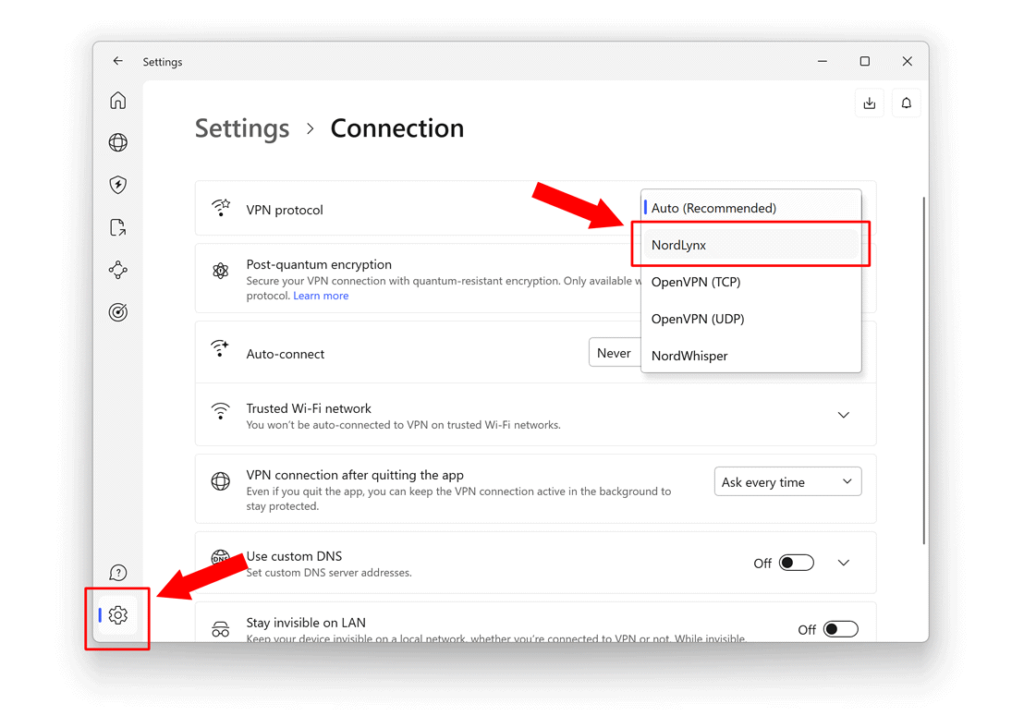
  • Suurem kiirus NordLynxiga, mis on uus VPN-protokoll, mille on NordVPN välja töötanud Wireguard avatud lähtekoodiga tehnoloogia põhjal.

Kui enamik teisi pakkujaid kasutab ainult olemasolevaid protokolle, on NordVPN otsustanud luua endale kohandatud versiooni, mis vastab paremini nende konkreetsele võrguarhitektuurile; miks see üldse oluline on?

… kiiremad ühendused:

NordLynx: speed

(ülaltoodud diagramm näitab NordLynxi ühenduskiiruste jaotust võrreldes teiste laialdaselt kasutatavate VPN-protokollidega, tuginedes Nordi poolt läbi viidud 250 000 testile)

  • Range logivastane poliitika, mida toetab Panama andmekaitseseadus ja mida auditeerib regulaarselt PWC Zürichi filiaal.

Tefincom S.A., NordVPN-i haldav juriidiline isik, on registreeritud Panama Vabariigis, mis tuntud anonüümsust ja andmekaitset pooldava suhtumise poolest.

Kui peaks juhtuma (väga ebatõenäoline) olukord, kus kolmandal osapoolel õnnestub sundida Tefincomi oma andmeid üle andma, pole seal väga midagi üle anda, kuna Nord ei hoia oma serverites klientide aktiivsuslogisid.

Lisaks sellele on NordVPN-il varuks veel üks väike nutikas trikk:

Lehel „Meist” avaldavad nad niinimetatud garantiiklausli – avalduse, mis kinnitab, et nad EI OLE saanud ühtegi taotlust klientide andmete avaldamiseks.

Miks see kasulik on? Paljud riigid keelavad ettevõtetel avalikkusele rääkida saadud avalikustamiste korraldustest, kuid ükski seadus ei keela avalikkusele selgesõnaliselt teada anda selliste korralduste puudumise kohta 😉

  • CyberSec blokeerib pahatahtlikud veebisaidid ja takistab häkkereid, et nad ei saaks sundida sinu seadmeid hajutatud rünnakutes osalema.

Nordi ainulaadne CyberSec süsteem on nagu täiendav tulemüür ja reklaamiblokeerija, mis on sisseehitatud otse VPN-i.

See aitab vältida ohtlikke saite ja nautida reklaamivaba (st ka kiiremat) veebi ilma täiendavat tarkvara paigaldamata.

  • NordVPN toetab mittetulundusühinguid, näiteks Amnesty International ja Internet Freedom Festival.

Jah, see ei ole küll selline funktsioon, mis sulle otseselt kasulik oleks, aga paljude inimeste jaoks on oluline teada, kas igapäevaseks kasutamiseks valitud bränd teeb lisaks raha teenimisele ka ühiskonna heaks midagi kasulikku.

Kui Nord ei toetaks aktiivselt inimõigusorganisatsioone ja küberturvalisuse projekte, kõlaks nende väited vaba ja avatud veebi väärtustamise kohta pisut pealiskaudselt, kas pole?

Kuidas NordVPN-i tõhusalt kasutada?

Lisaks sellele, et mõistad VPN-i funktsiooni ja seda, mille poolest Nord teistest pakkujatest erineb, on samuti oluline teada, kuidas seda kasutada nii, et saaksid sellest veebis tegutsedes maksimaalset kasu.

Esimesed sammud on üsna lihtsad:

  1. Mine ametlikule veebisaidile ja loo seal endale konto. Kui soovid saada suurimat soodustust, siis vaata allolevat boonuste osa, et näha hetke parimat pakkumist.
  2. Seejärel mine oma konto avalehele ning lae alla ja paigalda ametlik NordVPN tarkvara .
  3. Ühenda end meelepärase asukoha VPN serveriga või kasuta automaatse ühenduse funktsiooni, mis valib sinu jaoks parima lähedalasuva serveri.

See kõik on küll ilus ja lihtne, kuid

…erinevalt paljudest teistest vähem keerukamatest alternatiividest võib NordVPN olla palju võimsam turbe ja privaatsuse suurendamise abivahend, kui osata seda õigesti kasutada 👍

Siin on mõned olulised näpunäited, kuidas alustada:

  • Esiteks tasub välja valitud VPN laadida alla kõikidesse seadmetesse, mida regulaarselt kasutad, näiteks on Nordil eraldi rakendused Windows, Mac, Linux, Android ja iOS süsteemidele. Olgem järjekindlad oma püüdlustes tagada suurem privaatsus ja turvalisus!
  • Kogu oma koduse WiFi-võrgu kaitsmiseks on võimalik paigaldada NordVPN-i oma ruuterile. Kindlate ruuterimudelite jaoks konkreetsete juhiste saamiseks uuri lähemalt nende teadmistebaasi.
  • Reguleeri seadeid selliselt, et seadme sisselülitamisel käivituks sinu NordVPN rakendus taustal automaatselt ja ühendab sinu VPN-i (selle seadistuse leiad vahekaartidelt nimega „General” ja „Auto-connect”).
  • Kas soovid kõikvõimalikud riskid viia miinimumi? Lülita NordVPN-i seadetes sisse Kill Switch – see valik blokeerib automaatselt sinu internetiühenduse, kui VPN-i ühendus peaks katkema.

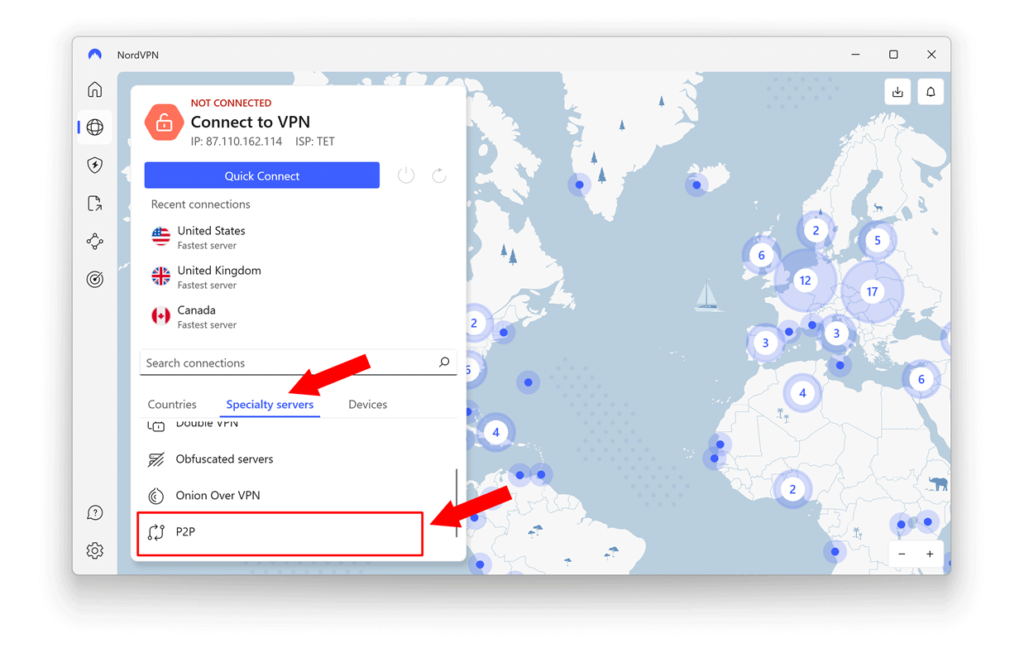
Samuti on hea meeles pidada, et NordVPN-il on mitmeid spetsiaalseid serverite tüüpe neile, kes vajavad täiendavat privaatsust ja turvalisust:

näiteks sobivad P2P-serverid ideaalselt torrentide allalaadimiseks, samas kui Double VPN pakub maksimaalset anonüümsust tsensuuri ja jälgimise vältimiseks.

Juba pelgalt NordVPN-i omamine on veebiturvalisuses ja privaatsuses suur samm edasi – ülaltoodud soovitused on mõeldud selleks, et saaksid oma tellimusest maksimumi võtta!

Hinnakiri, tagasimaksed ja tühistamine

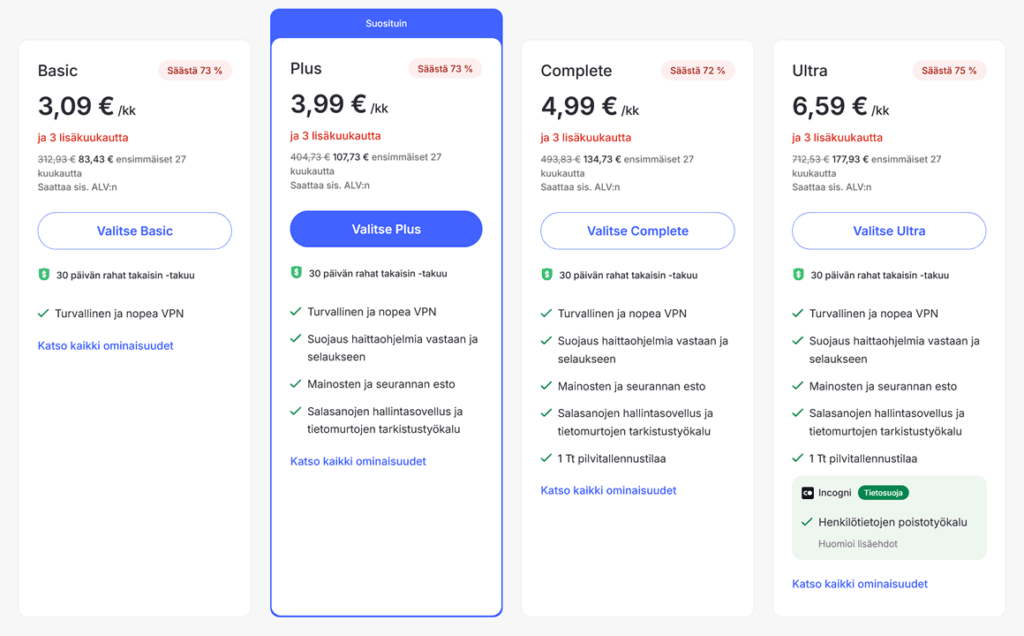
Mis puutub hinnakirja, siis NordVPN pakub nelja võimalust: ühe-, kahe- ja kolmeaastased tellimused ning samuti ka kuupõhine tellimus.

Kui võrrelda hindu ühe kuu kohta, on kolmeaastane tellimus selgelt kõige odavam, pakkudes ligikaudu 70% allahindlust võrreldes kuupõhise tellimusega (vaata allpool olevat viisi, kuidas saada sooduskood, millega saada veelgi suurem soodustus).

Nagu enamiku teiste VPN-de puhul, on ka siin kuupõhise makse hind teistest tellimustest kallim (3–4 korda kallim!), mis tähendab, et selle praktiline väärtus on üsna madal, eriti kui arvestada seda, et kõikidel tellimusvariantidel on 30-päevane raha tagasimaksmise garantii.

… räägime sellest lähemalt:

NordVPN-il on üsna standardne raha tagasimaksmise poliitika, mis tähendab, et uue tellimuse esimese kuu jooksul on sul võimalik oma konto tühistada ja saada täies mahus tagastus makstud summale 💸

NordVPN-i tagasimaksete kohta peaksid teadma kahte asja:

  • Pane tähele, et see sisaldab sõna „uus”! 100% raha tagasimaksmise garantii kehtib ainult viimase 30 päeva jooksul loodud kontodele.
  • Kuna Apple’ile meeldib asju ajada omamoodi, siis ei ole võimalik saada tagasimakset iOS-i rakenduse kaudu loodud NordVPN-i kontole. Sellisel juhul pead tagasimakse saama otse App Store’ist.

Kui sinu konto pole uus, st kui see loodi rohkem kui 30 päeva tagasi, saad selle endiselt igal ajal tühistada, kuid sellisel juhul ei tagastata ülejäänud summat.

Kokkuvõtvalt võib öelda, et kui väärtustad paindlikkust, on ilmselt uuele kontole parem aastane tellimus; kui otsid aga parimat hinda, on parim valik kolmeaastane tellimus. Mis toob meid järgmise teema juurde –

BOONUS: NordVPN-i sooduskood

Kui otsustad NordVPN-i proovida, siis miks mitte teha seda parima võimaliku hinnaga, kas pole?

Nordi kolmeaastane tellimus on juba niigi ligi 70% soodsam võrreldes kuupõhise tellimusega, kuid saame selle pakkumise veelgi paremaks teha.

Siin on viis, kuidas säästa lisaks veel 5 protsenti:

  1. Vajuta järgneval lingil, et rakendada automaatselt sooduskood, mis annab kolmeaastase tellimuse puhul 75% soodustust:

    NordVPN-is 75% soodustust

  2. Vajuta uuel vahelehel avanevas aknas punast registreerimisnuppu; ära pane tähele, et nupul on mainitud tavalist 70-protsendilist soodustust 🤓
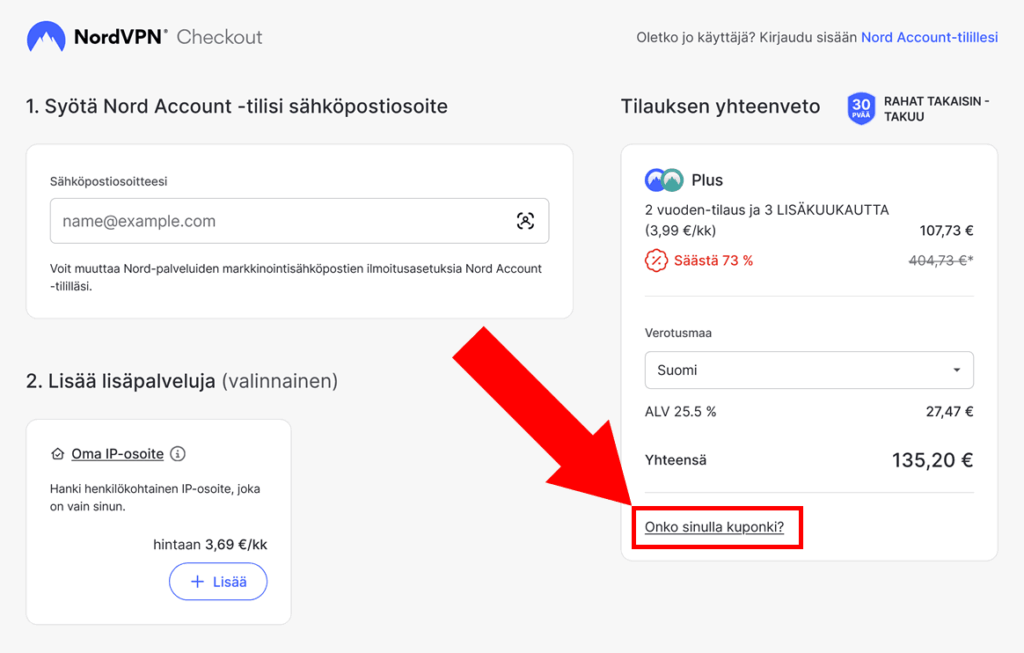
  3. Nupule vajutamine viib sind maksmise lehele – vaata allolevat tellimuste hinnakirja, et üle kontrollida, kas soodukood on ikka rakendatud:

    NordVPN coupon

    Kui see ei ole mingil põhjusel rakendunud, eemalda olemasolev sooduskood ja kopeeri sisendväljale järgnev kood:

    satori

Ja ongi olemas, parem pakkumine NordVPN jaoks koos 30-päevase raha tagasimaksmise garantiiga! Nüüd saad minna maksma, sinu kontole rakendatakse uus hind.

Järeldus: kas peaksid kasutama NordVPN-i?

Nüüd, kui meil on selgem pilt sellest, mida NordVPN täpselt pakub, on aeg vastata meie viimasele küsimusele –

Kas Nord on sinu raha väärt?

Vastus on kindel ja kõlav „jah”:

Tundub, et NordVPN on leidnud soodsa koha kõrge kvaliteedi ja taskukohase hinna vahel, pakkudes kombinatsiooni mõlemast, mida on peaaegu võimatu ületada.

On teatud olukordi, kus ettevõtte suurus mängib klientide heaolus suurt rolli.

Olles maailma suurim VPN, on Nordil võimalik teha suuri investeeringuid oma infrastuktuuri ja funktsioonidesse – mis omakorda tagab selle, et antud brändi jaoks on oluline oma maine säilitamine.

Kõigist virtuaalsetest privaatvõrkudest, mida oleme aastate jooksul testinud, võib NordVPN-i kindlasti soovitada väga hea hinna ja kvaliteedi suhtega lahenduseks parema veebiturvalisuse ja privaatsuse tagamiseks:

… alates igapäevasest sirvimisest, veebis ostlemisest, P2P/torrentitest ja voogedastusest kuni valitsuse tsensuuri vältimise ja suurema anonüümsuseni – NordVPN on kindlasti valik, mida tasub kaaluda.

***

Kas sul on endiselt Nordi kohta küsimusi? Või äkki oled seda VPN-i juba kasutanud ja tahaksid oma arvamust jagada? Jaga oma arvustust allolevas kommentaaride osas, aidakem üksteisel teha teadlikke otsuseid!

Outsourcing Web Development: The Who, Why, and How’s

Every business needs a website, and there are constantly not enough programmers. This has led to interesting changes and trends in the web development outsourcing market, which we’re going to analyze in this article.

If you’re not a programmer, or you don’t have programmers on your team, then you have to outsource the production of your software.

Many businesses even let go of their in-house teams in favor of outsourcing companies or freelancers. Such a transition can be hard at first, but ultimately it forces entrepreneurs to simplify and streamline their workflow and business processes.

Those that succeed at outsourcing and managing remote work have more resources to specialize on their products and run like lean, mean, entrepreneurship machines.

In this piece, we’ll analyze how outsourcing has changed over time, why it gives businesses a competitive edge, and how to make the most out of an outsourcing engagement.

The global market for software outsourcing

To put it simply, outsourcing means paying another company to do things instead of doing them by yourself or with your team, or by hiring new people to do them.

Outsourcing makes life easier for entrepreneurs and managers who have the budget to pay for it, as well as the necessary skills to oversee the service provider.

Businesses can outsource a large portion of their processes these days, from accounting, customer service, hiring, invoice management, all the way to building software.

Except for software-first companies, like game studios or software development agencies, a lot of businesses don’t need full-time programmers on their team. Even if they did want to hire, they would have to tap into an extremely tight IT services labor market and later invest significant resources into actually managing the specialists efficiently.

The best developers either work for high-profile tech companies and industry-leading enterprises, or become freelance consultants – or join the ranks of outsourcing companies.

However, although extreme growth in the IT industry continues to be… well, extreme, the outsourcing market is actually getting smaller (you’ll see why in a moment).

How much is the global software outsourcing market worth?

In 2018, the global market for outsourcing was worth $85.6 billion, which is a pretty steep drop from 2016 when it was worth $104.6 billion.

Over half of that market, around $62 billion, was IT outsourcing.

All the while, global spending on IT services reached $993 billion in 2018, and is forecast to grow to $1147 billion by 2021.

So why is the outsourcing market getting smaller? It could be explained by the fact that traditional outsourcing has changed. Businesses far and wide have been adopting cloud solutions to host their data and provide the tech infrastructure they need. It plays a huge part in the modern outsourcing market.

The same goes for Robotic Process Automation. Essentially, it’s the same as outsourcing, but not to a person, but an artificial agent, sometimes quite intelligent.

Cloud and RPA are not ‘traditional’ types of outsourcing, so they might not be included in the outsourcing market statistics. However, they solve almost the same problems for companies as outsourcing does. They free up your time, and provide a reliable solution for a reasonable price.

Who does the outsourcing and to what ends?

In short – the North and South Americas are the largest buyers of remote services. In 2017, according to KPMG, they were responsible for 41.5% of outsourcing deals globally. Europe, Middle East and Africa accounted for 35%, and Asia and Oceania – 23%.

According to a Clutch survey of 529 small business owners, 37% of small businesses are already outsourcing at least one business process. 52% were planning to outsource in 2019. They outsource mainly to be more efficient (24%), and get access to expert knowledge and skills (18%).

When it comes to bigger companies, in Deloitte’s survey of 521 market-leading companies, 93% are already using, or plan to use cloud computing, and 72% are using, or plan to use Robotic Process Automation.

Small companies outsource in order to do things that they don’t have the knowledge or resources to accomplish – like building websites or performing accounting tasks. Large businesses, on the other hand, seem to mostly outsource commoditized processes, like hosting and server management, or repeatable manual processes that robots can do faster.

In other words, small businesses outsource to gain competences and results they can’t generate themselves. The big players outsource to become more flexible and leaner than their competitors.

As you might have noticed, we didn’t mention lower costs – and that’s because…

Outsourcing is no longer about cost reduction

One of the major changes in the outsourcing market is that managers don’t outsource only to cut costs anymore. They see outsourcing as a way to become more flexible, agile, and competitive.

In approaching outsourcing options, low price is no longer the key consideration, so managers are looking at different criteria to find the best providers. A recent Deloitte survey clearly shows this trend:

42% of surveyed managers admit that they should’ve spent more time choosing an outsourcing partner. A lot of them admit that they need to take a more strategic approach to outsourcing in order to transform business processes, rather than just passing them over to someone else.

Companies are clearly becoming aware that outsourcing is a complex way to streamline business, and not a simple tactic to quickly cut costs. Outsourcing has turned into a collaboration that enables businesses to evolve capabilities – speed, flexibility, bleeding-edge technology – that they wouldn’t be able to reach without external support.

Because of that, we can expect the outsourcing market to continue growing, but not in the traditional sense. Instead of expanding outwards and competing on prices, it is more likely to deepen, differentiate, and focus more and more on providing high-quality, innovative, and even disruptive solutions.

In order words, we are likely to see intensifying speciation and increasing divides between –

Different types of outsourcing companies

If you want to outsource, say, the production of your website, there are a lot of options you can take.

The first thing you might consider is hiring a freelancer. With sites like Upwork or Freelancer.com, finding the right person can feel easy. However, the hiring manager needs to carefully manage the freelancer, and take care of the administrative procedures.

Then there is virtual employment or outstaffing. What’s the difference compared to outsourcing? As Talmatic explain in their blog, outstaffing companies essentially take on the hiring process, which means there is virtually no bureaucracy. You pay the outstaffing agency to find the right person, and then you manage that person like they’re a part of your team. It’s one of the most affordable and convenient ways to outsource web development or software development these days.

You can also pay for a software-as-a-service suite (SaaS) that will enable you to easily build your own website without any programming. This option would be the least costly, but it still requires you – or someone on your team – to do some (actually, most) of the work.

Finally, there’s also traditional outsourcing, also called the Managed Services Model. Here you hire an external company to set up a team, make all the technological decisions, and build a website that you have envisioned.

The biggest challenge here is communicating your requirements clearly, in a way that the outsourcing partner knows exactly what to do and how much resources (and hence your money) they can spend on the project.

In the MSM model, a big part of any successful partnership is a solid contract. The most common types of contracts are:

  • Fixed-price – both the price and the requirements for the project are agreed upon from the beginning
  • Time and Materials approach – the requirements are clear but open to changes, and the price is flexible and depends on how much the outsourcing partner spends on building your site
  • Agile – a mix of the above, usually with a stated budget limit, and an open approach to the requirements of the project so that they can be changed during production

In addition to the mode of cooperation, we can also classify outsourcing partners by their location relative to the buyer: onshore – in the same country, nearshore – on the same continent, and offshore – on a different continent.

Finally, we can define traditional and disruptive outsourcing:

Traditional outsourcing is a typical engagement where one company pays another to do something, like building a website. The work is done by human workers and the service doesn’t rely on technology. It enables managers to do things for which they don’t have in-house competences.

Disruptive outsourcing relies on modern technology to provide novel services that aren’t possible with just human workers. This includes SaaS solutions, cloud computing service providers, and robotic process automation. The work isn’t the only thing that is outsourced here, but also things such as the tech infrastructure that the business is built upon.

As you can imagine, when combined with traditional kind disruptive outsourcing enables companies to be even more agile, flexible and efficient.

What about the prices?

As you might have guessed, the cheapest option is SaaS. E.g. in the context of building a website, services like Wix and Squarespace enable you to set up and publish a decently-looking site for a small monthly fee (typically around $10-$30/mo). Not surprisingly, it’s also the most labour-intensive and limited option, which only works if you need a very simple site that will essentially be an online business card.

You can also hire a freelancer, or a virtual employee, to build a bespoke website for your business. Rates for freelance web developers start at around $10/hour, but that’s for the least experienced programmers – seasoned professionals can ask for multiples of that.

Indeed, according to CodeMentor the average market rate is between $60/hour and $80/hour. In addition to that, you will also need to pay for web hosting and manage the entire development process to make sure the finished website meets your requirements.

The time for traditional outsourcing, i.e. the managed services model, comes when your business is more digital-centric – think e-commerce, social media, high-profile blogs, or digital services.

In these cases, you usually don’t just need a website, you need a web application that has much broader capabilities. These are demanding projects, so if you don’t have an experienced in-house team, the second-best option is to work with an outsourcing partner that has significant experience doing similar projects.

All of the above options can be mixed-in with disruptive outsourcing. For example, your website can be built by an external partner, and then hosted on the Amazon cloud.

Things to keep in mind when outsourcing web development

In order to get the most from outsourcing, buyers need to take extra caution to protect their interests and ensure maximum results:

The first thing to do is properly vetting possible outsourcing partners. Ask for references, look at the portfolio, ask an expert if the company looks solid.

Second, don’t forget about clear, precise communication. It’s important that both sides of the engagement are on the same page about all conditions of the agreement in order to avoid problems that come from simple misunderstandings. It’s crucial to set your expectations straight from the start, and clearly communicate them to your business partner. Waiting for them to do the right thing is not a good way to go.

Another point that looks obvious but gets overlooked a lot: when you’re paying someone to build your software, or website, you should have the rights to the finished product. Make sure that it’s in the contract.

***

The software outsourcing market is constantly evolving, and though some statistics might suggest that it’s stalling, the fact is that a big part of outsourcing budgets has moved over to innovative technology services. Companies outsource more than ever, but do it in different ways and for different reasons.

In the future, we might be able to build websites by telling an AI a vague story – but that’s still a long way off; until that time comes, there will be need for professional skills and human judgement.

Managing a Remote Team for Online Projects: The Essential Webmaster Guide

In today’s technologically advanced environment, webmasters and online business owners are tackling complex issues which are well outside the scope of traditional tasks of a single person: they brainstorm new marketing strategies, convince influencers, earn the trust of advanced global AIs (aka Google), try to make sense of machine learning, and more.

One of the most interesting challenges of the XXIst century projects is managing a remote team. But why is it necessarily a challenge? Well, remote work is much more than a “work from home mentality” — it’s an entire new work paradigm which is vastly different from the standard office environments: it requires the team to rethink their approach to work and personal life.

Nowadays, remote work is finally transcending its “just another buzzword” status: companies are starting to realize the potential of allowing their employees more freedom; this is echoed by a Global Workplace Analytics study which suggests that up to 50% of all employees are utilizing telecommute (in one form or the other) and up to 90% of the workforce would prefer at least some parts of the work week to work remotely.

While most professionals want it, much fewer employers are too eager to join the party.

Why? Managing a remote team involves a number of hurdles, including finding the right professionals, ensuring engagement, building effective communication, evaluating the output, and handing out compensation.

In this article, we’ll focus on some of the most prominent problems of managing a remote team — and discuss which tools can be used to address them.

Challenge #1: Finding the Right Remote Talent

Let’s start with a self-evident advantage that remote work offers: the ability to hire globally. Switching to remote work presents a huge benefit for the company’s recruitment strategy — all of a sudden, you gain access to any talent there is — and the pool of available candidates is just overwhelming.

It’s always great to have a wide choice of options, but for small and large companies alike, the recruiting process gets increasingly harder with every dozen of new applicants. Accepting a new team member is often up to the team to decide — so every remote team struggles with these questions:

  • Are the candidate’s hard skills sufficient? By this people tens to mean the learned skills that enable an individual to perform a certain task efficiently.
  • What about their soft skills? Do they possess the level of emotional intelligence you find satisfactory?
  • Will they be the right fit in terms of work ethic and other parameters that are hard to quantify or even put into words?
  • Can they communicate well in the team’s language of choice? Even the simple matter of understanding each other can make or break entire teams.

In essence, all of these questions boil down to this one: “How can you ensure that this particular hire is the right fit for the team?”

Although you will learn the answer to this question eventually, it’s preferable to learn it before the new team member storms in and, say, commits their changes to your repository’s master branch. Ouch…

A popular solution to this challenge is something called online hiring platforms — companies that create their own pools of pre-selected remote professionals (web developers or content creators, for example) and offer their services to you.

An alternative to hiring platforms are freelance marketplaces like Upwork and Freelancer. Their model is more loyal towards freelancers: on these platforms, — so every job project can gather dozens and even hundreds of candidates. Indeed, this wide range of choice allows the employer to fine-tune the hiring process, but there’s another catch: checking the candidate’s skills.

On freelance marketplace platforms, the worker’s profile is pretty much the only proof of their credibility: although ratings and reviews from their previous employers help to assess their skills, it’s ultimately up to the freelancer to present themselves.

This means that the company must repeat the painstaking process of technical interview for every candidate — this is why services offered at Upwork and Freelancer are lower in price.

Hiring platforms like Toptal, Soshace, WriterAccess, and Dribbble Talent do the hard work for you: they pre-vet the candidates using various professional tools such as live programming, technical assessment tests, or AI-based screening – and ultimately provide you with a shortlist of the best talent they’ve found. In essence, they address the questions we’ve listed above and ensure that the candidate matches all of them.

In the end, it all comes down to the team manager to make the right call.

Hiring platforms tend to be more expensive than the marketplaces, but for the more impactful tasks where quality is more important than quantity, experience shows that pre-vetted talent tends to perform much better.

Challenge #2: Staying Connected as a Team

Stock images of a “freelancer on a beach with a laptop” which you can easily find all over the Web fail to convey the feeling of disconnectedness from the rest of the team. Working from home, cafe, or a local library is a great experience — until the remote professional realizes that their colleagues are so far away.

Lacking face-to-face communication with their colleagues, remote workers often feel excluded, undervalued, and underappreciated — so how can we help team members feel more connected?

The goal is to show our remote colleagues that they’re an equal part of the team. This can be achieved via audio- and video-conferencing, team building activities, and improving the work environment (i.e. making it more friendly and equal).

Every worker wants to feel valued and appreciated — this feeling drives and engages us. To keep remote team members engaged, you need to prove that they’re an equal part of the team:

  • Organize fun remote activities: for many types of offline get-togethers, there is an equivalent which can be held online, from photo contests to book clubs.
  • Show your appreciation with little gifts: these gifts don’t have to be costly; instead, they can be useful and thoughtful.
  • Ensure equality with physically present peers: for example, avoid joining the meeting from the same room and using the same device.

So do keep your remote team members engaged! Although salary is an important factor, it doesn’t govern the actual interest in the job. Think about the professionals you personally know: does money keep them engaged, helping overcome the struggles and challenges — or is there something more to it?

Challenge #3: Building and Maintaining Effective Communication

Each remote team has a potential to be highly performant — after all, their team members have been carefully selected and connected. To manage a remote team effectively for longer periods of time, we need to harness the remote professionals’ power of focus. This has a lot to do with the process of building effective communication.

In-team communication is especially important for remote teams as they lack casual chit-chat that happens every now and then in an office or co-working space, helping to keep the atmosphere friendly and relaxed. So, how can a remote team achieve effective communication under these constraints?

Enter modern workplace communication apps.

Software like Slack and Twist provides the so-needed workflow environment for remote teams — and also offers features you didn’t know you needed. Its true power lies in its versatility: everyone understands “communication” differently and they covers every definition imaginable. Brainstorming ideas together? Easy. Collaborating on work docs and discussing the latest changes? Check. Chit-chat and fun? Got you covered!

Such SaaS software excels at dividing in-team communication into distinct topics; for example, in Slack it does so via the feature called “channels”.

Channels, as the name suggests, are designed to house separate topics, streamlining the discussion: e.g. a channel for project discussion, a channel for company updates, and so on.

Teams can also set up their own private channels to talk and collaborate on specific tasks, projects, and files.

The channel system, therefore, has shown to be an effective way of organizing communication within the company: that way, remote professionals stay in the loop, while simultaneously avoiding information overflow and self-govern their workflow instead.

Challenge #4: Collaborating Efficiently

Effective communication is good and all, but what we really need to achieve results is efficient collaboration, right?

The everyday workflow of any team (especially remote ones) involves constant back-and-forth of documents and files, frequent version changes, tweaks, comments, revisions, etc etc

The good news is: much of the headache caused by these routine tasks can be avoided thanks to smart and efficient collaboration — so which tools can help us do that?

Solution? Project management tools!

For example, Slack and Google’s G Suite can form a powerful duo: thanks to their deep mutual integration, it often feels like they’re the same software.

In Slack, team members can create, import, edit, and search through G Suite files (i.e. spreadsheets, docs, calendars, folder, and so on), all the while keeping their colleagues informed about every change.

Additionally, Slack can also integrate with other services like GitHub (for coding), Zoom (for conferencing), and Trello (for Kanban-ing).

Other popular software that plays well with communication tools we’ve mentioned in the previous section include:

  • Asana, famous for its focus on clutter-free project management boards and workload management toolkit.
  • Monday, with its cheerful and minimalist interface, dozens of integrations, as well as task automation routines that allow you to perform repeating actions based on specific inputs.
  • Wrike, renown for superior visualization tools, planning charts, and flexible customization options.
  • Milanote for those who are working on creative projects (or simply prefer a more visual communication style).

The number of choices and potential features to evaluate seems overwhelming – luckily, these companies realize it, too, and provide free trials for potential users to get acquainted with their toolkits.

It’s worth keeping in mind that once you clear the initial hurdles and stick to a single solution that works for your team, you will continue to reap the productivity benefits for years to come!

Who Said Remote Means Distant?

Faced with the multiple challenges of managing remote talent, it’s tempting to just give in to the temptation of restricting your search to your own city… After reading this line, can you feel how slightly silly this idea sounds when spelled out in words?

After all, it’s 2025, and you’ve got the access to (almost) the entire population of the planet at your fingertips. Why not use it to your advantage?

***

What’s your experience with remote professionals? Have you hired any, or maybe you’re on the other side of the game? Share your thoughts in the comments section below, let’s discuss!

How to Start a WordPress Website in 2025: Beginner’s Guide to WP Setup

Here’s the thing: while WordPress is famously beginner-friendly, the first steps can still feel like assembling IKEA furniture without the instructions.

Domain names, hosting, themes, plugins, admin panels, SSL certificates, permalinks… what even is a permalink?

This guide is here to de-mystify all of it.

You’ll learn how to set up your first WP site the right way — from picking the right tools to clicking that shiny “Publish” button. No fluff, no jargon soup. Just a step-by-step walkthrough from someone who’s built dozens if not hundreds of WordPress websites since 2009.

Let’s get started 👇

What Is WordPress (Really)?

It powers a quarter of the Internet. It is by far the most popular way of creating and maintaining a website. It is free for anyone to use and modify in any way they want. But what is WordPress?

Let’s clear the fog: WordPress isn’t a website builder like Wix or Squarespace. It’s not a hosting service. And it doesn’t come with a neon “Launch Me” button either.

So… what is it?

WordPress is a free, open-source tool that helps you build and run websites. More precisely, it’s what’s called a Content Management System (CMS) — which is a fancy way of saying it handles all the behind-the-scenes stuff (text, images, menus, pages, users, settings) so you can focus on making your site look and work the way you want.

No coding required. Pinky swear.

It’s made up of three main ingredients:

  • WordPress Core – the actual CMS software that runs the show
  • Themes – these control how your website looks (layout, fonts, colors, the rest of the vibes)
  • Plugins – add-ons that make your site do more things (like contact forms, shops, SEO tools)

Think of it like this: WordPress Core is your house’s structure, themes are the interior design, and plugins are all the appliances and gadgets.

What can you do with WordPress?

  • Create and manage pages and blog posts
  • Customize your site’s appearance (without breaking anything)
  • Add functionality like email forms, image sliders, shopping carts, forums — you name it
  • Collaborate with other users (admins, authors, editors, contributors — each with their own superpowers)

But here’s what WordPress doesn’t do by default:

  • It doesn’t give you a domain name like mycoolwebsite.com — you’ll need to buy that separately (check out our domain guide)
  • It doesn’t host your website — you’ll need a place to “put” it (here’s our definitive guide on choosing a hosting provider)
  • It doesn’t magically write or design your content for you (yet 😏)

Don’t worry — we’ll walk you through all of that in this guide, with links to our best tutorials along the way. But first: is WordPress still a smart choice in 2025?

Should You Use WordPress in 2025?

Before we get into tools and settings and fancy themes, let’s ask a more fundamental question:

Is WordPress actually the right choice for your project?

Because while WordPress is powerful, flexible, and everywhere — it’s not always the best fit. But…

  • If you want full control over your site (without paying monthly fees)
  • If you’re okay learning a few new things along the way
  • If you want the ability to scale, customize, and actually own your site

…then WordPress is still one of the best options in 2025.

But let’s look at the competition for a sec.

When not to use WordPress

If you’re just testing an idea, need a single landing page up today, or absolutely don’t want to deal with hosting, domains, or plugins — then you might be better off with a site builder like Wix, Squarespace, or Webflow.

Those tools bundle everything (including hosting), and give you drag-and-drop control out of the box.

But the tradeoff?

You pay monthly, get fewer customization options, and once you’re in — you’re in. Moving away later is like trying to leave a cult with stylish fonts.

Why WordPress still wins (for most people)

Here’s why over 40% of websites still run on WordPress:

  • You can start free — the software is open-source and the vast majority of plugins and themes cost nothing
  • It’s endlessly flexible — blogs, portfolios, shops, forums, newsletters, even entire SaaS apps can be built on WP
  • You’re not alone — if you run into a problem, someone’s already solved it (and blogged about it)
  • You keep control — no proprietary lock-in, no surprise shutdowns, no weird limitations

Major sites like TechCrunch, BBC America, and even parts of whitehouse.gov use WordPress. If it works for them, it’ll probably work for you too.

So unless you have a very niche use case or hate learning new tools, WP is a solid bet in 2025.

Next, let’s open the package:

What You Need Before You Start

Before you can install WordPress and start tweaking settings like a pro, there are two essential things you’ll need to get sorted:

1. Domain Name

That’s your address on the Internet — the yourwebsite.com part.

You can register one via services like Namecheap, GoDaddy, or through your hosting provider.

But don’t rush it — your domain name matters more than you think. We’ve got an entire guide on choosing a domain if you’re not sure where to start.

2. Hosting Provider

This is where your website will “live” — a server that stores your files and delivers them to visitors.

There are thousands of hosting providers out there, but not all play nice with WordPress. Look for one that offers:

  • 1-click WordPress installs (saves a ton of time)
  • Free SSL certificate (for that secure https://)
  • Decent support (preferably with live chat)

Short on time? Go for Hostinger. Feel like going into the nitty-gritties? Check out our hosting guide.

Optional: A Local or Staging Setup

If you want to experiment before going live, you can set up WordPress on your computer (a “local” site) or use your host’s staging environment. This is especially useful for playing around without breaking anything on the public version.

Tools like Local by Flywheel make it ridiculously easy.

* * *

Once you’ve got your domain and hosting ready, it’s time to install WordPress.

You’ve got two options — and we’ll walk through both of them next.

Installing WordPress (2 Easy Methods)

Alright — you’ve got your domain, your hosting, and that glint of ambition in your eye.

Let’s get WordPress up and running.

There are two main ways to install WordPress:

  • Easy Mode: one-click install via your hosting control panel
  • Manual Mode: doing it yourself (still pretty simple, promise)

Pick whichever feels more comfortable. They both lead to the same result: a blank but functional WP site you can start customizing right away.

Method 1: One-Click Install (Recommended)

Most decent hosting providers offer a WordPress installer in their dashboard — usually under funky names like “Softaculous”, “Installatron”, or just a WordPress logo.

It’ll ask you to fill out a short form:

  • Site Name and Tagline – you can change these later
  • Admin username – please don’t use “admin” 🙏
  • Admin password – strong and unique (a password manager helps)
  • Email address – use one you actually check
  • Install path – leave blank if this is your main site (more on that below)

Click “Install”, wait 30 seconds, and boom — you’ve got a website.

What’s this “install path” thing? If you leave it blank, WordPress goes into the root folder (your main domain). If you add something like blog, your site will live at yourwebsite.com/blog. That’s useful if you want to run multiple sites later.

Method 2: Manual Install (The Nerdy but Useful Way)

If your host doesn’t offer one-click installs, or you just want to flex some technical skills, here’s how to do it manually. Total time: ~10 minutes.

  1. Download the latest version of WordPress from the official repository at wordpress.org
  2. Create a new MySQL database + user in your hosting panel (usually under “Databases”)
  3. Unzip WordPress and rename the folder to whatever you want (e.g. myawesomeproject)
  4. Upload the folder to your server via FTP using FileZilla or your host’s file manager
  5. In your browser, go to yourdomain.com and follow the setup wizard — enter your database info, pick admin username/password, etc

That’s it — you’re in! You can now log into your WordPress dashboard by visiting:

yourdomain.com/wp-admin

Bookmark that link. You’ll be using it a lot.

Next up: the settings you’ll want to tweak right away (before adding any content or themes).

Must-Change WordPress Settings

You’ve installed WordPress — congrats! 🎉 Before you start designing or publishing posts, let’s take five minutes to dial in some key settings.

Why now? Because a few defaults are… not great. And fixing them later is going to be increasingly messy.

Here’s what to do right after installing WP:

General Settings

Go to Settings → General in your WP dashboard. Fill out:

  • Site Title – this shows up in browser tabs and search results
  • Tagline – optional, but good for SEO if it describes what your site does

Also check:

  • Timezone – set it to your actual location so posts and backups get the correct timestamps
  • Date + Time Format – personal preference, but it affects how things display to visitors

Discussion Settings

Head to Settings → Discussion. If you plan to allow comments (for a blog or community site), go ahead and leave “Allow people to post comments” on. If not — turn it off and enjoy the silence.

Other smart tweaks:

✅ Enable “Comment must be manually approved” (trust me on this one)
❌ Disable pingbacks + trackbacks (they’re mostly spam these days)
✅ Enable threaded comments (looks cleaner if you do allow discussions)

Permalink Structure

This one’s crucial for both humans and search engines. Go to Settings → Permalinks and choose:

✔️ Post name

This setting turns ugly URLs like yourwebsite.com/?p=123 into clean, readable ones like yourwebsite.com/awesome-guide. Much better.

Remove Sample Content

WordPress installs often come with junk like a “Hello world” blog post or a “Sample Page”.

Delete them from Posts and Pages to avoid weird stuff showing up in your menus or sitemap.

* * *

Once that’s done, your site is cleaner, safer, and better prepared for Google (and humans).

Next up: how to make your site actually look and work the way you want — with themes and plugins:

Your First WP Themes and Plugins

Now that your site is lean and freshly installed, it’s time to give it some personality — and power.

This is where themes and plugins come in.

Plugins: What Your Site Can Do

Plugins are where the magic happens. They add new features to your WordPress site — things like contact forms, SEO tools, online stores, performance boosters, you name it.

There are 59,000+ plugins in the official repo alone, but don’t go overboard. A few well-chosen plugins will do more for your site than 30 random ones.

Here are a few essential (and free) picks to get started:

  • Rank Math – an SEO plugin to optimize titles, meta tags, and search snippets
  • Akismet – filters out spam comments automatically (a must if you allow comments)
  • WPForms Lite – lets visitors contact you through simple, customizable forms
  • LiteSpeed Cache (or WP Super Cache) – helps your site load faster
  • Wordfence Security – protects against hacks, malware, and other bad stuff

Want to track your visitors? Add Google Site Kit — it connects Analytics, Search Console, and more right into your dashboard.

A Word on Plugin Bloat

Not all plugins are good for your site. Some are slow, outdated, or conflict with others. So:

  • Stick to well-reviewed, actively updated plugins
  • Only install what you actually need
  • Delete (don’t just deactivate) anything unused

Themes: How Your Site Looks

Themes control your site’s design — layout, fonts, colors, header style, blog format, all of it.

You can think of them as your website’s outfit. And yes, you can change clothes later without losing your content.

There are thousands of themes out there, but don’t just grab the first flashy one. Some are bloated, others are buggy, and a few are downright broken.

To keep it simple:

If you’re planning to use the new full-site editing features in WordPress, look for a block-based theme like Astra or GeneratePress. They play nicely with the native editor and don’t weigh your site down.

Next step? Finding a theme that doesn’t suck.
We’ve got a full guide on that → how to choose the right WP theme.

Next Steps: What to Do After Setup

At this point, you’ve got:

✔️ A working WordPress site
✔️ Clean settings
✔️ A theme that doesn’t make you cringe
✔️ Plugins doing useful things in the background

So what now?

Here’s a short roadmap for what to do next:

  • Create your first pages: usually a homepage, an about page, and a contact page
  • Add your first blog post: even a short “hello world” intro is a good way to test things
  • make sure visitors can actually find stuff
  • Set up backups: your host might handle this, or you can install something like UpdraftPlus

Optional but smart:

  • Explore new themes if you want a more custom vibe
  • Start thinking about speed optimization, caching, and security — we’ll cover all that in upcoming guides

WordPress Setup FAQ

Do I need to know how to code to use WordPress?

Nope! You can build and manage an entire WordPress site without writing a single line of code. That said, knowing a bit of HTML/CSS or using a page builder like Elementor or the built-in block editor can give you more flexibility.

What’s the difference between WordPress.org and WordPress.com?

WordPress.org is the free, open-source version you install on your own hosting. WordPress.com is a hosted service — easier to start with, but much more limited unless you pay. If you want full control, use WordPress.org (which this guide covers).

Can I change my theme later?

Yes! You can switch themes anytime without losing your content. Just keep in mind that layouts and widgets might need a little cleanup afterward, especially if you were using a page builder or a highly customized theme.

Is WordPress secure?

WordPress is secure as long as you keep it updated, use strong passwords, and install reputable plugins. Adding a security plugin like Wordfence or Solid Security is also a good move — and always keep backups, just in case.

Can I build a store or portfolio with WordPress?

Absolutely. WordPress can handle everything from online shops (using WooCommerce) to photo portfolios, membership sites, forums, or even full-blown SaaS platforms. It’s endlessly flexible if you’ve got the right plugins.

* * *

WordPress can feel overwhelming at first — but once you’ve gone through these steps, it starts to click.

You’ve got the framework. Now it’s about content, design, and making your site actually useful to visitors.

In case you’ve got questions about WordPress installation and initial setup, don’t hesitate to hit us in the comment section below – let’s discuss!

Advertising Your Business on Facebook: a Beginner’s Guide

Facebook has evolved way past a platform to post selfies and stalk old classmates. In fact, it’s now become an incredibly powerful advertising tool for businesses of all sizes and types. From ecommerce to SaaS, companies of all kinds are finding huge success in Facebook ads.

As a newbie, it can be a bit difficult to wrap your head around what it takes to create a killer Facebook campaign. But instead of just whipping out your credit card and hoping for the best, read through this Facebook advertising guide for beginners to learn how it’s done.

Setting Up Your Ad Account

Even if you’ve already set up an ad account, you should pay attention to this section. Many businesses new to Facebook make the mistake of using a fake profile’s personal ad account as their business ad account. The notion is that this way anyone can log in to the generic Facebook account and manage the business page and ads. The problem here is that creating a fake account is against Facebook’s terms, which puts you in jeopardy of being shut down without notice.

Instead, you’ll need to use your personal Facebook page to create a Business Manager account. Once you’re set up on the Business Manager, you’ll be able to assign other people to the ad account and business page. Not only is this the right way to set up a business ad account, but it’s actually much easier to manage.

Installing the Facebook Pixel

In order to know that your ads are making a positive impact on sales, you’ll need to be able to track conversions and leads. Facebook makes this relatively easy to do, but you’ll need to install the Facebook Pixel first.

To install your Pixel, click on the Assets menu and select “Pixels.” Copy the base code given to you in the step-by-step instructions and add it to your website. After that, you’ll need to insert the appropriate event codes. For example, if you want to track how many people add products to their carts, you’d have to install the “add to cart” event code. You can learn more about installing Pixels and Pixel codes here.

If you’re using an ecommerce platform like Shopify, installing the Pixel code is as easy as going into your settings and pasting the Pixel code in the “Facebook Pixel” box, and clicking save.

Once you’ve added the Pixel code, you can check the status by going back to the Pixels section in the Business Manager. If it’s been installed correctly, it should be green and marked as “active.” Note that it can take 30 or so minutes to get up and running.

Creating Your Audiences

Once your account is set up and your Pixel is active, it’s time to start creating audiences. Facebook has three types you can choose from: saved audiences, custom audiences, and lookalike audiences. The type you choose will depend on the type of campaigns you’re going to run and which people you want to reach.

Saved Audiences – if you’re trying to reach new customers and you don’t have any customer files to work from, you’ll want to create a saved audience. Saved audiences are created by selecting various interests, behaviors, and demographics. It may help you first to create a buyer persona of your ideal customer. For example, how old are they? What’s their income level? Do they live in a specific region? Are they married?

You can layer numerous targeting features to narrow down your audience to a hyper-specific group of individuals who will be the most likely users of your product or service. It’s important to note that you’ll need to click “Narrow further” in order to layer targeting features. Otherwise, users will only have to meet one of the conditions to be added to your audience.

Custom Audiences – if you want to target people who have already visited your site and interacted with it (this is known as a retargeting campaign), you’ll need to create a custom audience. You can do this by uploading a list of existing customers or specific URLs that prospects have visited. In addition to that, you can build custom audiences based on interactions with a mobile app (if you have an app) or based on their engagement with your Facebook posts.

For example, if you sell motorcycle gear and you want to target people who are interested in helmets, you could target users who visited URLs on your site that contain the word helmet.

You can further refine the audience by adding or excluding other URLs. For example, if we only want to target people who visited helmet product pages, we could add the blog as an exclusion. This way, people who only read blog posts about helmets would not be in the audience.

Lookalike audiences are a unique Facebook advertising feature that uses an algorithm to automatically create an audience of other people who are likely to be interested in your products and services. E.g. you can create a valuable lookalike group by importing a list of your current customers. This type of audience can be handy if you’re not sure which interests, behaviors, or demographics to target on your own.

Designing Your Ads

Before you start designing your Facebook ads, you have to consider which audiences they’re for. For example, you shouldn’t use the same ads for your custom (retargeting) audience and your saved audiences. This is because these two types of audiences are at different stages in a buyer’s journey. People in your retargeting audience already have an interest in your brand and are relatively far along in your conversion funnel. But saved audiences are generally new leads, and they need to be warmed up before you try to sell to them. For retargeting audiences, you can design ads that show specific products along with a coupon code for added incentive. For saved audiences, on the other hand, try promoting value-driven, free content that educates prospects about your products and why they’re useful (i.e. a video, an educational blog post, or a free e-book).

Once you’ve decided which audience your ad will be served to, you can start working on a design. Facebook offers a variety of different ad formats that you can experiment with. The two most popular that you’re probably familiar with are the single image ad format and the carousel format. The latter allows you to include multiple images that users can scroll through like a gallery, which can be useful for showing different variations of the same product (i.e. color, use, edition).

When creating the design, keep in mind that it’s best to use compelling images and bright colors. This is because the Facebook newsfeed background is white, and bland ad images will most likely blend in. You want to create an image that pops so that you can capture the attention of consumers. Let’s go back to our example about motorcycle helmets and take a look at an ad from Motorcycler.com:

Based on the copy and the image, this is clearly a retargeting ad – they’re highlighting the benefits of buying from them over competitors, and they offer a discount as added incentive.

Let’s take a look at an example of an ad for new audiences:

This ad from Landpoint.net is aimed at people who are in the early stages of the buyer’s journey. It promotes a piece of free, educational content. When advertising to cool or cold leads, this is a much better approach than trying to sell them something right off the bat.

This ad from Landpoint.net is aimed at people who are in the early stages of the buyer’s journey. It promotes a piece of free, educational content. When advertising to cool or cold leads, this is a much better approach than trying to sell them something right off the bat.

Monitoring Performance

Once your ads are up and running, you’ll have to monitor them to make sure they’re performing to the best of their ability. You may have to make some adjustments to your bids, copy, or ad images if ads are doing poorly. Just be sure you give them enough time to run before you make any changes—jumping the gun will lead to decisions based on inaccurate data.

Once common mistake that new Facebook advertisers make is to base all their judgments off of impressions and click-through rates. While CTR is important, what you really need to look at is how many leads or conversions those clicks are leading to. Pay extra close attention to your cost per conversion or cost per lead.