Search results for

"fashion"

The Ultimate HideMyAss VPN & Free Proxy Review: Should You Use HMA in 2024?

☑︎ this review has been last updated in May 2024

Aah, alright, “ass” as in “donkey”, very clever, very clever. HideMyAss (HMA) knows how to present a rather boring topic in a fun way, you’ve got to give them that. Aside from playfulness, though, you might still wonder –

can I really trust them to “hide my ass” (this time not the donkey), together with my network traffic?

That’s exactly what we will find out in this in-depth review – while seeking answers to some of the most pressing questions related to online privacy and security:

  • 🔎Do I really need a VPN service?
  • 🔒And what is a VPN, by the way?
  • 🏆Is HMA any better than alternatives?
  • 🔑Is HMA’s free web proxy worth using?

Apart from that, we will also provide an exclusive 20% off link that can be used with any first-time HideMyAss subscription – regardless of your final choice, we thought it’d be nice to keep a discount option in any case.

The first thing we need to establish is of course whether or not VPN is a genuinely useful service at all – in other words: does it significantly decrease your odds of being hacked or getting into trouble while using the Internet?

(If you’re already closely familiar with the topic of VPNs and torrents and wish to get straight to the HMA analysis, click here to scroll down to the corresponding section.)

Is Torrenting Legal? (And Other Reasons for Getting a VPN)

Before we explain how VPNs work, it makes sense to look at the number one reason why they have such a broad appeal – peer-to-peer (P2) exchanges or torrents – as well as other common uses. Let’s look at the latter first:

Unless you live in a country such as China (你好!) which habitually blocks certain web resources on a national level, you won’t really encounter that many restrictions while browsing the web or streaming – an odd movie might be inaccessible in your country for commercial reasons, but realistically speaking that’s a small fraction of all available content.

However, content unblocking is still a widely demanded feature, even if by some people in some countries. Whether it’s watching the U.S. version of Netflix (now with more series you can watch in your lifetime!) or accessing websites that do not make it past your country’s state firewall – VPNs are the most reliable way of addressing this need that is available to individuals like you and I.

Online security is also paramount, especially when it comes to using web-based services such as internet banks, especially given the fact that we now access them from numerous devices and network connections with very uneven security standards.

Logging into your e-bank from your personal laptop connected to your password-protected home network is one thing – doing the same from a smartphone on a public, unrestricted wi-fi is something else.

And while most people tend to start worrying about these things only after they’ve had a major incident, like a hacked account or a stolen e-wallet, it’s always smarter to consider precautionary measures, right?

Another widely cited reason for using VPNs is privacy (the “hide” in “HideMyAss”). On VP websites, this isn’t usually explained in much detail beyond nebulous threatening phrases a-la Orwell, such as “the Big Brother is watching you”; what it really means, we can assume, is avoiding surveillance from both powerful agencies like the governments and malicious third parties like hackers (and maybe perverts).

HMA - online privacy

This is how HideMyAss visualizes online privacy

There are two things to note in this respect: firstly, if a government really, really wants to be spying on someone, it will find a way. In any case, unless you work in espionage or have committed a serious misdeed in your murky past, you’re overreacting.

Secondly, we’re all using Facebook on a daily basis (yes, we do!), which already speaks volumes about how much we “value” our privacy from giant corporations – as well as anyone interested and willing to pay them for accessing our data.

Alright, this got pretty dark pretty quickly… In any case, privacy is increasingly viewed as an important human right, and online is where it’s violated most frequently. That’s why “VPN” contains the “P”, and it’s especially topical for those who use peer-to-peer networks on a regular basis.

Yes, getting back to torrents: there’s a lot of confusion about how the law treats them around the world. Which is why we’ve prepared a short legal intro on the subject – a “torrenting for dummies” if you wish:

  • First of all, let’s make this clear right from the start: the BitTorrent protocol itself is NOT illegal in any country of the world. It’s just a file transfer framework that can be used to efficiently share any content between remote computers.
  • Building on the previous item, downloading or uploading a torrent is always LEGAL as long as it’s NOT copyrighted content – regardless of the jurisdiction.
  • That being said, sharing COPYRIGHTED content via a torrent network is considered an act of copyright infringement in many countries of the world.

Wait, you might object: if I invite my friends over to watch a movie that I’ve bought via Amazon Prime, is it then also an act of online piracy?!

Well, this little “counter-example” gives you a hint about how many grey areas this topic can potentially have, so strictly speaking there’s no consensus as to where exactly the innocuous sharing ends and the nefarious pirating begins.

However, there’s a catch:

Regardless of the interpretations, copyright holders don’t like the idea of their creations being distributed for free by someone else, even if that someone doesn’t earn a dime of profit in the process.

This has led to the rise of a powerful industry lobby, which pushes for fines and even legal actions against those who share copyrighted content via torrent networks. Such actions are mostly directed at torrent websites – but increasingly also at the end users (identified via their Internet providers).

There’s a silver lining as well, though:

Certain countries, such as Switzerland and Spain, have explicitly allowed downloading ANY torrents, as long as this is done for personal use.

If only there was a way of accessing the Web as if being located in another country… oh wait, there is! Incidentally, that’s what VPNs do, in addition to encrypting and anonymizing your Internet traffic (thus solving the aforementioned security and piracy issues as a bonus).

So, What Is a VPN, Exactly?

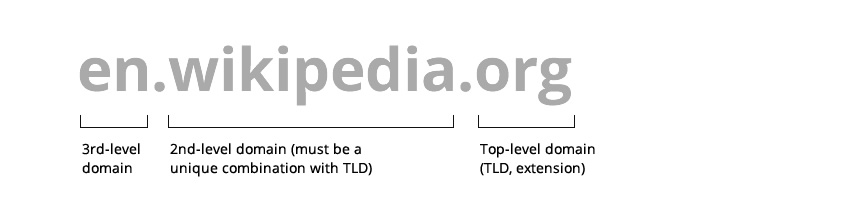
VPN stands for Virtual Private Network, which gives a hint as to what it’s all about. Not really? Alright, let’s break it down really quickly:

VPN is a technology for creating a secure network on top of an existing public network like the Internet. This new secure network acts almost as if the participating computers stood in the same room and were physically connected into their own private local net – but using sophisticated software instead of wires to connect computers around the world (hence virtual).

Still with me? …Hello?

To better understand the idea of how a virtual private network works, it helps to examine the most important components step by step (and to look at a picture, of course) –

How VPNs work

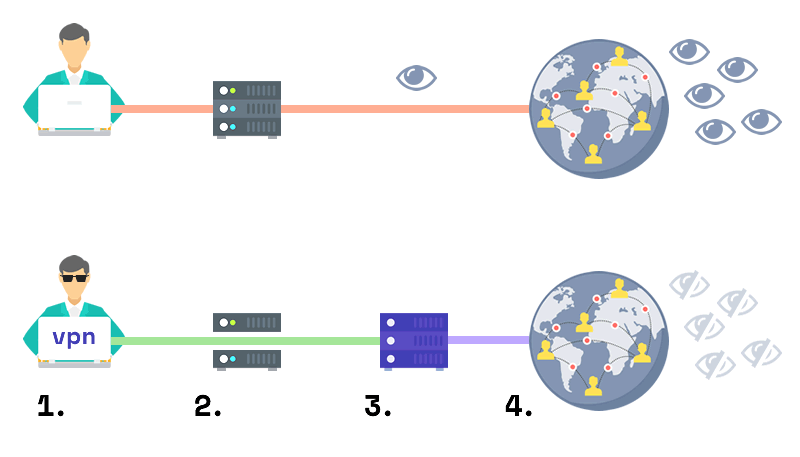
  1. With a VPN, your computer (1.) creates a direct, encrypted connection to a specialized server managed by the VPN provider. This connection is called a tunnel and functions as an independent layer on top of the existing network infrastructure.
  2. Your Internet Service Provider (2.) can see and forward your traffic, but it cannot read it because it’s encrypted inside the VPN tunnel.
  3. The VPN server (3.), to which you are connecting via the tunnel, is located in a specific country (which you can also choose before turning on the VPN).
  4. You interact with the Internet (4.) through the VPN server, which completely masks your connection’s origin and instead presents its own identity to the web.

From this we can already derive some of the criteria which might be important in evaluating the quality of a particular VPN (in our case, HideMyAss):

  • Security, i.e. which algorithms are being used to encrypt the connection and how well the VPN’s server handles your traffic. In other words, the green-coloured part of the VPN connection on the above diagram.
  • Privacy of your connection, i.e. whether any data that can be used to identify you (such as your unique IP address) is being recorded and stored by the VPN.
  • Connection speed, or how fast you can actually transfer data via the VPN’s server. This becomes especially important when talking about video streaming and torrents.
  • Server locations among which the VPN provider lets you choose for connecting to the Internet. The wider the choice, the better, of course.
  • Ease of use is another criterion that should not be underestimated: since you’ll be turning on your VPN quite often, it makes sense to ensure you’ve chosen the one that doesn’t annoy you with its quirky interface or complex logic.
  • Pricing is no doubt one of the most important factors, albeit not directly present on our explanatory chart: since VPNs are subscription-type services, even small differences in your monthly or yearly payments can stack up to significant savings (or a money-drain) over time.

Let’s find out how well HideMyAss meets these requirements – and finally decide if it’s worth using as your go-to VPN provider:

Tips on Testing HideMyAss

Like any other software-based service, your experience with HideMyAss starts with creating an account. This procedure is quite simple and includes filling in your name, email, country, and payment details; speaking of the latter: did you know that there’s no need to pay upfront?

That’s right, HMA has a free 7-day trial, which is not that easy to find – in fact, there’s no mention of it on the official homepage, unless you scroll all the way down and scan through the footer. In any case, here’s a direct link:

Get 7 days free at HideMyAss ›

Here’s another piece of advice: as soon as you create an account, go to your dashboard by clicking on the blue “My Account” phrase in the top right corner of the HMA website – and turn off auto-renewal under “Your HMA! Licences”.

“What’s the point of the test week in that case?”, I hear you asking – “What if I do want to continue using the VPN?”

Let me explain:

Firstly, your trial will still last for the allotted 7 days regardless of whether you cancel, which is a nice gesture on the part of HMA. This means you won’t have to remember to cancel if you decide not to subscribe, in order to avoid getting billed by accident.

More importantly, though, the trial comes with an automatic transition to the annual billing plan, which, if you’re using the VPN on a regular basis, is not the most value-for-money option.

If you decide in HMA’s favor after the test week, it’s much more economical to get the 3-year plan and forget about having to prolong your VPN subscription for a long, long time:

HMA plans

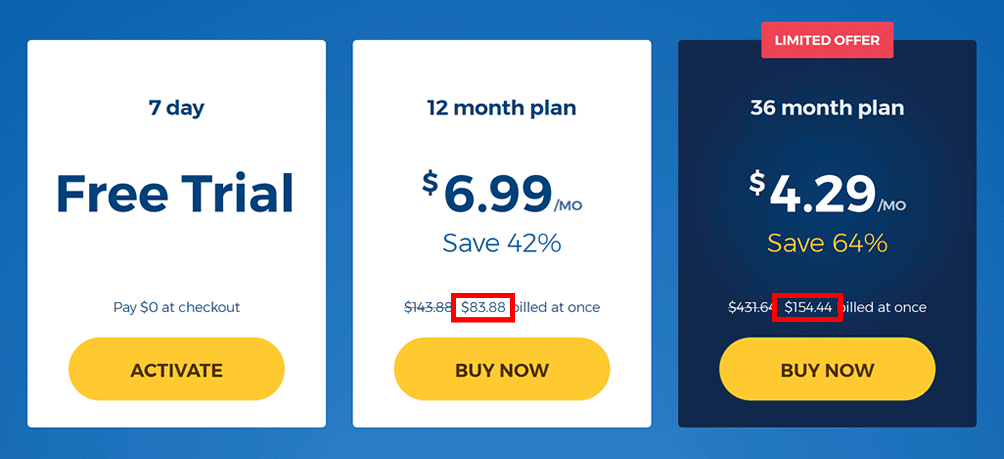
To see the point more clearly, let’s run the numbers: a 36-month package costs about a quarter (i.e. 25%) more than the 12-month bundle, but it will last you 3 times (i.e. 300%) longer!

So, if you decide to follow this recommendation, you’ll see a pop-up window on your device when your HMA trial expires, with a link to all available plans. You will be able to buy any package you like, including the 3-year plan with by far the lowest per-month rate.

In any case, it is worth examining each aspect of HMA before making the final decision, and in the next chapters we’ll do exactly that – following the criteria for evaluating VPN’s we’ve outlined above.

HMA Pro VPN: Our Impressions

To use HMA you’ll need to download their software on your machine, be it a computer or a smartphone; they offer versions for all major operating systems, including Android/iOS, Windows and Mac, and even Linux-based setups.

You can simultaneously use a single license key (i.e. one subscription) on five devices, which pretty much covers the needs of most people and even households. In case you have 7 children or just like to use a different phone every day of the week, you can ask HMA for an offer tailored to your specific number of gadgets.

Anyways, the point is that it makes sense to download both the full-screen and the mobile version of the HMA software during the trial period to make sure you’re comfortable with using both.

The program looks like a small blue window with a relaxingly simple interface consisting of a “connect” button and three tabs:

HideMyAss modes

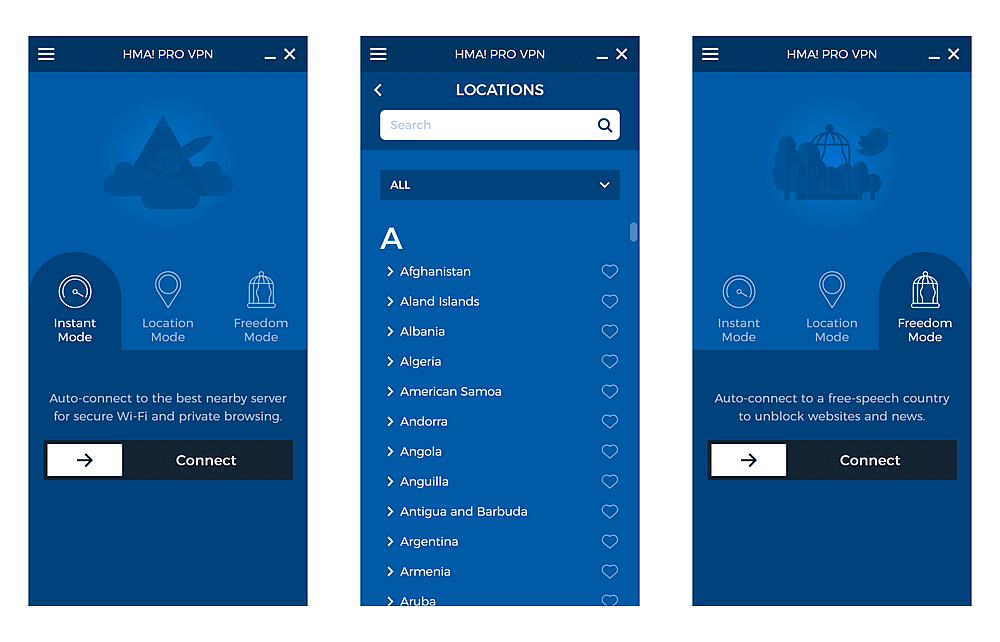
  • Instant mode for those who just want to get online via the VPN using the shortest (i.e. fastest) available route. When you hit “connect” you’ll be automatically matched with a nearby HMA server – and voilà, go browse/stream/torrent to your heart’s content.
  • Location mode for when you need to connect via a specific country, like the torrent-tolerant Spain or Switzerland for example. You can choose from over 280 locations in almost any conceivable country, including the likes of Aruba, Suriname, and Tokelau. Note that most of those are virtual locations – HMA acknowledges this fact but does not disclose which ones are which.
  • Finally, the aptly named Freedom mode for automatically connecting via a server located in a country with free speech. This is useful if you’re in turn located in one which doesn’t allow certain websites through the national firewall.

At first glance it might seem like Instant is by far the most useful mode in HideMyAss, unless you live in a country which actively blocks online content.

However, in practice the Location mode is at least just as handy: firstly, being able to choose a specific country lets you consume content originating from or exclusive to that country (e.g. stream videos only available to U.S. users).

Secondly, if you click on the dark-blue drop-down below the search bar you can filter the list of locations to see only those specifically optimized for streaming or peer-to-peer (torrents). This non-obvious feature is simply indispensable if you really want to get the maximum out of your VPN in every possible usage scenario.

When you’ve chosen your preferred mode, it’s time to go online! You will see the specific location via which you are connected as well as your new public IP address (by clicking on the little “i in the circle” icon next to the location):

HideMyAss connecting

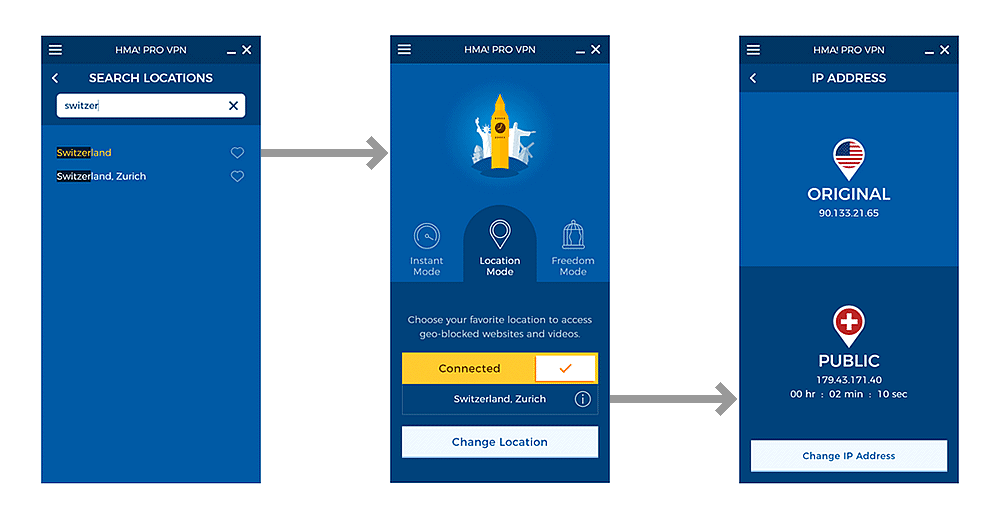
But since we’re all here for privacy and security, let’s double-check, shall we? Open your web browser, type “my ip” and hit Enter. Copy the result, then go to a third-party, independent IP checker, such as this or this one, and paste your address. Still that same country? Good!

Now that we’re online, the next thing to check is the speed: it would stink if you had to stream HD videos or download multi-gigabyte torrents via an excruciatingly slow connection, right?

As they say in mental health institutions, slow internet is much worse than no internet at all. Those nerve cells aren’t going to grow back, you know.

Here, again, we’ll use free third-party tools that can measure your connection parameters in a matter of seconds. Arguably the most advanced of those is Ookla’s Speedtest: before hitting “Go”, make sure the server that will be taking measurements is in the same country as your new IP address. Here’s how the process looks like:

HMA on Ookla Speedtest

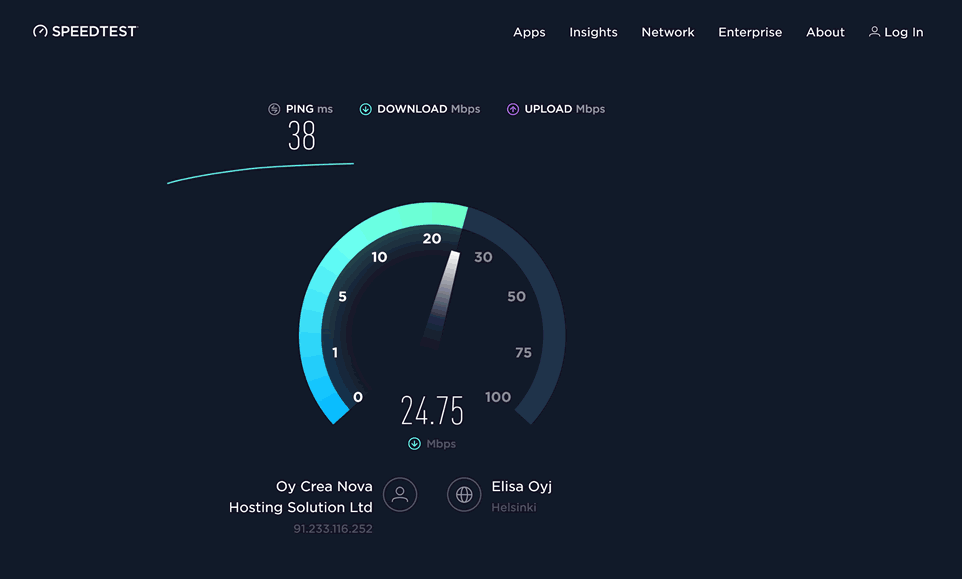
This specific test was run while being connected to a VPN server (rather randomly) in Finland, with a speed-test server also situated in Helsinki.

As you can see from the screenshot, the tested connection is anything but slow – and the download speed is actually fairly close to that of a VPN-less setup on the same network (Wi-Fi powered by a 4G mobile data router).

Let’s run a separate test (because why not?), this time on another online tool called Fast.com provided by Netflix:

HMA on Fast.com

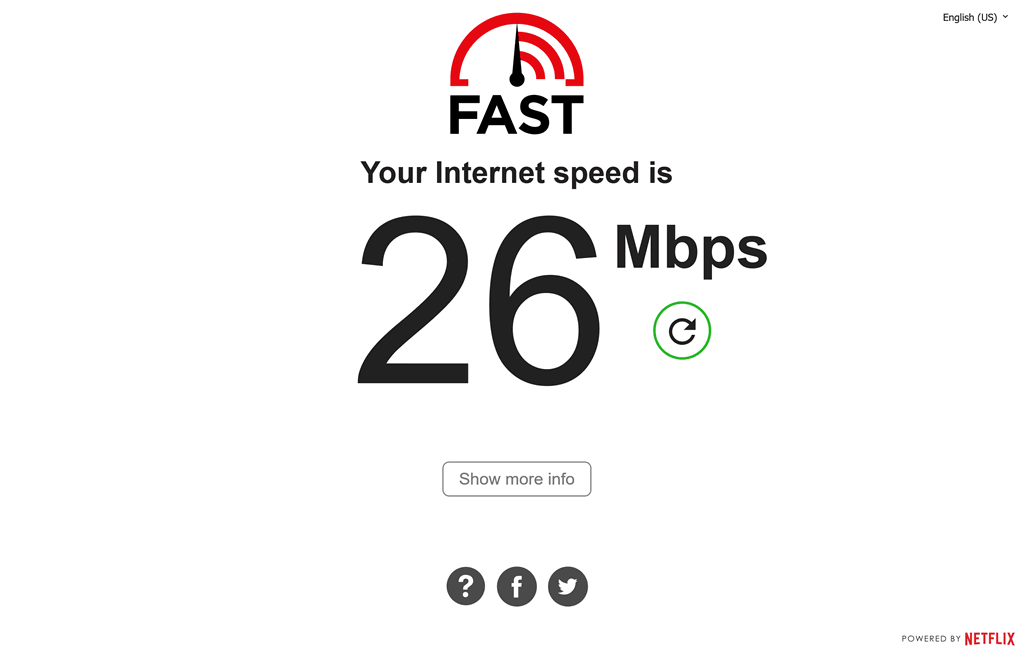
The result is almost identical, which means that we can conclude that HideMyAss has passed the speed challenge reasonably well. Some notes on this, though, before we move on:

Your actual speed will depend on several variables, including foremost the particular VPN location through which you are connecting, as well as of course your Internet provider’s capabilities (if you expected a VPN to provide a higher speed than your existing maximum, you might want to re-read the part about how it all works).

***

Still have that HMA app open on your device? Let’s look at the navigation menu, hidden behind the three-stripe (“hamburger”) icon in the top left corner: here you can find the necessary tools to manage your HMA account.

The most important section is “Preferences”, which you might want to visit before starting to use HMA on a regular basis:

In the “General” tab, the option that is worth activating is the “Start HMA! VPN Pro when my computer starts” checkbox – especially if your primary goals for using a VPN are security and privacy. After all, using a secure and private connection only intermittently kind of defeats the purpose.

HMA: Preferences

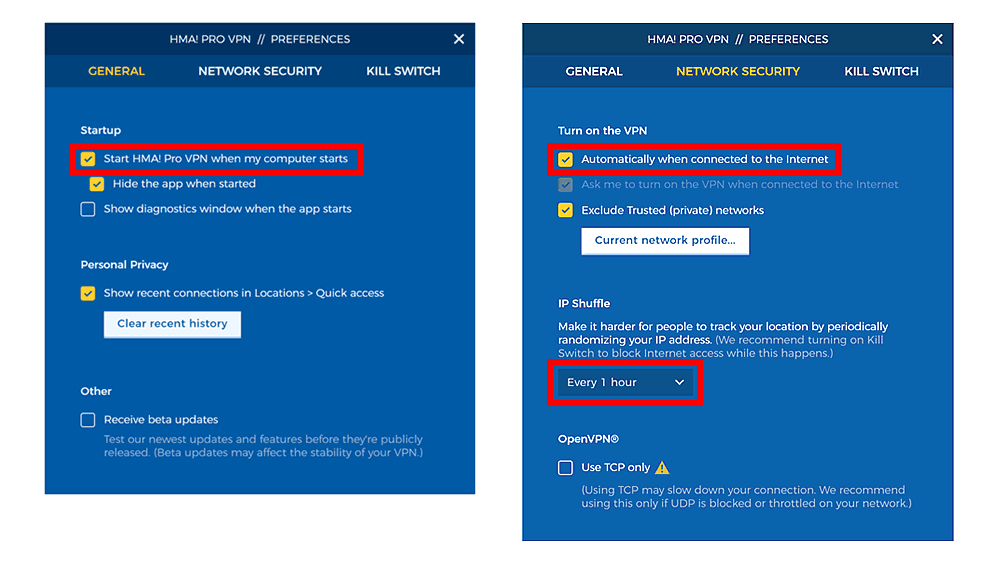
Following the same line of reasoning, you might also want to turn on the auto-connect for your HMA in the “Network Security” tab.

For the extra demanding privacy enthusiasts, there’s one more setting that is worth mentioning here: the so-called IP shuffle. Imagine not only wearing a camouflage, but also changing your suit every hour! This is what IP shuffle does, in a less metaphorical way, of course.

***

Overall, once you run the initial setup and configure the settings according to your preferences, HMA tends to “blend into the background” – providing all the benefits of a VPN without you ever thinking about its existence (especially if you set it to auto-connect as mentioned above).

Aside from all the perks, you will probably not notice any changes in your day-to-day internet experience with HideMyAss turned on – establishing a web connection will take milliseconds as usual, and Internet speed will stay brisk.

What about pricing, though?

As we’ve seen earlier, HMA essentially has a single subscription plan (all features, unlimited traffic) with several pricing options depending on your billing cycle – i.e. the length of the period you’re willing to pay for in advance.

Compared to its major competitors, there are two major positive things to note about HideMyAss’ approach to pricing:

  • Price levels are generally on the lower end – HMA has evidently chosen to stay below the market average for VPN subscriptions, which means that whichever billing period you choose, you’ll pay a bit less than for a comparable plan with other large providers such as ExpressVPN or Astrill.
  • There is an extra-discounted 3-year billing plan which is a relative rarity among VPN services. The savings on this plan can be so high (over 70%) that your final cost for using HMA for 3 years will be almost the same as for 2 years!

Combined, these two features create an attractive value-for-money offer: a 3-year license which costs almost as much as a 2-year option, which in turn costs less than the average price you’ll get at competing VPNs…

…“Hold on a second”, – you might want to exclaim at this point – “didn’t you mention a free proxy-something earlier? Does that mean there’s a version of the HMA that won’t cost you anything?”

About that:

Free HMA Web Proxy

HMA took hiding your em… donkey… to an entirely new level when they introduced a web proxy service that’s completely free to use!

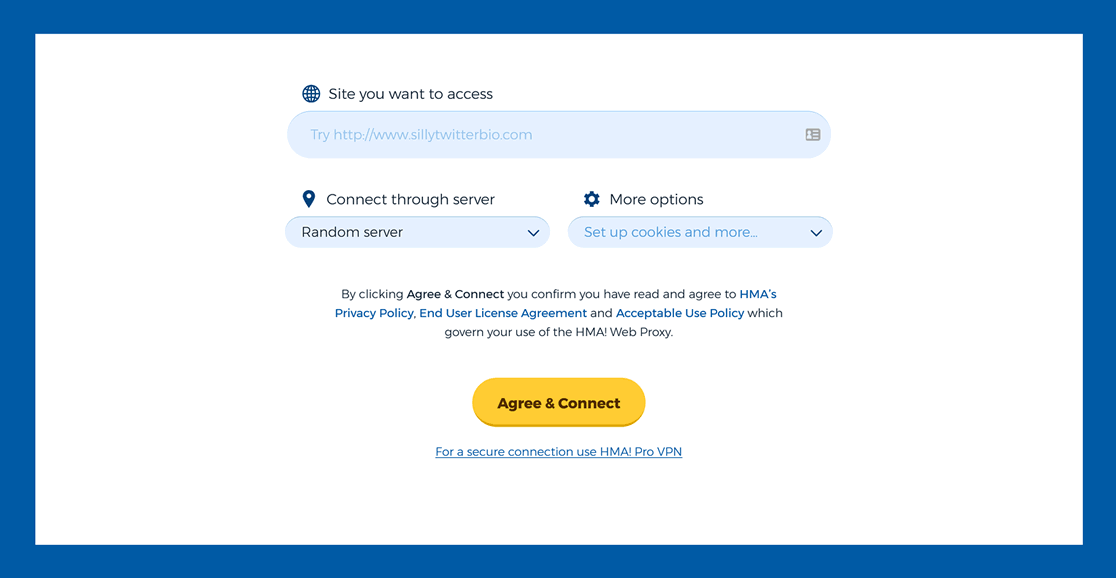
It’s works like this: you visit their proxy page, enter the website you’d like to unlock or visit anonymously, and hit the big yellow “Agree & connect” button:

You even get to choose between several servers around the world, located in a couple of countries in North America and Europe. For extra “proxyness”, you can also use the “More options” drop-down to hide the URL as well as disable all cookies and scripts on the target page:

HideMyAss free web proxy

The big question, though, is this: what’s the difference between a web proxy and a VPN? Is this a viable substitute for an HMA account?

While the result might look like a “VPN in a browser tab”, the similarity is only superficial. To understand why, let’s first look at what a web proxy even is:

A proxy server acts as an intermediary between you and the target website, presenting your requests as if they came from the proxy itself.

While this setup does mask your real IP for a single web request in a VPN-like fashion, there are several important differences that make it kind of useless for VPN-specific applications:

  • Most crucially, a proxy server does not encrypt your connection, which means that while your IP is hidden, any data you exchange with the final web page will still be susceptible to all sorts of attacks.
  • The web proxy cannot be used outside the browser tab where it is active, i.e. you won’t be able to, say, download torrents with this tool.
  • Being a free service, it is not optimized for speed or performance: in other words, the pages you access through it will load slower, and you most definitely won’t be able to stream videos of any reasonable quality.
  • Since it’s a browser-based application, the HMA web proxy will be practically useless on your mobile device, where most of the web traffic originates from within various apps.

Whew, that’s a lot of but’s! It seems that, while being a useful tool for one-off excursions into restricted content, the free proxy by HideMyAss is nowhere near as useful and secure as a fully functional VPN.

And that’s completely understandable – after all, why would a company provide a free tool that fully replaces its main product?! :)

Back to the main product, by the way: there’s one more important aspect we haven’t discussed yet, and that’s the legal dimension –

Under the Hood: HMA and Your Privacy

While it’s clear that HideMyAss is a powerful tool when it comes to security, usability, and features, we believe it’s worth digging deeper on the privacy front.

The most important thing you want to know in this respect is whether your VPN provider keeps the logs of your online activity coupled with your personally identifiable data.

Where do you look for such information?

In the privacy policy, of course!

If you study the official privacy policy of HMA, you will notice the following statement in section 1 (“What data our VPN processes?”):

HMA zero logs

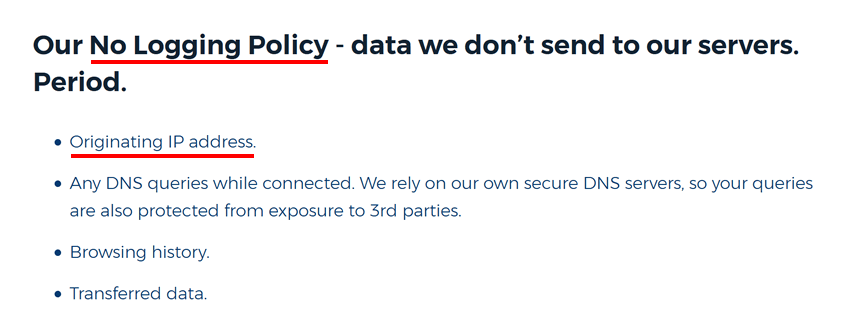
In other words, your IP address, which can be easily traced back to your person via your Internet Service Provider, is NOT being logged as part of HMA’s normal way of conducting business.

Why does that matter?

Because, even if requested by authorities, HMA will not be able to submit much: since their keep no logs of your activity on their servers.

…And HMA are quite upfront about disclosing any information they do record, if requested by authorities:

HMA sharing policy

And in the case of HMA, this is not just legal gibberish: the operating company behind the service, Privax Ltd, is registered in the United Kingdom, the country with some of the most powerful copyright lobbies and a history of copyright-related court cases that target users instead of platforms.

To be clear, the probability of authorities asking HMA for your specific data is very low. But if they do, you can be pretty sure that Privax will comply, because as a UK company, it is subject to some of the strictest laws in this area.

Another reason we paid extra attention to the zero-logs policy is the fact that in 2016 HideMyAss was acquired by Avast, a multinational software maker based in the Czech Republic, EU.

Since HMA is now just a small part of a large corporation dealing in antivirus software, it’s highly unlikely that the parent company would jeopardize its reputation or risk confrontation with authorities in any of its home markets (and that includes most of the world).

However, thanks to its no-logging policy, HideMyAss can actually be a useful tool for concealing your stuff, be it donkeys, posteriors, or personally identifiable data.

So, how do all the various factors stack up for this VPN provider?

In the next section we will prepare for our final evaluation of the HideMyAss VPN service by summing up its main plusses and weaknesses.

Pros and Cons of HideMyAss

Alright folks, we’re this close to our final verdict on HMA! Here’s a neat recap of all major findings we’ve presented throughout this review so far:

  • HMA provides a considerably higher level of online privacy by routing your web traffic via specialized servers, presenting an anonymized façade to the outside Internet.
  • Your web connection is secured with state-of-the-art encryption techniques to eliminate the risk of being hacked or robbed.
  • HMA keeps zero logs and does not record your IP address or other personally identifiable information.
  • HideMyAss subscription offers slightly lower prices compared to other major VPN providers; all pricing options include all features and unlimited traffic.
  • HMA comes with a 30-day full refund guarantee in case you’re not satisfied with its services.
  • Among other things, HMA offers a three-year billing option at a more than 70% discount to the monthly price, which means 3 years of use will cost almost as much as 2 years if purchased in advance.
  • Simple yet powerful interface with several usage modes (“Instant”, “Location”, and “Freedom”) for different situations and needs.
  • 900+ servers in more than 200 (physical and virtual) locations representing every region of the world, each optimized either for general-purpose use, streaming, or P2P.
  • Superior connection speed from most of the local servers, meaning that you won’t notice any changes compared to VPN-less browsing, even on the fastest Internet Service Providers running high-speed optical networks.
  • HideMyAss VPN can be used on up to 5 devices simultaneously, including smartphones and Linux-based computers.
  • Power users will feel good about a slew of additional settings like IP shuffling, connection kill switch, and real-time diagnostics.
  • 24/7 customer support in your language. The fastest way to get answers to your questions is via a live chat, but if you’re an email fan, there’s also a dedicated contact form on the HMA official website.
  • HMA also offers a free web proxy which is useful for situations when you just need to access a single website from a different IP. Note however that the free proxy does not use VPN-grade encryption.
  • A significant portion of HMA’s servers are virtual servers, which provide an IP of another country while being physically located in just a handful of places like United States, the UK, and Czech Republic. To make things a bit less trustworthy, the company doesn’t disclose which of the offered locations are real and which are virtual.
  • HMA is a part of the international conglomerate – the Avast Group, and is registered in the UK, which is not the best jurisdiction when it comes to anonimity protection laws.
  • If you decide to continue using HMA after the 7-day trial, you will only be given an option of a 1-year billing cycle. To get around that, see the Testing Tips part of this review.

BONUS: Exclusive 20% Off HMA Coupon Code

Before we move on to the final verdict on HMA, here’s a treat: we’ve prepared a 20%-off discount code that you can use with a 1-month or 12-month subscription options.

Regardless of whether you decide to use the VPN we are discussing in this review, it’s nice to know that there’s a possibility to save even more without compromising the quality of the service you receive, right?

To use the promo code, follow these simple steps either before or after having used up the free 7 days. As we discussed earlier, in the latter case you might be better off cancelling the trial first and buying your subscription anew, as you’ll have a wider choice of billing options:

  1. Head over to this exclusive HideMyAss pricing page, using the direct link below – and click “Buy now” under the plan you like:

    Get 20% Off HideMyAss VPN ›

  2. An additional discount of 18-20% will be added to the HMA’s default price for any plan you choose.
  3. Voila! The discount will automatically be applied to your current purchase. Using this link, you’ll be able to get the 3-year subscription cheaper than 2-year plan.

In case the link above does not work, leave a note for us in the comments section below, we’ll be glad to help! And now, to answer our initial question:

Should You Use HMA? Our Verdict + User Opinions

So, privacy and security fans, what will it be? Should you be hiding your rear with HMA? On a more basic level, are VPNs worth using at all?!

The answer will not be as straightforward as one would hope (but still pretty straightforward!) Here it is:

As a security solution, HideMyAss VPN offers a simple yet powerful tool that boasts state-of-the-art encryption – ensuring your web connection and therefore sensitive data is always safe from hackers and other mean types.

As a content-unblocking solution, HMA opens up the online world, allowing you to access any website from any country, at the speeds that are only limited by your own internet connection. No more regional restrictions on content from Netflix, YouTube, etc!

In terms of privacy, most users will find HMA useful – but if you’re a real privacy freak or if you’re interested in using P2P networks such as torrents, you might want to look at something like NordVPN with a Panama-registered legal entity.

To sum up:

If you’d like to secure your internet connection from the prying eyes, to access geographically-restricted content – and feel safer when your browse the web as a bonus, HideMyAss is one of the best VPNs out there. You might want to look at the testing tips section above for a better deal at HMA.

Get 70% Off HideMyAss VPN ›

What’s your experience with HideMyAss? Still having doubts or questions about virtual private networks in general? Leave your comments in the discussion section below, we won’t disclose your email or IP address 😎

Affiliate disclosure: while our reviews are always independent and we try to be as unbiased as possible, we do believe that it is a question of decency to disclose that some of the hyperlinks in this article are affiliate links. This means that we might get one-time commissions for purchases made through such links – at no additional expense to the buyer. In other words, the prices of the offers are unaffected by the nature of the links. Thank you for your understanding and support!

A Beginner’s Guide to Influencer Marketing

Influencer marketing may have been last year’s internet buzzword, but the strategy is here to stay. According to a recent survey, 63% of marketers increased their influencer marketing budgets in 2017, so it looks like early adopters have already realized the benefits of influencer marketing and doubled down. If there’s ever a time for your brand to start taking advantage of this relatively novel marketing strategy, it’s now.

For the uninitiated, here’s a beginner’s guide to influencer marketing: what it is, why it works, and how you can start using it to meet your marketing goals.

What Is Influencer Marketing?

Probably the most common misconception about influencer marketing is that it’s essentially a celebrity brand endorsement. You used to see them in TV ads and now they’re all over celebrity social profiles. And yes, celebrity endorsement is a thousand-year-old marketing tactic – still, influencer marketing is different. When Shaq endorses a sleep apnea mask, consumers are well aware that he’s being paid to promote it and, more importantly, likely haven’t actually even tried the product at all. With influencer marketing, endorsements don’t go from celebrity to consumer, they go from consumer to consumer.

So, instead of paying Oprah or Shaq millions to endorse your product, you instead turn to more down-to-earth social media users or bloggers who have an audience interested in your business niche. Fashion blogger and Instagram personality Kimberley Pavao is a great example of this. Brands pay her to share her opinion of their products on her blog and social accounts:

Why Does Your Business Need It?

Influencer marketing is still a fairly new tactic, but there’s already plenty of evidence that it’s effective, and will only become more important for businesses. Here are a few figures to illustrate how:

  • 47% of consumers (and counting) use ad blocking technology when browsing (In other words, it’s getting harder to reach your audience through traditional advertising channels).
  • 71% of social media users are more prone to make purchasing decisions on social media recommendations rather than other signals, and this trend is not going on a decline any time soon.
  • According to some measurements, influencer marketing content delivers up to 11X higher ROI (return on investment) than more “traditional” forms of digital marketing.

It seems that people don’t really want to see banners, popups, or even endorsements by celebrities with whom they feel nothing in common. They want to hear the opinions and recommendations of their peers.

How to Get Started With Influencer Marketing

Now that we’ve clarified what influencer marketing is and why your brand might need it, here are the steps you can take to get started.

  1. First, as pretty much in any marketing campaign, it’s useful to define your goals. Here’s the first question you need to answer: what do I hope to achieve with the help of influencers?  There are aspects along the entire conversion funnel that are well-suited as key performance indicators for influencer marketing efforts: from improving brand awareness, increasing social media reach and generating new leads – to growing sales and improving customer retention. Your goals will determine what kind of influencers you pick, what tools you use to manage them, and the kind of content you create with them.
  2. Next, you will need to find the right influencers that can help drive the goals you’ve set in step 1. Finding and vetting potential influencers is easier than you think if you use the right tools, which will be discussed in the next section of this guide. There are 4 main factors you should consider when searching for a potential influencer (in order of importance):

    Relevance – the most valuable trait an influencer can have is an audience that is interested in what your business has to offer;

    Engagement rate – just because a blogger has a lot of followers it doesn’t automatically mean their audience is actually paying attention;

    Sentiment – when you associate your business with an influencer, you’re also implicitly associating it with every other opinion this person makes online, so pay attention to any negative statements or controversial content and how their existing audience have reacted to it in the past;

    Reach – make sure your influencer has enough of an audience to make working together worthwhile. That said, don’t be fooled into thinking that small, audiences aren’t valuable – in fact, a recent Experticity study found that micro-influencers (i.e. those with 1,000-10,000 followers) have 20+ times more meaningful conversations than typical users.

  3. Once you’ve identified influencers that fit with your brand and your marketing goals, you can reach out to them to start building a relationship. If you found them through an influencer marketplace (see below), you’ll probably be able to skip a lot of this preamble, but if you found your potential influencer through social listening, it’s up to you to make contact, build a relationship, and propose working together.

    Start by engaging with them on their preferred media platforms: share their content and comment on their posts. If you want to really stand out, try mentioning them in your own blog or social media channels. Include them in a round-up post or reach out for a quote.

    After you’ve built some rapport, you can contact them directly about becoming an influencer. If they have their own brand to promote, this could even be a mutually beneficial relationship with no payment involved. For example, online marketers team up all the time to create guides, podcasts, and other content that widens reach and engages new audiences for everyone involved.

    If this is not an option in your particular case, you can always follow the more classical path of paying your influencer to share your content on social media, create a branded video, or feature your brand on their blog.

  4. Now it’s time for content creation! If you use a specialized marketplace, it’s up to influencers to come up with content ideas for you as part of their proposal to work together. You only need to select the one(s) you like and then start working together.

    A setup like this makes it easy to maximize your influencer’s creativity skills, because for maximum results their endorsements should be as unique and authentic as possible. When you set too much restrictions for their content, that’s rarely the case. So even if you’re working with an influencer one-on-one (outside of a marketplace), make sure you give them freedom to develop their own ideas.

  5. Influencer marketing is an investment of time and money, so just like any other marketing strategy it requires tracking and analysis to deliver high results. What metrics you use will depend on your goals set at the very beginning, but here are some indicators that might be especially relevant:

    Click-through rate (CTR), i.e. how many people click through to your site from your influencer’s content. Use Google Analytics UTM tags or a link-tracking tool like Bit.ly to know where your clicks come from.

    Social metrics – these are new followers, likes and comments from influencer content. Each major social platform has its own suite of analytics that can greatly enhance your ability to track everything that’s going on with your pages, posts, and other social media assets.

    Sales or conversions – use custom coupon codes or Google Analytics goal tracking to monitor conversions driven by influencer content. Apart from that, it’s actually possible to create and track unique coupon codes for each of your influencers to share.

    Use these and other KPIs to identify the most and least valuable influencers and adjust your strategy accordingly to improve returns on your marketing investment.

Tools to Help with Influencer Outreach

While rolling up your sleeves and manually searching for influencers is a viable strategy, there are numerous specialized tools that take most of the tedious bits out of this process, letting you automate practically every step of the way:

Firstly, we just can’t skip BuzzSumo, which is a potent tool for finding both blogging and social media influencers. You can simply type a keyword into its search bar and the system will return the most shared content related to the keyword, as well as which platforms are already creating content related to your niche. If you use BuzzSumo’s paid features, you are able to see the most powerful social profiles that shared the content as well.

Naturally, social platforms like Twitter, Instagram, LinkedIn, and Facebook are where influencers hang out. In order to automate the process of looking for the most relevant influencers, you can use a tool like Keyhole or Hootsuite to monitor hashtags related to your niche.

Finally, there are specialized influencer platforms that are designed to help you connect with online personalities that want to help brands promote their business. Here are a few popular ones: Klear, HYPR, Famebit, Revfluence, Octoly, and Influenster. Te best part about them is that their built-in tools can help you analyze an influencer’s audience demographics, engagement, and reach – using all the data, you will be able to make much more informed decisions as to which people to work with for promoting your brand.

Over to You!

In this beginner’s guide to influencer marketing, we’ve discussed the basics of what you need to know to get started with the strategy. Once you’re set your goals and done the groundwork, specialized marketplaces and tools will make it quite easy to find and collaborate influencers that have a relevant audience ready to engage with your brand. Just take the time to find the right influencers, let them get creative, and track the results and you might soon see how much more powerful influencer marketing can be compared to the traditional advertising methods.

SEO Basics: The Quest for Better Search Rankings

Contents

What Is Search Engine Optimization?

Any site owner can confirm that getting people to visit a website can often be much harder than actually building one, especially with all the specialized tools available on the modern Web. And for many webmasters, organic search traffic (i.e. visitors that come naturally from Google’s search results pages) is considered something akin to a holy grail, for two important reasons.

Firstly, you don’t have to pay for every click, and secondly – such users come to your website after explicitly searching for a specific word or phrase, which uncovers their current intent. The latter is a very strong factor determining how actively your visitors can be expected to engage with your page, performing the actions you want them to perform, from reading and sharing your content to following your recommendations and buying your products.

However, for all its advantages, organic traffic can be notoriously hard to obtain – and even harder to retain – in a consistent fashion. This is where SEO comes in, as a set of strategies intended to improve a webpage’s search positions for specific keywords.

Does SEO Still Work?

Successful search engine optimization used to be quite different (and arguably much less complicated) back in the day – there was a time when it was sufficient to repeat the necessary word as many times as possible on a page for higher rankings – or leave several hundred comments on various forums linking to your website.

Google’s algorithms have been evolving constantly, though, and most of the techniques that virtually guaranteed a ranking boost ten years ago not only stopped working, but can actually hurt your organic traffic in the long term.

A logical question arises in this respect: do any of the optimization techniques still bring positive results at all?

While Google is becoming more and more “intelligent”, it still remains an algorithm, which means it needs some parameters to use in its ranking decisions – it can’t just rank search results randomly in hopes of staving off any manipulation.

What this means is that SEO will always remain relevant, by its definition as “optimization for the factors that are used for search results rankings” – what has changed is the actions that constitute such “optimization”. In order to determine which tactics might be called modern-day SEO, we’ll need to understand the search engines’ point of view first.

In Google’s Shoes

Before we begin, one quick side note: you’ve probably noticed that we are using “Google” as a synonym for “search engines” at large in this guide. This is not a coincidence: according to various sources like Statista and NetMarketShare, Google accounts for more than 80% of the global search market, and up to 95% of the entire desktop search traffic in such major countries as Brazil and India.

Such near-monopolistic position forces other competitors like Yahoo and Bing to emulate the leader, effectively giving Google the power to drive the entire search engine market, which is why we will be focusing on it throughout the article, just like most SEO professionals do in their day-to-day activities.

In its mission statement, the company says that its goal is to:

organize the world’s information and make it universally accessible and useful

While this is a worthy undertaking benefitting all of humanity etc, one should not forget the primary cash machine that allows Google to exist: its enormous pay-per-click advertising business called AdWords (generating almost all of the $90 billion of the search giant’s 2016 revenues). This means two things:

  1. If there’s a way to consistently influence one’s rankings, people will buy fewer ads (why pay for each click when you can invest a fixed amount of money and time to get free clicks?)
  2. Even though ads are what matters for Google, search results should still be of high quality, since people will stop using the search engine if they aren’t; fewer users, in turn, will put the ad revenues under jeopardy, which Google understandably wouldn’t enjoy.

From this, we can go on and deduce, with a fair degree of confidence, some of the engine’s preferences with respect to organizing its search results.

Things Google Likes

In order for people to keep using the search engine (and for Google to earn its advertising profits), the results it generates in response to people’s search queries should possess one paramount property: they should be useful. In other words, people want to be able to find whatever they were looking for, and the faster – the better.

Google can’t (yet) ask its users directly if they like what they see in the search results, so it has to resort to indirect methods of determining the quality of a page with respect to a specific search phrase. There are two parts to this assessment: the page’s quality (the on-site SEO factors) and the page’s authority (often called off-site SEO factors).

When gauging the quality of a particular web page, search engines look at all measurable parameters they can lay their hands on:

Originality – a page’s value to the users is higher when its content is unique rather than taken from somewhere else, as simple as that. While original content is very unlikely to earn you high rankings on its own, plagiarizing is a sure way down the rankings and even to a penalty bench.

Substance – while there’s no hard rule that says “less text on a page is bad for SEO”, you should consider if your visitors would appreciate a deeper discussion of the topic at hand rather than a few superficial sentences. If that is likely to be the case, make sure your content is as substantial and well-researched as possible.

Usability – how long a visitor spends on your website is often a good indicator of its usefulness; time spent on a page, in turn, is heavily influenced by how easy it is to use it, including layout, navigation, and design. Making sure your website looks professional and adheres to UX (user experience) best practices is crucial in optimizing for better search rankings.

Speed – digital devices have made us all quite impatient with their immediate-feedback interfaces; according to Google, more than half of smartphone users abandon a web page if it takes more than 3 seconds to load. To rephrase that: the faster a page loads, the better for the user – which, in turn, means that load time is very likely to be one of Google’s ranking factors, especially for pages accessed via mobile devices (since many people browse the web on metered mobile plans and fixed mobile internet usage limits or even pay per megabyte).

Our dedicated on-page SEO guide covers the above items in more detail, including practical advice on how to make the most out of each parameter and maximize your page’s chances of better search rankings.

Moving on to the authority metrics, this is where Google estimates how trustworthy a page is based on other websites’ actions. In plain terms, off-page SEO is mostly about third-party resources linking out to your pages: if such a link looks genuine, it tells search engines that other websites appreciate your content.

The more authority you gather through incoming links from other trusted websites, the higher your chances for top search rankings.

Things Google Doesn’t Like

While it’s quite obvious that the opposites of the things described above are red flags for search engines, it’s still useful to quickly review the behaviours that are detrimental to search rankings:

Low quality – Google’s algorithms are constantly improving, i.e. getting better and better at spotting unoriginal, superficial, difficult to use, or offensive content. Such pages don’t stand a chance of ranking high in search results, and sometimes even ranking at all.

Bad company – if your immediate “web surroundings”, i.e. sites that link to you and the ones you link to, are of dubious quality and reputation, your chances of higher rankings might suffer as well. And while you can’t control who links to your website, it is possible to take action if you spot any shady inbound links: by uploading a disavow list in the Google Webmaster Console you can tell the search engine which of your backlinks you don’t want it to consider.

Manipulation – while there’s nothing bad in improving your website for the sake of getting higher rankings, outright gaming the algorithm has never been something Google was particularly fond of. Add to that the fact that it’s becoming ever more sophisticated and eagle-eyed, and it’s clear that the risks involved hardly make it a worthwhile strategy to pursue.

Over to You

Search engine optimization is no hard science – rather a soft skill that can be improved by involving common sense and collecting as much experience as possible. In case you’ve got some interesting stories to share, or have questions about the topics covered in this guide, let us know in the comments section below!

Understanding Web Hosting: How It Works and How to Choose One

Contents

How Hosting Works?
What to Look for in a Hosting
Types of Hosting Services
Choosing the Suitable Solution
Over to You!

How Hosting Works?

Every time you visit a website, there’s a hosting provider involved in the process. How does it work? Let’s start with the basics: a website is a collection of files that define its visual appearance and functionality, so it needs to be stored (hosted) somewhere with constant access to the Internet so that anyone can access these files at any time.

The function of keeping the website available to other network participants is carried out by a server – in essence a specialized computer. It is always on and constantly online, its architecture and software optimized for storing (hosting) and sending (serving) the files that constitute the website.

Individual people and organizations rarely own their own servers – instead they purchase the right to use them from specialized companies called hosting providers. In exchange for periodic payments, they give you the tools needed to host and manage your website, making it available to anyone on the Internet.

Most retail hosting providers come with a control panel – a user-friendly interface to perform various tasks related to your website, usually including:

  • File manager to directly create, modify, and delete the files on the server that belong to your website.
  • Database manager that allows creating, removing and modifying access rights for the databases used by your website (in case there are any).
  • Applications to quickly install the most popular content management systems, such as WordPress or Drupal.
  • Many providers also allow creating and managing email addresses associated with your domain, as well as setting email forwarding and auto-responders.
  • Analytics features such as server resource usage tracking tools as well as site usage statistics.
  • Domain settings that allow you to bind a domain name to your website’s files, making your site available using a human-readable internet address (called URL).

Speaking of which, many hosting providers also offer the possibility to register domain names, sometimes even offering a domain for free when you purchase a hosting plan subscription. The most prominent providers with such offers include Bluehost and GoDaddy. If you wish to learn more about what domains are and how to pick one quickly and efficiently, head over to our in-depth guide on domain names.

What to Look for In a Hosting

While there are several broad types of hosting services, we will talk about them in more detail in the next section – before that, let’s look at some of the important parameters that deserve attention regardless of the particular type:

Uptime – on the web, the standard of availability is “always available” – we’re not used to websites e.g. not working on weekends like some physical stores or offices might do. Since the primary purpose of a server is to make your website accessible to Internet users, one of the key requirements for any hosting provider is maximum uptime – i.e. the servers being up and running 24/7.

While it’s not reasonable to expect a strictly 100% figure (things do happen, even to highly specialized and well-maintained computers with optimized software), a decent hosting should keep each of its servers online at least 99.5% of the time.

Domain-related services – to recap, since a domain name only becomes accessible as a website’s primary web address when it’s bound with the server that hosts the website, it’s quite natural for many hosting providers to also offer domain registration services.

Buying a domain and hosting from the same company removes the necessity managing each item in a separate place and allows for easier billing and scaling. Moreover, you’ll be free of the hassle of setting up the domain name so that it binds with a third-party server, since a domain registered with the hosting provider will already have default settings that allow it to work with that hosting “out of the box”.

Hardware – the specific components used in the server actually does make a difference to your website’s loading speed. Key items to pay attention to are memory (RAM), the processor (CPU), and the permanent memory. RAM allows servicing multiple requests simultaneously, which means higher RAM will enable your website to handle higher traffic without being overwhelmed. The CPU correlates with website performance in a similar manner – the more powerful it is, the smoother your website runs; chances of dropping load speeds are also reduced in times of visitor traffic spikes.

As for permanent memory, the most important parameter is its type: while HDD (hard disk drive) used to be the standard for web hosting solutions, its new competitor, the solid-state drive (or SSD) allows for much faster data access, which also translates into higher loading speed for your website. It’s worth noting that hardware parameters may not always be disclosed in hosting offers, yet it is still useful to understand how physical components of your server can potentially affect your online project.

Physical location – even if we keep the server’s hardware configuration constant, visitors from different parts of the world will experience different loading speeds on your website simply because it takes longer for the signals to reach them when the server is “talking” to their device. It is thus important to keep in mind where your users are located and try to choose a hosting provider with servers physically located in the same geographic area.

The difference is speed might not be that much within the same country (e.g. a server in New York will load websites to users from San-Francisco without noticeable delays), but if your primary audience is e.g. in Australia, choosing a US-based hosting provider might not be the best idea since the delay might sum up to several seconds, which is a LOT of time on the web.

Control panel – before making a choice in favour of one or another hosting, it also wouldn’t hurt to find out whether you will have access to a hosting control panel, because if it’s not included into the offer, you will either have to work without it (rarely manageable unless you’re an experienced developer), pay additional money for it as an extra service, or install one yourself (which is almost always a hassle).

A control panel provides an easy, visual way manage your hosting: installing a website engine, accessing the website’s files directly, adjusting additional settings offered by the hosting provider. Some of the most commonly used hosting control panels include cPanel and Plesk.

Types of Hosting Services

As we’ve seen above, every hosting service is essentially a specialized computer that stores your website’s files and handles requests from visitors. This basic dish can come in several flavours, though, depending on how the server’s computing resources are allocated between the provider’s clients.

Before we continue, a disclosure: some links used here are affiliate links, which means we receive a small commission in case our visitors click them and purchase a hosting subscription. The good news is, the price you pay for hosting via our links is not any different from the standard price (it’s more about the hosting provider rewarding us with a part of their existing marketing budget) – so if you find the guide helpful, do use our links to buy hosting :)

It is important to distinguish between the types of hosting because each is specialized in solving a specific set of goals, with its own pricing. We’ll first summarize the most important differences in a table and then look closer at each type below.

Shared VPS Cloud Dedicated
Resource allocation Split between clients Allocated per client Distributed across servers Entire server for client
Degree of control Pre-defined features, via control panel Almost like having your own server Full control over your setup Full control over server’s software
Clients per server Many Few Few One
Ease of use Easy Easy / medium Medium / hard Hard
Scalability Medium / low High / medium High Low
Pricing group $ – $$ $ – $$ $$ – $$$ $$$
Notable examples Bluehost Host1Plus Digital Ocean Rackspace

Shared hosting is the most popular and widely used type, its name making clear that each physical machine (server) is used to store and handle websites for many clients at the same time; in other words, dozens of hosted websites compete for the server’s storage capacity and processing power, as well as bandwidth.

This means shared hosting is not a powerful and flexible as having an entire server just for yourself – yet the thing is that in most cases you don’t need that; the vast majority of websites require modest computing resources to run well, and the pricing advantage of shared hosting makes it really smart idea, as long-run savings from each month’s payments can quickly stack up to significant sums of money.

Another attractive side of shared hosting is ease of use: most large providers include a control panel and various additional features into their shared hosting offers, making it by far the most hassle-free type of hosting for the clients to set up and maintain.

One sub-type of shared hosting has gotten quite popular nowadays – the so-called WordPress hosting. Its key value proposition is reduced maintenance for those who are sure from the start that they’ll only use WP for their online project’s needs. Such offers typically include pre-installed WP, regular automatic updates, backups, and security monitoring. The pricing is also higher than classical shared hosting though.

Virtual Private Hosting or VPS is similar to shared hosting in that each client gets a part of server’s resources allocated to their needs, but in this case the allocation is very specific and can be upgraded/downgraded easily.

Another key difference can be derived from the name itself: “private” means you get a part of the server “walled off” specifically for you, and you can do anything with it as if it were your own server. “Virtual” means that it’s still not a physical delimitation, though – which means there are hard limits to the degree to which you can scale, imposed by the performance of the underlying physical server.

Cloud hosting is often confused with VPS, possibly because both are about detaching from the more “traditional” relationship between a server and its users, yet there’s an important difference in the basic idea: with cloud hosting, resources are pooled from many networked servers and allocated to clients as needed.

In other words, instead of partitioning a part of a physical server for a single client, cloud hosting spreads client’s resources across multiple machines, achieving much higher resilience and scalability. This means that you only pay for the actual resources you use and have much higher degree of flexibility in your setup, but it also means higher pricing (you’re effectively renting out a part of a whole bunch of servers). Another thing to bear in mind is the expertise and skills required for managing cloud hosting.

Dedicated hosting is, as its name suggests, about giving a single client full access to their very own physical server. This literally means that you are being allocated a specific computer which you can manage remotely in any way you like.

All resources of that machine are yours to make use of, which means not having to share bandwidth, memory or processing power with any other website. As one might expect, this comes at a price: dedicated hosting almost always costs significantly more and requires professional setup and maintenance.

You might also encounter the term “managed hosting” which has no clear-cut definition, but is typically used to imply a dedicated server plus the setup and maintenance mentioned above – in other words, an offer combining the performance of dedicated hosting with an almost hands-free experience of shared hosting. Must we mention that it’s also the most expensive type?

Now that we’re familiar with the general hosting features and the various kinds of hosting that exist, we can make a better choice between the available options.

Choosing the Suitable Hosting Solution

In order to approach this issue in a consistent and systematic fashion, let’s break down the process of choosing a hosting provider into several simple steps:

  1. Understand your needs. The first step is to have a clear idea of what your online project will need in terms of performance, flexibility and features. Some of the valid questions to ask yourself are as follows: What are you building – a website, an online store, a community, an application, a digital product? What will the expected visitor traffic be and how fast will it grow? What technologies and functionality to make it work? How much money can you spend on this?
  2. Decide on the hosting type. At this point it is already possible to narrow down the choice to a specific type of hosting services based on such requirements as scalability, speed, price, control and features – which you’ve pinpointed in the previous step. You can use the table in the section about hosting types above to help you.
  3. Check for needed features. Once you’ve picked the hosting type, you can continue by looking at several companies which offer respective services: again, using the information from step 1, you can now examine each offer for the presence of features you’ll need, like bundled content management systems, domain or email management, database access, security features such as SSL certificates and domain privacy, available computing resources, physical location, etc.
  4. Study upgrade options. Another aspect that is worth a look is the possibility of upgrading the particular hosting plan to higher resource allocations and additional features – this might be useful to know in advance so that when your online project grows, you won’t face the need to switch to another hosting provider just because you’ve outgrown your existing one.
  5. Investigate the pricing. Finally, make sure that the price tag on your chosen hosting plan fits your budget and doesn’t look uncompetitive compared to other similar offers (which you’ve seen in step 3, for example). One more thing to check in case of promotional pricing is how much the hosting will cost after your initial billing period is over – it has become popular among providers to offer considerable discounts on the first year of use, thus it’s useful to keep in mind how much you’ll actually be paying afterwards.

Based on these five steps it is possible to narrow down your choice to a couple of specific offers by specific hosting companies – i.e. from 100s of potential candidates to 1-2. In addition to that, going through web hosting reviews can help gather additional insights that will finally allow you to find the best option for your situation.

Over to You!

Still struggling to make the final choice in favour of a specific hosting provider? Having general questions about hosting? Share your thoughts and experiences in the comments section below, let’s discuss!

Domain Name: How to Choose the Right One Without Getting a Headache

Contents

What Is a Domain Name?
Domain Name Syntax
Domain Extensions
Good vs Bad Names
Tips on Choosing a Domain
Where to Register?
Ask Your Questions!

What is a Domain Name?

A domain name (or simply domain) is a string of symbols that identifies a certain entity or area of control on the Internet. Most commonly nowadays, the term “domain name” is used to refer to a human-friendly identifier of a website hosted on a specialized computer called server.

For example, the Wikipedia website can be found on the www.wikipedia.org domain, and the German version of the online encyclopaedia is located at de.wikipedia.org.

While other computers plugged into the Web will know it by its machine name (IP address), which consists of a series of numbers, e.g. 91.198.174.192 for Wikipedia – people will use a corresponding domain name instead, mainly because it’s less daunting to memorize and use than a series of random figures. Since shared hosting is a very popular type of hosting, it is worth noting that while exactly one IP address is normally attributed to a given server, that machine can host and run more than one website at a time. In that case the domains are mapped to specific folders inside the server, each holding its own website’s files.

The entire idea of having domains only makes sense if each domain name is unique. This is ensured by a system of international organizations and registries that carefully keep track of all existing domain names and the IP addresses of the corresponding servers.

While there are nearly endless possible domain names, not any combination of letters will take you somewhere on the Web – in order to make a domain name active and bind it to a specific server it needs to be officially registered with the DNS, the Domain Name System. People and organizations can achieve this with the help of dedicated domain registrars, most of which, like GoDaddy or Bluehost, also (unsurprisingly) offer web hosting services.

It is noteworthy that, contrary to the common way of phrasing it (also in some marketing materials by the registrars), no one can actually own a domain name – you merely rent it, i.e. buy the right to control it for a certain period of time. After that, you either prolong your registration into the next period, or the domain name “expires”, becoming unclaimed again and therefore available for anyone to register anew.

Domain Name Syntax

To understand how domain names work, let’s take apart the Wikipedia example we’ve used above:

It’s easy to notice that a domain consists of labels concatenated with dots. These correspond to the structure of the Web: the right-most label (“org”) is the top-level domain, or TLD (also called an extension) and the labels that follow from right to left are second- and further-level domains that are lower in the Web hierarchy.

The .org top-level part can be present in many various domain names, but its combination with the “wikipedia” second-level domain should be unique. For more specific areas of the “wikipedia” domain there are third-level domains (in our example, “en”) which in this case correspond to different language versions of the encyclopaedia.

In this context, a domain name is also called a hostname, since its purpose is to unambiguously locate the host machine that contains the files of a specific website. In other words, a hostname is a full identifying address of a specific resource among all other resources on the Web. If we then also add the method for retrieving it, we’ll get its URL (Uniform Resource Locator), or, colloquially, its web address.

The most widely used method for retrieving web pages is the Hypertext Transfer Protocol, or HTTP for short; looks familiar, right? This is what you see in front of any web address if written explicitly (e.g. http://wikipedia.org), and also in your browser’s address bar (although most modern browsers tend to omit the “http” bit while displaying a web page, it will still be there if you copy the string from the address bar and paste it into a text document).

Domain Extensions

While the second-level domains can be represented by any combination of letters, numbers, and dashes, the TLDs (domain extensions, or top-level domains) come from a limited set of pre-agreed labels, such as “com”, “org”, “net”, “fr”, etc. Those can be loosely subdivided into three groups: generic, country-specific, and specialized.

Generic extensions (also called gTLD in an attempt to look cooler) are some of the earliest top-level domains that can be used in a wide range of cases, for example a .org extension can be used with any organization (typically chosen by non-profits), .edu extensions are used throughout the world by universities and other educational institutions; .com (=“commercial”) is even more versatile, being suitable for virtually any purpose.

Country-specific extensions are exactly what their name suggests – a collection of two-letter top-level domains representing local websites that target a specific country or group of countries. For example, an .nl extension is used for the Netherlands, .ru for Russia, and .eu for the European Union. It is worth noting that certain country-specific TLDs have ownership restrictions – in order to register one, a person or organization must meet certain criteria, such as being a registered resident of a European Union country (for an .eu domain).

Specialized extensions were only introduced several years ago and are the most fun group: not only is the choice much, much wider here (consisting of several hundred alternatives) – the names themselves are more descriptive and sometimes just outright awesome. In addition to genuinely useful ones like .web or .app, there are some that can make your website really (and we mean really) stand out; for a short list of our favourites, see the next section with tips on choosing a domain name.

Given all the available choice or top- and second-level domain combinations, choosing the one can be a daunting and mentally depleting task. Before we dive into tips that will make this process easier for you, let’s first go over some general recommendations – these will help weed out many options and ultimately arrive at the one that is both good-looking and useful.

Good vs Bad Names

While judging a domain name is always at least partially subjective (“I just happen to like/dislike domains with numbers in them” etc), it is still possible to pin down several important criteria which need to be met in order to maximize its usefulness and the number of people who will like the domain.

  • Meaningful: since a domain name acts as a unique signifier for a website, and therefore almost always stands for a person, company or organization, it makes sense for it to actually have (at least some) meaning. Yes, finding an unclaimed domain among the gibberish combinations is much easier, but it will also be that less useful as the public name for your online project.

    Meaningful domain names are easier to memorize and recall; in addition to that, they evoke certain associations and/or emotions, which can be used to serve your overall goal. For example, domains like “ertuyewf.com” are most certainly easy to register, but they look like a person was too lazy to come up with a proper name; on the other hand, a name like waitbutwhy.com is both memorable and descriptive.

  • Short: the maximum allowed length of a domain name is 63 characters, but a reasonable goal would be to go much lower than that – in fact, in the vast majority of cases the shorter the domain name, the better. In the younger days of the Web, it could be beneficial to cram as many keywords into a domain name as possible, since it was one of the early ranking factors in search engine algorithms. This is, of course, no longer the case, so domain names like this one don’t make much sense.

    www.cool-awesome-keyword-rich-domain-name-of-maximum-allowed-length.com (it’s actually available, you can snatch it before it’s gone!)

    A short domain is easy to memorize and recognize, and it’s easy to spell (even if it’s not an existing word, a nearly-random 5-letter combination is still easier to grasp than a 10-letter one). Shorter domain names also look more professional, indicating conspicuously that their owners have taken some time to find a name that is both concise and not still taken by someone else.

    Thankfully, it’s easier to find shorter domains nowadays, after the launch of hundreds of additional top-level domain extensions for any purpose and situation, from .agency to .limo – which means that sticking to a long name has even less excuses.

  • Easy to spell: this principle closely corresponds with the previous two (when a domain name is meaningful and short, it’s also almost inevitably easy to spell), yet there’s more to it. Even if your domain is an invented word (e.g. the name of your new product), a person’s name, or a non-existing combination of letters, it’s still very advisable to try to avoid letter combinations which can be spelled in more than one way or which are often confused by people. Intentional misspellings are also a shot in own leg: even when used for innocent reasons, they can make it much harder for people to type your site’s address, tell it to friends, or even find it in a search engine.

    Numbers and non-letter symbols such as dashes are worth a separate mention: while it might be much easier to find a domain name containing those, it will be more difficult to remember and reproduce. Numbers and dashes will also make your domain look less serious and lower its perceived credibility. No matter how clever you thing a domain substituting a “for” for a “4” will be, bear in mind that in most people it will induce a mental eye-roll rather than appreciation.

  • Legally respectful: it should go without saying, but we’ll still say it – a domain name containing offensive words (and allusions) is not only disrespectful, but also bad for your online project’s reputation and long-term prospects. Another strategy to avoid is trying to fool the visitors by making the domain name look like an existing brand; not only will you get warnings or even lawsuits from the original holder of the brand sooner or later – users who discover that they’ve been tricked will never return to your site again. Not to mention the potential sanctions from Google and other search engines.

Tips on Choosing a Domain

There are more than 330 million registered domain names on the Web, which means a LOT of nice ones are already taken (and some seemingly strange or useless ones, too). In this crowded market, the search for a domain that matches all your needs and wants can be a daunting task – here are some tips to make it less so. To check for the availability of your domain name ideas, you can use e.g. GoDaddy’s tool.

Consider relevant words and phrases: while it is not advisable to stuff your domain name with keywords, compiling a list of terms that describe your project will help you identify new sources of potential synonyms and word combinations. Widening your choice of words will greatly increase the available “pool” of domain names since each of them can be combined with several extensions.

Use specialized tools to help you brainstorm: there is a number of free online tools which are meant to make your search easier; some of our favourites are Dot-o-mator, which produces combinations of your keywords with popular beginnings and endings from various categories – and our own tool, which generates keyword-based suggestions by performing all kinds of manipulations with your keywords – from shortening to attaching suffixes and additional topical words. Both tools automatically check for domain name availability, greatly reducing the number of times you will need to do it by hand – however, even if you find the perfect domain using any of them, it is recommended to register it in a more convenient fashion; check the next chapter of our guide for more details!

Get creative with the top-level extension: another trick related to domain extensions is substituting the last letters of the second-level domain with the top-level extension, similarly to what Instagram did when they were small and much less known and used the “http://instagr.am” address. Apart from various country-specific domains that can be handy in this strategy (like the Lybian extension .ly), the .io and .co get used a lot nowadays to make up for the severe shortage of decent available .com domains. Just make sure there’s no established website occupying the .com version of your .co domain to avoid losing your hard-earned traffic to it.

Consider the new extensions: as mentioned previously, there are hundreds of new domain zones now available in addition to the classical ones; this means that your search doesn’t have to stop on .com or your country-specific TLD! The best part is – most new extensions are full words, which means you can make the second-level domain shorter and/or include an additional topical term to enhance your web address and convey additional information about the nature of your business up front. To get you going, just take a look at our (half-serious) list of some of the coolest new TLDs:

  • .beer (because why not?)
  • .george (in case you want to etch your name onto the Web)
  • .genting (what the hell that even means? ..sounds cool though)
  • .ninja (for the stealthy professionals)
  • .sucks (yes, it’s an actual extension)

And with Google clearly stating that new extensions are treated on par with the old ones in terms of search engine rankings, there are really no serious arguments why you should not consider them for your online project.

Check the domain’s “baggage”: since any domain can be registered anew after its previous owner stops prolonging their registration, there’s a non-zero chance to stumble upon a domain that was previously in active use. While such domain can still retain some authority in the eyes of Google, not to mention links from other websites already pointing at it (free SEO for you!), it’s still worth doing a quick check using the Wayback Machine to make sure that the previous website wasn’t breaking any laws or using spammy tactics.

Where to Register a Domain Name?

Eventually, you will find it – the domain that suits your needs, sounds cool, and is short, clear and easy to spell (congratulations, by the way!). Now you need to register it for yourself, and again you’re confronted with a wide choice of possible registrars. Not again! While domain registration can be seen as a commodity, i.e. there’s no intrinsic way to make it better or worse, there is one important forward-looking factor to consider here.

Since the purpose of a domain is to identify a website, you will eventually (probably sooner than later) need to create a website on your newly acquired domain – this means you’ll need a hosting to store it and serve the website to visitors. For this reason, it is advisable to purchase a domain name from a large and reputable hosting provider – not only will it be easier to manage everything from a single admin panel, many providers will actually allow you to register a domain name for free (saving $10-15) when you buy even the least expensive hosting plan. The most popular offers can be found on GoDaddy and Bluehost.

Over to You!

Do you have additional tips for choosing the perfect domain name? Need help with one? Share your thoughts in the comment section below, let’s discuss!

How to Choose a WordPress Theme for Your Website

If you’re running a WordPress blog or a company website, its design is largely determined by the theme you are using. In this article, we will discuss what a theme actually is, why you need it, and how to make the right choice that will make you a happy website owner.

What is a Theme?

Let’s start with the basics: a website template is a set of visual styles and page layouts that users can upload/install to their websites and customize up to their needs. A stand-alone template includes HTML and CSS3 files, and often some JavaScript; even though adding content is up to the template user, some bundles also include pre-made images, audio and video.

Website templates are usually created for a specific website engine, or CMS (content management system): a Joomla template won’t work for WordPress, and a template that is meant for Wix will is usually not portable to Drupal or Ghost. Summarizing the above, a WordPress theme is a web template made specifically for WordPress-powered websites.

If you’ve already tried looking for a WP theme, you’ve surely noticed that scarcity is definitely not a problem: rather, one can quickly get overwhelmed by the sheer variety of hundreds and thousands of template options all over the web. To help you choose, we’ve compiled a list of the most important factors to consider; before we get to that, however, let’s quickly answer the question:

Why Do You Need a Theme?

To understand the implications of using a website template, let’s look at the alternatives. First of all, you may hire a freelancer (or an agency) and order a custom website design – this is a suitable option if have several thousand dollars to spare, as high-quality, personalized web design is not a cheap product these days. Moreover, you will need to choose a knowledgeable developer to implement the design, or you’ll end up with a product of poor quality that might be ridden with bugs and security glitches.

If you don’t feel like paying that much for your website, you may think of creating your website yourself. This is a viable option if you already know the basics of web design and development, yet if you’re new to both of these fields AND you need a website now, this option may be ruled out with easy heart.

The third way to launch your website is by using a content management system (CMS) and a template. As you might have probably guessed, this option combines the speed of the first approach with the low cost of the second option:

  • Using a website template is a good solution for small businesses, even if you’re on a budget. The template’s average price is $40 – $80, which is way less than for a custom design from an agency.
  • Website templates help you save massive amounts of time as you don’t have to start from scratch with your designs. Templates not only come with pre-made layouts and styles, but also frequently with sample data that contains diverse content, pre-made for you by template developers. Using sample data, you can simply change the text and images to the ones you need.
  • With many templates, you save on acquiring paid plugins as authors tend to equip their themes with premium plugins, such as sliders or content builders, at no additional cost.
  • High-quality website templates are usually well-documented and many of them come with customer support so help you solve any configuration issues.
  • You can easily check which theme an established website is using with the help of our WordPress detector.

Things to Take into Account When Choosing a WP Theme

To fully reap the advantages listed above, it is worth while keeping certain things in mind while choosing the right WordPress template for your future website:

  1. Who is behind the theme? To end up with a high-quality template that is built with valid, well-structured code, you are better off searching for it on the websites of the leading template providers, such as ThemeForest, TemplateMonster, or Elegant Themes. By doing so, you can be sure that you’ll get a product free of security vulnerabilities, glitches and bugs. Moreover, due to the severe competition, well-established template providers are motivated to deliver designs that follow the latest trends and bring you the most powerful features.
  2. Does the theme look modern? If you want your website to be taken seriously, you’ll need a theme that looks current and professionally designed. Some of the most prominent features of modern web design include clean, clear lines, plenty of white space, bold, easily readable typography, absence of obtrusive, noisy or too detail-rich elements. It is also a given nowadays that a website looks good on all types of screens, from large HD monitors to the smallest smartphones – so be sure to check out how the theme looks and behaves on various devices.
  3. Does the visual style match your needs? Your website’s design and content should go hand in hand – depending on what you’re offering and who your target audience is, you might want to adjust your requirements. For examples, if the site is meant to showcase your creative works, a more minimalist and bold theme with an emphasis on imagery could be suitable, while a more text-focused theme is a good fit with an information-heavy website, such as a blog or a news portal.
  4. Do you need a niche template? Keep your specific needs in mind when looking for a specialized theme – be it fashion, photography, car repair, sports, education, consulting or food industry, you’ll be able to find a number of options that offer niche-specific features and design elements.

    Niche templates include features that provide for specific needs of your visitors and clients. For example, you’ll find an extended real estate search plugin in a real estate template, an appointment booking plugin in a healthcare or beauty salon template, a timetable plugin in education or sports template, etc.

  5. Does it load fast? Load speed is one of the most important visitor retention factors for any web page – so make sure the theme you’ve chosen does not take too long to fully render a page. Among the factors that most commonly influence website speed are the scripts, stylesheets, and other files loaded by the theme and bundled plugins. You can check a theme’s demo page in Pingdom’s Speed Test or using the GTMetrix engine to make sure everything is running smoothly.

    It’s an additional bonus if your chosen template comes with an animated pre-loader which clearly indicates to your guests that the page is in the process of being loaded. Be mindful, however, that it’s not a substitute for lean, optimized code, as Google and other search engines will still prefer pages which load faster.

  6. Does it include a content builder? Most theme users prefer creating pages using content builders nowadays; a content builder is a visual system that offers pre-designed elements as drag-and-drop blocks for your content. Such a tool helps you add varied content (such as tabs, dividers, counters, progress bars, timelines, blurbs, diagrams, tables, etc.), as well as create and reuse entire custom layouts.

    It’s not a big deal if your chosen theme doesn’t include a page builder out of the box, though – you can always purchase and install one by your own, e.g. the Visual Composer, one of the most popular plugins from the CodeCanyon marketplace.

  7. Is it search engine optimized? Look for a template that is built in accordance with recommendations of major search engines, such as Google, Yahoo and Bing. You use free tools such as the SEO Site Checkup to perform an SEO audit of the chosen theme’s demo website or other existing pages that use the theme.

    Despite the fact that there are numerous specialized (free) SEO plugins for WordPress out there, it’s always a plus if a theme allows at least defining meta titles and descriptions for individual pages, as this alone might even be enough to avoid using yet another third-party plugin that would potentially slow down your website.

  8. Is it compatible with major plugins? It’s also worth checking whether a template is compatible with popular WordPress plugins such as WooCommerce, Contact Form 7, BuddyPress, bbPress, etc. Most good themes will offer pre-built features and styling for the most widely used plugins, while the best theme authors will also offer their help in ensuring that a given less popular plugin also plays nicely with the theme.

Premium or Free?

The web is a pretty competitive and largely frictionless market – which means that in most cases, you truly get what you pay for; even if what you paid was zero dollars. Having said that, it would be unjust to claim that only premium WP themes are worth your while: there are numerous free templates that offer most (if not all) of the important features of paid ones (you can check out our free Bento theme for example).

With the free themes getting more and more advanced, it can be argued that the real value of premium templates stems from three thigs these days: pre-built layouts, more detailed documentation, and faster, dedicated support. The former saves you massive amounts of time by allowing to start from entire websites pre-designed on top of a specific theme and just fill them with your content; the latter will come handy if you’re on a tight schedule.

Overall, it all boils down to your personal requirements: in case you’re okay with getting into the nuts and bolts of it, and do not have significant time constraints, a free theme might be a good fit; if, though, you value top quality visuals, abundance of options and quick support, going for a paid theme might be a sensible idea.

Over to You!

Have questions about any of the above tips? Still can’t choose between two or more WP themes after reading this? Drop us a line in the comments section below, we’ll be happy to help!

SEMrush vs Ahrefs: Which SEO Toolkit to Choose?

Growing your online presence is not easy these days, especially with all the competition and endless alternative sources of information on the web, but the more visitors you get on your site, the greater the chances that someone will actually pay for something you offer. There are several important sources of traffic, including foremost organic search, social networks, and other websites – and none comes easy if you don’t manage it in a systematic fashion. Even those who start from scratch tend to realize the need for a professional tool at some point – be it because of the increased complexity or the need to expand beyond the obvious options.

Since you’re reading this, you’ve most probably heard of both Ahrefs and SEMrush; we’ve compiled a comparative analysis so don’t have to waste time researching which one is best for you. Let’s dig in:

SEMrush – the Online Marketing Swiss Knife

Having started as a primarily search engine marketing tool, SEMrush has evolved over the years to include SEO, SEM, Social media marketing, as well as content marketing and PR. When it comes to search engine optimization, here are some of the notable features SEMrush has to offer:

Competitor analysis – learn from others the smart way! You can have a better insight into what the best keywords are and what the target audience wants, as well as what topics are popular in your field. Exploring your competitor’s backlink profiles and traffic will give you the information you need.

Keyword analysis – targeting the right keywords is really important for search engines. SEMrush gives you the value of every keyword and the possibility to compare it with search volume, traffic, CPC estimation and other parameters. Once you have all the data, you can choose the most profitable keyword for you.

Site review – all of the things that are wrong with your site can be easily removed or changed with the Site Audit feature. Whether you just want to check your site’s health or take a look at SEO optimization progress, this is the feature you need. Not just that, you can also detect and correct minor SEO issues such as add missing tags, detect error pages and optimize every type of link.

If you decide to use SEMrush, you should expect to spend starting from $99.95 per month ($83 if you’re buying an annual subscription). Small and medium enterprises managing their growth phases can consider the Guru plan ($199.95 per month), while agencies could benefit best from the Business offer ($399.95 per month).

Ahrefs – the Heavy Artillery of a SEO Expert

Using Ahrefs provides the entire vertical of tools, from keyword search and content ideation to competitor analysis and rank tracking. Some of the most noteworthy components of the Ahrefs package include:

Site Explorer – provides you with a detailed analysis of backlinks, search traffic, and keywords of any site you’re interested in (including your own or your competitors’, or course). The tool has three sub-sections that focusing on a specific SEO aspect – Backlink Checker, Organic Traffic Research kit and the Paid Traffic Research kit.

Content Explorer – helps you identify trending and popular content from any niche. This is a great tool to search for new content ideas and analyze the prospects of your existing posts and pages in terms of both social sharing and linking potential.

Keyword Explorer – this tool allows you to estimate the value of your existing keywords as well as come up with new ones. The analysis is country-based, which might be especially useful for multilingual and multi-location projects. One of the most useful features of the Keyword Explorer is the proprietary keyword difficulty score developed by Ahrefs, which allows quickly estimating the competitiveness of a particular phrase and compile a corresponding link-building plan.

If you opt for Ahrefs, there are 4 pricing plans, starting from Lite ($99 per month or $82 with annual billing) and Standard ($179 per month), through Advanced ($399 per month), and Agency pricing plan ($999 per month). There is a 14-day free trial, which is a nice little bonus as compared to SEMrush, which requires an upfront payment for using its tools.

The Choice

Both SEMrush and Ahrefs are excellent toolkits if you need to boost traffic to your website, and each will be a significant help in your day to day online marketing activities. While many features they offer do overlap, some general recommendations can still be made when it comes to making the choice. If you’ve looking for an all-round solution for all your online marketing activities, SEMrush is a more versatile alternative: it covers all important web traffic channels, so you don’t have to pay for any other tools with specialized functions.

If, however, you’re already using other tools for your social media and SEM efforts, or if your primary focus is organic search engine traffic, Ahrefs is the ideal choice: it has everything a SEO expert might need, and maybe more – all backed by the largest proprietary search index outside of Google.

Have you used either (or both) of the above described tools previously? We’d love to hear what you think! Hit us in the comments section below:

Bento Theme Manual

About the Theme

Bento is a free multi-purpose WordPress theme packed with features and possibilities. With a variety of templates and settings, it can be used to create anything from personal blogs or landing pages to complex showcases and online shops. Bento is a result of years of theme-building expertise accumulated here at Satori Studio, making it a stable and reliable, yet at the same time remarkably flexible theme. With over 80 theme options as well as dozens of settings for individual pages and posts, Bento offers unprecedented customization possibilities for both beginners and experienced WordPress users.

Bento is responsive, retina-ready, and translation-compatible. The theme is also bundled with the Content Builder plugin by SiteOrigin, which offers an easy drag-and-drop interface for creating both simple and complex pages, with a choice from dozens of building blocks such as text, images, sliders, carousels, buttons, widgets, and many more.

Thank you for choosing Bento! We hope you will enjoy using it as much as we have enjoyed building it.

Version: 2.2 (changelog)
Theme demo: satoristudio.net/bento
Free download: wordpress.org/themes/bento

Support and Feature Requests

You can ask us a question or report a bug on the official support forum. We generally aim to respond to all requests and messages within 5 business days, yet would appreciate your patience taking into account the fact that the theme is a free and open-source item.

Moreover, if you have suggestions or ideas on how Bento or our support could become better, please do not hesitate to get in touch – we appreciate your feedback!

Installation

Please follow these steps to install Bento:

  1. In the admin area of your WordPress website, visit the Appearance -> Themes admin menu section.
  2. Click on the “Add New” button on top of the page.
  3. Input “bento” into the search form on the right hand side of the page.
  4. When results appear, locate the “Bento” theme and place the cursor over it.
  5. Several controls will appear; click on the blue “Install” button in the bottom right corner.
  6. Wait for the theme to upload and install; after the process completes, click “Activate” on the next screen.
  7. After a successful installation of the theme you will be prompted to install the bundled Content Builder plugins – please see the respective section of the current manual for more information.

Alternatively, you can install Bento manually:

  1. Download the theme archive from the official theme page.
  2. In the admin area of your WordPress website, visit the Appearance -> Themes admin menu section.
  3. Click on the “Add New” button on top of the page.
  4. On the next screen, click on the “Upload Theme” button on top of the page.
  5. Click on the “Choose File” button that appears.
  6. In the pop-up window, navigate to the archive you’ve downloaded on step 1. and press “Open”.
  7. Click on the “Install Now” button to the right, which has now become active.
  8. Wait for the theme to upload and install; after the process completes, click “Activate” on the next screen.
  9. After a successful installation of the theme you will be prompted to install the bundled Content Builder plugins – please see the respective section of the current manual for more information.

That’s it, you’re all set!

Updating Bento

You can update the theme from the Apperance -> Themes section of your website’s admin panel: when an update is available, you will see a “New version available” ribbon on top of the Bento theme box; click on the “Update now” link in the ribbon – everything else will be handled automatically.

Alternatively, you can update the theme manually:

You can always download the latest version of Bento from the official repository. After obtaining the “bento.zip” archive, unzip it and upload the resulting “bento” folder into the following folder inside your WordPress installation: /wp-content/themes/ using an FTP client or your hosting provider’s file manager. Agree to replace all existing files if prompted. Updating the theme will not erase any theme settings, pages, posts or other content.

Theme Options

Bento comes with a powerful set of options that allow full customization of the theme according to your wants and needs. All theme options can be set through the native WP Customizer interface in your admin area, by visiting the Appearance -> Customize section. After any modifications to the theme options please do not forget to click on the blue “Save & Publish” button in the top right corner of the customizer area.

The theme adds or affects 16 sections of the Customizer panel:

  1. Help & Expansion Pack – here you can find useful links as well as information on the Expansion Pack
  2. Site Identity – this section allows you to set the custom logo, favicon, and other site-wide branding.
  3. Site Elements – in this section you can set up various elements of the website such as displaying next posts in blog without reloading the page, fixing the header on top of the window when scrolling through the website, etc.
  4. Site Layout – here you can set the width of the content area, choose between a wide and a boxed layout for the website, as well as set up the backgrounds for the website and the content area.
  5. Site Colors – allows you to define the background color for the website (please note that for this to have effect, the “boxed” mode should be set in the “Site layout” section).
  6. Site Background Image – allows you to define the background image for the website (for this to have effect, the “boxed” mode should also be set in the “Site layout” section).
  7. Fonts and Typography – in this section you can input the fonts to be used for the headings, the menu, and the rest of the texts of your website. Just go to the Google Fonts repository, pick any fonts you like, and write their names into the respective fields. Note that all fonts used in this section can also be identical if you wish.
  8. Header Colors – this section allows you to choose the colors of each separate element in the header section of the website, including foremost the main menu.
  9. Content Colors – here you can change the colors of each element in the body of the website, i.e. the content and the sidebar areas.
  10. Footer Colors – the third styling section lets you choose the color of every element in the footer, the lowermost part of the website.
  11. Homepage Settings – apart from the standard options of choosing which page to display as the front of the website, Bento allows you to choose the header image and call-to-action elements for that page.
  12. Additional CSS – here you can add your own CSS code to the website, without the need to edit the style.css file. This code will stop having effect if you switch to another theme, but will be restored if you then switch back to Bento.
  13. SEO Settings – here you can define the meta information for search engines. Please note that this feature is only available with the Bento Expansion Pack.
  14. Analytics Code – allows you to add Google Analytics code to track your website’s traffic and other visitor data. Please note that this feature is only available with the Bento Expansion Pack.
  15. Call to Action Popup – the settings in this section enable you to activate and customize the call-to-action popup for converting your visitors. Please note that this feature is only available with the Bento Expansion Pack.
  16. Preloader – here you can activate and customize the loading animation for your website’s pages in order to improve user experience and only display fully rendered pages to your visitors. Please note that this feature is only available with the Bento Expansion Pack.

There are two menu locations in Bento: in the primary header area where the logo is situated (primary menu), as well as in the footer, below the footer widget area and next to the copyright statement. The primary menu can have sub-menus up to two levels deep (i.e. a sub-menu item can have its own sub-menu); the footer menu does not display submenus and is intended for a flat navigation section, such as terms and conditions, contact information, etc.

The menus are sourced from the native WordPress menu constructor, found in the Appearance -> Menus admin section. You can create and assign your own menus to each of the menu locations: first, create a new menu by clicking on the respective link just below the “Edit Menus” tab, entering a unique name in the “Menu Name” box, and clicking on the blue “Create Menu” button on the right; once you’ve created a menu, the checkboxes in the “Theme Locations” option under the “Menu Settings” section will provide an opportunity to assign the menu to one of the locations mentioned above (you can also change it later by visiting the “Manage Locations” tab on the same admin page).

To add new items to a menu, tick the respective page, post, or term in the panels on the left hand side of the menus admin page; you can rearrange added items by means of drag-and-drop, and create sub-menus by dragging an item under its intended parent item and then slightly more to the right, until it sticks.

Grids And Other Page Layouts

Bento comes with a flexible page layout system, consisting of three parts, each of which can be configured while in the editor mode for a particular page, post or product:

  1. Page templates, of which there are two: the default template (i.e. classical page) and the grid template, which, in turn comes in three varieties (see details below). Any page can be assigned any of the two templates by using the “Template” drop-down in the “Page Attributes” settings block on the right hand side of the page edit screen.
  2. Grid modes, of which there are three: masonry – a tightly packed layout using various tile sizes which fills all available gaps (demo); columns grid – a layout which uses “cards” with images and text and aligns them by columns (demo); and rows grid – a layout which organizes the blocks by rows, independently of their heights (demo). Grid modes can be switched using the “Grid mode” drop-down in the “Grid settings” box which appears at the bottom of the page when the “Grid” template has been chosen in the “Template” drop-down in the “Page Attributes” settings block on the right hand side of the page edit screen
  3. Sidebar configurations, which exist in three varieties: right-sidebar (default), left-sidebar, and full-width. Each of these can be mixed with any of the page templates or grid modes described above. To switch between sidebar configurations in Bento, use the “Sidebar layout” drop-down in the “General settings” box underneath the text area editor, in the edit mode of the particular page. Since Bento version 2.0 it is now also possible to set site-wide sidebar defaults, the respective option is located in the “Site Layout” tab of the Customizer panel

The pages with “grid” templates (see point 1 above) act as containers for displaying collections (grids) of individual items, which can be posts, products (in the presence of WooCommerce) and projects (in case you have the Bento Expansion Pack installed and activated). You can set which content types to display on a grid page by using the “Content Types” checklist found in the “Grid Settings” box which appears underneath the content area when switching to the “Grid” template in the page editor mode.

Since Bento version 2.0 grids are filterable by taxonomies (tags or categories) and can be ordered by date, title, or comment count, the respective settings can be found in the “Grid settings” box mentioned above.

It should also be noted that individual posts (Posts admin menu section), products (Products admin menu section) as well as projects (Portfolio admin menu section) have a separate settings box called “Masonry Tile Settings” which allows customizing the look of the particular item on a grid page with the “masonry” grid mode (see points 1 and 2 above for details).

The images for the tiles and grid items in other grid modes are sourced from the thumbnails (featured images) of the respective posts/projects/products. The overlay text of masonry items is generated from the titles, while the body text of the columns and rows grid mode tiles comes from the main content of the respective post or the post’s excerpt, if it is not empty.

Apart from that, you can add even more diversity to your pages by using the bundled Content Builder, which enables constructing column grids with 2-6 columns of various relative widths, as well as mini-grids and other layouts elements right inside the content area of any page or post.

One-Page Mode

Bento is capable of creating one-page websites, which implies having all information on the same page, with the navigation menu scrolling to the respective section of that page without the need to reload the page every time the visitor clicks a link. This layout has become quite popular in the recent years, especially for smaller websites with a simple structure which does not require multi-layered navigation. One-page mode can increase the impact of your website by keeping the visitors engaged.

It should be noted that using one-page mode in Bento implies the presence of the bundled Content Builder plugin (see installation details in the respective section of this manual). The following steps outline the process of creating a single-page website using Bento:

  1. Create a page (Pages -> Add New) using the Builder – while in the page edit mode, click on the “Page Builder” tab in the top right corner of the content area. This will be your canvas for the one-page layout.
  2. Use rows (the “Add Row” button in the top left corner of the content area) to organize the contens of the page into sections, corresponding to how you want your one-page layout to be structured.
  3. For each such row, hover over the small wrench/spanner icon in the top right corner, and click on “Edit row” in the hover-menu. In the pop-up window that opens, click on the “Attributes” section under the “Row Styles” on the right. Input an identifier for the row into the “Row Class” field; the identifier should consist of lowercase latters, underscored, and dashes – e.g. “contact-us”. Click on the blue “Done” button to save the changes.
  4. Save/update the page by clicking on the blue “Publish” (“Update”) button in the top right corner of the page editor view.
  5. Visit the Appearance -> Menus admin section and create a menu, if you haven’t yet done so (please see this chapter for more details on menus). In the accordeon on the left click on “Custom Links”, and into the URL field input the URL of your website’s home page, plus the “Row Class” identifier you’ve specified earlier, preceded by a hash, i.e. “http://yourwebsite.com/#contact-us”. The “Link Text” field should contain the name of the menu item as seen by the user. After filling out the fields click on the “Add to Menu” button below and then on the blue “Save Menu” button on the right in order to save the changes.
  6. Voila! The menu items you add in this fashion will link to specific sections of your page, and the window will scroll smoothly to the required location thanks to the theme’s built-in scripts.

Header Layouts

The theme offers four distinct header configurations to personalize the look and feel of your website, which can be set by using the “Menu Layout” drop-down in the “Site Layout” section of the Customizer panel:

  1. Top, right-aligned: this is the classic configuration with the header on top, the logo on the left and the menu on the right.
  2. Top, centered: the header is on top of the page, with both the logo and the menu centered (see demo).
  3. Top, hamburger button + overlay: the header is on top of the page, with the logo on the left and the menu represented by a hamburger icon on the right; clicking on the hamburger opens a full-page overlay with the menu (see demo). This option is most suitable for websites with flat navigation structure, since the overlay menu does not support submenus.
  4. Left side: the header is on the left side of the page, pushing the content area to the right. The logo and the menu are left-aligned inside the header (see demo).

Widget Areas

There are three widget areas in Bento: the Sidebar, which is situated on the right or left side of the content (see the Page Layouts section for more details on content alignment); the Footer, which is situated below the content and above the copyright area; and the WooCommerce sidebar, which is identical to the first widget area in its position but is displayed only on WooCommerce-related pages, such as the shop, individual product pages, checkout, etc.

By default all widget areas are empty, you can add widgets to them by visiting the Appearance -> Widgets admin menu section – simply drag the needed widget from the left side of the view and drop it onto one of the widget areas on the right. It must be noted that when a widget area is empty, it will not display on the front-end – in other words, if there are no widgets in the Sidebar widget area, all pages and posts with sidebar layouts will still appear as full-width (same logic is applied to other widget areas); this is done automatically to avoid unnecessary swathes of empty space on the website.

Color Customization

You can change the color of any group of elements in Bento using the visual colorpickers in the Customizer panel; the respective tabs are “Header Colors”, “Content Colors”, and “Footer Colors”. To change a color setting, click on the rectangle to the right of the “Select Colour”, which will open a hover control; there are three ways of interacting with the control: by clicking into any part of the square gradient area, by using the colored squares on the bottom (which will change the hue of the gradient area), and by using the draggable caret on the right, which will change the level of saturation. Apart from using the hover control, you can simply input the color in the hex notation into the field which appears next to the colorpicker once you click on it. To clear the value of the colorpicker, use the “Clear” button on the right of the active hover control. Do not forget to click on the blue “Save & Publish” button on top of each section to preserve your colors!

Visual Content Builder

Bento comes bundled with a powerful free content builder by SiteOrigin which allows easily creating awesome professional layouts from a set of “building blocks”, including text, images, buttons, grids, widgets, and many more. Its use is not required for Bento to work, yet your webmaster experience will be much more pleasant with the content builder installed. Upon activating the Bento theme you will see a prompt on top of each admin page recommending to install the Content Builder, which is as easy as clicking the link in the prompt. It is also recommended to install the second offered bundled plugin, the Extra Elements package, which will enhance your Content Builder with cool additional blocks such as galleries, sliders, post grids, etc. Alternatively, you can also install both plugins manually from the Plugins -> Add New admin section. After having installed both plugins you will need to activate them by clicking on the “Activate” link underneath the title of the respective plugin. You can also install the bundled plugins by visiting the Appearance -> Install Required Plugins admin menu section.

After activating both plugins it is advisable to visit the Plugins -> SiteOrigin Widgets and click the “Activate” button on every available widget since some of them might be disabled by default. Moreover, it is recommended to visit the Settings -> Page Builder admin section and tick the checkboxes of the content types you wish to use the Builder with, in the “Post Types” option inside the “General” tab.

Please note that due to the way the theme generates grid pages, the Post Loop element of the Content Builder will not create a grid if you choose the “content-grid.php” in the “Template” drop-down. If you need a post grid, you’re better off using either the theme’s built in template or the “Simple Masonry” widget supplied by the SiteOrigin Builder.

For a detailed guide on using the Content Builder, including high-quality tutorial videos, as well as widget-related support, please refer to the official manual.

Post Formats

There are six post formats in Bento, which can be switched between using the “Format” settings box on the right side of the post editor mode view:

  1. Standard – the default format, used for displaying the text, images, and other content in a normal way.
  2. Aside – intended for shorter remarks, thoughts, announcements, etc. This format does not display a title.
  3. Gallery – used for gallery-type posts, such as photo collages.
  4. Quote – pre-formatted for displaying quotes; the content of the post becomes the text of the quote, and the title of the post is used as the author of the quote. It is recommended to use plain-text mode for quote-format posts instead of the Content Builder mode.
  5. Link – useful for recommending specific links; the title of the post is used as the text (anchor) of the link, while the URL of the first link within the content of the post will be used as the link destination.
  6. Image – intended for displaying single images.

Advanced Page Headers

Pages, posts and other content types in Bento can display full-width headers with text and button overlays like seen on the theme demo homepage or this page. To enable this feature, tick the “Activate Extended Header” checkbox in the “Page Header Settings” section underneath the content area in page editor mode. Doing so will expand a set of additional options which such as defining the height of the header by setting the padding above and below the title, customizing the coloured semi-transparent overlay to increase readability of the title, as well as adding primary and secondary action buttons to the header. The header image itself is sourced from the post/page featured image, which can be added via the native Featured Image box on the right side of the page edit mode view.

In addition to the page/post title, it is also possible to add subtitles in Bento, which are sourced from the excerpt of the respective page. In case you do not see the “Excerpt” field while in the edit mode, please click on the “Screen Options” tab in the top right corner of the screen in edit mode and tick the respective checkbox.

The front page’s header image and call to action buttons can be added via the “Homepage settings” section of the Customizer. Since Bento version 2.0, it is also possible to assign a separate header image to the blog posts page – the controls can be found in the same section of the Customizer.

Please note that due to particularities of the WordPress templating system extended headers do not currently affect the WooCommerce shop page, as well as other archive pages, such as category, tab, or custom taxonomy archives.

Vector Icons

Bento comes with 500+ vector icons from FontAwesome, which you can use on any page or post by inserting a simple piece of markup: an <i></i> tag with a class which specifies which icon to use. For detailed usage instructions please refer to the official FontAwesome guide.

Translating Bento

The theme uses proper WordPress functions to wrap all localizable strings, which means it can be both manually translated and used with third-party translation plugins such as the free Polylang or the paid WPML. The files needed for a manual translation are located in the “languages” folder inside Bento’s main directory; for detailed instructions on translating themes manually please see this guide. In case a plugin requires inputting the theme’s text domain, please use “bento”.

WooCommerce + Bento

The theme is fully compatible with the world’s most popular free e-commerce WordPress plugin, WooCommerce. The plugin is free software and is not included within the theme, i.e. it must be installed separately to activate Bento’s WooCommerce features. No additional steps are required from the theme’s side after the installation of WooCommerce – however, you can adjust certain additional parameters in the “Website Elements” tab of the Customizer panel For a demonstration of how Bento works with WooCommerce, please see the “E-commerce” section of the official theme demo.

The grid page template in Bento works just as well with WooCommerce products – you can tick the “product” option in the “Content Types” setting found in the “Grid Settings” box which appears underneath the content area when switching to the “Grid” template in the page editor mode in order to create project grids or even mixed post+project grids. The “Masonry Tile Settings” box also works for individual products (enter the editor mode for the product and scroll to the bottom of the view) for customizing how a particular item will look as a tile in a masonry grid.

Please note that the extended header feature does not currently affect the default WooCommerce shop page due to the limitations of the WP templating system. In case you need a shop with a header image, you can create a new static page, set it to Grid template, and choose “products” as the source of grid items in the “Grid Settings” box underneath the main content edit area. DO NOT set this new page as the WooCommerce shop page, since doing so will prevent the header image from being displayed.

Importing Demo Content

There is a sample data file available for Bento which includes all data from the official theme demo, it can be downloaded here (please right-click on the link and choose “Save As” in the popup dialogue). In WordPress, you can import data by going to Tools -> Import, clicking on the WordPress installer and installing it in the pop-up window, then clicking “Activate Plugin & Run Importer”, and choosing the xml content file to upload. After you press “Upload file and import”, do not forget to check the “Download and import file attachments” box (you can also set the author for the imported posts in the same screen, but that is not mandatory), then press “Submit”. In case you do not have the WooCommerce plugin installed, the “product” and “product tag” items will return errors when imported – you can ignore the error messages in this case. In case you install WooCommerce after importing demo content, the demo products will not be visible and will need to be imported anew – you can use this separate source file to do it. Moreover, in case you install the Bento Expansion Pack after importing demo content, the demo projects for the portfolio will not be visible and will need to be imported anew – you can use this separate source file to do it.

Please note that the sample data does not contain any settings in the “Settings” admin section or any Customizer panel settings; you will also need to assign the menus to their respective locations – make sure that the theme location checkbox is checked in the “Menu Settings” section right under the menu constructor in the Appearance -> Menus admin section.

Child Themes

It is highly recommended to use a child theme for any modifications to Bento code – this way your changes won’t get overridden when a theme update occurs. A minimal sample setup for a child theme can be downloaded here; more information on using child themes can be found in this part of the official WordPress knowledgebase.

Frequently Asked Questions

The website went blank after updating the theme to a newer version; what gives?
Please completely remove the existing version of the Expansion Pack plugin and install it anew using this source; after that, refresh you web page – in case the issue is not fixed at that point, please let me know and I will investigate further.

I have uploaded the theme manually but upon pressing “activate” the system returns a white screen and the website stops working. What the hell is wrong?!
Don’t panic :) It is most probably due to your hosting server running out of php memory, breaking the website when you tried to install an additional item. What needs to be done is to add the following line to wp-config.php file in the root folder of the WordPress website:

define('WP_MEMORY_LIMIT', '2048M');

If this does not work, try doubling the figure in the brackets; if still broken, please contact us.

I have uploaded the theme manually and it shows the message “Are you sure you want to do this? Please try again.” What went wrong?
Please upload the unzipped theme folder (it should have the name “bento”) into the “wp-content/themes/” directory of your WordPress installation using an FTP client – some hosting providers have small file upload limits for user convenience which limits the usage of WordPress’ internal theme uploader. After that, visit the Appearance -> Themes admin page, locate the newly uploaded theme from the list, and click “Activate”.

All portfolio projects I create with the Expansion Pack display a 404 error (“page not found”).
Please try visiting the “Settings -> Permalinks” admin section and clicking on the blue “Save Changes” button without adjusting anything. After that, refresh the portfolio page in your browser and try to access the project pages.

License

Like WordPress itself, Bento is licensed under the GPL (GNU General Public License) and is free for personal and commercial application – use it to make something cool, have fun, and share what you’ve learned with others.

Changelog

2.2 / 29 August 2019
Improved main menu behaviour on sertain mixed one-page setups.
Fixed header background color on scroll for centered header configurations.
Fixed menu text color setting as applied to second-level submenu items.
Fixed the bug that prevented the SiteOrigin widget block from displaying properly.

2.1.3 / 10 July 2019
Fixed page excerpts for pages with Grid template.

2.1.2 / 8 July 2019
Improved compatibility for admin scripts.

2.1.1 / 20 June 2019
Improved thumbnail support for custom post types registered by third-party plugins.
Fixed scroll position for same-page menu links with active full-height page header.
Fixed the Grid settings animation for classic editor mode.

2.1 / 26 March 2019
Fixed compatibility issues with the Gutenberg editor.
Added extra styling for the admin metaboxes.

2.0.6 / 6 February 2019
Improved side menu scrolling for very long menu cases.

2.0.5 / 26 November 2018
Updated theme screenshot to comply with the latest requirements.

2.0.4 / 22 October 2018
Fixed mobile logo sizing for side-menu layout.

2.0.3 / 27 September 18
Standardized button appearance across all browsers.
Fixed copyright displaying in the theme footer.
Updated theme translations.

2.0.2 / 20 July 2018
Added more blog page controls to the “Homepage Settings” tab of the Customizer.
Fixed the behaviour of the extended header elements on blog posts pages.

2.0.1 / 11 July 2018
Fixed the CMB2 admin notice bug.
Added extra functions for the Expansion Pack.
Fixed the text float issue on aligned images inside content.
Fixed submenu chevron positioning for larger menu font sizes.

2.0 / 29 June 2018
Replaced all Isotope layouts in the theme with modern CSS grids, removed Isotope dependency.
Added a category filter for grid pages.
Added item ordering options for grid pages.
Added site-wide options for page/post sidebars layouts.
Blog posts page can now have an image header.
Completely rewrote the Customizer scripts using Customizer JS API.
Replaced Font Awesome internal dependency with a CDN.
Improved primary menu CSS for higher robustness and customizability.
Fixed side-menu layout styling issues.
Replaced submenu menu chevrons with analogous Dashicons.

1.8.1 / 27 February 2018
Updated the bundled CMB2 library.
Updated the bundled FontAwesome set to v5.
Improved the behaviour of the “Hide thumbnail” post option.

Version 1.8 / 29 December 2017
Improved WooCommerce single product page styling.
Removed animations from footer widget nav menus.
Included backward-compatibility for the custom logo function.
Fixed scroll position for the same-page links from the CTA buttons in the presence of fixed header.

Version 1.7.9 / 8 December 2017
Added a Spanish translation.
Fixed sidebar behavior on blog index-template pages.

Version 1.7.8 / 9 November 2017
Submenus in side-menu layout now stay open on pages corresponding to active submenu items.
Masonry grid now behaves better on page resize with side-menu layout.
Added the “target” attribute to allowed html for the footer copyright.

Version 1.7.7 / 25 October 2017
Fixed the full-width grid behaviour in the presence of side-menu.
Fixed the bug which prevented the new breakpoint for fixed header on scroll.
Fixed thumbnail display with active extended header on static pages.

Version 1.7.6 / 2 October 2017
Fixed scroll positions for same-page links in the absence of fixed header.
Posts with excerpts now display the excerpt on the native blog page.
Added more robustness to the one-page links js function.
Fixed margins for the first stretched Content Builder element.

Version 1.7.5 / 8 August 2017
Fixed thumbnail visibility for posts with active Extended Header
“Hide featured image” option now also hides thumbs on native blog page.

Version 1.7.4 / 17 July 2017
Improved the presentation of item content in column and row grids.
Fixed html tag rendering in grid items of quote format.
Fixed duplicate featured images on grid pages with active extended headers.
Removed unneeded arrows from grid page excerpts.

Version 1.7.3 / 11 July 2017
Fixed thumbnail behaviour on pages with active extended header.

Version 1.7.2 / 10 July 2017
Fixed content width for the SiteOrigin Features widget.
Fixed side menu width for boxed site layout.
Fixed grid image for posts and projects with active extended headers.

Version 1.7.1 / 19 June 2017
Fixed call to action button alignment settings with extended header being switched on.
Fixed the default logo line height for long site titles.
Fixed mobile menu scroll behaviour for one-page setups.
Adjusted the fixed header position with active admin bar.

Version 1.7 / 11 May 2017
Moved the mobile styles breakpoint to a smaller width (1024px).
Added a control to change the logo padding.
Fixed mobile menu z-index order for cases with transparent header.

Version 1.6.7 / 25 April 2017
Updated the included CMB2 library.
Fixed header overlay and tile overlay opacity setting saving.
Removed hyphenation from the stylesheet.

Version 1.6.6 / 12 April 2017
Fixed submenu behaviour with active sticky header given that a page is loaded in the middle.
Added a more universal fix for the same-page menu item highlight on scroll.
Added product gallery features support for WooCommerce 3.0+.

Version 1.6.5 / 7 April 2017
Added full pingback support in the theme using native WP functions.
Improved the function that determines the number of WooCommerce shop columns.
Fixed the appearance of the WooCommerce Star Rating filter widget.
Fixed same-page menu item highlight on scroll.
Fixed the sticky header positioning when loading the page in the middle.

Version 1.6.4 / 3 March 2017
Fixed the featured images control visibility issue for the project content type.
In case of empty logo the theme now displays site title in its place.
Replaced the theme screenshot with a more accurate one.
Replaced the front-end welcome header with an admin page.
Removed Expansion-Pack-specific metaboxes from the front-end.
Moved the option to edit the credit link in the footer into the Expansion Pack.
Corrected the name and description of the colors section of the Customizer.
Fixed the output of the “link” and “quote” format posts and linked to single post view.

Version 1.6.3 / 13 February 2017
Added the header image upload field for the Expansion Pack.
The bottom footer does not display at all now if the footer menu and the copyright statement are blank.
Fixed the featured image behaviour in the presence of extended header on Grid pages.

Version 1.6.2 / 5 February 2017
Fixed the “Hite title” option on WooCommerce product pages.
Removed the unnecessary “Hide thumbnail” setting from pages.
Removed Facebook and Twitter links and fixed the rating link in the Customizer
Added notes on site title and tagline into the readme file.
Moved the “Tile image” field into the Expansion Pack.
Corrected handles for third-party scripts and styles.
Updated the included CMB2 library.

Version 1.6.1 / 1 February 2017
Corrected the text domain in the translation function which sets sidebar names.
Added unminified versions for all minified js files included in the theme.
Replaced custom comment function arguments with hooks.
Added the pagination link mechanism to page template.
Removed the “create-function” call from the WooCommerce “loop_shop_per_page” hook.
Removed theme prefixes from third-party script-enqueue handles.
Escaped all input for the wp_localize_script(), image URLs in the logo function, and category lists in post meta.
Replaced the json_encode() with the native wp_json_encode() function.
Moved the register_nav_menus() function inside the after_setup_theme() call.
Removed the excessive function_exists() check for the register_nav_menus() call.
Wrapped admin strings for plugin activation module into proper localization functions.
Added a reset to the custom grid query.
Switched to home_url() in the custom WooCommerce search function.
Removed the unnecessary “page-” prefix from the grid template.
Removed excessive escaping for the get_search_query() function.
The search form now fills with existing search query using the get_search_query() function.
Removed the excessive post date from the bento_entry_meta() template function.
Wrapped the year in the theme footer into a localization tag.
Fixed the unordered multiple placeholders issues included libraries
Removed the error control operators from the included CMB2 library.

Version 1.6 / 25 January 2017
Moved all theme-related support and upsell links into a single native Customizer section.
Removed all premium sections and fields from the Customizer for non-upgraded users.
Got rid of the ‘add_option’ call on theme activation.
Displaying the novice header only to users with admin capabilities.
Got rid of any separately stored additional options.
Added the user-defined website title with home link to the copyright notice in the footer.
Moved some of the page/post meta settings to Customizer or the Expansion Pack.
Replaced the global $post calls with get_queried_object_id().
Replaced the deprecated woocommerce_get_page_id().
Moved the custom site background option to the native Customizer functions.
Replaced the logo-related calls with native WP functions.
Replaced site_url() with home_url().
Added has_nav_menu checks for all theme-defined menu locations.
Replaced the custom excerpt-generating function with the native WP function and filters.
Defined the content width variable using a global.
Moved the custom CSS theme option to the WordPress native setting.
Escaped all user-inputted data on output for improved security.
Switched to the native WP imagesLoaded script.
Enqueuing admin scripts only on necessary screens.
Removed the redundant register_script() function calls.
Made menu and sidebar names translation-ready.
Removed the upload_mimes filter from the theme.
Corrected license version inconsistensies across theme files.
Added a readme file with theme information and credits.
Improved WooCommerce cart styling on smaller screens.
Fixed search form icon when used as a SiteOrigin widget.
Fixed Content Builder elements overlaying the mobile menu.
The fixed header now fits inside the boxed website layout.

Version 1.5.5 / 25 October 2016
Fixed bug in masonry grid image urls.
Fixed “post types” multicheck for “grid” pages.

Version 1.5.4 / 22 October 2016
Updated the CMB2 included library.
Sanitized all output instances.

Version 1.5.3 / 21 October 2016
Adjusted the way the CMB2 library is included into the theme.

Version 1.5.2 / 18 October 2016
Prefixed all hooks in the included php libraries.
Reverted to non-prefixed names for JS library enqueues.
Included favicon using native WordPress functionality.

Version 1.5.1 / 9 October 2016
Improved the way Google Fonts are added to the theme.
Added theme prefixes to all external libraries and custom classes.

Version 1.5 / 7 October 2016
The “hide title” setting now also works if the extended header has been activated.
Added an option to hide the featured image on posts and projects.
Mobile menu now closes also on touching outside the menu.
Fixed scroll position on page load with hashed URLs and fixed header.
Fixed oversize logo fit on side-header configuration in IE11.
Fixed the duplicate subheading issue for extended header.
Added sanitization to all output fields.
Corrected HTML validation errors.

Version 1.4.1 / 16 September 2016
Fixed content width bug in the Customizer.
Fixed individual page/post setting effect scope.
Added defaults to all get_theme_mod calls.

Version 1.4 / 12 September 2016
Migrated theme options into the native Customizer.
Moved non-theme functionality into the Expansion Pack.
Optimized and streamlined the functions.php theme file.
Fixed pagination links for Grid page template on static front page.
Updated JS breakpoints from pixels to em units to sync with CSS breakpoints.

Version 1.3 / 23 August 2016
Added highlight for the current position in the footer menu.
Fixed mobile menu animation on iOS.
Fixed sidebar logic in the absence of sidebar widgets.
Fixed Google maps header behaviour for maps without custom styles.
Fixed post meta for posts in Uncategorized category.
Fixed header menu submenu styling on transparent headers with large logos.
Fixed theme welcome screen on side-header configuration.
Added full translation into Ukrainian (special thanks to Vadim Chernobublik).
Improved footer widget area compatibility with Polylang plugin.
Fixed Theme Options tab navigation beaviour in Firefox in cyrillic languages.
Fixed Google Fonts appearance in Safari for latin-ext and cyrillic characters.
Fixed sidebar on WooCommerce shop category pages.

Version 1.2 / 23 June 2016
Added a possibility to upload a separate logo for mobile devices.
Site header custom color now also applies to fixed header.
Fixed Theme Options framework bug in php 7.
Fixed the bug with the “Hide title” setting for Grid pages.
Header background color setting now also affects side header layout.
Added full translation into French (special thanks to ThemeCloud.io)

Version 1.1 / 16 May 2016
Added a possibility to upload a separate tile image apart from thumbnails.
The heading font setting in Theme Options now affects extended header headings.
Added full translation into Russian.
Fixed compatibility of link colors with user-defined styles in Content Builder.
Fixed sidebar layouts for pages that were created using other themes.

Version 1.0.2 / 20 February 2016
Fixed the submenu animations and styling for “side” menu layout.
Added extra padding to the mobile menu in the absence of logo.
Hiding mobile menu elements if no menu has been created.

Version 1.0.1 / 4 February 2016
Updated theme screenshot.

Version 1.0 / 3 February 2016
Initial release.

Bento Expansion Pack

About the Expansion Pack

Bento Expansion Pack is a plugin that has been developed by the authors of Bento in order to add more capabilities to the theme. It’s easy to install and offers a host of cool additional features such as portfolio functionality, pre-built layouts, video and maps headers, preloaders, and many more. The Expansion Pack also allows to fully customize the copyright statement in the footer, removing all our branding. The Pack can be downloaded here for $25 (one-time payment), which includes support and lifetime updates; this is about 2-3 times less than what you’d need to pay for a premium theme elsewhere.

Version: 2.0 (changelog)
Expansion Pack demo: satoristudio.net/bento, “Expansion Pack” menu section.

License

The Bento Expansion Pack is licensed under the GPL (GNU General Public License); one purchase of the Expansion Pack offers one activation key, which is in turn valid for two activations – i.e. it can be used to activate the Expansion Pack on two separate instances of WordPress, be it on individual domains, subdomains, or localhost setups. The second activation has been primarily included for the sake of giving an opportunity to configure the Expansion Pack on a test environment (e.g. Localhost or separate dev URL) before using it on a live website.

Installation

Please follow these steps to install and activate the Expansion Pack:

Step one: install the Expansion Pack.

  1. Purchase the Pack at the bottom of the official page and download the archive using the link in the purchase confirmation email which is sent automatically to the email address you’ve indicated during the checkout.
  2. After downloading, please visit the Plugins -> Add New section in your website’s WordPress admin panel and click on the “Upload plugin” button on top of the page, next to the heading.
  3. After that, click on “Choose File” and navigate to the archive you’ve downloaded from the link in your confirmation email, then press “Open”.
  4. When the pop-up window closes, click on the “Install now” button that appears in the center of the screen and wait for the magical fairies to do their thing.
  5. After the installation has completed, click on the “Activate plugin” link.

Step two: activate the Expansion Pack

  1. After installing the Pack, visit the Plugins -> Bento Expansion Pack Activation section in your website’s WordPress admin panel.
  2. Input your licence key – the long string of letters and numbers seen above in this email – into the field, and click on the “Activate license” button.
  3. A green success message should appear. Great success! The new features and options will be available from the Appearance -> Customize admin section.

Updating Bento Expansion Pack

Since version 2.0, Expansion Pack has received an auto-update routine which periodically checks for available updates and displays a notification if a newer version of the plugin is available. If you see such message next to the Expansion Pack in the Plugins – Installed Plugins section of the admin panel, simply click on the “update now” link to bring your version up to date.

Alternatively, you can also manually download the latest version of the Expansion Pack at any time using the download link from the automatic email you received after your purchase. After obtaining the “bento-expansion-pack.zip” archive, unzip it and upload the resulting “bento-expansion-pack” folder into the following directory inside your WordPress installation: /wp-content/plugins/ using an FTP client or your hosting provider’s file manager. Agree to replace all existing files if prompted.

Included Features

The current version of the Bento Expansion Pack augments the theme with the following features, and more are being added all the time:

  • Fully customizable or removable footer copyright message.
  • Portfolio with various layouts and a new specialized content type called “project” (demo).
  • Beautiful prebuilt layouts for the Content Builder allowing you to create professional-looking pages in seconds (demo).
  • Fully customizable pop-ups for engaging and converting more visitors (demo).
  • A new element above the header in the form of a customizable full-width bar that can display any HTML, e.g. contact details or promo offers (demo).
  • “Under construction” mode which automatically redirects all non-logged-in visitors to the from page of the website, displaying a custom “coming soon” template (demo).
  • Customizable preloading animations for better user experience (demo).
  • Video headers which help your pages to stand out and leave an impression (demo).
  • Google Maps headers with customization and styling possibilities (demo).
  • “Twitter Feed” custom widget for displaying your latest tweets in your website’s sidebar or footer.
  • “Advanced Recent Posts” custom widget with additional options compared to the standard one.
  • Possibility to upload own fonts for displaying the website’s body, headings, and menu text.
  • Possibility to add a Google Analytics tracking snippet without touching the theme’s code.
  • SEO settings such as meta data for search engines.

The Expansion Pack adds 6 new sections to the Customizer panel:

  • SEO Settings – allows you to set the meta information for search engines.
  • Analytics Code – here you can insert the Google Analytics code to track your website’s traffic and other visitor data.
  • Call to Action Popup – enables you to activate and customize the call-to-action popup for converting your visitors.
  • Preloader – in this section you can activate and customize the loading animation for your website’s pages in order to improve user experience and only display fully rendered pages to your visitors.
  • Coming Soon Page (since 2.0) – allows activating and configuring the “under construction” mode.
  • Top Bar (since 2.0) – provides control over a new full-width section above the header.

After installing and activating the Bento Expansion Pack you will be able to customize or fully remove the copyright message in the theme footer – just input your own text or HTML into the “Copyright message in the footer” field in the “Site Identity” tab of the Customizer panel.

Portfolio and Projects

The Expansion Pack adds a new custom content type to the Bento theme: the so-called “projects”, which are pre-styled for showcasing work by creative agencies, service providers, freelancers, photographers, etc. The projects function similarly to the classical WordPress posts and be can created by visiting the Portfolio -> Add New admin menu section. There is a separate specialized taxonomy for projects which is called “types” (Portfolio -> Types admin menu section) which works just like categories do for classical WP posts, and which can be used to differentiate between the projects and construct filters used on portfolio pages; you can specify one or more types for any particular project by using the “Types” settings box in the right part of the editor mode view.

In order to display your projects, you can use the existing layouts and features found in Bento, namely the “Grid” page template. After successfully activating the Expansion Pack, the “project” content type becomes available in the “Content Types” checklist found in the “Grid Settings” box which appears underneath the content area when switching to the “Grid” template in the page editor mode. You can use this setting to create grids of projects or even combined grids displaying both projects and posts or projects and products, or all three content types. In case only “project” is chosen as the content type to display on a particular grid page, that page will automatically display a portfolio filter based on which “types” you assign to each of the projects (see portfolio filter demo here).

In case the project pages you create display a 404 error (“page not found”), please try visiting the “Settings -> Permalinks” admin section and clicking on the blue “Save Changes” button without adjusting anything. After that, refresh the portfolio page in your browser and try to access the project pages.

Prebuilt Layouts

The Expansion Pack includes a continuously expanding set of pre-formatted page layouts for the Content Builder, designed to fit specific needs, such as product homepages or corporate landing pages (see live demos here). These pre-packaged layouts have been built with the aim of saving your time by offering a fast and easy way of setting up professional-looking pages.

Currently the Expansion Pack offers the following pre-built-layouts:

  • Product Homepage With Slider
  • Corporate Homepage
  • Creavite/Agency Homepage
  • Coming Soon Page

In order to make use of the pre-built layouts, you will need to have the Content Builder and the Extra Elements plugins installed (see this section of the current manual for more details). The layouts are accessible for all users of the Bento Expansion Pack by switching to the “page builder” mode (click on the respective tab in the top right corner of the content area while editing a page) and clicking on the “Prebuilt Layout” button in the content area – in case the page is new you haven’t added any content yet – or clicking the “Prebuilt” button in the top left corner above the content area. The available layouts are found under the “Theme Defined”. Each layout contains placeholder text and icons, so after applying a layout you will only need to replace those with your own text and icons by editing each respective section; you can, of course, modify any of the layouts in any way you require, using them as a basis for creating more custom pages.

Popups For Converting Visitors

Visitor engagement is one of the most important success metrics for almost any website, which is why the Expansion Pack features a tool to help you transform more visits into actions using specialized pop-ups (see a demo here). It is a popular method of motivating website visitors to perform a specific task, such as signing up for a newsletter or clicking a button, or even purchasing a product / service. In order to set up a converting pop-up with the help of Bento Expansion Pack, please follow these steps:

  1. Create a page that will serve as the content of the pop-up (Pages -> Add New admin menu section); it can include any text, images, Content Builder elements or layouts, as well as third-party shortcodes such as contact forms, social widgets, etc.
  2. Visit the “Call to Action Popup” tab of the Customizer panel and choose the page you’ve created in step 1 from the “Source of content for the popup” drop-down.
  3. In the same tab, choose where to display the pop-up using the “Display call to action popup” setting and set the trigger using the “Popup trigger” setting.

The “Call to Action Popup” tab of the Theme Options panel mentioned in the steps above also contains auxiliary settings to fine-tune your pop-up, such as the width of the pop-up window, its border thickness and color, as well as overlay color and opacity.

Please note that pop-ups use cookies to only display once per session to each user; in other words, once the pop-up is shown to a particular visitor, it will not appear again to that particular visitor until they close their browser window. This is done in order to minimize the chances of the pop-ups becoming annoying to your website’s visitors.

Preloader

Bento Expansion Pack allows displaying a loading animation to the visitors while a page is loading in the background in order to only display the fully loaded page to the viewers and at the same time to let them know that the process of loading the page is underway (see the preloader in action here). The preloader can be activated and configured in the “Preloader” tab of the Customizer panel.

Top Bar

Since version 2.0, you can activate and configure a new site element with Bento Expansion Pack – a full-width bar above the header. It can contain any text or even HTML and can be customized in terms of color palette and content alignment. All settings for the top bar can be found in the respective tab of the Customizer panel.

Coming Soon Mode

Since version 2.0, the Expansion Pack offers the possibility to switch to an “under construction” mode for your website, which means all non-logged-in visitors will be automatically redirected to the front page, which, in turn, will utilize a custom template with no navigation and other details. You can pick any existing page as the basis for the content of the “coming soon” page, all related settings can be found in the “Coming Soon Page” tab of the Customizer panel. When the “coming soon” mode is active, only the site admins are able to see the full website, which allows for hassle-free launch preparations.

Video Headers

One of the new types of headers available in the Bento Expansion Pack is full-width video – an additional setting in the extended header which allows uploading a video file to display as a background of the page title (see demo here). The .mp4 file format is recommended for the video files, yet you can also use .ogg and .webm files. The smaller the size of the file you’re using, the better for user experience and SEO, it’s recommended that the size of the video file does not exceed 2-3 Mb; using a Content Delivery Network is highly encouraged to increase loading speed and reduce server load.

Please note that it is still recommended to upload a static header image using the “Header Image” field in the same settings section in order to have a fallback for the cases when the video fails to load or play. Moreover, the image will display as the header on smaller devices since the video will automatically be hidden in order to save on data service bandwidth. When defining a video background, you can use all other extended header settings and features in a normal fashion; if you wish to revert to displaying a static image header, click on “Remove” under the video you’ve uploaded and save changes to the page.

Google Maps Headers

In addition to video headers, the Expansion Pack allows creating headers with functional maps using the Google Maps API v3 (see live demo here). In order to set up such a header you need to check the “Activate Google Maps header” checkbox in the “Map Header” settings section underneath the content area in the page editor mode. After that you will be able to set the parameters for the map, such as its centering point, zoom level, and height, as well as define a custom style for the map using your own code or the ready-made snippets from Snazzy Maps; to achieve the latter, navigate to the page of the style you like and click on the “Copy” button or simply select and copy the code under the “Javascript Style Array” heading.

It should be noted that the Google Maps header has precedence over the image/video header – in other words, in case you activate the map your header will display a map regardless of which settings you have in the “Page Header Settings” box.

Extra Widgets

Bento Expansion Pack adds the following widgets to the standard WordPress selection in the Appearance -> Widgets admin section:

  • Twitter Feed – a configurable stream of tweets from a specific Twitter account. Since Twitter requires creating an application in order to display its data on third-party websites, please follow the instructions in the widget settings area to set up the required data.
  • Advanced Recent Posts – a take on the standard WordPress “Recent Posts” widget offering more display elements such as thumbnails and more links as well as more customization options.

All widgets above are pre-styled to work seamlessly with Bento’s Customizer panel color settings.

SEO settings

After activating the Expansion Pack you will notice a new section in the page/post edit mode view, beneath the main content area: the “SEO Settings” box allows defining the meta title and description for each individual page without having to introduce additional strain on your WordPress website by installing a separate SEO plugin.

In addition to that, the new “SEO Settings” tab added by the Expansion Pack to the Customizer panel allows you to set the front page meta title and description (used by search engines such as Google and Bing), as well as customize the suffix added to all page meta titles.

Since version 2.0 of the Expansion Pack, there is also a possibility to turn off all SEO settings, preventing the plugin from generating any custom meta tags. This can be useful if you are willing to activate a third-party SEO plugin on your WordPress install. The checkbox for deactivating the SEO settings can be found in the respective tab of the Customizer panel.

Changelog

Version 2.0 / 11 July 2018
Added a top bar for contact details or other additional information.
Added a full-height header image option.
Added a pre-built layout for a coming soon page.
Content Builder tags are now stripped from meta descriptions.
Added a “coming soon” page option.
Added an option to disable all SEO settings.
Fixed the portfolio filter.
Set up automatic Expansion Pack updates from our server.
Fixed image import in pre-built layouts for the Content Builder.

Version 1.1.1 / 11 May 2017
Header video now switches to image at a smaller width.

Version 1.1 / 24 April 2017
Fixed a compatibility issue between EP maps and the Content Builder maps widget.
Made the Expansion Pack translatable.
Fixed the issue which prevented the EP widgets from being available in the backend.
Fixed file upload issue introduced by changes in WP core from 4.7.1.

Version 1.0
Initial release