
Awesome, you’ve decided you need a website – that means a new project is about to reach the world through the wonders of the Internet! 🦄
On a more practical note, though: how do you keep that website available to the world? The site’s data should be stored somewhere, after all.
That “somewhere” is a specialized computer called a server (because it serves your website’s constituents to your visitors) – so here’s what we’re going to discuss in this guide:
- First, in order to find solutions to our website conundrum we will need to understand what exactly a server is and how it works. If you’re familiar with all this, feel free to skip to the next part,..
- …where we’ll learn how to configure and run your own web server at home (and discuss why it’s called “the hard way”).
- Finally, we will look at a somewhat easier alternative – yes, you guessed it, renting a server – and see how this approach may actually be more cost-efficient than a seemingly “free” home server.
Let’s dive in:
Ingredients of a Web Server
The Hard Way: a DIY Host
What You Should Know
Pros and Cons of Home Hosting
The Easier Alternative
Update: New DIY Hosting Options
Which Method to Choose?
Ingredients of a Web Server
As we’ve already established above, without something to make it available to the world, a website is just a heap of files.
In principle, any computer (including your smartphone) can become a web server – all it needs is to meet a couple of conditions:
- Stable internet connection, preferably a fiber or high-speed link, in order to be able to receive requests from visitors and serve them files 24/7. A website that is only available during the day might have worked for young Ilon Musk in 1995, but it’s a total no-no in 2026.
- Specialized software that can receive requests from the network and send the website’s files to the user’s computer in the correct way.
- Sufficient resources, including storage, memory, and processing power, to be able to generate responses really quickly and support several (or a lot) simultaneous sessions.
But before you think the first point is a cakewalk, remember: with a home server, upload speed matters much more than download speed!
While the most often-cited parameter for browsing the web, playing online games, and streaming video is the download speed, the reverse is much more important for serving website files to visitors!
This means you’ll need to keep in mind your internet provider’s upload speed – which is much lower than download speed for most types of connections – not to mention the fact that real upload speed during peak hours might differ significantly from the advertised figures.
And don’t forget: your computer must stay powered and connected 24/7, meaning any system updates, cable mishaps, or blackouts will take your site offline.
***
But let’s assume for the time being that you are using the latest fiber connection at home and never leave your computer unattended. What specialized programs do we need to run a web server?
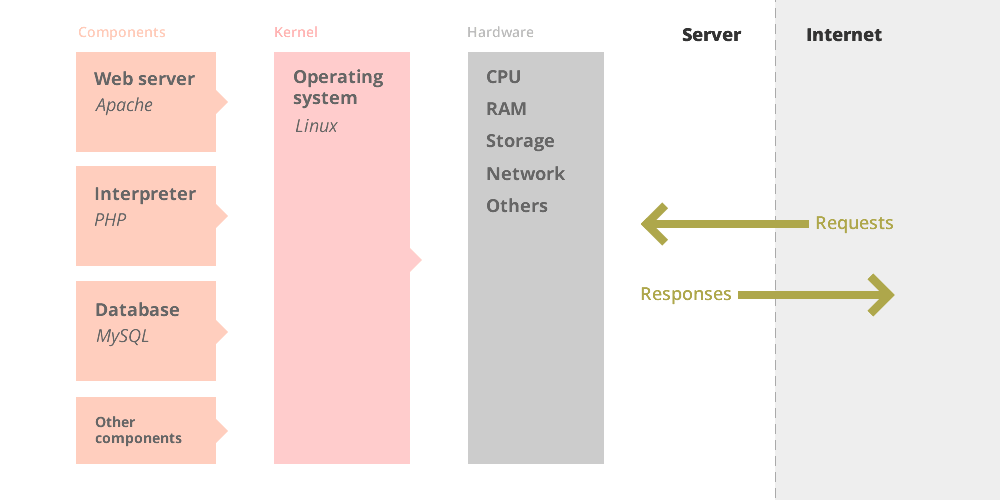
To host a website built on a popular platform like WordPress, your homemade server will need a couple of crucial programmatic components:
- The web server itself, a piece of software that coordinates the entire client-server shebang: i.e. something able to receive requests from remote users and send the website’s files to them is the correct manner. The most popular web servers today are Apache and Nginx.
- A database which will store the website’s data, such as content and settings. By far the most popular free database engine on the web is MySQL, which comes in many flavors, including foremost MariaDB.
- An interpreter for files written in a scripting language, e.g. PHP or Perl. This usually comes with modules that extend its core functionality and allow other parts of the server to perform various extra tasks, such as speaking with the database or getting remote files.
All of this, and several other minor components, works on top of the server’s operating system – most commonly Linux:
However, manually installing and configuring every server component can be a tremendous pain in the rear – thankfully, we can use a ready-made “packaged stack” to simplify things.
Here’s the gist –
The Hard Way: Running Your Own Server at Home
When it comes to software, there are 4 main free options for those who want to host a website locally; the differences boil down to interface, compatibility, and additional tools:
- WAMP, which was created mostly for the Windows operating system, as its first letter suggests;
- MAMP, a package geared towards MacOS users which also has a rudimental Windows version;
- LAMP, the classical Linux stack for server deployment which stands for “Linux, Apache, MySQL, and PHP”;
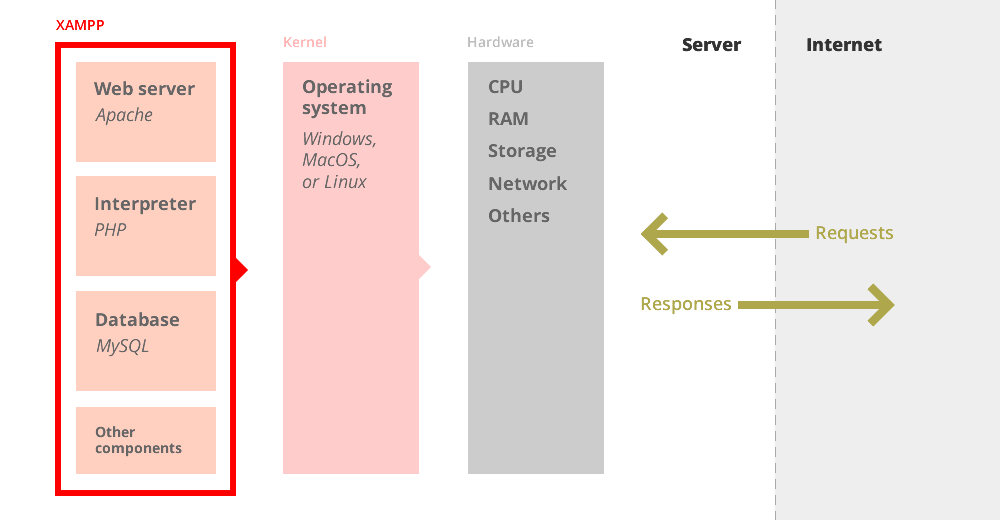
- XAMPP, a user-friendly, cross-platform solution that is available for all major operating systems.
Thanks to its versatility as well as a slew of free pre-built modules for running popular content management systems (CMS) like WordPress, the XAMPP is arguably the best option for setting up a web server in domestic conditions.
Remember the essential server components we described earlier? With XAMPP, they are all neatly tucked into a single package and set up (almost) automatically during the installation. The end result looks something like this:
Before we look at the specific steps though, here is a piece of information you should definitely see before trying them in practice:
***
IMPORTANT! In order for your home-hosted website to be available using a domain name (like https://yourdomain.com) you need to make sure that your internet service provider can provide you with a static IP address.
With a dynamic external IP we lose the entire point of hosting from home because you will have to adjust your domain name’s configuration each time your provider gives you a new IP (which may be every time you connect to the web).
While a few home internet packages include static IPs by default, they might be available as a separate paid add-on or as a part of a small business package.
***
Alright, assuming we do have a static IP available let’s roll up our sleeves and put that website online:
You can download the appropriate version of XAMPP from their official homepage; here’s a step-by-step guide to get you started:
- The installation process itself is quite straightforward, you can simply click “Next” or “OK” on all prompts. Click on “Allow access” when the system asks you to give new network permissions – this bit is needed for the proper functioning of the local server.
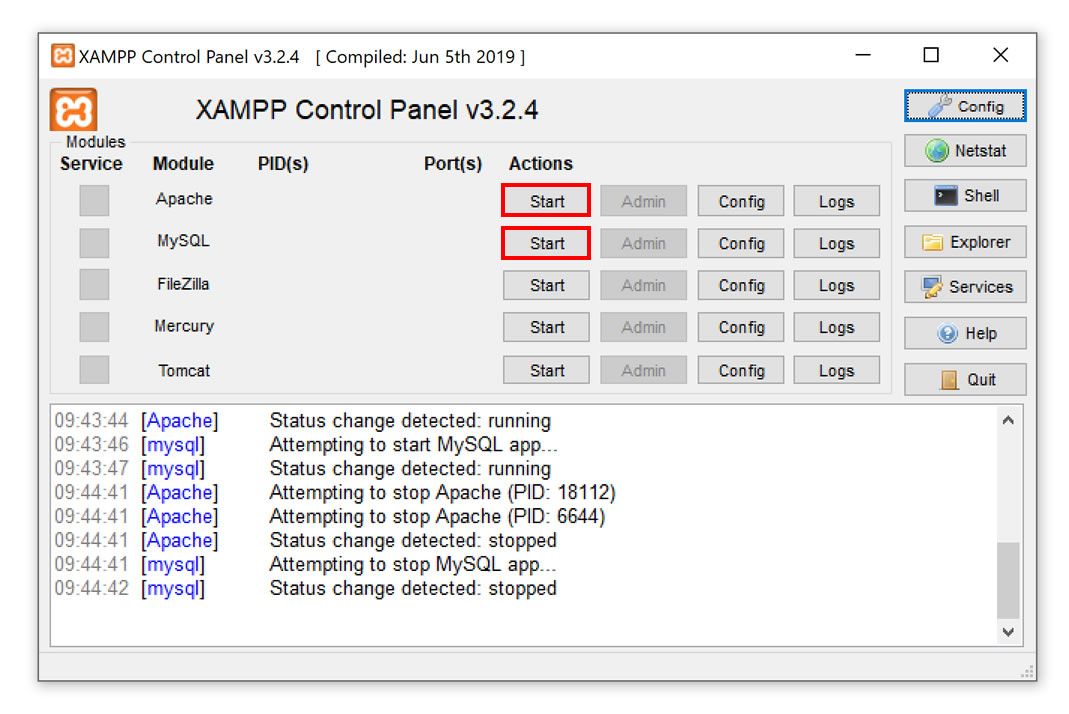
- Once XAMPP is installed, you can open the control panel and start the Apache and MySQL services; the respective statuses should turn green, and you should see a test page if you go to
http://localhostin your browser.

- As we mentioned earlier, using a ready-made module for your favorite CMS (e.g. WordPress or Joomla) will save you a lot of time compared to manual setup, so for this tutorial let’s download the WP module from Bitnami’s official repository.
- When the download finishes, click on the module installer and follow the prompts; be sure to un-tick the “Deploy in the cloud” checkbox – it’s a paid feature, and the entire purpose of our current quest is to achieve a local setup!
- When it’s done, launch the application and it should open a crispy new WordPress website which is now accessible at
http://localhost/wordpress. - Boom! You now have a fully functioning WordPress site on your local machine. The files will live in the
C:\xampp\apps\wordpress\htdocsfolder (this may change depending on where you installed XAMPP). - If we want our new website to be accessible from any other computer on the web, we will need to do two more things. First, you will need to buy a domain name – the best choice is available via larger providers such as GoDaddy or Namecheap.
-
Second, we will need to link that domain to your local website. For starters, go to
C:\xampp\apache\conf\extraon your computer and open thehttps-vhosts.conffile with a notepad or any other plain-text editor. Paste the following lines at the bottom of the file:<VirtualHost *:80> ServerName yourdomain.com ServerAlias www.yourdomain.com DocumentRoot "C:\xampp\apps\wordpress\htdocs" </VirtualHost>
Replace the bold parts with your real data wherever needed. Save and close the file.
-
We will also need to adjust the operating system’s host file; you will find it in the following folder –
C:\WINDOWS\system32\drivers\etc(or/private/etc/hostsif you’re on an Apple machine). Open the file and add this line at the bottom:127.0.0.1 yourdomain.com
- Next, if you are using a home router you will need to assign a static IP to your computer in the router’s settings. The procedure depends on your router model, so please consult with its manual for the exact set of steps (hint: look for the “DHCP” keyword).
- While we’re at it, add a routing rule to direct your external (fixed) IP traffic to your device’s static IP in your router’s admin panel. Again, very much depends on your router brand and model.
- Our website is now exposed to the internet through an IP address. All that’s left to do is to point your domain’s A-record to this IP in the DNS settings. Again, this will vary greatly depending on the domain vendor – consult their documentation or support for specifics.
- Note that DNS settings might need a couple of hours to propagate around the web. To check if everything works, visit
yourdomain.comin your browser, preferably outside of your home network (e.g. using 4G data on your mobile).
Aand we’re done! Piece of cake 🍰
Now that we are familiar with the basic setup, let’s look at two crucial things you should take into account before deciding to host a website from home:
Things You Should Know When Running a Home Server
If you’re thinking about sticking with the DIY setup, the two most important considerations at this point are security and costs.
Any owner of a home server set up using XAMPP (or any other ‘AMP for that matter) should be aware that the default level of security that comes with a fresh install is meant strictly for local activities – in other words,
For a website exposed to the Internet, security in a default XAMPP setup is almost non-existent.
Here are just some of the things that are meant to make local development easier but instantly create glaring security holes if left untreated in a public website:
- The default MySQL database administrator account (aka the root user) has no password, in other words free access to anyone.
- ProFTPD, the bundled file transfer service, uses a known username-password combination (“lampp” for user “daemon”).
- The default users of other included software such as Mercury and FileZilla services are also no secret.
- Default XAMPP versions today come slightly more hardened, but still assume local-only usage. Public-facing deployment still requires hardening steps like disabling remote root access and setting strong passwords for all services.
This means that you will need to customize all of the above if you want your website to have at least minimal attack resistance (if using a well-known default password could even be considered an attack at all…)
Fortunately, most guides are available in your XAMPP dashboard’s How-To section using this link: http://localhost/dashboard/howto.html.
***
Why did we mention costs, though – isn’t our home-made server supposed to be free by definition?!
Well, as Captain famously remarked,

Using this energy use calculator, you can approximate the additional cost of power that will be consumed by your home server.
For a modest 60-Watt computer and an average US $0.17/kWh electricity price point, you’ll be paying $6-$12 per month for your home server’s juice.
Expect to pay around 50% more in states like New York and 200% more in places like Hawaii; if you live in the European Union, your server’s energy costs will be closer to 8-15 EUR per month.
Pros and Cons of “Home Hosting”
Before we discuss the alternative, let’s summarize the advantages and disadvantages of creating your own server at home:
- Useful experience: in the process of setting up your own server you can gain a much deeper understanding of how the world wide web works, under the hood.
- Full control: you can fine-tune every nook and cranny of your custom setup (also called a stack) to suit your requirements.
- New lightweight devices: low-power mini-PCs like Raspberry Pi 5 or ARM-based servers (e.g., Odroid H4) make DIY hosting more energy-efficient than ever before.
- Electricity costs: as mentioned above, your home server will consume $5 to $10 per worth of electricity, and that’s if you’re lucky to live in a place with a low per-kWh price.
- Static IP required: your internet hosting provider will need to be able to give you a fixed IP address (usually at an additional charge) in order for your domain name to be stable.
- IPv6-only ISPs: Some newer ISPs now offer only IPv6 connections. If you want IPv4 compatibility for your site, you might need workarounds like tunnels or proxies.
- Low security: since XAMPP is mainly meant for local development, its security is nowhere near the level that is sufficient for a system that is exposed to the outside world.
- Manual maintenance: you will need to configure and manage the home server by yourself, which includes regular updates, security control, and uptime monitoring.
- Lower speeds: as we mentioned earlier, most home internet providers offer much lower upload speeds than those available at specialized data centers, which means higher latency for your website’s visitors.
- Stability issues: automatic updates, power outages, and other inconveniences all threaten to put your site offline at any moment.
- Resource requirements: unless you own a really powerful machine, even a couple of simultaneous visitors can visibly slow down or crash your website. Low RAM can also interfere with browsing or gaming on the same computer.
As you can see, running your own home server seems to be an uphill battle – and the costs are not as low as one would imagine (i.e. far from “free”).
But there’s a second way, of course – the one you’ve probably discarded as impractical before learning about all the pitfalls of locally hosted websites:
The Easy Way: Using an Existing, Managed Server
Suppose you need a place to live. One option is to gather the necessary tools and materials, learn the technical skills and build your own house by hand …or you can always buy a ready-made house or just rent one (which most people do in real life).
Well, web hosting is a bit like that, at least in terms of the hassle involved.
One of the biggest reasons people still think about running a server at home is the idea that it must be cheaper—or even “free”—compared to paying for professional hosting.
Is this intuition true? What are the real costs of a home server?
Knowing what we already know about the requirements and the setup, let’s run the numbers:
- Electricity bill for a computer running 24/7 will amount to circa $6-$12 per month, depending on your location and the machine’s configuration (modern hardware like ARM-based mini-PCs can lower this, but most repurposed PCs will land in this range)..
- Domain name will still need to be purchased for an additional $1-$2 per month (the price of a typical
.comdomain is around $10 per year, and new domain extensions like.techor.yogacost more). - Static IP from your home internet provider will either need to be purchased as an extra or as a part of a (typically more expensive) business package, which can cost anywhere between $10-$20 more than your default package.
Even using the lowest estimates, running a full-fledged home server today would cost at least $13–$20 per month. Realistically, after accounting for potential hardware upgrades, backup solutions, and occasional downtime headaches, it’s closer to $25–$40 monthly.
And that’s the punchline:
— for the same price (or less), you can rent a fast, managed virtual private server (VPS), or even a basic dedicated server from a major cloud provider—complete with security, scalability, and no worries about power outages or hardware failures. More on this – in our dedicated hosting provider guide.
Compared to the cost of DIY servers, value hosting like Hostinger (first two years $3/month, then $12/month) doesn’t look expensive anymore 🤷
Update: New DIY Hosting Options
If you’re still determined to self-host, some exciting new options have emerged lately, including:
- ARM-based mini-servers: devices like the Raspberry Pi 5 can run a production-ready website with drastically lower power usage (~10W peak!) and silent operation.
- Dynamic DNS: if you can’t get a static IP, services like DuckDNS or No-IP can help map your dynamic home IP to a domain name automatically — though uptime reliability will still be a challenge.
- Decentralized Hosting: cutting-edge technologies like IPFS (InterPlanetary File System) and Web3 hosting allow you to serve websites from distributed peer-to-peer networks. Still niche, but growing fast.
However, for a public, serious project, renting a reliable VPS remains the safest path in 2026.
Which Method Should I Choose?
There’s no doubt that turning your computer into a server and hosting your own website from home could be a great experience…
…in educational terms. You will definitely get a much deeper understanding of the mechanisms that make the Internet tick, as well as learn to set up and manage a complex IT system with a clear practical result.
But is it worth it if you just need to host a website as cheaply and quickly as possible?
Not really.
While your software components and the hardware won’t cost you anything extra, the less obvious expenses quickly pile up to a sizeable $25-$40 per month.
Compared to that, a $3-$12 per month for a hands-off solution that does not require you to go through a 12-step setup process is something to consider.
***
Got any questions about DIY hosting and its alternatives? Have a personal experience of building a home server? Hit us in the comments below, let’s help everyone make more informed decisions!
Raspberry Pi, and Dynamic DNS….
FTW.
Hosting your website as a static or near static site on a Raspberry Pi computer solves some of the problems mentioned