Facebook has evolved way past a platform to post selfies and stalk old classmates. In fact, it’s now become an incredibly powerful advertising tool for businesses of all sizes and types. From ecommerce to SaaS, companies of all kinds are finding huge success in Facebook ads.
As a newbie, it can be a bit difficult to wrap your head around what it takes to create a killer Facebook campaign. But instead of just whipping out your credit card and hoping for the best, read through this Facebook advertising guide for beginners to learn how it’s done.
Setting Up Your Ad Account
Even if you’ve already set up an ad account, you should pay attention to this section. Many businesses new to Facebook make the mistake of using a fake profile’s personal ad account as their business ad account. The notion is that this way anyone can log in to the generic Facebook account and manage the business page and ads. The problem here is that creating a fake account is against Facebook’s terms, which puts you in jeopardy of being shut down without notice.
Instead, you’ll need to use your personal Facebook page to create a Business Manager account. Once you’re set up on the Business Manager, you’ll be able to assign other people to the ad account and business page. Not only is this the right way to set up a business ad account, but it’s actually much easier to manage.
Installing the Facebook Pixel
In order to know that your ads are making a positive impact on sales, you’ll need to be able to track conversions and leads. Facebook makes this relatively easy to do, but you’ll need to install the Facebook Pixel first.
To install your Pixel, click on the Assets menu and select “Pixels.” Copy the base code given to you in the step-by-step instructions and add it to your website. After that, you’ll need to insert the appropriate event codes. For example, if you want to track how many people add products to their carts, you’d have to install the “add to cart” event code. You can learn more about installing Pixels and Pixel codes here.
![]()
If you’re using an ecommerce platform like Shopify, installing the Pixel code is as easy as going into your settings and pasting the Pixel code in the “Facebook Pixel” box, and clicking save.
Once you’ve added the Pixel code, you can check the status by going back to the Pixels section in the Business Manager. If it’s been installed correctly, it should be green and marked as “active.” Note that it can take 30 or so minutes to get up and running.
Creating Your Audiences
Once your account is set up and your Pixel is active, it’s time to start creating audiences. Facebook has three types you can choose from: saved audiences, custom audiences, and lookalike audiences. The type you choose will depend on the type of campaigns you’re going to run and which people you want to reach.
Saved Audiences – if you’re trying to reach new customers and you don’t have any customer files to work from, you’ll want to create a saved audience. Saved audiences are created by selecting various interests, behaviors, and demographics. It may help you first to create a buyer persona of your ideal customer. For example, how old are they? What’s their income level? Do they live in a specific region? Are they married?
You can layer numerous targeting features to narrow down your audience to a hyper-specific group of individuals who will be the most likely users of your product or service. It’s important to note that you’ll need to click “Narrow further” in order to layer targeting features. Otherwise, users will only have to meet one of the conditions to be added to your audience.
Custom Audiences – if you want to target people who have already visited your site and interacted with it (this is known as a retargeting campaign), you’ll need to create a custom audience. You can do this by uploading a list of existing customers or specific URLs that prospects have visited. In addition to that, you can build custom audiences based on interactions with a mobile app (if you have an app) or based on their engagement with your Facebook posts.
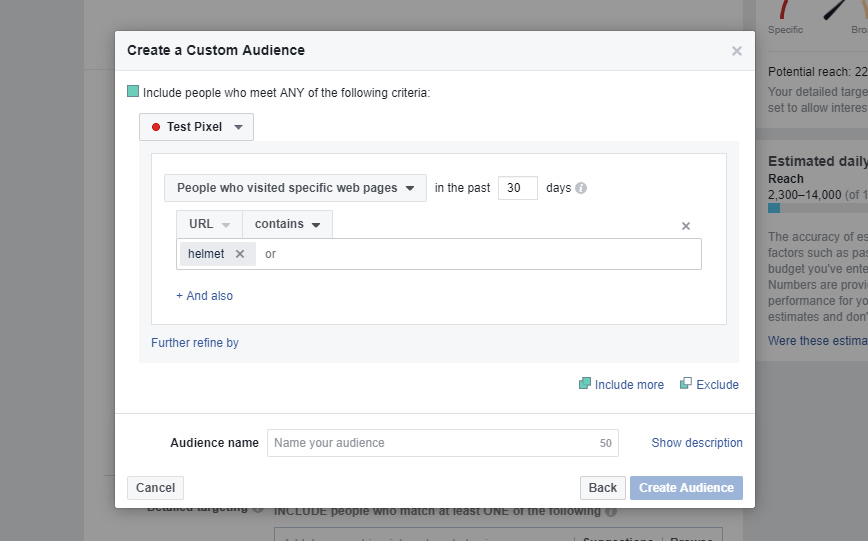
For example, if you sell motorcycle gear and you want to target people who are interested in helmets, you could target users who visited URLs on your site that contain the word helmet.

You can further refine the audience by adding or excluding other URLs. For example, if we only want to target people who visited helmet product pages, we could add the blog as an exclusion. This way, people who only read blog posts about helmets would not be in the audience.
Lookalike audiences are a unique Facebook advertising feature that uses an algorithm to automatically create an audience of other people who are likely to be interested in your products and services. E.g. you can create a valuable lookalike group by importing a list of your current customers. This type of audience can be handy if you’re not sure which interests, behaviors, or demographics to target on your own.
Designing Your Ads
Before you start designing your Facebook ads, you have to consider which audiences they’re for. For example, you shouldn’t use the same ads for your custom (retargeting) audience and your saved audiences. This is because these two types of audiences are at different stages in a buyer’s journey. People in your retargeting audience already have an interest in your brand and are relatively far along in your conversion funnel. But saved audiences are generally new leads, and they need to be warmed up before you try to sell to them. For retargeting audiences, you can design ads that show specific products along with a coupon code for added incentive. For saved audiences, on the other hand, try promoting value-driven, free content that educates prospects about your products and why they’re useful (i.e. a video, an educational blog post, or a free e-book).
Once you’ve decided which audience your ad will be served to, you can start working on a design. Facebook offers a variety of different ad formats that you can experiment with. The two most popular that you’re probably familiar with are the single image ad format and the carousel format. The latter allows you to include multiple images that users can scroll through like a gallery, which can be useful for showing different variations of the same product (i.e. color, use, edition).
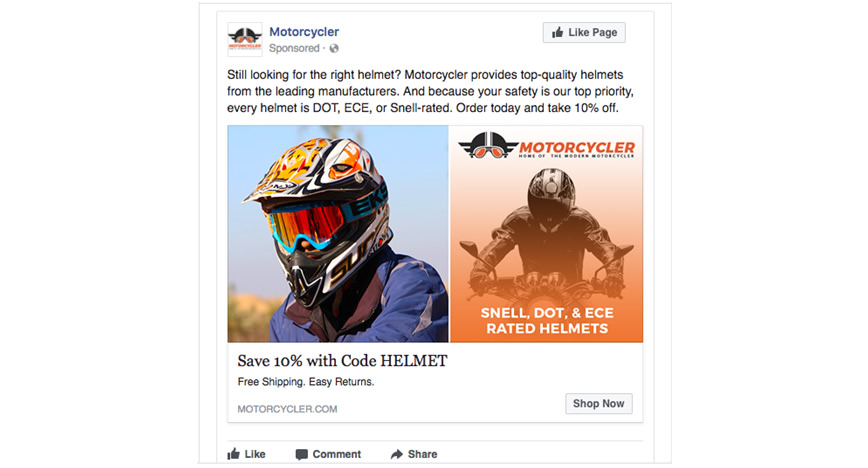
When creating the design, keep in mind that it’s best to use compelling images and bright colors. This is because the Facebook newsfeed background is white, and bland ad images will most likely blend in. You want to create an image that pops so that you can capture the attention of consumers. Let’s go back to our example about motorcycle helmets and take a look at an ad from Motorcycler.com:

Based on the copy and the image, this is clearly a retargeting ad – they’re highlighting the benefits of buying from them over competitors, and they offer a discount as added incentive.
Let’s take a look at an example of an ad for new audiences:

This ad from Landpoint.net is aimed at people who are in the early stages of the buyer’s journey. It promotes a piece of free, educational content. When advertising to cool or cold leads, this is a much better approach than trying to sell them something right off the bat.
This ad from Landpoint.net is aimed at people who are in the early stages of the buyer’s journey. It promotes a piece of free, educational content. When advertising to cool or cold leads, this is a much better approach than trying to sell them something right off the bat.
Monitoring Performance
Once your ads are up and running, you’ll have to monitor them to make sure they’re performing to the best of their ability. You may have to make some adjustments to your bids, copy, or ad images if ads are doing poorly. Just be sure you give them enough time to run before you make any changes—jumping the gun will lead to decisions based on inaccurate data.
Once common mistake that new Facebook advertisers make is to base all their judgments off of impressions and click-through rates. While CTR is important, what you really need to look at is how many leads or conversions those clicks are leading to. Pay extra close attention to your cost per conversion or cost per lead.
